background image

23

2.

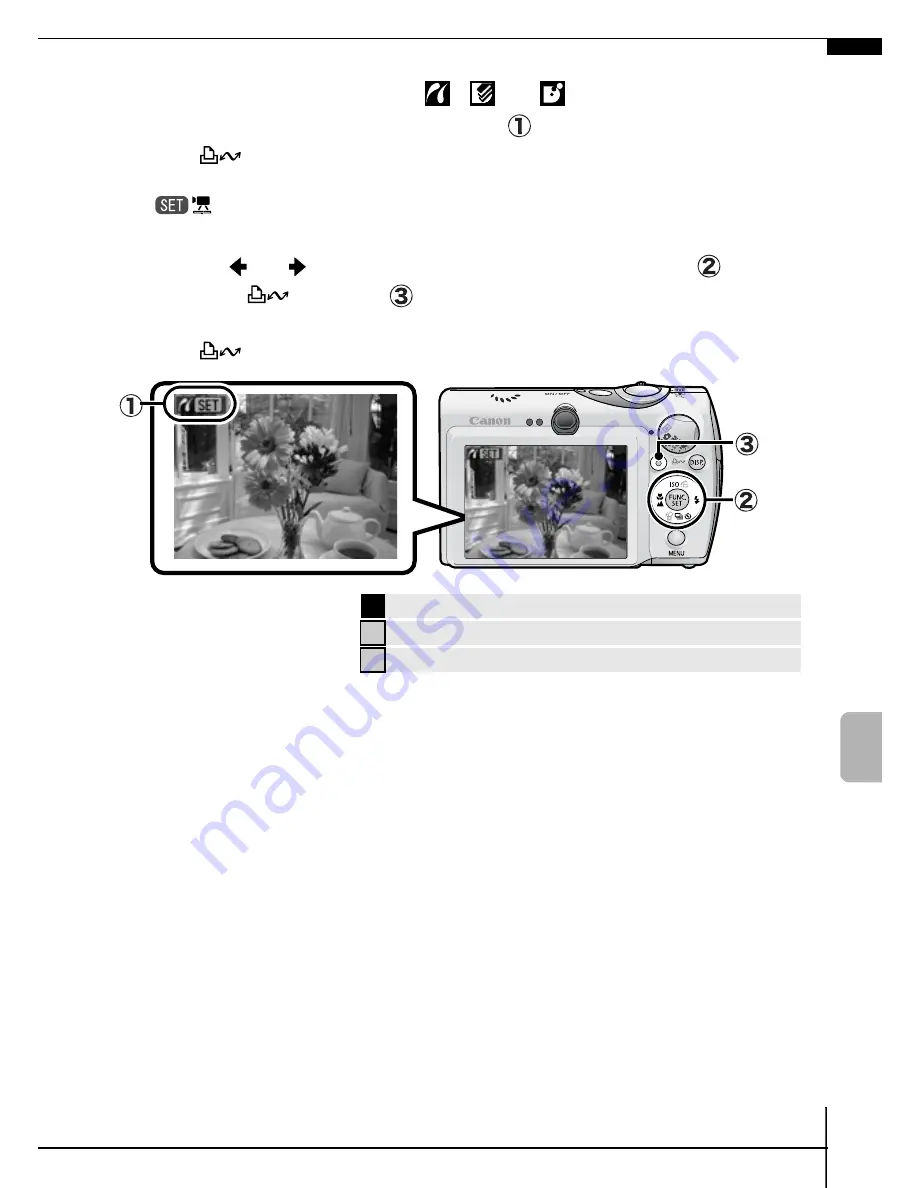
Set the camera to the playback mode, turn on the 
power and confirm that 

 or 

 is displayed in the 

upper left of the LCD monitor (

).

• The 

 button will light blue.

• The displayed icon will vary according to the printer model.

 will display in the movie mode.

3.

Use the   or   button to select an image to print (

) and 

press the 

 button (

).

• You can also select an image with the touch control dial.
• The 

 button will blink blue and printing will start. 

Î

See the 

Advanced Guide

: Setting the DPOF Print Settings (p. 97). 

Î

See the 

Direct Print User Guide.

Î

See the user guide for your printer.

Pr

int
in

g

Summary of Contents for 1267B001

Page 1: ...ons Shooting Playback Erasing Menus and Settings Camera User Guide Please Read This First This guide explains how to prepare the camera and use its basic features ENGLISH Basic CEL SF9PA210 Downloading Images to a Computer Printing ...

Page 2: ...date time and language Shooting Playback Erasing Menus and Settings Handling precautions references to the various shooting and playback functions Printing Installing the software Downloading images to a computer Using the software In this guide the Basic Camera User Guide is called the Basic Guide and the Advanced Camera User Guide is called the Advanced Guide Also battery refers to the battery p...

Page 3: ...ide p 24 Red Eye Reduction Lamp Advanced Guide p 33 Self Timer Lamp p 16 Viewfinder Window Advanced Guide p 18 Flash p 14 Lens When carrying the camera by the strap be careful not to swing the camera or catch it on other items The Components Guide Attaching the Wrist Strap The Components Guide ...

Page 4: ... p 27 A V OUT Audio Video output Terminal Advanced Guide p 103 Terminal Cover Tripod Socket Memory Card Slot Battery Cover Lock Release Switch p 7 DC Coupler Terminal Cover Advanced Guide p 125 Memory Card Slot Battery Cover p 7 The interface cable and AV cable cannot be connected simultaneously ...

Page 5: ... pp 10 11 Print Share Button pp 22 30 DISP Display Button Advanced Guide p 12 FUNC SET Function Set Button p 20 Advanced Guide p 22 Touch Control Dial pp 4 18 MENU Button p 21 Advanced Guide p 23 Macro Infinity Button p 15 ISO Speed Jump Button Advanced Guide pp 65 76 Flash Button p 14 Single Image Erase Continuous Self timer Button pp 16 19 Advanced Guide p 37 The Components Guide ...

Page 6: ...ayed out Place a finger on the touch control dial over a function you want to set and the icon will enlarge on the LCD monitor You can easily select images using the touch control dial during play back p 18 You can easily select time zones for the world clock using the touch control dial Advanced Guide p 20 You can set the touch icons to On Off in the Set up menu Advanced Guide p 26 Sample of shoo...

Page 7: ...uter Orange Ready to shoot flash on Blinking Orange Ready to shoot camera shake warning Left Indicator Yellow Macro mode infinity mode AF lock mode Blinking Yellow Focusing difficulty camera beeps once Never do the following while an indicator is flashing green These actions may corrupt image data Shake or jolt the camera Shut off the power or open the memory card slot battery cover The Components...

Page 8: ...d to the battery charger CB 2LXE and plug it into a power outlet Battery charger model names and types vary by region The charge indicator will light orange while the battery is charging It will change to green when the charge is complete Charging takes approximately 2 hours 5 minutes Preparations To protect the battery and prolong its life do not charge it for longer than 24 hours continuously Î ...

Page 9: ...row and hold it while pulling the battery out 3 Inserting the Memory Card 1 Insert the memory card until it clicks into place 2 Close the memory card slot battery cover Ensure that the memory card is correctly oriented before inserting it in the camera Inserting it backward may cause the camera to fail to recognize the memory card or to malfunction Î See the Advanced Guide Handling the Memory Card...

Page 10: ...rd Use a finger to push the memory card in until you hear a click then release it You can use SD memory cards SDHC memory cards and MultiMediaCards with this camera These cards are collectively called memory cards in this guide ...

Page 11: ...the or button to select a language and press the FUNC SET button The display language can also be set in the Set up menu p 21 A rechargeable lithium battery is built into the camera to save such settings as the date time This battery charges when the main battery is in the camera When you pur chase the camera place the main battery in it for approx imately four hours or use AC Adapter Kit ACK DC30...

Page 12: ...o Auto 3 Aim the camera at the subject 4 Focus and shoot 1 Press the shutter button halfway to focus When the camera focuses it beeps twice and the indicator lights green orange when the flash fires In addition a green AF frame appears in the LCD monitor on the portion of the image used to set the focus Shooting Î See the Advanced Guide Using the LCD Monitor p 12 Î See the Advanced Guide Power Sav...

Page 13: ...s Keeping the shutter button pressed after a shot Pressing the FUNC SET or DISP button while the image is dis played in the LCD monitor To stop displaying the image press the shutter button halfway Selecting a Shooting Mode 1 Turn the mode dial to the desired mode In the and modes press the FUNC SET button and use the or button to select a shooting mode then press the FUNC SET button Î See Indicat...

Page 14: ...hoot overlapping images that can later be merged stitched to create one panoramic image on a computer SPECIAL SCENE Portrait Produces a soft effect when photographing people Night Snapshot Allows you to take snapshots of people against twilight or night backgrounds by reducing the effects of camera shake even without using a tripod Kids Pets Allows you to capture subjects that move around such as ...

Page 15: ...ith a natural hue MOVIE Shoots a movie when you press the shutter button You can select from the following modes Standard High Resolution for viewing on computer monitors at large sizes Compact convenient for email attachments Color Accent for recording all colors in black and white except for the selected color and Color Swap for recording a selected color as a different color In mode the resolut...

Page 16: ...Red Eye Reduction Function p 33 Î See the Advanced Guide Setting the Slow Synchro p 33 You are recommended to shoot with the camera attached to a tripod or other device if the camera shake warning icon appears The option cannot be set in Auto mode Telephoto Zooms in on the subject Wide Angle Zooms out from the subject Auto On Off Î See the Advanced Guide Functions Available in Each Shooting Mode p...

Page 17: ...nimum shooting distance 5 cm 2 in Maximum telephoto setting 107 80 mm 4 2 3 1 in Minimum shooting distance 30 cm 12 in Infinity Use this mode to record subjects 3 m 9 8 ft or more from the end of the lens Use the LCD monitor to compose close ups in macro mode since images composed with the viewfinder may be off center The exposure may not be optimal when the flash is used in macro mode The option ...

Page 18: ...r you press the shutter button 2 sec before the shutter releases the self timer lamp and sound speed up 1 2 sec Self Timer shoots 2 sec after you press the shutter button The self timer sound beeps quickly 1 when you press the shutter button and the shutter releases 2 sec later Custom Timer you can change the delay time 0 10 2 15 20 30 sec and number of shots 1 10 3 When Delay is set to 2 or more ...

Page 19: ... MENU button Î See Menus and Settings p 21 If the Shots option is set to 2 or more shots the following occurs The exposure and white balance are locked at the settings selected for the first shot If the flash is used the interval between shots lengthens because the flash must charge The interval between shots lengthens when the built in mem ory of the camera fills Shooting will automatically cease...

Page 20: ...n to display the image you wish to view Use the button to move to the previous image and the button to move the next image Holding the button down advances the images more rapidly but shows them less clearly Circling a fingertip to the left or right on the touch control dial selects an image as follows Moving fingertip in a counterclockwise direction displays the previous image and clockwise displ...

Page 21: ...t an image with the touch control dial 2 Confirm that Erase is selected and press the FUNC SET button To exit instead of erasing select Cancel Erasing Please note that erased images cannot be recovered Exercise adequate caution before erasing an image Î See the Advanced Guide Erasing Images p 95 Playback Erasing ...

Page 22: ...e or button to select a menu item Some items may not be selectable in some shooting modes Use the or button to select an option for the menu item You can select further options with the MENU button for some options After selecting an option you can press the shutter button to shoot immediately After shooting this menu will appear again allowing you to adjust the settings easily Press the FUNC SET ...

Page 23: ...ome shooting modes Use the or button to select an option Menu items followed by an ellipsis can only be set after pressing the FUNC SET button to display the next menu Press the FUNC SET button again to confirm the setting Press the MENU button Î See the Advanced Guide Menu List p 24 My Camera Menu This example shows the Rec menu in Auto mode In playback mode the Play Print Set up and My Camera me...

Page 24: ...n on the printer s power 1 Since this camera uses a standard protocol PictBridge you can use it with other PictBridge compliant printers in addition to Canon brand printers 2 You can also use card photo printers such as the CP 10 CP 100 CP 200 CP 300 Printing Canon Brand Printers SELPHY ES Series SELPHY CP Series Compact Photo Printers 2 PIXMA Series SELPHY DS Series Bubble Jet Printers Interface ...

Page 25: ...ry according to the printer model will display in the movie mode 3 Use the or button to select an image to print and press the button You can also select an image with the touch control dial The button will blink blue and printing will start Î See the Advanced Guide Setting the DPOF Print Settings p 97 Î See the Direct Print User Guide Î See the user guide for your printer Printing ...

Page 26: ... See the Software Starter Guide for details Downloading Images to a Computer Supplied Software Install It Do Not Install It Downloading Method Computer Procedure Camera Procedure Computer Procedure OS Windows 98 Second Edition SE z z Windows Me z z Windows 2000 z z Windows XP z z z Mac OS X z z z Computer System Requirements Basic Guide p 25 Software Starter Guide Connecting the Camera to a Comput...

Page 27: ...s 98 SE Windows Me 128 MB or more Windows 2000 Windows XP 256 MB or more Interface USB Free Hard Disk Space Canon Utilities ZoomBrowser EX 200 MB or more PhotoStitch 40 MB or more Canon Camera TWAIN Driver 25 MB or more Canon Camera WIA Driver 25 MB or more Display 1 024 x 768 pixels High Color 16 bit or better OS Mac OS X v10 2 v10 4 Computer Model The above OS should be pre installed on computer...

Page 28: ...tallation settings 3 When the installation is finished the Finish or Restart button appears Click the one that appears 4 When the screen returns to the desktop display remove the Canon Digital Camera Solution Disk from the CD ROM drive Ensure that you install the software first before connecting the camera to the computer Double click the Canon Digital Camera Installer icon in the CD ROM window Wh...

Page 29: ...camera s mode dial to playback and turn on the power The camera and computer will be able to communicate Always grasp the sides of the connector when disconnecting the interface cable from the camera s DIGITAL terminal USB Port DIGITAL Terminal Interface Cable Interface Cable If the Digital Signature Not Found window appears click Yes The USB driver will automatically finish installing onto the co...

Page 30: ...small versions of the downloaded images will display in the ZoomBrowser EX Main Window By default the downloaded images are saved into subfolders according to their shooting dates If the window to the right does not appear click the Start menu and select All Programs or Programs followed by Canon Utilities CameraWindow PowerShot IXY IXUS DV 6 and CameraWindow Downloading Images Using the Camera p ...

Page 31: ...the computer By default the downloaded images are saved into the Pictures folder Thumbnails small versions of the downloaded images will display in the ImageBrowser Browser Window By default the downloaded images are saved into folders according to their shooting dates Downloading Images Using the Camera p 30 Downloading Images Using a Computer By default all images that have yet to be downloaded ...

Page 32: ...ink blue while downloading is in progress The display will return to the Direct Transfer menu when the download is complete To cancel the download press the FUNC SET button All Images Transfers and saves all images to the computer New Images Transfers and saves to the computer only the images that have not been previously transferred DPOF Trans Images Transfers and saves to the computer only the i...

Page 33: ...the MENU button to return to the Direct Transfer menu Only JPEG images can be downloaded as wallpaper for a computer On the Windows platform the files are automatically created as BMP images The option selected with the button is retained even when the camera s power is turned off The previous setting will be in effect the next time the Direct Transfer menu is displayed The image selection screen ...

Page 34: ...type of waste could have a possible negative impact on the environment and human health due to potentially hazardous substances that are generally associated with EEE At the same time your cooperation in the correct disposal of this product will contribute to the effective usage of natural resources For more information about where you can drop off your waste equipment for recycling please contact...

Page 35: ...infants Avoid dropping or subjecting the camera to severe impacts Do not touch the flash portion of the camera if it has been damaged Stop operating the equipment immediately if it emits smoke or nox iousfumes Do not handle the power cord if your hands are wet Use only recommended batteries and accessories The battery charger and compact power adapter are designed for exclusive use with your camer...

Page 36: ......

Page 37: ......

Reviews: