background image

ENG-9

Using the Image Stabilizer

When you look through the binoculars, the image may be shaking and 

difficult to see since your hands are holding the binoculars. In such a 

case, the Image Stabilizer can help steady the image.


z

The binoculars feature a 

general IS

, which provides image 

stabilization when looking at a wide area, and a 

POWERD IS

, which is 

especially effective when continuously aiming the binoculars at one 

point.


z

The Image Stabilizer can be operated using the following methods:

(1) Five-minute operation


z

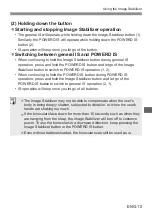
Starting and stopping Image Stabilizer 

operation

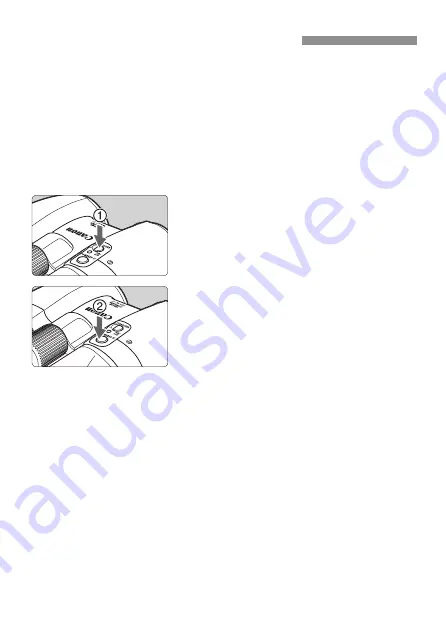
•  Press the Image Stabilizer button and quickly 

let it go, and the general IS will operate 
continuously for five minutes (1).
To stop general IS operation, press and 
release the Image Stabilizer button again (1).

•  Similarly, pressing the POWERD IS button 

and quickly letting it go will activate the 
POWERD IS continuously for five minutes (2).
To stop POWERD IS operation, press and 
release the POWERD IS button again (2).


z

Switching between general IS and POWERD IS

•  During  general  IS  operation,  press  and  quickly  release  the  POWERD  IS 

button to switch to POWERD IS* (2).
Also, press and hold the POWERD IS button during general IS operation to 
switch to POWERD IS. Operation will be stopped once the button is released 
(2).

•  Similarly,  pressing  and  quickly  releasing  the  Image  Stabilizer  button  during 

POWERD IS operation will cause the binoculars to switch to general IS* (1).
Also, press and hold the Image Stabilizer button during POWERD IS operation 
to switch to general IS. Operation will be stopped once the button is released 
(1).

*

 After switching to the other IS, it will continue to operate for five minutes.

Summary of Contents for 10x32 IS

Page 1: ...Instructions ENG ...

Page 2: ...rize yourself with the proper operation Also please keep this instruction booklet in a safe place so that you can refer to it at anytime z z IS stands for Image Stabilizer Symbols Warning to prevent malfunction or damage to the binoculars Supplementary hints for using the binoculars Accessories The binoculars come with the following accessories Case 1 Strap 1 Eyepiece lens caps 1 Strings for eyepi...

Page 3: ...ocation may occur if a bag is placed over their head z z If the strap is mistakenly wrapped around the neck suffocation may result Caution regarding the binoculars Details pertaining to risks that may result in injury z z Do not place the binoculars on an unstable surface Doing so may cause the binoculars to fall and could result in a personal injury z z Do not use the binoculars while walking Doi...

Page 4: ...ithout scratching it Warning regarding the batteries Details pertaining to risks that may result in death or serious injury z z Please follow the precautions below when using batteries Not doing so may result in overheating generation of smoke ignitions battery leakage and explosions which may lead to fire or personal injury 1 Be sure not to use batteries with a nominal voltage rating of 1 5V or h...

Page 5: ...t inside they may leak and cause damage Handling Precautions z z Storing the binoculars in a humid location may cause fungus to form on the lenses or cause the lenses to become cloudy If the binoculars are not to be used for an extended period clean the lenses and body thoroughly and store in a well ventilated dry place z z If the binoculars are taken from a cold environment to a warm one condensa...

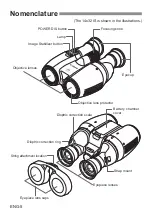
Page 6: ...ons Image Stabilizer button Objective lenses Lamp Dioptric correction scale Dioptric correction ring String attachment location Battery chamber cover Objective lens protector Strap mount Focusing knob Eyecup Eyepiece lenses Eyepiece lens caps POWERD IS button ...

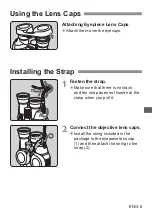
Page 7: ...s Installing the Strap 1 Fasten the strap z z Make sure that there is no slack and the strap does not loosen at the clasp when you pull it 2 Connect the objective lens caps z z Install the string included in the package to the eyepiece lens cap 1 and then attach the string to the strap 2 ...

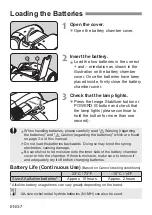
Page 8: ...es please carefully read Warning regarding the batteries and Caution regarding the batteries which are found on page 3 4 of this manual z z Do not load the batteries backwards Doing so may bend the spring electrodes causing damage z z Be careful not to let moisture onto the inner side of the battery chamber cover or into the chamber If there is moisture make sure to remove it and adequately dry it...

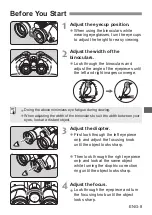
Page 9: ...above minimizes eye fatigue during viewing z z When adjusting the width of the binoculars to suit the width between your eyes look at a distant object 3 Adjust the diopter z z First look through the left eyepiece only and adjust the focusing knob until the object looks sharp z z Then look through the right eyepiece only and look at the same object while turning the dioptric correction ring until t...

Page 10: ... and release the Image Stabilizer button again 1 Similarly pressing the POWERD IS button and quickly letting it go will activate the POWERD IS continuously for five minutes 2 To stop POWERD IS operation press and release the POWERD IS button again 2 z z Switching between general IS and POWERD IS During general IS operation press and quickly release the POWERD IS button to switch to POWERD IS 2 Als...

Page 11: ...ion 1 2 When continuing to hold the POWERD IS button during POWERD IS operation press and hold the Image Stabilizer button and let go of the POWERD IS button to switch to general IS operation 2 1 IS operation will stop once you let go of all buttons z z The Image Stabilizer may not be able to compensate when the user s body is being deeply shaken subjected to vibration or when the user s hands are...

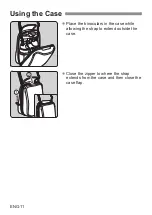
Page 12: ...ENG 11 Using the Case z z Place the binoculars in the case while allowing the strap to extend outside the case z z Close the zipper to where the strap extends from the case and then close the case flap ...

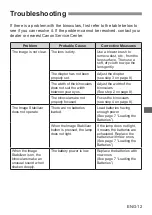
Page 13: ...culars does not suit the width between your eyes Adjust the width of the binoculars See step 2 on page 8 The binoculars are not properly focused Focus the binoculars see step 4 on page 8 The Image Stabilizer does not operate There are no batteries loaded Load batteries having enough power See page 7 Loading the Batteries When the Image Stabilizer button is pressed the lamp does not light If the la...

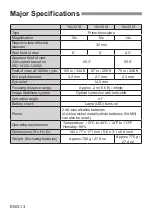
Page 14: ...upil diameter 3 2 mm 2 7 mm 2 3 mm Eye relief 14 5 mm Focusing distance range Approx 2 m 6 6 ft infinity Image Stabilizer system Optical correction with lens shift Correction angle 1 Battery check Lamp LED turns on Power 2 AA size alkaline batteries AA size nickel metal hydride batteries Ni MH can also be used Operating environment Temperature 10 C to 45 C 14 F to 113 F Humidity 90 Dimensions W x ...

Page 15: ...he equipment into an outlet on a circuit different from that to which the receiver is conected Consult the dealer or an experienced radio TV technician for help CAN ICES 3 B NMB 3 B Only for European Union and EEA Norway Iceland and Liechtenstein These symbols indicate that this product is not to be disposed of with your household waste according to the WEEE Directive 2012 19 EU the Battery Direct...

Page 16: ...CT1 B033 A 0317Ni CANON INC 2017 ...

Reviews: