background image

12

SuperSix EVO CX/SE OMS

Technical Information

Rear Derailleur Mount (RD)

138671 Rev 1 (3/21)

NGLI-2

2 N·m

2

3

1

2

M3 X 14mm

(2X)

3 N·m

2

1

2

3

4

5

6

M5 X 16mm

(2X)

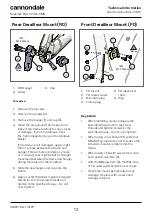
To replace:

1.  Remove the rear axle.

2.  Remove the screws (2).

3.  Remove the hanger (1) and cap (3).

4.  Clean the area around the dropout and 

inspect the frame carefully for any cracks 

or damage.  If you find damage, have 

the frame inspected by your Cannondale 

Dealer .


If the frame is not damaged, apply a light 

film of  grease between the frame and 

hanger. This will help minimize any noise 

or “creaking” that might result from slight 

movement between the frame and hanger 

during movement of the derailleur.   

5.  Slide the new hanger and cap onto the 

frame.  

6.  Apply Loctite® 242 (or medium strength 

thread lock) to the screw threads and 

tighten to the specified torque.   Do not 

over-tighten.

Rear Derailleur Mount (RD)

Front Derailleur Mount (FD)

1.  RD Hanger

2.   Screw

3. Cap

1.  FD mount

2.   FD cable screws

3.  Di2 cable plug

4.  Frame plug 

5.  FD mechnical 

cable 

6. Plug

Key points:

• 

When installing, clean and apply the 

specified thread lock to the screw 

threads and tighten screws to the 

specified torque.  Do not over-tighten.

• 

When using a mechanical FD system or 

SRAM eTap, install item (4) to reduce the 

intrusion of water or debris into the 

frame.

• 

When using a FD with an electrical wire, 

such as Di2, use item (3).

• 

Add the BB plug, item (6), that fills hole 

of FD cable guide exit when not in use.

• 

Check the mount periodically for any 

damage.  Replace with a new one if 

damage is found.

Summary of Contents for SuperSix EVO CX

Page 1: ...READ THIS SUPPLEMENT AND YOUR CANNONDALE BICYCLE OWNER S MANUAL Both contain important safety information Keep both for future reference Owner s Manual Supplement SuperSix EVO CX SE English...

Page 2: ...zardous situation which if not avoided may result in death or serious injury NOTICE Indicates special precautions that must be taken to avoid damage Symbols Symbol Name Description NGLI 2 NGLI 2 synth...

Page 3: ...ion You can download Adobe Acrobat PDF versions of any manual supplement from our website http www cannondale com Contacting Cannondale Cannondale USA Cycling Sports Group Inc 1 Cannondale Way Wilton...

Page 4: ...II Section D Inspect For Safety in your Cannondale Bicycle Owner s Manual BEFORE you ride You can be severely injured paralyzed or killed in an accident if you ignore this warning Inspection Crash Da...

Page 5: ...n Road Bikes Relative to conventional rim brakes disc brakes are less affected by water do not wear or heat the rims and therefore are more consistent Disc brakes also may be more powerful To minimize...

Page 6: ...ts Ask you dealer for help with trainers the right one and the correct way to use it NOTICE TRAINERS Improperly mounting a bike in a trainer or using one that is not compatible with your particular bi...

Page 7: ...ightening Torques Correct tightening torques for the fasteners on your bicycle e g bolts screws and nuts is important for your safety and to maintain the durability and performance of your bicycle We...

Page 8: ...me Seat post Insert Depth 44cm 190mm 51cm 230mm 54cm 237mm 56cm 260mm 58cm 268mm Tire Size x Max Tire Width measured 700c x 44mm Brakes Mount Type Min Max Rotor Dia FT Flat Mount 140mm 160mm RR Flat M...

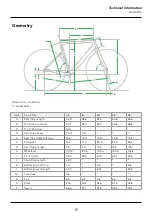
Page 9: ...D Head Tube Angle 70 0 71 0 E Seat Tube Angle Effective 74 6 74 0 74 0 73 5 73 5 F Standover 74 3 77 3 80 2 82 2 84 3 G Head Tube Length 9 3 11 0 13 2 15 3 17 5 H Wheelbase 100 2 100 5 102 0 103 4 104...

Page 10: ...ion 1 4 cable switch cover 2 Mechanical shift cover 3 Shimano Di2 port cover 4 Sram eTap cover 5 Internal cable guide 6 Guide screws M3 x 8 7 Cover screws M3 x 12 1 Serial Number The 7 digit serial nu...

Page 11: ...cables touching it The interior of the BB Shell is to remain free of any cable housings hydraulic hoses or electrical wires These items must be captured by the cable guides as they emerge from the do...

Page 12: ...eur 5 Slide the new hanger and cap onto the frame 6 Apply Loctite 242 or medium strength thread lock to the screw threads and tighten to the specified torque Do not over tighten Rear Derailleur Mount...

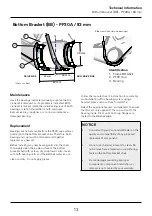
Page 13: ...make sure both bearing units and the BB shell surfaces are clean and dry Do not apply grease Follow the manufacturer s instruction for assembly and installation of the bearing system using a headset...

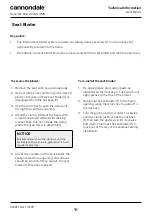
Page 14: ...rame 5 If the saddle angle adjustment is required loosen the saddle clamp bolts adjust the saddle and tighten to the specified torque NOTICE Use only solvents specified in the instructions Use only a...

Page 15: ...7 4 NGLI 2 CRB GEL CRB GEL 3 1 CRB GEL CRB GEL Minimum Insert Maximum Insert Maximum Depth Apply carbon paste to entire length of the inserted seat post Identification 1 Saddle Clamp 2 Seat Post 3 Sl...

Page 16: ...t binder the seat post and frame opening All surfaces should be smooth If they are not the seat binder 1 should be replaced Seat Binder To re install the seat binder 1 Re apply grease and carbon paste...

Page 17: ...RB GEL NGLI 2 b a c d NGLI 2 Identification 1 Seat Binder 2 Nut Base Identification a Sliding Clamp b Roll Pins 2X c Washer d Grub Screw Seat binder shown disassembled for clarity APPLY GREASE AND CAR...

Page 18: ...can damage your frame A standard dish rear wheel assembled on this frame will result in insufficient tire clearance leading to rubbing and serious frame damage This kind of damage is not covered by t...

Page 19: ...1 S6 EVO Int Seat Binder v2 E2 K26070 Silicone Seatpost Grommet D Shape F K26040 KNOT 27 Seat Binder Screw G K32161 BB Guide Covers ID Part Number Description H KP449 Rubber Brake Housing Grommets I K...

Page 20: ...OPE Cycling Sports Group Europe B V Geeresteinselaan 57 3931JB Woudenberg The Netherlands service cyclingsportsgroup com CSG UK Cycling Sports Group Vantage Way The Fulcrum Poole Dorset BH12 4NU 44 0...

Reviews: