background image

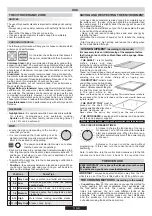
with  the  finger,  the  recommended  position  is  "3".

The hardness of the water can be judged by incrustation or by the 

level of dryness.

It is therefore important that the correct dosage of Rinse Aid is 

regulated to give the best results.

After the wash,

.  if  streaks  occur  on  the  dishes,  decrease  the  amount  by  one 

position.

.  if  whitish  spots  occur,  increase  the  amount  by  one  position.

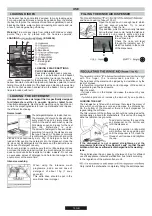
LOADING THE SALT

The dishwasher is fitted with a softener that clears the water of 

lime  which  could  cause  scale  and  damage  the  dishwasher.

On  the  bottom  of  the  diswasher  there  is  a  salt  dispenser  for 

regenerating the softener.

The filter element of the softener unit should be recharged with a 

salt specially produced for dishwashers. This salt can be bought 

either as tablets or as granules.

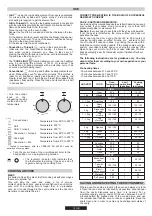
To add salt, unscrew the cap of the 

salt  dispenser  on  the  bottom  and 

refill the dispenser.

During  this  operation  a  little  water 

will  overflow  but  keep  adding  salt 

until the dispenser is fill, clean the 

thread of salt residue and retighten 

the cap.

If  the  dishwasher  is  not  required  straightaway,  set  the 

programme Cold rinse ("Eco+Rapid, 2 Leds") so that the salt 

solution which has overflowed is discharged from the washing 

tank.

The salt dispenser has a capacity of between 1.5 kg for efficient 

use of the appliance, it should be refilled from time to time according 

to the regulation of the water softener unit.

Only install the dishwasher completely filling the salt dispenser.

  LOADING  DISHES

It is essential to use a detergent that is specifically designed 

for  dishwashers  either  in  powder,  liquid  or  tablet  form.

Unsuitable detergents, (like those for washing up by hand) do not 

contain the proper ingredients for use in a dishwasher and impede 

the efficient functioning.

Normal wash

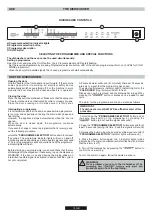
The detergent dispenser is inside the door. 

The dispenser lid should be closed before 

every wash.To open it, simply press the 

catch. At the end of each wash cycle the 

lid is always open and ready for the next 

time  the  dishwasher  is  used. 

The amount of detergent to be used varies 

according to how dirty the dishes are and 

the type of wash. A 15g dose is normally 

recommended. If the water is hard or the 

dishes  are  exceptionally  dirty,  25g  of  detergent  should  be

loaded. After pooring the detergent into the dispenser, close the 

lid, since not all detergents are the same and the instructions on 

the boxes of detergent can vary.

We should just like to remind users that too little detergent does 

not clean the dishes properly whilst too much detergent not only 

does not produce better results but is also a waste. Do not use 

an excessive amout of detergent and help limit damage to the 

environment at the same time.

Intensive washing

  LOADING  THE  DETERGENT

  FILLING THE RINSE AID DISPENSER

.

and has a capacity of about 130 ml.

Open the lid and pour in enough liquid, which 

will  last  several  washes.  Try  to  avoid 

overloading. Close the lid.

This additive, which is automatically released 

during the last rinse cycle, helps the dishes to 

dry  quickly  and  prevents  spots  and  stains 

forming. It is always advisable 

to use rinse aid.

Check  the  rinse  aid  level 

through the indicator eye "A"

which is situated in the centre 

of the dispensers.

USE

The basket has been carefully designed to make loading easy. 

For good wash performance, remove any debris from the dishes 

(bones, tooth picks, the remains of meat and vegetables) to avoid 

blocking the filters, water outlet and washing arm nozzle and, as 

a result, reducing washing efficiency.

Warning ! 

to avoid any injury from cutlery with blades or sharp 

points,  they  can  be  placed  with  the  handles  upwards.

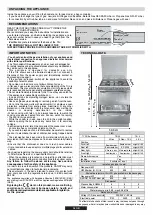
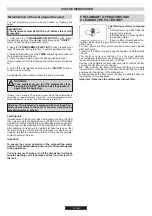
LOADING 

(EN 60436)

A

C-

D-Small bowl

H- Medium bowl

I - Serving dish

LOADING 4 PLACE SETTINGS    

PLUS CASSEROLES

Casseroles, salad bowls, souppans, 

lids etc., can be loaded on the basket.

It is advisable to arrange the cutlery 

in the  basket provided for that purpose. If there is any cutlery with 

narrow handles, it should be placed with handles upwards, to avoid 

falling  through the bottom of the basket and blocking the washing

arm. Do not put wooden handled lids in the basket, or any whose 

lids are bonded with resin.

15 GB

When  using  the  intensive  wash 

programme,  add  a  second  dose  of 

detergent  of  about  15g  (1  soup 

spoonful).

This  extra  dose  should  be  put  in  the 

small tank (see immage)

A

B

F

A

D

G

L
I

C

B

E

H

Summary of Contents for TRIO

Page 1: ... IT DE NL INSTRUCTIES VOOR GEBRUIK EN INSTALLATIE ISTRUZIONI D USO E DI INSTALLAZIONE NOTICE D EMPLOI ET D INSTALLATION MANUAL DE INSTRUCCIONES GEBRAUCHS UND INSTALLATIONSANWEISUNGEN USINES DE ROSIÈRES 30 rue Y LACELLE Rosières 18400 Lunery France ...

Page 2: ......

Page 3: ...ance or other damage or loss arising through use that is not consistent with domestic or household use even if located in a domestic or household environment shall not be accepted by the manufacturer to the fullest extent permitted by law The door should not be left in the open position since this could present a potential hazard es tripping WARNING Knives and other utensils with sharp points must...

Page 4: ...e guard must be replaced in accordance with the instructions Only use the temperature probe recommended for this oven WARNING Never remove the oven door seal Only use the oven for its intended purpose that is only for the cooking of foods any other use for example as a heat source is considered improper and therefore dangerous The manufacturer cannot be held responsible for any damage resulting fr...

Page 5: ...appliance it is necessary to refer to the technical instructions which will provide the necessary instructions concerning modification of the appliance to the conditions of use of the coun try Prior to installation ensure that the local distribution conditions nature of the gas and gas pressure and the adjustment of the appliance are compatible The adjustment conditions for this appliance are stat...

Page 6: ...apidly The hob lid for gas model While the cooker is in use keep the lid in the upright position before opening the lid remove any items from it to avoid any spillage before closing the lid let all the hot parts of the cooker cool down do not store heavy or metallic objects on the lid If you wish to dispose of an old dishwasher be careful to remove the door to eleminate the risk of children becomi...

Page 7: ...r side the distance between the Trio and the cabinet must be at least 15 cm see Figure 1 while the distance between the Trio and the rear wall must be at least 5 5 cm The distance between the Trio and any other unit or appliance above it e g An extractor hood must be no less than 70 cm Figure 1 The cooker has adjustable feet for perfect levelling on the floor Make the gas connection to the install...

Page 8: ...it anticlockwise increases the flow Use this adjustment to obtain a flame of approximately 3 to 4 mm in length and then replace the control knob When the gas supply available is LPG the screw to set the idle flame must be turned clockwise to the end stop Restore the knobs CASE 2 regulating screw not visible see figure 3B Remove grids burners and lid Remove the top plate Using a small screwdriver t...

Page 9: ...liance must be earthed In the absence of adequate earthing you will notice that when touching the metal parts of your appliance an electrical dispersion can be felt due to the presence of a radio interference suppressor A power cord is supplied with the Trio which allows it to be Amp socket A power cord is not supplied with this Trio but it is equipped with a terminal block that enables you to cho...

Page 10: ...P 6HPL IDVW FP X LOLDU FP Pans with curved ridged or warped bottoms are not recommended WARNING If a flame is accidentally extinguished turn the knob to the off position and do not attempt to re ignite if for at least 1 minute If over the years the gas taps become stiff to turn it is necessary to lubricate them Such operation must be carried out only by qualified Service Engineers äAluminium pans ...

Page 11: ... utensils is important to obtain good cooking results Always use good quality cookware with perfectly flat and thick bases Ensure that the base of the pot or pan is dry Use pans whose diameter is wide enough to completely cover the surface unit CHOOSING UTENSILS The following information will help you to choose cookware which will give good performance On the label check the mark that shows if the...

Page 12: ... Turn the control knob on the requesting cooking method and set a temperature USE Conventional Grill Grill Turnspit Convection Turnspit Cook light Convection Fan Temperature from 65 C to 250 C Temperature 200 C Temperature 200 C Temperature from 65 C to 250 C Temperature from 65 C to 250 C Temperature from 65 C to 250 C C P 65 90 115 140 165 190 210 250 1 1 5 kg 48 17 7 FOOD Oven Temperature in C ...

Page 13: ...st seconds The programme indicator lights will turn on and off individually and sequentially and some audible signals will sound The running programme will be cancelled and all the programme indicator lights will flash Before starting a new programme you should check that there is still detergent in the dispenser If necessary top up the dispenser WARNING if the door is opened during the drying pha...

Page 14: ...H WKH FRUUHFW RSHUDWLRQ RI WKH DQWL RYHUIORZ VDIHW device it is recommended not to move or to tilt the dishwasher during operation If it is necessary to move or to tilt the dishwaher first make sure the washing cycle is finished and that no water is left in the tank If there is any break in the power supply while the dishwasher is operating a special memory stores the selected programme and when t...

Page 15: ...ing to how dirty the dishes are and the type of wash A 15g dose is normally recommended If the water is hard or the dishes are exceptionally dirty 25g of detergent should be loaded After pooring the detergent into the dispenser close the lid since not all detergents are the same and the instructions on the boxes of detergent can vary We should just like to remind users that too little detergent do...

Page 16: ...indicate the current water softener setting level 3 Press the same button again to select the required water softener level each time the button is pressed one indicator light will come on the water softener level is indicated by the number of lights on For level 5 4 lights will flash for level 0 all lights will be off 4 Turn off the dishwasher by pressing the ON OFF button to confirm the new sett...

Page 17: ... again automatically WHAT NOT TO WASH It should also be remembered that not all dishes are suitable for washing in a dishwasher We advise again using the dishwasher to wash items in thermoplastic cutlery with wooden or plastic handles saucepans with wooden handles items in aluminium crystal leaded glass unless otherwise stated Certain decorations may fade It is therefore a good idea before loading...

Page 18: ... clean water and then dry The drip tray after grilling remove the drip tray from the oven and pour the grease into a container Wash and rinse the drip tray in very hot water using a sponge and washing powder If still stained withs sticky food immerse in soapy water The drip tray can be clean in the dishwasher Never put the drip tray back in the oven if still dirty 7 29 1 225 66 It is recommended t...

Page 19: ...filter very dirty 2Q HOHFWURQLF DSSOLDQFH ZLWKRXW D display Eco indicator light and indicator OLJKW 1R ZLWK DXGLEOH VLJQDO Switch off the appliance Turn on the tap Re set the cycle Water inlet tap turned off RDG RI GLVKHV LV RQO partially washed Check Burnt on food remains must be soaked before putting pans indishwasher Reposition saucepans Remove spray arm by unscrewing ring nut clockwise and was...

Page 20: ...pe Gas type Pression gaz Gas pressure 95 167 238 333 l h 73 127 182 254 g h G20 20 mbar Max kW Min kW AUX SR R UR 1 00 1 75 2 50 3 50 0 25 0 40 0 60 0 70 76 101 118 144 P Kw 1 100mm Gaz Type Gas type Pression gaz Gas pressure 95 167 238 333 l h G30 G31 28 30 37 mbar Max kW Min kW AUX SR R UR 1 00 1 75 2 50 3 50 0 25 0 40 0 60 0 70 P Kw 50 66 80 94 1 100 mm Gaz Type Gas type Pression gaz Gas pressu...

Page 21: ... l h G30 G31 50 50 mbar Gaz Type Gas type Pression gaz Gas pressure Max kW Min kW AUX SR R UR 1 00 1 75 2 50 3 50 0 35 0 50 0 75 0 95 P Kw 46 58 71 83 1 100 mm 73 127 182 254 g h TYPE TRI 5 S TYPE TRI 5 S KIT 35000238 II2H3B P Tipo di gas Gas type G20 Pressione gas Gas pressure 20 mbar CH AT AUX SR R UR P Kw Max kW Min kW 1 1 75 2 50 3 50 0 25 0 40 0 60 0 70 76 101 118 144 1 100mm 95 167 238 333 l...

Page 22: ... de transcription contenue dans cette notice Le constructeur se reserve le droit de modifier les produits en cas de necessite meme dans l interet de utilisation sans causer de prejudices aux caracteristiques de fonctionnement de securite des appareils m La empresa constructora declina toda responsabilidad derivada de eventuales errores de impresi6n contenidos en el presente libro Se reserva ademas...

Reviews: