background image


Per ulteriori informazioni, consultare le sezioni 

"Materiali che possono essere utilizzati all'interno del 

microonde" e "Materiali che non possono essere 

utilizzati nel forno a microonde". È possibile che anche 

altri utensili in materiali  non metallici non possano 

essere usati in modo sicuro


con i forni a microonde. In caso di dubbi, è possibile 

verificare la compatibilità di tali utensili attenendosi alla 

procedura descritta di seguito.


Verifica della compatibilità degli utensili:


1.  Riempire un contenitore compatibile con i forni a 

microonde con 1 tazza di acqua calda (250 ml) e 

immergervi l'utensile.


2.  Avviare il ciclo di cottura alla massima potenza per 1 

minuto.


3.  Toccare l'utensile. Se si presenta caldo al tatto, non 

utilizzarlo per la cottura a microonde.


4.  Non protrarre il ciclo di cottura per oltre 1 minuto.


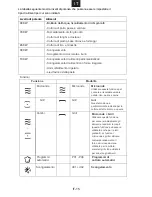
Materiali che possono essere utilizzati nel forno a microonde 

Utensili


Commenti


Carta 

metallizzata


Utilizzabile solo a scopo di protezione. È possibile utilizzare piccoli pezzetti di carta 

metallizzata per coprire fettine di carne rossa o bianca ed evitare che vengano cotte 

eccessivamente. È possibile che si verifichino archi elettrici se la carta metallizzata è 

troppo vicina alle pareti del forno. Mantenere una distanza di sicurezza minima di 2,5 cm (1 

pollice) dalle pareti del forno.


Vassoio per 

rosolatura 

Seguire le istruzioni del produttore. Posizionare la base del vassoio per la rosolatura ad 

almeno 5 mm (3/16 di pollice} dal ripiano girevole. Un utilizzo errato del ripiano girevole 

potrebbe provocarne la rottura. 

Piatti 

Utilizzare solo piatti compatibili con i microonde. Seguire le istruzioni del produttore. Non 

utilizzare piatti crepati o scheggiati. 

Barattoli di 

vetro 

Rimuovere sempre il coperchio. Utilizzarli solo per riscaldare gli alimenti. La  maggior parte 

dei barattoli in vetro non è resistente al calore e potrebbe quindi rompersi. 

Contenitori in 

vetro 

Utilizzare solo contenitori in vetro resistente al calore. Verificare che non abbiano un bordo 

in metallo. Non utilizzare piatti crepati o scheggiati. 

Sacchetti per 

la cottura in 

forno 

Seguire le istruzioni del produttore. Non utilizzare laccetti di chiusura in metallo. Forare la 

busta per consentire la fuoriuscita del vapore. 

Piatti e tazze di 

carta 

Utilizzare solo per la cottura/il riscaldamento per brevi periodi di tempo. Non lasciare il 

forno a microonde incustodito. 

Asciughini di 

carta 

Utilizzare solo per coprire gli alimenti per il riscaldamento e l'assorbimento di grasso. 

Utilizzare solo per la cottura per brevi periodi di tempo. Non lasciare il forno a microonde 

incustodito. 

Pergamena 

Utilizzare solo come copertura per prevenire schizzi o come involucro per la cottura a 

vapore. 

Plastica


Utilizzare solo recipienti compatibili con i forni a microonde. Seguire le istruzioni del 

produttore. Verificare che i contenitori in plastica siano classificati come "Sicuri per i forni a 

microonde". Alcuni contenitori in plastica possono ammorbidirsi quando il cibo al loro 

interno si riscalda. Bucare o forare le sacche per la bollitura e le sacche in plastica 

ermetiche, a seconda delle istruzioni del produttore. 

Involucri in 

plastica


Utilizzare solo involucri compatibili con i forni a microonde. Utilizzare gli involucri per 

coprire i cibi durante la cottura e mantenere il loro grado di umidità. Non avvolgere 

l'involucro direttamente attorno al cibo. 

Termometri 

Utilizzare solo termometri compatibili con i forni a microonde (termometri per carne o dolci). 

Carta oleata 

Utilizzare questa carta solo per coprire gli alimenti, prevenire gli spruzzi ed evitare che gli 

alimenti si secchino eccessivamente. 

I T

UTENSILI 

ATTENZIONE

Rischio di lesioni per 

Per limitare al 

minimo i rischi, verificare 

sempre che le operazioni 

di manutenzione o 

riparazione, che comportano 

la rimozione della copertura 

di protezione contro l'energia 

a microonde, vengano 

effettuate solo da personale

qualificato.  

il personale 

IT-9

Summary of Contents for MIG440VTX

Page 1: ...GB MICROWAVE OVENS IT FORNI A MICROONDE MANUALE DI ISTRUZIONI ES HORNOS MICROONDAS MANUAL DE INSTRUCCIONES USER INSTRUCTIONS RU МИКРОВОЛНОВАЯ ПЕЧЬ ИНСТРУКЦИЯ ПО ЭКСПЛУАТАЦИИ MIG440VTX ...

Page 2: ...RUCTIONS CAREFULLY Read these instructions carefully before using your microwave oven and keep it carefully If you follow the instructions your oven will provide you with many years of good service GB MODEL MIG440VTX ...

Page 3: ...amaged the oven must not be operated until it has been repaired by a competent person ADDENDUM If the apparatus is not maintained in a good state of cleanliness its surface could be degraded and affect the lifespan of the apparatus and lead to a dangerous situation PRECAUTIONS TO AVOID POSSIBLE EXPOSURE TO EXCESSIVE MICROWAVE ENERGY Model Rated Voltage Rated Input Power Microwave Rated Output Powe...

Page 4: ...y or mental capabilities or lack of experience and knowledge if they have been given supervision or instruction concerning use of the appliance in a safe way and understand the hazards involved Children shall not play with the appliance Cleaning and user maintenance shall not be made by children unless they are older than 8 and supervised 4 Keep the appliance and its cord out of reach of children ...

Page 5: ...rowave heating has ended 15 This appliance is intended to be used in household and similar applications such as staff kitchen areas in shops offices and other working environments by clients in hotels motels and other residential type environments farm houses bed and breakfast type environments 16 If the supply cord is damaged it must be replaced by the manufacturer its service agent or similarly ...

Page 6: ...ng children with reduced physical sensory or mental capabilities or lack of experience and knowledge unless they have been given supervision or instruction concerning use of the appliance by a person responsible for their safety 25 Children should be supervised to ensure that they do not play with the appliance 26 The appliances are not intended to be operated by means of an external timer or sepa...

Page 7: ...uching heating elements Children less than 8 years of age shall be kept away unless continuously supervised 32 The microwave oven must be operated with the decorative door open for ovens with a decorative door 33 Surface of a storage cabinet can get hot READ CAREFULLY AND KEEP FOR FUTURE REFERENCE GB GB 6 ...

Page 8: ... must be plugged into an outlet that is properly installed and grounded Consult a qualified electrician or serviceman if the grounding instructions are not completely understood or if doubtexists as to whether the appliance is properly grounded If it is necessary to use an extension cord use only a 3 wire 1 A short power supply cord is provided to reduce the risks resulting from becoming entangled...

Page 9: ... carefully with a damp cloth when they are dirty 4 Do not use harsh abrasive cleaners or sharp metal scrapers to clean the oven door glass since they can scratch the surface which may result in shattering of the glass 5 Cleaning Tip For easier cleaning of the cavity walls that the food cooked can touch Place half a lemon in a bowl add 300ml 1 2 pint water and heat on 100 microwave power for 10 min...

Page 10: ...ctions Should be labeled Microwave Safe Some plastic containers soften as the food inside gets hot Boiling bags and tightly closed plastic bags should be slit pierced or vented as directed by package Microwave safe only Use to cover food during cooking to retain moisture Do not allow plastic wrap to touch food Thermometers Microwave safe only meat and candy thermometers Wax paper Use as a cover to...

Page 11: ...shields the food from microwave energy Metal trim may cause arcing May cause a fire in the oven Plastic foam may melt or contaminate the liquid inside when exposed to high temperature Wood will dry out when used in the microwave oven and may split or crack May cause arcing Transfer food into microwave safe dish May cause arcing Transfer food into microwave safe dish May cause arcing and could caus...

Page 12: ... of the micr owave oven Danger Do not disassemble this appliance Touching internal components of this Place the microwave oven on a firm flat surface Make sure that there is surfi Important information about installing This appliance is NOT intended for use in a commercial environment Please observe the installation instructions provided and note that this appliance should only be installed by a q...

Page 13: ...ure that it is in the centre 2 Open the door and fasten the micr owave with the sc ws that were supplied 100 455 595 600 min 580 560 568 22 455 22 595 558 568 min 460 542 542 540 min beluchtingsopp 250 cm2 min beluchtingsopp 250 cm2 450 100 600 min 550 min 580 560 20 20 560 min min 550 min aeration surface 250 cm2 min aeration surface 250 cm2 458 2 Note There should be gap above the oven 594 594 4...

Page 14: ...3 Put the tray on the shaft and adjust slightly the shaft arm 2 Adjust the angle of the tray the tray roller should point to one of INSTALL THE TRAY 1 Check the position of the shaft GB 5 1 GB 13 ...

Page 15: ...nel and Features OPERATION 1 Function knob 2 Power Weight button 4 On Off Button 5 Temperature automenu button 6 Clock button 7 Start Pause button 8 Selection knob GB 3 Children lock button 5 6 1 4 8 3 2 7 GB 14 ...

Page 16: ...the power levels are suitable power levels you can choose and for Function Mode Microwave Microwave Microwave Use the microwave function to cook and reheat vegetables meat Grill Functions potatoes rice fish and Grill Auto programs Automatic cooking programs Defrost d01 d02 Defrost Grill The grill is very suitable to prepare thin pieces of meat and fish P01 P0 Grill Microwave Grill Use this functio...

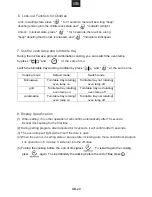
Page 17: ...Microwave Cooking 1 Press the button to activate the microwave function 01 00 is blinking in The max cooking time depends on the power that has been set When the power is 900W the MAX time is 30 minutes and other powers are 90 minutes 3 Press button to adjust the power microwave power 5 Press button to start cooking NOTE the step quantities for the adjustment time of the coding switch are as follo...

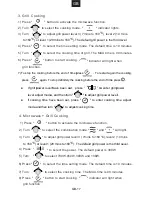
Page 18: ...o l power level me o enter grill p l ooking time power adjust to enter c If cooking time ha 1 Press button to activate the microwave function 2 Turn to select the combination mode and will light to select the power The default power is 300W 4 Microwave Grill Cooking 3 Turn to adjust grill power level 3 7mins to 160 level 2 10 mins to 160 or level 1 20 mins to 160 The default grill power is the thi...

Page 19: ...ress ng To 9 1 Press button to activate the microwave function 6 Press button to start cooking 4 Press button and set the weight The power the time and the temperature are already set Program Category Item If you hear a beep the combi microwave oven stops Turn the food and pr ess the start pause button to continue the defrosting program Bread cake and fruit Meat poultry and fish Time weight the fi...

Page 20: ...2 170 3 25 Meat P02 300 g 400 g 500 g 200 g 300 g 400 g 500 g P03 150g with 1200 ml cold water P04 P05 Potato P06 200 g 300 g 400 g 500 g P07 Beverage 1cup about 120ml 1 2cups about 240ml 2 3cups about 360ml 3 8 Popcorn P0 100 g 0 10 0 20 0 30 0 40 0 50 0 20 0 30 0 40 0 50 0 05 0 10 0 15 0 20 0 30 0 40 0 50 Note Popcorn should be placed on th high rack 60 mm the height is The menu chart e GB 19 ...

Page 21: ...table tray not rotating Turntable tray rotating oven lamp on oven lamp off Turntable tray not rotating Turntable tray rotating oven lamp on oven lamp off Turntable tray not rotating Turntable tray rotating 1 When setting if no other operation it will confirm automatically after 10 seconds Except clock setting for the first time 2 During setting program after adjusted for 3 seconds it will confirm ...

Page 22: ... be separately collected and treated If at any time in future you need to dispose of this product please do NOT dispose of this product with household waste Please send this product to WEEE collecting points where available It is forbidden to run the unit without any food inside It is very dangerous GB 21 ...

Page 23: ... attentamente queste istruzioni prima di utilizzare il forno a microonde e conservarle con cura Per ottenere prestazioni ottimali nel lungo termine è indispensabile seguire le istruzioni contenute in questo documento CONSERVARE CON CURA QUESTE ISTRUZIONI I T ...

Page 24: ...seguente rischio di danni per la salute Non rompere o manomettere gli interblocchi di sicurezza b Non collocare alcun oggetto tra il lato anteriore del forno e lo sportello e rimuovere sempre tutto lo sporco e i residui di soluzioni detergenti dalle superfici di tenuta c AVVERTENZA se lo sportello è aperto o le tenute sono danneggiate non utilizzare il forno a microonde e farlo riparare da una per...

Page 25: ... ESPOSIZIONE A UN ECCESSIVA ENERGIA DEL MICROONDE 8 Durante il riscaldamento di alimenti contenuti in vaschette in plastica o carta controllare il forno perché è possibile che i contenitori si incendino ISTRUZIONI IMPORTANTI PER LA SICUREZZA AVVERTENZA IT 3 Questo elettrodomestico può essere usato da bambini dagli 8 anni in su con capacitàmentali fisiche e sensoriali ridotte o con mancanza di cono...

Page 26: ...stituito dal costruttore da un rappresentante o da una persona con analoga qualifica per evitare danni 17 Non conservare o utilizzare il forno in ambienti aperti 18 Non utilizzare il forno in presenza di acqua in cantine umide o vicino a piscine 19 La temperatura delle superfici esterne potrebbe raggiungere valori molti alti quando il forno è in uso Le superfici si riscaldano durante l uso Tenere ...

Page 27: ...eno che ciò avvenga sotto la supervisione di una persona responsabile della loro sicurezza o siano state date istruzioni relative al suo utilizzo 25 Verificare sempre che i bambini non giochino con la piastra 26 Le unità non sono progettate per essere comandate mediante l utilizzo di un timer esterno o un telecomando dedicato 27 AVVERTENZA per evitare possibili scosse elettriche verificare che l u...

Page 28: ...elementi riscaldati I bambini al di sotto degli 8 anni devono essere tenuti lontani a meno che non siano sotto costante sorveglianza 32 Il forno a microonde deve funzionare con lo sportello decorativo aperto per forni con sportello decorativo 33 La superficie di un mobile puòsurriscaldarsi LEGGERE ATTENTAMENTE E CONSERVARE PER FUTURE CONSULTAZIONI IT 6 ...

Page 29: ...nità deve essere dotata di messa a terra In caso di cortocircuito la messa a terra limita il rischio di scosse elettriche poiché fornisce un percorso per la dissipazione della corrente elettrica Questo forno viene fornito con un cavo dotato di un filo e una spina di messa a terra Deve essere collegato a una presa a muro correttamente installata e dotata di idonea messa a terra Rivolgersi a un elet...

Page 30: ... Scollegare sempre l unità dall alimentazione elettrica 1 Pulire l interno del forno a microonde dopo l uso con un panno leggermente inumidito 2 Pulire gli accessori seguendo la normale procedura e utilizzando acqua e sapone 3 Pulire a fondo il telaio dello sportello e i componenti vicini con un panno inumidito se sporchi 4 Non utilizzare detergenti abrasivi o raschietti metallici affilati per pul...

Page 31: ...trebbe quindi rompersi Contenitori in vetro Utilizzare solo contenitori in vetro resistente al calore Verificare che non abbiano un bordo in metallo Non utilizzare piatti crepati o scheggiati Sacchetti per la cottura in forno Seguire le istruzioni del produttore Non utilizzare laccetti di chiusura in metallo Forare la busta per consentire la fuoriuscita del vapore Piatti e tazze di carta Utilizzar...

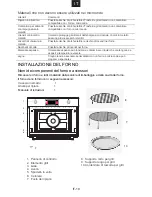
Page 32: ...i incendi nel forno Materiale espanso Il materiale espanso può fondersi e contaminare i liquidi che contengono se esposti a temperature elevate Legno Il legno tende a seccarsi se riscaldato con un forno a microonde e può creparsi o spaccarsi INSTALLAZIONE DEL FORNO Nomi dei componenti del forno e accessori Rimuovere il forno e tutti i materiali dalla scatola di imballaggio e dalla cavità del forno...

Page 33: ... unità NON è progettata per l uso in ambienti commerciali Seguire le istruzioni di installazione contenute in questo documento e fare installare l unità solo a un tecnico qualificato L unità è munita di una spina che deve essere collegata solo a una presa a muro funzionante con idonea messa a terra Se è necessario sostituire la spina L installazione e il collegamento dei cavi devono essere effettu...

Page 34: ...unzionamento del forno a microonde Dimensioni da rispettare per l installazione 1 10 00 0 450 Min 550 560 58 568 2 20 4555 5 542 560 min 550 20 455 542 m m mii i n n n 458 0 2 540 594 6 60 00 0 95 594 Superficie minima richiesta per la ventilazione 250 cm2 2 250 cm Superficie minima richiesta per la ventilazione 250 cm2 2 min 580 Nota lasciare spazio sufficiente sopra al forno a microonde Montaggi...

Page 35: ...Controllare la posizione del fusto 2 Regolare la posizione del ripiano Il rullo del ripiano deve essere orientato verso un punto del fusto 3 Collocare il ripiano sul fusto ed effettuare le regolazioni necessarie I T 5 1 IT 13 ...

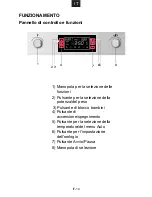
Page 36: ... Pulsante per la selezione della potenza del peso 4 Pulsante di accensione spegnimento 5 Pulsante per la selezione della temperatura del menu Auto 6 Pulsante per l impostazione dell orologio 7 Pulsante Avvio Pausa 8 Manopola di selezione I T 3 Pulsante di blocco bambini 5 6 1 4 8 3 2 7 IT 14 ...

Page 37: ...idimento di gelato Lievitazione della pasta Funzioni Funzione Modalità Microonde Microonde Microonde Utilizzare questa funzione per cuocere e riscaldare verdure patate riso pesce e carne Grill Grill Questa funzione è particolarmente indicata per la cottura di fette di carne o pesce I T Grill Microonde Grill Utilizzare questa funzione per cuocere rapidamente gli alimenti e renderli croccanti questa...

Page 38: ...il pulsante per attivare la funzione microonde Sul display lampeggiano le cifre 01 00 e viene contemporaneamente visualizzata l icona della funzione Se non si effettua alcuna operazione entro 10 secondi la potenza impostata viene automaticamente confermata 2 Ruotare la manopola per impostare il tempo di cottura Il tempo di cottura massimo dipende dalla potenza impostata Se la potenza è stata impos...

Page 39: ...La durata massima èdi 90 minuti 6 Premere il pulsante per iniziare la cottura La spia col simbolo si accenderàdurante la funzione grill 7 Per interrompere la cottura prima della fine del tempo premere Per riavviare la cottura premere di nuovo Per interrompere definitivamente la cottura prima della fine del tempo premere Se il livello di potenza del grill è stato selezionato premere per regolare la...

Page 40: ...iziare la cottura La spia col simbolo si accenderàquando il grill èin funzione Se il livello di potenza del grill è stato selezionato premere per regolare la modalità del livello di potenza del grill e poi girare per regolare il livello di potenza del grill Se il livello di potenza del microonde è stato selezionato premere per regolare la modalitàdel livello di potenza del microonde e poi girare p...

Page 41: ... del programma automatico per selezionare la modalità di cottura L indicatore si illumina a o Programma Categoria Descrizione d01 scongelamento Carne rossa e bianca pesce Il forno a microonde si arresta dopo l avviso acustico Girare gli alimenti e premere il pulsante Avvio Pausa per continuare lo scongelamento d02 scongelamento Pane dolci e frutta P01 P02 P08 4 Premere il pulsante 5 Ruotare 6 Prem...

Page 42: ... P07 1 2 3 8 P0 100 g 0 10 0 20 0 30 0 40 0 50 0 20 0 30 0 40 0 50 0 05 0 10 0 15 0 20 0 30 0 40 0 50 The menu chart Pizza carne verdure Pasta patate pesce bevande Popcorn Nota Popcorn devono essere posizionati sulla griglia in alta l altezza èdi 60mm 450ml di acqua fredda 50g con ml di acqua fredda 100g con 150g con 1200ml di acqua fredda 800 1 Coppa circa 120ml 2Coppe circa 240ml 3Coppe circa 36...

Page 43: ...a attivata la modalità di blocco e si illumina anche l indicatore Disattivazione quando la funzione è attivata premere per 3 secondi Il forno genera un avviso acustico prolungato ad indicare che la funzione è stata disattivata e l indicatore si spegne Spia di controllo del forno e ripiano girevole Nelle modalità di cottura a microonde grill e combi è possibile attivare la spia di controllo del for...

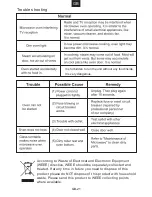
Page 44: ...potrebbe essere molto pericoloso Problema Azione correttiva Causa probabile 1 Il cavo di alimentazione non è stato collegato saldamente Scollegare il cavo di alimentazione e ricollegarlo dopo 10 secondi 2 Fusibili bruciati o intervento dell interruttore automatico Sostituire il fusibile o reimpostare l interruttore automatico fare effettuare la riparazione a personale tecnico qualificato del produ...

Page 45: ...roondas MANUAL DE INSTRUCCIONES MODELO MIG440VTX Lea las instrucciones antes de utilizar el horno microondas y no las tire Si sigue las instrucciones su microondas durará muchos años GUARDE LAS INSTRUCCIONES ES ...

Page 46: ...rres de seguridad b No colocar objeto alguno entre la parte frontal del microondas y la puerta ni deje que se acumulen restos o producto limpiador en las superficies de cierre c ATENCIÓN Si la puerta o el cierre de la puerta estuviesen dañados el microondas no podría funcionar hasta que una persona cualificada se encargase de su reparación ADENDA Si el electrodoméstico no se conserva en buenas con...

Page 47: ...l calentar alimentos en recipientes de plástico o papel vigile el horno ya que podrían quemarse 10 No cocine los alimentos en exceso 11 No utilice el horno como alacena No guarde en él alimentos como pan galletas etc INSTRUCCIONES DE SEGURIDAD IMPORTANTES ATENCIÓN ES 3 Este aparato puede ser utilizado por niñ os de 8 años o más y personas con incapacidad fí sica sensorial o mental o con falta de e...

Page 48: ...onamiento La superficie puede calentarse durante la utilización del horno No ponga el cable encima del microondas y no obstruya los ventiladores del mismo 20 No deje el cable colgado del microondas o del lugar donde esté colocado el horno 21 Si no se limpia el horno podría deteriorarse la superficie pudiendo afectar negativamente a la vida útil del electrodoméstico y dar lugar a situaciones de pel...

Page 49: ...n del horno Los niños pequeños han de mantenerse alejados No utilizar limpiadores de vapor res abrasivos o cuchillas de metal para limpiar el cristal de la puerta del horno ya que podrían rallar la superficie lo que podría provocar el resquebrajamiento del cristal 29 No han de utilizarse limpiadores abrasivos o cuchillas de metal para limpiar el cristal de la puerta del horno ya que podrían rallar...

Page 50: ... elementos de calentamiento Los niñ os menores de 8 añ os de edad deberán mantenerse lejos a menos que estén supervisados 32 El horno microondas debe funcionar con la puerta decorativa abierta para los hornos con puerta decorativa 33 La superficie de un armario se puede calentar LEA Y GUARDE PARA FUTURAS CONSULTAS ES 6 ...

Page 51: ...ra Este horno tiene que tener toma de tierra En caso de cortocircuito la toma de tierra reduce el riesgo de descarga eléctrica ya que proporciona una vía de escape para la corriente eléctrica El horno dispone de un cable para la toma de tierra del enchufe correspondiente El enchufe ha de conectarse a una clavija con una toma de tierra adecuada Consulte a un electricista o a una persona del servici...

Page 52: ... el interior del honro después de su utilización con un paño humedecido 2 Limpiar los accesorios normalmente con agua y jabón 3 El marco de la puerta y el sello así como los alrededores han de limpiarse con un paño humedecido cuando estén sucios 4 No use limpiadores abrasivos ni rascadores metálicos afilados para limpiar el cristal de la puerta del horno ya que pueden rayar la superficie lo que pu...

Page 53: ...n romperse Vasos de vidrio Sólo vasos de vidrio resistentes al calor Asegurarse de que no tiene componentes metálicos No utilice vasos rotos ni con fisuras Bolsas de cocina para horno Seguir las instrucciones del fabricante No cerrar con cierre metálico Hacer agujeros en las mismas para permitir la salida del vapor Platos y vasos de papel Utilizar sólo para un calentado rápido Vigilar el microonda...

Page 54: ...ovocar fuego dentro del horno Espuma plástica La espuma plástica puede fundirse o contaminar el líquido interior cuando se somete a temperaturas elevadas Madera La madera se deshidratará cuando se utilice en microondas y puede romperse o resquebrajarse CONFIGURACIÓN DEL HORNO Nombres de las Piezas del Horno y Accesorios Retire el horno y todos los materiales de la caja de cartón y del interior del...

Page 55: ...e sobre la instalación Este electrodoméstico NO está destinado a un uso comercial Leer las instrucciones de instalación que se proporcionan y advertir que el electrodoméstico sólo lo debe instalar un técnico cualificado El electrodoméstico dispone de un enchufe y sólo puede conectarse a un enchufe con toma de tierra adecuado En caso de ser necesario un nuevo enchufe sólo un electricista cualificad...

Page 56: ...es pueden afectar al funcionamiento del microondas Dimensiones de instalación Nota habrá de dejarse espacio suficiente en la parte superior del horno Encastre No sujetar ni mover el horno tirando por la manilla de la puerta La manilla de la puerta no soporta el peso del microondas y podría romperse 1 Colocar el microondas con cuidado en la caja asegurándose de que está centrado 2 Abrir la puerta y...

Page 57: ...LACION DE LA BANDEJA 1 Comprobar la posición del eje 2 Ajustar el ángulo del eje la bandeja giratoria ha de señalar uno de los brazos del eje 3 Colocar la rejilla en el eje y ajustar con cuidado ES 5 1 ES 13 ...

Page 58: ... características 1 Mando de funcionamiento 2 Botón potencia peso 4 Botón encendido apagado 5 Botón temperatura menú automático 6 Reloj 7 Mando de Arranque Pausa 8 Mando de selección ES 3 Botón de bloqueo de niños 5 6 1 4 8 3 2 7 ES 14 ...

Page 59: ...delicados Descongelar alimentos con forma irregular Ablandar helados Subir masas Funciones Función Modo Microondas Microondas Microondas Utilizar para cocinar o recalentar verduras patatas arroz pescado y carne Grill Grill Idóneo para trozos de carne o pescado poco gruesos ES Grill Microondas Grill Cocinar alimentos rápidamente y asar al mismo tiempo gratinar El microondas y el grill trabajan a la...

Page 60: ...ulsar el botón aparecerá el icono microondas Si no se toca en 10 segundos se confirmará automáticamente la potencia 2 Girar el mando para configurar el tiempo de cocción El tiempo máximo de cocinado depende de la potencia que se haya configurado Cuando la potencia es 900 el tiempo máximo es de 30 minutos el resto de potencias permiten una cocción de 90 minutos W 3 Pulsar para ajustar la potencia d...

Page 61: ...rilla El tiempo má ximo es de 90 minutos 6 Pulse el botó n para empezar a cocinar El indicador se iluminaráen la funció n de parrilla 7 Para detener la cocció n antes del final presione Para volver a empezar de nuevo la cocció n pulse de nuevo Para detener definitivamente la cocció n antes de que termine el tiempo presione Si se ha establecido el nivel de potencia de la parrilla presione para intr...

Page 62: ...cocinar El indicador se iluminaráen la funció n de parrilla Si se ha establecido el nivel de potencia de la parrilla presione para introducir el modo de ajuste del nivel de potencia de la parrilla y luego gire para ajustar el nivel de potencia de la parrilla Si se ha establecido el nivel de potencia del microondas presione para introducir el modo de ajuste del nivel de potencia del microondas y lu...

Page 63: ...ntalla P02 P 4 Pulsar 6 Pulsar para iniciar la cocción 2 Girar para seleccionar el modo de cocina Se iluminará 3 para seleccionar el peso del menú 5 Girar Girar P01 para seleccionar el menú automático Se mostrará en la pantalla d01 d02 o o Programa Categoría Alimento d01 descongelación Carne pollo y pescado d02 descongelación Pan repostería y fruta Si se escucha un bip el microondas combinado se d...

Page 64: ...07 1taza sobre 120ml 1 2tazas sobre 240ml 2 3tazas sobre 360ml 3 8 P0 100 g 0 10 0 20 0 30 0 40 0 50 0 20 0 30 0 40 0 50 0 05 0 10 0 15 0 20 0 30 0 40 0 50 The menu chart Pizza carne vegetal Pasta patata pescado bebidas palomitas de maí z Nota Las palomitas de maí z deben colocarse sobre la parrilla alta la altura es de 60mm 50g con 450ml de agua frí a 100g con ml de agua frí a 150g con 1200ml de ...

Page 65: ...pagada Combinación Bandeja giratoria en acción luz encendida Bandeja giratoria estática luz apagada ES 1 Al configurar si no se hace toca nada más la configuración se confirma automáticamente después de 10 segundos Excepto cuando se configure el reloj por primera vez 2 Durante el programa de configuración después de ajustado durante 3 segundos se confirmará después de 3 segundos 3 Cuando el horno ...

Page 66: ...ncionamiento anormal apague el aparato no lo trate bruscamente y póngase en contacto con el Servicio de Asistencia NÚMERO DE SERIE DEL PRODUCTO Dónde se encuentra Es importante informar al Servicio de Asistencia de su código de producto y del número de serie un código de 16 caracteres que empieza por el número 3 Se puede encontrar en el certificado de garantía o en la placa de datos situada en el ...

Page 67: ...к начать пользоваться микроволновой печью внимательно прочтите данное руководство и сохраните его Если вы будете выполнять все указания представленные в данном руководстве то ваша микроволновая печь будет безотказно служить вам в течение многих лет СОХРАНИТЕ ЭТО РУКОВОДСТВО RU ...

Page 68: ...омещайте никакие предметы между дверцей и передней панелью микроволновой печи и не допускайте скапливания грязи или остатков чистящих средств на уплотняемых поверхностях c ПРЕДУПРЕЖДЕНИЕ Если на дверце или на уплотнительной прокладке дверцы микроволновой печи имеются повреждения то запрещается пользоваться микроволновой печью до тех пор пока эти повреждения не будут устранены квалифицированным спе...

Page 69: ...пециалистом 5 Используйте только такую посуду которая пригодна для использования в микроволновых печах 6 Должна регулярно выполняться чистка микроволновой печи и из нее должны удаляться все отложения пищи Важные инструкции по технике безопасности ПРЕДУПРЕЖДЕНИЕ RU 3 Это устройство может использоваться детьми старше 8 лет и лицами с ограниченными физическими сенсорными или умственными способностями...

Page 70: ...ер снимите с него проволочные завязки и металлическую ручку 13 Установка данной микроволновой печи должна выполняться строго в соответствии с инструкциями по установке которые поставляются вместе с микроволновой печью 14 Не нагревайте в микроволновой печи яйца в скорлупе и вареные яйца в скорлупе так как яйца могут взорваться даже после прекращения микроволнового нагрева RU 9 Если устройство испус...

Page 71: ...я стола или полки 21 Если микроволновая печь не будет поддерживаться в чистом состоянии то это приведет к повреждению ее поверхностей и к снижению ее срока службы а также может привести к возникновению опасных ситуаций 22 После подогревания детского питания хорошо перемешайте или взболтайте его для того чтобы тепло равномерно распределилось в продукте Проверьте температуру пищи перед тем как дать ...

Page 72: ... печи абразивными чистящими средствами или металлическими скребками так как это может привести к образованию на стекле царапин что в свою очередь может вызвать растрескивание стекла 30 Во время работы электроприбор нагревается до высокой температуры Не прикасайтесь к нагревательным элементам расположенным внутри микроволновой печи RU 31 ВНИМАНИЕ Устройство и его доступные компоненты нагреваются во...

Page 73: ...и бора может привести к поражению электрическим током Не вставляйте вилку сетевого шнура в электрическую розетку пока электроприбор не будет правильно установлен и заземлен Данный электроприбор должен быть заземлен В случае пробоя на корпус защитное заземление обеспечивает отвод электрического тока на землю и таким образом уменьшает опасность поражения электрическим током Данный электроприбор снаб...

Page 74: ...тактом контактами заземления 1 Микроволновая печь поставляется с коротким сетевым шнуром При использовании длинного сетевого шнура вы будете задевать за него и спотыкаться об него 2 Если используется длинный шнур или удлинительный шнур 1 Нагрузочная способность шнура или удлинительного шнура должна быть не меньше номинального тока потребляемого электроприбором 2 Удлинительный шнур должен иметь три...

Page 75: ...ите их влажной тканью 4 Не пользуйтесь агрессивными абразивными чистящими средствами и острыми металлическими скребками для очистки стеклянной дверцы микроволновой печи во избежание царапания поверхности и последующего разрушения стекла 5 Полезный совет Для облегчения очистки полостных стенок контактирующих с приготовленной пищей Положите половинку лимона в бокал добавьте 300мл полпинты воды и наг...

Page 76: ... с инструкциями производителя Не пользуйтесь посудой имеющей трещины или сколы Стеклянные кувшины Обязательно снимите крышку Используйте только для нагревания пищи до теплого состояния Большинство стеклянных кувшинов изготовлены из нестойкого к нагреву стекла и могут разрушаться при нагреве Стеклянная посуда Пользуйтесь стеклянной посудой изготовленной только из термостойкого стекла предназначенно...

Page 77: ...ии Металлическая отделка на посуде может привести к искрению Скрученные завязки из металлической проволоки Могут привести к искрению и к возгоранию внутри микроволновой печи Бумажные пакеты Могут привести к возгоранию внутри микроволновой печи Пенопласт При воздействии на пенопласт высокой температуры пенопласт может расплавиться или загрязнить находящуюся внутри него жидкость Дерево При использов...

Page 78: ...бытовых применений Строго соблюдайте инструкции по установке Установка данного электроприбора должна выполняться только к валифицированным техником Электроприбор снабжен штепсельной вилкой которая должна подсоединяться только к правильно установленной заземленной электрической розетке Если требуется установить новую электрическую розетку или подсоединить шнур питания то эта работа должны выполнять...

Page 79: ...приемники и телевизоры могут оказывать влияние на работу микроволновой печи Установочные размеры min мин min aeration surface 250 cm 2 минимальная площадь отверстия для вентиляции 250 см 2 Встраиваемая техника Во время переноски не держите электроприбор за ручку дверцы Ручка дверцы может не выдержать вес электроприбора и отломиться 1 Осторожно вставьте микроволновую печь в нишу Проверьте центровку...

Page 80: ...Проверьте положение вала 2 Расположите противень в таком положении чтобы один из роликов противня был направлен к одному из выступов на валу 3 Наденьте противень на вал и немного отрегулируйте положение противня RU 5 1 RU 14 ...

Page 81: ...ния и органы управления 1 Ручка выбора функции 2 Кнопка Мощность Вес 3 4 Кнопка Вкл Выкл 5 Кнопка Температура автоматические меню 6 Кнопка часов 7 Кнопка Пуск Пауза 8 Ручка выбора RU Кнопка блокировки детей 5 6 1 4 8 3 2 7 RU 15 ...

Page 82: ...жим Микроволновый нагрев Микроволновый нагрев Микроволновый нагрев Используйте функцию микроволнового нагрева для приготовления и разогревания овощей картофеля риса рыбы и мяса Гриль Гриль Гриль очень хорошо подходит для приготовления тонких ломтиков мяса и рыбы RU Гриль с вентилятором Микроволновый нагрев гриль с вентилятором Используйте эту функцию для быстрого приготовления пищи и одновременно ...

Page 83: ...икроволнового нагрева на дисплее начинает мигать 01 00 и появляется пиктограмма микроволнового нагрева Если в течение 10 с не выполняется никаких действий то ранее установленная мощность будет подтверждаться автоматически 2 Поверните ручку чтобы установить время приготовления пищи Максимальное время приготовления пищи зависит от выбранной мощности Когда установлена мощность 900 Вт максимальное вре...

Page 84: ...нок и выберите время приготовления гриля Максимальное время приготовления составляет 90 минут 6 Нажмите на кнопку чтобы начать приготовление Индикатор загорится после включения гриля 7 Чтобы досрочно остановить приготовление пищи нажмите на кнопку Чтобы возобновить приготовление пищи снова нажмите на кнопку Чтобы окончательно и досрочно остановить приготовление пищи нажмите на кнопку Если уровень ...

Page 85: ...ремя приготовления Максимальное время приготовления составляет 90 минут 8 Нажмите на кнопку чтобы начать приготовление Индикатор загорится после включения гриля Если уровень мощности гриля был установлен нажмите на кнопки чтобы войти в режим регулировки уровня мощности гриля а потом поверните ползунок для настройки уровня мощности гриля Если уровень мощности микроволновой печи был установлен нажми...

Page 86: ...тобы выбрать автоматическое меню На дисплее отображается Р01 Р02 Р08 4 Нажмите кнопку 5 Поверните ручку чтобы выбрать вес пищи 6 Нажмите кнопку чтобы начать приготовление пищи Программа Категория Вид пищи d01 размораживание Мясо птица и рыба d02 размораживание Хлеб кекс и фрукты Если вы слышите звуковой сигнал микроволновая печь выключается Переверните пищу и нажмите кнопку пуск пауза для продолже...

Page 87: ...P0 100 g 0 10 0 20 0 30 0 40 0 50 0 20 0 30 0 40 0 50 0 05 0 10 0 15 0 20 0 30 0 40 0 50 The menu chart Примечание Попкорн должны быть помещены на высокой стойке высота 60 мм Пицца мясной овощной пасты картофеля рыбы напиток попкорн срез срезы срезы 50g с 450 мл холодной воды мл холодной воды 800 100g с 150g с 1200 мл холодной воды 1 Кубок o 120 2 кубков o 240 кубков o мл 360 мл мл 3 RU 21 ...

Page 88: ...оворотный стол вращается лампа в печи горит Поворотный стол не вращается лампа в печи не горит Гриль Поворотный стол вращается лампа в печи горит Поворотный стол не вращается лампа в печи не горит Комбинированный Поворотный стол вращается лампа в печи горит Поворотный стол не вращается лампа в печи не горит RU 1 Если во время выполнения установок не выполняется никаких операций то выбранная устано...

Page 89: ...иде конденсата на холодных поверхностях например на дверце печи Это нормальное явление Печь была включена без загруженной в нее пищи Запрещается включать микроволновую печь без находящихся внутри нее продуктов Это очень опасно Неисправность Возможная причина Способ устранения 1 Вилка сетевого шнура неплотно вставлена в электрическую розетку Выньте вилку из розетки Подождите 10 секунд и вставьте ее...

Page 90: ...тронного оборудования если они имеются RU СЛУЖБА ПОДДЕРЖКИ КЛИЕНТОВ Если невозможно определить причину нарушения в работе отключите устройство не подвергая его резкому воздействию и обратитесь в Службу поддержки клиентов СЕРИЙНЫЙ НОМЕР ИЗДЕЛИЯ Где он находится При обращении в Службу поддержки необходимо сообщить код изделия и его серийный номер код из 16 знаков начинающийся цифрой 3 его можно найт...

Reviews: