background image

• Only use the meat probe recommended for this oven.
• Do not use a steam cleaner for cleaning operations.
• Connect a plug to the supply cable that is able to bear the voltage, 
current and load indicated on the tag and having the earth contact. The 
socket must be suitable for the load indicated on the tag and must have 
ground  contact  connected  and  in  operation.  The  earth  conductor  is 
yellow-green in colour. This operation should be carried out by a suitably 
qualified professional. ln case of incompatibility between the socket and 
the appliance plug, ask a qualified electrician to substitute the socket 
with another suitable type. The plug and the socket must be conformed 
to  the  current  norms  of  the  installation  country.  Connection  to  the 
power  source  can  also  be  made  by  placing  an  omnipolar  breaker 
between  the  appliance  and  the  power  source  that  can  bear  the 
maximum connected load and that is in line with current legislation. The 
yellow-green earth cable should not be interrupted by the breaker. The 
socket or omnipolar breaker used for the connection should be easily 
accessible when the appliance is installed.
• The disconnection may be achieved by having the plug accessible or 
by  incorporating  a  switch  in  the  fixed  wiring  in  accordance  with  the 
wiring rules.
• lf the power cable is damaged, it should be substituted with a cable or 
special bundle available from the manufacturer or by contacting the 
customer  service  department.  The  type  of  power  cable  must  be 
H05V2V2-F. This operation should be carried out by a suitably qualified 
professional.  The  earth  conductor  (yellow-green)  must  be 
approximately 10 mm longer than the other conductors. For any repairs, 
refer only to the Customer Care Department and request the use of 
original spare parts.
• Failure to comply with the above can compromise the safety of the 
appliance and invalidate the guarantee.
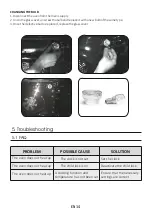
• Any excess of spilled material should be removed before cleaning.
• A long power supply failure during an occurring cooking phase may 
cause  a  malfunction  of  the  monitor.  ln  this  case  contact  customer 
service.

EN 03

Summary of Contents for FCNE613X

Page 1: ...VED THE REPRODUCTION OF ANY PART OF EU DIRECTIVE 2002 95 CE AMENDMENTS MATERIALS IN COMPLIANCE WITH REQUIREMENTS A5 27 11 2020 KULLANMA KILAVUZUL C HNMEF02 61813 27 11 2020 C FİDANCI K ÖZGÜR USER MANUAL C HNMEF02 OVEN GENERAL TOLERANCE ISO 2768 m Printing Color Grey Scala SC 000 000 PRODUCTION RELEASED A B C D E 4 2 8 3 5 9 1 1 White Paper 2 2 52 gr m 70 gr m 61813 27 11 20 Kontrol paneli görüntüs...

Page 2: ...USER INSTRUCTIONS OVENS MANUALE D ISTRUZIONI FORNO EN 02 IT 15 CANDY HOOVER GROUP S R L Via Comolli 16 20861 Brugherio MB Italy ...

Page 3: ... caused by the accidental resetting of the thermal interruption device the appliance should not be powered by an external switching device such as a timer or be connectedtoacircuitthatisregularlyswitchedonandoff Children under 8 should be kept at a safe distance from the appliance ifnotcontinuouslysupervised Childrenshouldnotplaywiththeappliance The appliance can be used by those aged 8 or over an...

Page 4: ...ellow green earth cable should not be interrupted by the breaker The socket or omnipolar breaker used for the connection should be easily accessiblewhentheapplianceisinstalled The disconnection may be achieved by having the plug accessible or by incorporating a switch in the fixed wiring in accordance with the wiringrules lf the power cable is damaged it should be substituted with a cable or speci...

Page 5: ...ity WARNING Donotlinetheovenwallswithaluminiumfoilorsingle use protectionavailablefromstores Aluminiumfoiloranyotherprotection in direct contact with the hot enamel risk melting and deteriorating the enameloftheinsides WARNING Neverremovetheovendoorseal CAUTION Do not refill the cavity bottom with water during cooking or whentheovenishot No additional operation setting is required in order to oper...

Page 6: ...2 Accessories 2 3 First use Product Description 8 3 1 Display description 3 2 Using the minute timer 3 3 Cooking modes Use of the Oven 9 4 1 General notes on cleaning 4 2 Aquactiva Function 4 3 Maintenance Removing and cleaning wire racks Removal of the oven window Removal and cleaning of the glass door Changing the bulb Oven Cleaning and Maintenance 11 5 1 F A Q Troubleshooting 14 ...

Page 7: ...omefundamentalrules donotpullonthepowercabletodisconnecttheplugfromthesocket donottouchtheappliancewithwetordamphandsorfeet ingeneraltheuseofadaptors multiplesocketsandextensioncablesisnotrecommended incaseofmalfunctionand orpooroperation switchofftheapplianceanddonottamperwithit 1 2 Electrical Safety ENSURE THAT AN ELECTRICIAN OR QUALIFIED TECHNICIAN MAKES THE ELECTRICAL CONNECTIONS The power sup...

Page 8: ...ordance with European Directive 2012 19 EU regarding electric and electronic appliances WEEE The WEEE contain both polluting substances that can have a negative effect on the environment and base elements that can be reused ItisimportantthattheWEEEundergospecifictreatmentstocorrectlyremoveand dispose of the pollutants and recover all the materials Individuals can play an important role in ensuring...

Page 9: ...ure and leave on for about 1 hour this will remove any lingering smellsofnewness 2 Product Description 2 1 Overview 1 Control panel 2 Shelf positions lateral wire grid if included 3 Metal grill 4 Drip pan 5 Oven door 2 2 Accessories Drip pan 1 Collects the residues that drip during the cooking offoodsonthegrills EN 08 Metal grill 2 Holds baking trays and plates Lateral wire grids 3 It located at b...

Page 10: ...attheendofthesettime The timer will count down from the set time return to the O position and switch off automatically Fornormaluseofovensetthetimertothe position TosettheovenensurethetimerisnotontheOposition 3 2 Using the minute timer To set the cooking time turn dial one complete revolution and then position the index to the required time When the time has lapsed the signal will ring forafewseco...

Page 11: ...an circulates air at room temperature around the frozen food so that it defrosts in a few minutes without the protein content of the foodbeingchangedoraltered BOTTOM HEATING FAN The bottom heating element is used with the fan circulating the airinsidetheoven Thismethodisidealforjuicyfruitflans tarts quichesandpâté Itpreventsfoodfromdryingandencouragesrisingincakes breaddoughandotherbottom cookedfo...

Page 12: ...ingaspongeandwashing upliquid If greasy residues remain immerse the pan in water and detergent Alternatively you can wash the pan inthedishwasheroruseacommercialovendetergent Neverputadirtypanbackintotheoven 4 2 Aquactiva Function The Aquactiva procedure uses steam to help remove remaining fat and food particles from the oven 1 Pour 300 ml of water into the Aquactiva container at the bottom of the...

Page 13: ...hing them downwards 3 Replacethewindowbycarryingouttheprocedureinreverse Removingandcleaningwireracks 1 Removethewireracksbypullingtheminthedirectionofthearrows seebelow 2 To clean the wire racks either put them in the dishwasher or use a wet sponge ensuring that they are driedafterwards 3 Afterthecleaningprocessinstallthewireracksinreverseorder EN 12 ...

Page 14: ...racting it from the oven door NB in pyrolytic ovens also remove thesecondandthirdglass ifpresent 7 Attheendofcleaningorsubstitution reassemblethepartsinreverseorder Onallglass theindication Pyro mustbelegibleandpositionedontheleftsideofthedoor closetothe left handlateralhinge Inthisway theprintedlabelofthefirstglasswillbeinsidethedoor LOW E 1 2 3 1 2 3 4 5 6 7 EN 13 ...

Page 15: ...replaced replacetheglasscover 5 Troubleshooting 5 1 FAQ PROBLEM POSSIBLE CAUSE SOLUTION The oven does not heat up The clock is not set Set the clock The child lock is on A cooking function and temperature has not been set Deactivate the child lock Ensure that the necessary settings are correct The oven does not heat up The oven does not heat up EN 14 ...

Page 16: ...NZA assicurarsi che l elettrodomestico sia spento prima disostituirelalampadinaperevitareognipossibilitàdifolgorazione AVVERTENZA perevitare rischicausatidauninvolontarioripristino dell interruttore automatico l elettrodomestico non deve essere alimentato da un dispositivo di commutazione esterno quale ad esempioun contaminuti oppure essere collegato ad un circuito che viene regolarmenteaccesoespe...

Page 17: ...elettrodomestico richiedere ad un tecnico specializzato di sostituire la presa con un altra di tipo compatibile La spina e la presa devono essere conformi alle normative attuali del paese di installazione Il collegamento alla rete di alimentazione può essere effettuato anche collocando un interruttore automatico onnipolare tra l elettrodomesticoelaretedialimentazione ingradodisupportareil caricoma...

Page 18: ... caso contattareilservizioclienti L elettrodomestico non deve essere installato dietro a una porta a scopoornamentaleperevitarneilsurriscaldamento Quandosi posizionaunoscaffale all interno accertarsi che il blocco sia rivolto verso l alto e nella parte posteriore della guida Lo scaffale deveessereinseritocompletamentenellaguida AVVERTENZA Non rivestire le pareti del forno con fogli di alluminio op...

Page 19: ...zo Descrizione del Prodotto 21 3 1 Descrizione del display 3 2 Uso del contaminuti 3 3 Modalità di cottura Utilizzo del Forno 22 4 1 Note generiche di pulizia 4 2 Funzione Aquactiva 4 3 Manutenzione Rimozione e pulizia delle scaffalature a filo Rimozione dello sportello del forno Rimozione e pulizia della porta in vetro Sostituzione della lampadina Pulizia e Manutenzione del Forno 24 5 1 F A Q Ris...

Page 20: ...apparecchioconmaniopiedibagnatioumidi ingeneraleèsconsigliabilel usodiadattatori presemultipleeprolunghe incasodiguastoe ocattivofunzionamentodell apparecchio spegnerloenonmanometterlo 1 2 Sicurezza Elettrica FAREEFFETTUAREICOLLEGAMENTIELETTRICIADUN ELETTRICISTAOTECNICOQUALIFICATO La rete di alimentazione a cui viene collegato il forno deve essere conforme con le normative in vigore nel paese di i...

Page 21: ...9 EU sulle apparecchiature elettriche ed elettroniche WEEE I WEEE contengono sia sostanze inquinanti che possono provocare conseguenze negative sull ambiente che componenti di base che possono essere riutilizzati E importante che i WEEE siano soggetti a trattamenti specifici per rimuovere e smaltire correttamente tutti gli inquinanti e recuperare tutti i materiali I singoli possono giocare un ruolo...

Page 22: ...orninuovi IT 21 2 Descrizione del Prodotto 2 1 Panoramica 1 Pannello di controllo 2 Posizioni ripiani castelletto se previsto 3 Griglia metallica 4 Leccarda 5 Porta forno 2 2 Accessori Leccarda 1 Raccoglie i residui di cibo che gocciolano durante la cottura Griglia metallica 2 Sostiene teglie e piatti Griglie laterali a rete 3 Si trovano su entrambi i lati del vano cottura Contengono griglie metal...

Page 23: ...nuti Allo scadere del tempo prescelto la manopola raggiungerà la posizione di suoneria O in corrispondenzadellaqualeilfornosispegneautomaticamente Il forno può essere acceso solo impostando un tempo di cottura o girando la manopola inposizione 3 2 Uso del contaminuti Per selezionare il tempo prescelto ruotare la manopola di un giro completo quindi ritornare con l indice nella posizione corrisponde...

Page 24: ...elare in pochiminutisenzamodificareodalterareilcontenutoproteico RESISTENZA INFERIORE VENTILATA adatta per cotture delicate torte soufflè 220 STATICO sono in funzione le resistenze superiore e inferiore È la cottura tradizionale ottima per arrostire cosciotti selvaggina ideale per biscotti melealfornoeperrendereicibimoltocroccanti PIZZA Con questa funzione l aria calda circola nel forno per garantire...

Page 25: ...in un contenitore e lavare la vaschettainacquacalda utilizzandounaspugnaedeldetergenteperpiatti Se rimangono dei residui di grasso immergere la vaschetta in acqua e detergente In alternativa è possibile anche lavare la vaschetta nella lavastoviglie oppure utilizzare un detergente per forni di tipo commerciale Nonreinseriremaiunavaschettasporcanelforno IT 24 4 2 Funzione Aquactiva Laproceduradipuli...

Page 26: ...ore premendoliversoilbasso 3 Installarenuovamentelosportelloeseguendolaproceduraall inverso Rimozioneepuliziadellescaffalatureafilo 1 Rimuoverelegrigliearetetirandoleindirezionedellefrecce vedisotto 2 Per pulire le griglie a rete metterle in lavastoviglie o utilizzare una spugna umida assicurandosi che sianosuccessivamenteasciugate 3 Dopolapulizia installarleinordineinverso IT 25 ...

Page 27: ...a cura dalla controporta del forno NB nei forni pirolitici rimuovereancheilsecondoeterzovetro sepresente 7 Alterminedellapuliziaosostituzioneriassemblarelepartinell ordineoppostoalla rimozione Su tutti i vetri l indicazione Low E deve essere correttamente leggibile e posizionata sul lato sinistro della porta vicino alla cerniera laterale sinistra In questo modo l etichetta stampata del primo vetro...

Page 28: ...he le impostazioni necessarie siano corrette Il forno non si scalda Il forno non si scalda IT 27 6 Garanzie Il prodotto è garantito oltre che ai sensi di legge alle condizioni e nei termini riportati sul certificato di garanzia convenzionale inserito nel prodotto Il certificato dovrà essere conservato e mostrato al nostro Centro di Assistenza Tecnica Autorizzato in caso di necessità insieme allo s...

Page 29: ...avo di alimentazione Se il montaggio del plinto non consente la circolazione dell aria per ottenere le massime prestazioni del forno è necessario creare un apertura di 500x10mm o la stessasuperficiein5 000mm2 IT A A 600 mm 560 mm 560 mm 560 mm 560 mm x 45 mm A 560 mm 590 mm EN IT 42835911 A5 11 2020 Rev_A Themanufacturerwillnotberesponsibleforanyinaccuracyresultingfromprintingortranscripterrorscon...

Reviews: