background image

EN-

17

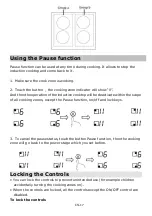
Using the Pause function

Pause function can be used at any time during cooking. It allows to stop the
induction cooktop and come back to it.

1. Make sure the cook zone is working.

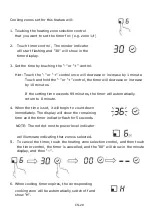
2. Touch the button , the cooking zone indicator will show “ll”.
And then the operation of the induction cooktop will be deactivate within the scope
of all cooking zones, except the Pause function, on/off and lock keys.

3. To cancel the pause status, touch the button Pause function , then the cooking
zone will go back to the power stage which you set before.

Locking the Controls

• You can lock the controls to prevent unintended use (for example children

accidentally turning the cooking zones on).

• When the controls are locked, all the controls except the ON/OFF control are

disabled.

To lock the controls

Summary of Contents for CI642CTTWIFI

Page 1: ...ode d emploi de la table de cuisson à induction FRANÇAIS Руководство по эксплуатации индукционной варочной панели РУССКИЙ CI642CTTWIFI Thank you for purchasing the CANDY induction hob Please read this instruction manual carefully before using the hob and keep it in a safe place for future reference ...

Page 2: ...p com Safety Warnings Your safety is important to us Please read this information before using your cooktop Installation Electrical Shock Hazard Disconnect the appliance from the mains electricity supply before carrying out any work or maintenance on it Connection to a good earth wiring system is essential and mandatory Alterations to the domestic wiring system must only be made by a qualified ele...

Page 3: ...rd this appliance must be installed according to these instructions for installation This appliance is to be properly installed and earthed only by a suitably qualified person This appliance should be connected to a circuit which incorporates an isolating switch providing full disconnection from the power supply Failure to install the appliance correctly could invalidate any warranty or liability ...

Page 4: ... by the electromagnetic field Failure to follow this advice may result in death Hot Surface Hazard During use accessible parts of this appliance will become hot enough to cause burns Do not let your body clothing or any item other than suitable cookware contact the Induction glass until the surface is cool Metallic objects such as knives forks spoons and lids should not be placed on the hob surfac...

Page 5: ...storage surface Never leave any objects or utensils on the appliance Do not place or leave any magnetisable objects e g credit cards memory cards or electronic devices e g computers MP3 players near the appliance as they may be affected by its electromagnetic field Never use your appliance for warming or heating the room After use always turn off the cooking zones and the cooktop as described in t...

Page 6: ...any part of the appliance unless specifically recommended in the manual All other servicing should be done by a qualified technician Do not use a steam cleaner to clean your cooktop Do not place or drop heavy objects on your cooktop Do not stand on your cooktop Do not use pans with jagged edges or drag pans across the Induction glass surface as this can scratch the glass Do not use scourers or any...

Page 7: ...sensory or mental capabilities or lack of experience and knowledge if they have been given supervision or instruction concerning use of the appliance in a safe way and understand the hazards involved Children shall not play with the appliance Cleaning and user maintenance shall not be made by children without supervision WARNING Unattended cooking on a hob with fat or oil can be dangerous and may ...

Page 8: ...guards designed bythe manufactuer of the cooking appliance or indicated by the manufacture of the appliance in the instruction for use as suitable or hob guards incorporated in the appliance The use of inappropriate guards can cause accidents This appliance incorporates an earth connection for functional purposes only Congratulations on the purchase of your new Induction Hob We recommend that you ...

Page 9: ...to 2000W 3 2000 W zone boost to 2600W 4 1500 W zone boost to 2000W 5 Glass plate 6 Control panel 1 Heating zone selection controls 2 Timer control 3 Power Timer regulating key 4 keylock control 5 ON OFF control 6 Boost function control 7 Pause function control 8 Direct cook button 9 WiFi button ...

Page 10: ...tion coil induced currents Before using your New Induction Hob Read this guide taking special note of the Safety Warnings section Remove any protective film that may still be on your Induction hob Using the Touch Controls The controls respond to touch so you don t need to apply any pressure Use the ball of your finger not its tip You will hear a beep each time a touch is registered Make sure the c...

Page 11: ...agnetic base glass wood porcelain ceramic and earthenware Do not use cookware with jagged edges or a curved base Make sure that the base of your pan is smooth sits flat against the glass and is the same size as the cooking zone Use pans whose diameter is as large as the graphic of the zone selected Using a pot a slightly wider energy will be used at its maximum efficiency If you use smaller pot ef...

Page 12: ...s entered the state of standby mode 2 Place a suitable pan on the cooking zone that you wish to use Make sure the bottom of the pan and the surface of the cooking zone are clean and dry 3 Touching the heating zone selection control and a indicator next to the key will flash 4 Set a power level by touching the or control a If you don t select a heat zone within 1 minute the induction hob will autom...

Page 13: ...2 Turn the cooking zone off by touching the and scrolling down to 0 or holding the and button at the same time for 1 second it will cut down to 0 directly Make sure the power display shows 0 then shows H and then 3 Turn the whole cooktop off by touching the ON OFF control 4 Beware of hot surfaces H will show which cooking zone is hot to touch It will disappear when the surface has cooled down to a...

Page 14: ...the beep touch and button at the same time and hold for 3 second the timer indicator will show flashing previous total power level e g 2 5 Touch and hold and for 1 second again to switch to other power level for example 3 0 When the power that you want is flashing touch the button pause function and hold for 5 seconds The buzzer will beep 10 times It means you have finished the setting Note 1 Afte...

Page 15: ...t will be on all the time Otherwise the WiFi indicator light will keep flashing How to set Set the direct cook procedure on hOn App and send the command to the hob you will hear two beeps and the dot of the timer display will flash Then touch the Direct cook button you will hear one beep and the dot of the timer display will be fixed The hob will work following the setting on App and the selected ...

Page 16: ...ED EQUIPMENT Product information for networked equipment power consumption of the product in networked standby if all wired network ports are connected and all wireless network ports are activated N A How to activate wireless network port For WiFi activation press 3 seconds the WiFi button How to deactivate wireless network port For WiFi de activation press 3 seconds the WIFI button ...

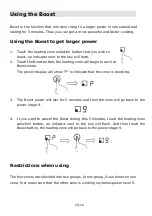
Page 17: ...ork at Boost mode The power display will show P to indicate that the zone is boosting 3 The Boost power will last for 5 minutes and then the zone will go back to the power stage 9 4 If you want to cancel the Boost during this 5 minutes touch the heating zone selection button an indicator next to the key will flash And then touch the Boost button the heating zone will go back to the power stage 9 R...

Page 18: ...ktop will be deactivate within the scope of all cooking zones except the Pause function on off and lock keys 3 To cancel the pause status touch the button Pause function then the cooking zone will go back to the power stage which you set before Locking the Controls You can lock the controls to prevent unintended use for example children accidentally turning the cooking zones on When the controls a...
Page 19: ... It switch off the hob automatically within 10s if the water flow to the control panel while buzzer will beep 1 second Detection of Small Articles When an unsuitable size or non magnetic pan e g aluminium or some other small item e g knife fork key has been left on the hob the hob automatically go on to standby in 1 minute The fan will keep cooking down the induction hob for a further 1 minute Aut...

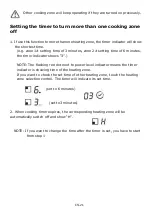
Page 20: ...king zone 2 Touch timer control The minder indicator will start flashing and 30 will show in the timer display 3 Set the time by touching the or control Hint Touch the or control once to decrease or increase by 1 minute Hold the or control of the timer to decrease or increase by 10 minutes 4 Cancel the time by touching the timer control and the 00 will show in the minute display 5 When the time is...

Page 21: ...y 10 minutes If the setting time exceeds 99 minutes the timer will automatically return to 0 minute 4 When the time is set it will begin to count down immediately The display will show the remaining time and the timer indicator flash for 5 seconds NOTE The red dot next to power level indicator will illuminate indicating that zone is selected 5 To cancel the timer touch the heating zone selection c...

Page 22: ... the timer indicator shows 3 NOTE The flashing red dot next to power level indicator means the timer indicator is showing time of the heating zone If you want to check the set time of other heating zone touch the heating zone selection control The timer will indicate its set time set to 6 minutes set to 3 minutes 2 When cooking timer expires the corresponding heating zone will be automatically swi...

Page 23: ...able for Induction glass cooktops but sugary food or spillovers as soon as possible If left to cool on the glass they may be difficult to beware of hot cooking zone surfaces 1 Switch the power to the remove or even permanently damage the glass surface Cut hazard when the safety cover cooktop off at the wall 2 Hold the blade or utensil at a 30 angle and scrape the is retracted the blade in a scrape...

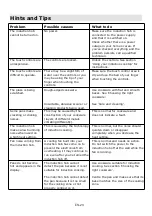
Page 24: ...r clicking noises This may be caused by the construction of your cookware layers of different metals vibrating differently This is normal for cookware and does not indicate a fault The induction hob makes a low humming noise when used on a high heat setting This is caused by the technology of induction cooking This is normal but the noise should quieten down or disappear completely when you decrea...

Page 25: ... corresponding protective codes Problem Possible causes What to do F3 F4 Temperature sensor of the induction coil failure Please contact the supplier F9 FA Temperature sensor of the IGBT failure Please contact the supplier E1 E2 Abnormal supply voltage Please inspect whether power supply is normal Power on after the power supply is normal E3 High temperature of the induction coil temperature senso...

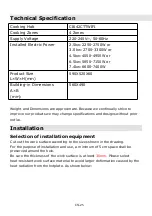
Page 26: ...mate Because we continually strive to improve our products we may change specifications and designs without prior notice Installation Selection of installation equipment Cut out the work surface according to the sizes shown in the drawing For the purpose of installation and use a minimum of 5 cm space shall be preserved around the hole Be sure the thickness of the work surface is at least 30mm Ple...

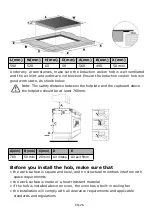
Page 27: ...hotplate and the cupboard above the hotplate should be at least 760mm A mm B mm C mm D E 760 50 mini 20 mini Air intake Air exit 5mm Before you install the hob make sure that the work surface is square and level and no structural members interfere with space requirements the work surface is made of a heat resistant material if the hob is installed above an oven the oven has a built in cooling fan ...

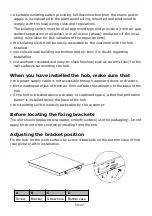
Page 28: ... to clean finishes such as ceramic tiles for the wall surfaces surrounding the hob When you have installed the hob make sure that the power supply cable is not accessible through cupboard doors or drawers there is adequate flow of fresh air from outside the cabinetry to the base of the hob if the hob is installed above a drawer or cupboard space a thermal protection barrier is installed below the ...

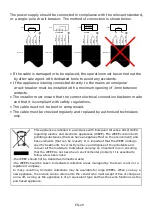
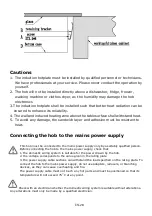
Page 29: ...he hob to the mains power supply This hob must be connected to the mains power supply only by a suitably qualified person Before connecting the hob to the mains power supply check that 1 the domestic wiring system is suitable for the power drawn by the hob 2 the voltage corresponds to the value given in the rating plate 3 the power supply cable sections can withstand the load specified on the rati...

Page 30: ... or compressed The cable must be checked regularly and replaced by authorised technicians only This appliance is labelled in accordance with European Directive 2012 19 EU regarding electric and electronic appliances WEEE The WEEE contain both polluting substances that can have a negative effect on the environment and base elements that can be reused It is important that the WEEE undergo specific t...

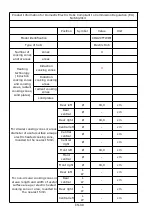
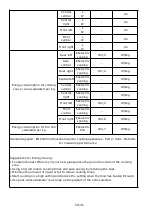
Page 31: ...g cooking areas radiant cooking zones solid plates For circular cooking zones or areas diameter of useful surface areaper electric heated cooking zone rounded to the nearest 5mm Rear left Ø 18 0 cm Rear central Ø cm Rear right Ø 18 0 cm Central left Ø cm Central central Ø cm Central right Ø cm Front left Ø 18 0 cm Front central Ø cm Front right Ø 18 0 cm For non circular cooking zones or areas len...

Page 32: ...tric cooking Wh kg Front right ECelectric cooking 195 6 Wh kg Energy consumption for the hob calculated per kg ECelectric hob 194 7 Wh kg Standard applied EN 60350 2 Household electric cooking appliances Part 2 Hobs Methods for measuring performance Suggestions for Energy Saving To obtain the best efficiency of your hob please place the pan in the centre of the cooking zone Using a lid will reduce...

Page 33: ...itshinweise Ihre Sicherheit liegt uns am Herzen Lesen Sie vor der Benutzung des Kochfelds bitte diese Hinweise Montage Stromschlaggefahr Trennen Sie das Gerät von der Netzstromversorgung ab bevor Sie Arbeiten oder Wartungsmaßnahmen daran durchführen Der Anschluss an eine zuverlässige Masseverbindung ist wesentlich und zwingend vorgeschrieben Veränderungen der hauseigenen Elektroanlage dürfen nur v...

Page 34: ...ngern könnte Um Gefahren zu vermeiden muss dieses Gerät anweisungsgemäß installiert werden Dieses Gerät muss von einer qualifizierten Person fachgerecht installiert und geerdet werden Dieses Gerät muss an einen Stromkreis mit einem Trennschutzschalter angeschlossen werden so dass es vollständig von der Spannungsversorgung abgetrennt werden kann Die nicht fachgerechte Installation des Geräts kann z...

Page 35: ... um sicherzustellen dass ihre Implantate nicht durch das elektromagnetische Feld beeinträchtigt werden Andernfalls kann Lebensgefahr bestehen Gefahr durch heiße Flächen Bei der Benutzung werden zugängliche Teile dieses Geräts so heiß dass sie Verbrennungen verursachen können Achten Sie darauf ihren Körper ihre Kleidung oder sonstige Gegenstände außer geeignetem Kochgeschirr vom Induktionsglas fern...

Page 36: ...rsichtigkeit besteht Schnitt oder Verletzungsgefahr Wichtige Sicherheitshinweise Lasen Sie das Gerät nie unbeaufsichtigt wenn es in Betrieb ist Überkochendes Gargut kann zu Rauchbildung führen und übertretendes Fett kann sich entzünden Benutzen Sie das Gerät nie als Arbeits oder Ablagefläche Lassen Sie nie Gegenstände oder Arbeitsgeräte auf dem Gerät liegen Achten Sie darauf keinesfalls magnetisie...

Page 37: ...zungen erleiden Lassen Sie Kinder nie allein oder unbeaufsichtigt in dem Bereich in dem das Gerät in Betrieb ist Kinder oder Personen mit einer Behinderung die ihre Fähigkeit zur Benutzung des Gerätes einschränkt sind von einer verantwortlichen und kompetenten Person in den Gebrauch einzuweisen Dieser Verantwortliche muss sich davon überzeugen dass sie das Gerät ohne jede Gefahr für sich selbst od...

Page 38: ... Hersteller dem zugelassenen Kundendienst oder ähnlichem Fachpersonal ausgewechselt werden um Gefahren vorzubeugen Dieses Gerät ist für den Einsatz im Haushalt und ähnliche Anwendungen vorgesehen wie z B Personalküchen in Geschäften Büros und anderen Arbeitsumgebungen Bauernhöfe Gäste von Hotels Motels und anderen Wohneinrichtungen Bed and Breakfast Einrichtungen WARNUNG Das Gerät und dessen zugän...

Page 39: ...LS einen Brand mit Wasser zu löschen sondern schalten Sie das Gerät aus und ersticken Sie die Flamme dann z B mit einem Deckel oder einer Feuerlöschdecke WARNUNG Brandgefahr Keine Gegenstände auf der Kochfläche liegen lassen WARNUNG Wenn die Oberfläche Risse aufweist schalten Sie das Gerät aus um die Gefahr eines Stromschlags zu vermeiden weil Kochfeldoberflächen aus Glaskeramik oder ähnlichem Mat...

Page 40: ...e Benutzung eines ungeeigneten Kochfeldschutzes kann zu Unfällen führen Dieses Gerät verfügt nur für funktionale Zwecke über einen Erdungsanschluss Herzlichen Glückwunsch zum Kauf Ihres neuen Induktionskochfelds Wir empfehlen dieses Gebrauchs Montageanleitung aufmerksam zu lesen um sich umfassend damit vertraut zu machen wie das Gerät korrekt installiert und bedient wird Hinweise zur Montage entne...

Page 41: ...rkung auf 2000 W 3 2000 W Zone Verstärkung auf 2600 W 4 1500 W Zone Verstärkung auf 2000 W 5 Glaskeramikfläche 6 Bedienfeld Bedienfeld 1 Kochzonenauswahl 2 Timer Steuerung 3 Leistungs Zeiteinstellung 4 Tastensperre 5 EIN AUS 6 Boost Funktion 7 Pausenfunktion 8 Direktkochen Taste 9 WiFi Taste ...

Page 42: ...Lesen Sie aufmerksam diese Anleitung unter besonderer Beachtung des Abschnitts Sicherheitshinweise Entfernen Sie sämtliche Schutzfolien die sich eventuell noch am Induktionskochfeld befinden Benutzung des Bedienfelds Die Elemente des Bedienfelds reagieren auf leichte Berührung so dass kein Druck ausgeübt werden muss Benutzen Sie die gesamte Fingerkuppe nicht nur die Fingerspitze Jede erfasste Berü...

Page 43: ...chirr aus folgenden Materialien ist ungeeignet reiner Edelstahl Aluminium oder Kupfer ohne Magnetboden Glas Holz Porzellan Keramik und Steingut Benutzen Sie kein Kochgeschirr mit scharfen Kanten oder gewölbtem Boden Achten Sie darauf dass der Boden des Kochtopfs eben ist vollflächig auf der Kochfläche aufliegt und dieselbe Größe wie das Kochfeld hat Benutzen Sie Kochtöpfe deren Durchmesser der Ken...

Page 44: ...felds Kochfeld einschalten 1 Drücken Sie auf EIN AUS Nach dem Einschalten ist ein Piepton zu hören und das Display zeigt oder als Hinweis darauf dass das Induktionskochfeld in den Standby Modus gewechselt ist 2 Stellen Sie einen geeigneten Kochtopf auf die gewünschte Kochzone Achten Sie darauf dass der Boden des Kochtopfs und die Kochzone sauber und trocken sind 3 Wenn Sie nun die Zonenauswahl ber...

Page 45: ...ie Kochzone aus indem Sie die Taste berühren und nach unten auf 0 gleiten Oder halten Sie die Taste und gleichzeitig 1 Sekunde lang gedrückt um direkt auf 0 herunterzuschalten Stellen Sie sicher dass die Leistungsanzeige 0 und dann H anzeigt und dann 3 Schalten Sie das gesamte Kochfeld aus indem Sie auf EIN AUS drücken 4 Vorsicht bei heißen Oberflächen Im Display wird H angezeigt wenn die Kochzone...

Page 46: ...Piepton gleichzeitig die Tasten und 3 Sekunden lang gedrückt Auf der Timer Anzeige blinkt die vorherige Gesamtleistung auf z B 2 5 Halten Sie und erneut 1 Sekunde lang gedrückt um auf eine andere Leistungsstufe umzuschalten z B 3 0 Wenn die gewünschte Leistungsstufe blinkt berühren Sie die Taste Pausenfunktion und halten sie 5 Sekunden lang gedrückt Der Summer piept zehnmal Damit ist die Einstellu...

Page 47: ...leuchtet die WiFi Kontrollleuchte durchgehend Andernfalls blinkt die WiFi Kontrollleuchte weiter Einstellungen Stellen Sie den Direktkochvorgang in der hOn App ein und senden Sie den Befehl an das Kochfeld Sie hören zwei Signaltöne und der Punkt der Timer Anzeige blinkt Tippen Sie nun auf die Direktkochtaste Sie hören einen Piepton und der Punkt der Timer Anzeige leuchtet durchgehend Das Kochfeld ...

Page 48: ...rt sind Nicht verfügbar Aktivieren des drahtlosen Netzwerk Ports Für die WiFi Aktivierung drücken Sie 3 Sekunden lang die WiFi Taste Deaktivieren des Funknetzwerk Ports Für die WiFi Deaktivierung drücken Sie 3 Sekunden lang die WIFI Taste a DRAHTLOS PARAMETER Technologie Wi Fi BLE Standard 802 11 b g n v4 2 BR EDR BLE Frequenzband MHz 2400 2500 2400 2500 Maximale Leistung mW 100 8 b PRODUKTINFORMA...

Page 49: ...eige zu blinken 2 Berühren Sie die Boost Taste um die Boost Funktion für die betreffende Kochzone zu aktivieren Die Leistungsanzeige zeigt P als Hinweis darauf an dass die Leistung der Zone verstärkt wird 3 Die Boost Leistung hält 5 Minuten und dann geht die Zone zurück auf Leistungsstufe 9 4 Um die Boost Funktion während dieser 5 Minuten abzubrechen berühren Sie die Kochzonenauswahltaste neben de...

Page 50: ...rzeit während des Garvorgangs verwendet werden Damit lässt sich das Induktionskochfeld vorübergehend deaktivieren 1 Vergewissern Sie sich dass die Kochzone aktiviert ist 2 Berühren Sie die Taste Die Kochzonenanzeige zeigt ll an Der Betrieb des Induktionskochfelds wird für alle Kochzonen deaktiviert ausgenommen Pause Ein Aus und Tastensperre 3 Um die Pausenfunktion wieder zu deaktivieren berühren S...

Page 51: ...h gestoppt Überkochschutz Der Überkochschutz ist eine Sicherheitsfunktion Diese Funktion schaltet das Kochfeld innerhalb von 10 Sekunden automatisch ab wenn das Wasser zum Bedienfeld fließt während der Summer 1 Sekunde lang piept Erkennung kleiner Gegenstände Sollten sich ein ungeeigneter Kochtopf z B falsche Größe oder nichtmagnetischer Boden oder irgendwelche Kleinteile z B Messer Gabel Schlüsse...

Page 52: ... Kochzone auszuwählen 2 Drücken Sie auf die Taste Timer Die Erinnerungsanzeige beginnt zu blinken und im Display wird 30 angezeigt 3 Wählen Sie mit der oder Steuerung die gewünschte Zeiteinstellung Hinweis Berühren Sie einmal den Regler oder um ihn um 1 Minute zu verringern oder zu erhöhen Halten Sie die Taste oder gedrückt um den Einstellwert um 10 Minuten zu erhöhen bzw zu verringern 4 Brechen S...

Page 53: ...n die eingestellte Zeit 99 Minuten überschreitet wird der Timer automatisch auf 0 Minuten zurückgestellt 4 Wenn die Zeit eingestellt ist beginnt sofort der Countdown Das Display zeigt die verbleibende Zeit und die Erinnerungsanzeige blinkt 5 Sekunden lang HINWEIS Der rote Punkt neben der Leistungsstufenanzeige leuchtet als Hinweis darauf dass die Zone ausgewählt wurde 5 Um den Timer abzubrechen be...

Page 54: ...n der Leistungspegelanzeige bedeutet dass die Timer Anzeige die Zeit der Kochzone anzeigt Wenn Sie die eingestellte Zeit einer anderen Kochzone überprüfen möchten berühren Sie den Kochzonen Auswahlregler Der Timer zeigt die eingestellte Zeit an auf 6 Minuten geschaltet auf 3 Minuten geschaltet 2 Wenn der Timer abläuft wird die entsprechende Kochzone automatisch ausgeschaltet und H angezeigt HINWEI...

Page 55: ... anderes geeignetes Instrument in einem Winkel von 30 und schaben Sie die Verschmutzung in Richtung eines kühlen Kochfeldbereichs ab 3 Spülen Sie mit etwas Wasser nach und trocknen Sie die Glasfläche dann mit einem sauberen Lappen oder Papiertuch 4 Befolgen Sie die Schritte 2 bis 4 unter Normale Gebrauchsspuren auf Glas oben Beseitigen Sie Rückstände von geschmolzenen und zuckerhaltigen Lebensmitt...

Page 56: ...e Pfannen geben knisternde oder knackende Geräusche von sich Dies kann an der Herstellungsart des Kochgeschirrs liegen Schichten unterschiedlicher Metalle schwingen unterschiedlich Das ist normal bei Kochgeschirr und kein Hinweis auf einen Mangel Bei hohen Temperaturstufen macht das Induktionskochfeld ein leise brummendes Geräusch Dies liegt an der Technologie des Induktionskochens Das ist normal ...

Page 57: ... Problem Mögliche Ursache Abhilfe F3 F4 Temperatursensor des Induktionsspulenausfalls Wenden Sie sich bitte an den Lieferanten F9 FA Temperatursensor IGBT Fehler Wenden Sie sich bitte an den Lieferanten E1 E2 Unnormale Versorgungsspannung Überprüfen Sie bitte die Netzversorgung Schalten Sie das Gerät wieder ein wenn die Netzversorgung normal ist E3 Hohe Temperatur des Induktionsspulen Temperaturse...

Page 58: ...alten wir uns Änderungen hinsichtlich Spezifikation und Konstruktion jederzeit vor Montage Wahl der Montageausrüstung Schneiden Sie die Arbeitsplatte entsprechend den Größenangaben in der Zeichnung zu Aus Gründen der Montage und Benutzung muss rund um die Aussparung mindestens 5 cm Platz gelassen werden Die Dicke der Arbeitsplatte muss mindestens 30 mm betragen Verwenden Sie bitte eine Arbeitsplat...

Page 59: ...eld über einem Ofen montiert wird muss dieser einen integrierten Kühllüfter haben Die Installation muss alle geforderten Abstände sowie sämtliche Normen und Vorschriften einhalten Um das Gerät vollständig von der Netzstromversorgung abzutrennen muss ein geeigneter Trennschutzschalter entsprechend den jeweiligen Vorschriften und Bestimmungen vorgesehen und installiert sein Der Trennschutzschalter m...

Page 60: ...zschalter ist für den Benutzer leicht erreichbar Vor dem Anbringen der Befestigungsklammern Legen Sie das Gerät auf eine stabile ebene Unterlage Verpackung verwenden Achten Sie darauf dass die hervorstehenden Bedienelemente keinem Druck ausgesetzt werden Anpassen der Halterungsposition Fixieren Sie das Kochfeld nach der Montage indem Sie es mit den vier Halterungen unten am Kochfeld an der Arbeits...

Page 61: ...mann an die Netzstromversorgung angeschlossen werden Überprüfen Sie vor dem Anschließen des Kochfelds an die Netzstromversorgung 1 dass die vorhandene Elektroanlage für die Leistungsaufnahme des Kochfelds geeignet ist 2 dass die Netzspannung den Angaben auf dem Typenschild entsprechen 3 dass die vorhandenen Stromkabel für die auf dem Typenschild angegebene Last ausgelegt sind Verwenden Sie für den...

Page 62: ...owohl umweltschädliche Stoffe die negativen Folgen für die Umwelt verursachen als auch wiederverwendbare Grundstoffe Es ist wichtig dass die Elektro und Elektronik Altgeräte einer speziellen Behandlung unterzogen werden um die Schadstoffe korrekt zu entfernen und zu entsorgen und alle Materialien zurückzugewinnen Jeder kann dazu beitragen dass Altelektrogeräte nicht zu einem Umweltproblem werden D...

Page 63: ...lungskoch bereiche feste Platten Bei runden Kochzonen oder bereichen Durchmesser der nutzbaren Fläche pro elektrisch beheizter Kochzone abgerundet auf 5 mm Hinten links Ø 18 0 cm Hinten Mitte Ø cm Hinten rechts Ø 18 0 cm Mitte links Ø cm Mitte Mitte Ø cm Mitte rechts Ø cm Vorn links Ø 18 0 cm Vorn Mitte Ø cm Vorn rechts Ø 18 0 cm Bei nicht runden Kochzonen oder bereichen Länge und Breite der nutzb...

Page 64: ...saufnahme des Kochfelds pro kg Elektro kochfeld 194 7 Wh kg Angewandter Standard EN 60350 2 Elektrische Haushaltskochgeräte Teil 2 Kochfelder Methoden zur Leistungsmessung Energiespartipps Um die beste Effizienz Ihres Kochfelds zu erreichen platzieren Sie das Kochgeschirr bitte in der Mitte der Kochzone Mit einem Deckel verringern Sie die Garzeit und sparen Energie Verwenden Sie möglichst wenig Wa...

Page 65: ...re sécurité est importante pour nous Veuillez lire ces informations avant d utiliser votre table de cuisson Installation Risque de choc électrique Débranchez l appareil du réseau électrique avant d effectuer tout travail ou entretien sur celui ci Le raccordement à un bon système de mise à la terre est essentiel et obligatoire Seul un électricien qualifié est habilité à effectuer des modifications ...

Page 66: ...l afin de réduire vos coûts d installation Afin d éviter tout danger cet appareil doit être installé conformément aux présentes instructions d installation Cet appareil doit être correctement installé et mis à la terre uniquement par une personne qualifiée Cet appareil doit être raccordé à un circuit incorporant un sectionneur permettant une déconnexion complète de l alimentation électrique L inst...

Page 67: ...ter leur médecin ou le fabricant de l implant avant d utiliser cet appareil pour s assurer que leurs implants ne seront pas affectés par le champ électromagnétique Le non respect de ces consignes peut entraîner le décès Risque de surface chaude Pendant l utilisation les parties accessibles de cet appareil deviennent suffisamment chaudes pour causer des brûlures Ne laissez pas votre corps vos vêtem...

Page 68: ... stocker en toute sécurité et hors de portée des enfants Le non respect de cette précaution peut entraîner des blessures ou des coupures Consignes importantes de sécurité Ne laissez jamais l appareil sans surveillance lorsqu il est utilisé L ébullition cause des vapeurs et des débordements graisseux qui peuvent s enflammer N utilisez jamais votre appareil comme surface de travail ou de rangement N...

Page 69: ...appareil Les enfants qui montent sur la table de cuisson peuvent être gravement blessés Ne laissez pas les enfants seuls ou sans surveillance dans la zone où l appareil est utilisé Les enfants ou les personnes handicapées qui limitent leur capacité à utiliser l appareil doivent avoir une personne responsable et compétente pour les renseigner sur son utilisation L instructeur doit s assurer qu il p...

Page 70: ... son agent d entretien ou des personnes possédant le même type de qualification afin d éviter tout risque Cet appareil est destiné à un usage domestique et à d autres applications similaires telles que espaces cuisine du personnel dans des boutiques bureaux et autres espaces de travail maisons de ferme par les clients dans des hôtels motels et autres espaces de type résidentiel dans les espaces de...

Page 71: ...ncendie Ne JAMAIS essayer d éteindre un feu avec de l eau mais éteindre l appareil puis couvrir la flamme avec un couvercle ou une couverture anti feu par exemple AVERTISSEMENT Risque d incendie ne pas stocker d objets sur les surfaces de cuisson AVERTISSEMENT Si la surface est fêlée éteindre l appareil pour éviter les risques d électrocution choc pour les surfaces de cuisson en vitrocéramique ou ...

Page 72: ...L utilisation d un dispositif de protection non approprié peut provoquer des accidents Cet appareil inclut un raccordement à la terre pour des finalités fonctionnelles uniquement Nous vous félicitons de votre choix de la table de cuisson à induction Nous vous recommandons de prendre le temps de lire ce manuel d instruction d installation afin de bien comprendre comment l installer et l utiliser co...

Page 73: ...yer 1500 W augmenté pour atteindre 2000W 5 Table de verre 6 Panneau de commande Panneau de commande 1 Touches de sélection de la zone de cuisson 2 Touche du temporisateur 3 Touche de réglage de la puissance et du temporisateur 4 Touche de verrouillage 5 Touche Marche Arrêt 6 Touche Fonction Boost 7 Commande de la fonction de mise en pause 8 Touche de Direct cook 9 Touche sans fil Wi Fi ...

Page 74: ...ifs Avant d utiliser votre nouvelle table de cuisson à induction Lisez ce guide en prenant note de la section Consignes de sécurité Enlevez tout film protecteur qui pourrait encore se trouver sur votre table de cuisson à induction Utilisation des commandes tactiles Les commandes répondent au toucher vous n avez donc pas besoin d appuyer fort Utilisez la boule de votre doigt pas son bout Vous enten...

Page 75: ...iaux suivants ne sont pas adaptées acier inoxydable pur aluminium ou cuivre sans base magnétique verre bois porcelaine céramique et grès N utilisez pas d ustensiles de cuisson dont les bords sont dentelés ou dont la base est incurvée Assurez vous que la base de votre casserole est lisse qu elle repose à plat contre le verre et qu elle est de la même taille que la zone de cuisson Utilisez des casse...

Page 76: ...son 1 Appuyez sur la touche Marche Arrêt Après la mise en marche l avertisseur sonore retentit une fois et toutes les touches affichent ou pour signifier que la table à induction est en mode de veille 2 Posez la casserole sur la zone de cuisson que vous souhaitez utiliser Veillez à ce que le fond de votre casserole et la surface de la zone de cuisson soient propres et secs 3 En appuyant sur la tou...

Page 77: ...ouhaitez éteindre 2 Éteignez le foyer de cuisson en appuyant sur et en réduisant jusqu à 0 ou en appuyant en même temps sur les touches et pendant 1 seconde cela réglera directement le foyer sur 0 Assurez vous que la touche affiche 0 puis H puis 3 Éteignez la table de cuisson en appuyant sur la touche Marche Arrêt 4 Prenez garde aux surfaces chaudes H indique une zone de cuisson encore trop chaude...

Page 78: ...issance par ex 3 0 Lorsque la puissance que vous souhaitez régler clignote appuyez sur la touche Fonction de mise en pause et maintenez la enfoncée pendant 5 secondes Le bip retentira 10 fois Cela signifie que vous avez terminé le réglage Remarque 1 Après l étape 2 vous devez appuyer sur et dans les 3 secondes après avoir entendu le bip sonore Sinon vous devrez tout reprendre depuis l étape 2 2 À ...

Page 79: ...le point de l affichage du temporisateur clignotera Appuyez ensuite sur la touche de direct cook vous entendrez un bip et le point de l affichage du temporisateur ne clignotera plus La table de cuisson fonctionnera suivant le réglage de l application et les zones sélectionnées afficheront A Sur l application vous aurez accès à 15 recettes de cuisine assistée ainsi qu à certaines fonctions spéciale...

Page 80: ...t activer le port de réseau sans fil Pour activer le Wi Fi appuyez sur la touche Wi Fi pendant 3 secondes Comment désactiver le port de réseau sans fil Pour désactiver le Wi Fi appuyez sur la touche Wi Fi pendant 3 secondes a PARAMÈTRES DU SANS FIL Technologie Wi Fi BLE Standard 802 11 b g n v4 2 BR EDR BLE Bande s de fréquence MHz 2400 2500 2400 2500 Puissance maximale mW 100 8 b INFORMATIONS SUR...

Page 81: ...ux près de la touche commence à clignoter 2 Appuyez sur la touche Boost le foyer de cuisson commencera à fonctionner en mode Boost La touche affichera P pour indiquer que le foyer est en mode Boost 3 Le niveau de puissance Boost durera 5 minutes puis le foyer reviendra à la puissance 9 4 Si vous souhaitez supprimer le mode Boost au cours de ces 5 minutes appuyez sur la touche de sélection du foyer...

Page 82: ...t d éteindre puis de rallumer la table de cuisson à induction 1 Assurez vous que le foyer de cuisson fonctionne 2 Appuyez sur le bouton l indicateur de zone de cuisson affichera ll Ensuite le fonctionnement de la table de cuisson à induction sera désactivé pour toutes les zones de cuisson sauf en ce qui concerne la Fonction de mise en pause du bouton de Marche Arrêt et les touches de verrouillage ...

Page 83: ...eiller la température à l intérieur de la table de cuisson à induction Lorsqu une température excessive est détectée la table de cuisson à induction s arrête automatiquement Protection en cas de débordement La protection en cas de débordement est une fonction de protection de sécurité Elle éteint automatiquement la table de cuisson en 10 secondes si de l eau se déverse sur le tableau de commandes ...

Page 84: ...lisation du temporisateur comme minuteur Si vous ne souhaitez pas sélectionner une zone de cuisson 1 Vérifiez que la table de cuisson est éteinte Remarque vous pouvez utiliser le minuteur même sans sélectionner de zone de cuisson 2 Appuyez sur la touche du temporisateur l indicateur de la minuterie commence à clignoter et 30 s affiche 3 Réglez le temps à l aide des touches ou Remarque Appuyez sur ...

Page 85: ... minutes Si le temps de réglage dépasse 99 minutes la minuterie revient automatiquement à 0 minute 4 Une fois le temps réglé le décompte commence immédiatement L écran affiche le temps restant et le temporisateur clignote pendant 5 secondes REMARQUE Le point rouge près de l indicateur du niveau de chauffe s allume pour indiquer que la zone de cuisson est sélectionnée 5 Pour supprimer la minuterie ...

Page 86: ...e l indicateur de niveau de chauffe signifie que l indicateur de temps affiche le temps de ce foyer de cuisson Si vous voulez contrôler le temps de cuisson réglé sur un autre foyer de cuisson appuyez sur la touche de sélection du foyer de cuisson Le temporisateur indiquera le temps réglé réglage à 6 minutes réglage à 3 minutes 2 Quand le temps de cuisson est terminé le foyer de cuisson corresponda...

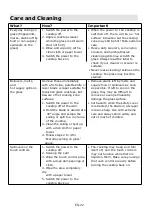
Page 87: ...es de cuisson 1 Coupez l alimentation réseau de la table de cuisson 2 Tenez la lame ou l ustensile à un angle de 30 et grattez la saleté ou déplacez le déversement vers un endroit frais de la table de cuisson 3 Nettoyez les salissures ou déversements avec un torchon ou un essuie tout 4 Suivez les étapes 2 à 4 ci dessus pour Salissures de tous les jours sur le verre Enlevez le plus rapidement possi...

Page 88: ...nges métalliques abrasives ou de produits de nettoyage inadéquats Utilisez des ustensiles de cuisine à fond plat et lisse Voir la section Choisir une bonne batterie de cuisine Voir la section Entretien et nettoyage Certaines casseroles font des craquements ou des cliquetis Cela peut être dû à la construction de votre batterie de cuisine couches de différents métaux vibrant de manière différenciée ...

Page 89: ...ion et contacter un technicien qualifié Affichage et inspection des défaillances Si des événements anormaux surviennent la table de cuisson à induction entrera automatiquement en condition de protection et affichera les codes de protection correspondants Problème Cause possible Solution F3 F4 Défaillance du capteur de température de la bobine d induction Veuillez contacter le fournisseur F9 FA Déf...

Page 90: ... Du fait que nous nous efforçons continuellement d améliorer nos produits nous pouvons modifier les spécifications et les conceptions sans préavis Installation Choix du matériel d installation Découpez la surface de travail selon les dimensions indiquées sur le dessin Pour l installation et l utilisation un espace d au moins 5 cm doit être préservé autour du trou Assurez vous que l épaisseur du pl...

Page 91: ... cuisson et le meuble au dessus doit être d au moins 760 mm A mm B mm C mm D E 760 50 minimum 20 min Entrée d air Sortie de l air 5 mm Avant d installer la table de cuisson assurez vous que la surface de travail est d équerre et de niveau qu aucune partie n interfère avec l espace nécessaire le plan de travail est constitué d un matériau résistant à la chaleur si la plaque est installée au dessus ...

Page 92: ...que pour le revêtement des murs autour de la table de cuisson Une fois que la table de cuisson est installée assurez vous que le câble d alimentation n est pas accessible par les portes d armoire ou les tiroirs un flux d air frais circule entre l extérieur du meuble inférieur et la base de la table de cuisson si la table de cuisson est installée au dessus d un tiroir ou d un placard une barrière t...

Page 93: ...le doivent être résistants à la chaleur Cette table de cuisson ne doit être connectée au réseau d alimentation que par du personnel qualifié Avant de connecter la table de cuisson au réseau d alimentation vérifiez que 1 le circuit domestique est suffisant pour la puissance nécessaire à la table de cuisson 2 la tension correspond à la valeur indiquée sur la plaque signalétique 3 les sections de câb...

Page 94: ...ualifiée Cet appareil est étiqueté conformément à la directive européenne 2012 19 EU relative aux appareils électriques et électroniques DEEE La catégorie DEEE recouvre à la fois les substances polluantes pouvant avoir des retombées négatives sur l environnement et les composants de base pouvant être réutilisés Il est important que les DEEE subissent des traitements spécifiques pour éliminer et je...

Page 95: ...nduction Foyers à cuisson rayonnante Plaques massives Pour les foyers ou zones de cuisson circulaires diamètre de la surface utile des zones de cuisson électrique arrondi à 5 mm près Arrière gauche Ø mm 18 0 cm Arrière centre Ø mm cm Arrière droite Ø mm 18 0 cm Centre gauche Ø mm cm Centre centre Ø mm cm Centre droite Ø mm cm Avant gauche Ø mm 18 0 cm Avant centre Ø mm cm Avant droite Ø mm 18 0 cm...

Page 96: ...e cuisson calculée par kg Table de cuisson électrique CE 194 7 Wh kg Norme appliquée EN 60350 2 pour les appareils de cuisson électriques à usage domestique Partie 2 Plaques de cuisson Méthodes pour mesurer la performance Conseils pour des économies d énergie Pour obtenir la meilleure efficacité de votre table de cuisson placez la casserole au centre de la zone de cuisson L utilisation d un couver...

Page 97: ...мацию Установка Опасность поражения электрическим током Перед проведением любых работ или технического обслуживания отсоединяйте варочную панель от электрической сети Подключение варочной панели к исправной системе заземления является обязательным для безопасной эксплуатации Любые изменения в систему домашней электропроводки может вносить только квалифицированный электрик Несоблюдение данного указ...

Page 98: ...ния квалифицированными специалистами Для отключения от электрической сети на линии питания панели должен быть установлен выключатель Неверная установка прибора приведет к немедленному аннулированию гарантии и освобождает изготовителя от любой ответственности Эксплуатация и техническое обслуживание Опасность поражения электрическим током Запрещается готовить пищу на треснувшей или лопнувшей панели ...

Page 99: ...сайтесь частями тела одежды и другими предметами за исключением кухонной посуды к стеклянной поверхности панели до полного ее остывания Не кладите на панель металлические предметы например ножи вилки ложки крышки и т п так как они могут сильно нагреваться Не подпускайте к горячей панели детей Рукоятки сковород могут нагреваться до высокой температуры Следите за тем чтобы они не находились над друг...

Page 100: ...анов управления Не полагайтесь только на функцию автоматического отключения конфорок после снятия кухонной утвари Не позволяйте детям играть с панелью залезать на нее или сидеть на ней Не храните детские игрушки или лакомства в шкафах над панелью При попытке добраться до них дети могут получить серьезные травмы Не оставляйте детей одних или без присмотра в помещении где работает варочная панель Де...

Page 101: ...ный прибор предназначен для бытового использования на кухнях в магазинах офисах и других рабочих заведениях в жилых домах клиентами в отелях гостиницах и других жилых помещениях клиентами в мотелях хостелах и т п ВНИМАНИЕ Панель и ее открытые части нагреваются во время использования Будьте осторожны и не прикасайтесь к конфоркам Не оставляйте детей младше 8 лет рядом с варочной панелью без присмот...

Page 102: ...станционного управления ВНИМАНИЕ Не оставляйте без присмотра готовящиеся блюда Процесс приготовления пищи должен находиться под постоянным контролем ВНИМАНИЕ Для предотвращения падения панель необходимо надежно закрепить Смотрите указания по установке ВНИМАНИЕ Используйте только крепления поставленные изготовителем панели указанные в руководстве пользователя или встроенные в устройство Использован...

Page 103: ... повышения мощности до 2 600 Вт 4 Конфорка 1500 Вт в режиме повышения мощности до 2 000 Вт 5 Стеклянная плита 6 Панель управления Панель управления 1 Кнопки выбора конфорки 2 Таймер 3 Кнопки выбора мощности установки таймера 4 Кнопка блокировки панели управления 5 Кнопка ON OFF ВКЛ ВЫКЛ 6 Кнопка функции повышения мощности 7 Кнопка паузы 8 Кнопка прямого приготовления 9 Кнопка WiFi ...

Page 104: ...локерамическая плита индукционная катушка индукционный ток Перед использованием новой индукционной варочной панели Прочтите настоящее руководство особенно раздел Меры предосторожности Снимите с панели защитную пленку Использование сенсорной панели Кнопки управления реагируют на касание Их не нужно нажимать Для управления используйте подушечку пальца а не ноготь При каждом касании будет раздаваться...

Page 105: ...ля готовки Не допускается использование утвари из следующих материалов чистая нержавеющая сталь алюминий или медь без магнитного основания стекло дерево фарфор керамика Не используйте посуду с острыми углами или изогнутым дном Убедитесь в том что дно посуды ровное плотно прилегает к стеклу и по размеру совпадает с конфоркой Используйте утварь диаметр дна которой превышает диаметр окружности конфор...

Page 106: ...посуды Использование индукционной варочной панели Для запуска приготовления 1 Коснитесь кнопки ON OFF ВКЛ ВЫКЛ После включения раздастся звуковой сигнал на дисплее появится или указывая на то что варочная панель находится в дежурном режиме 2 Поставьте подходящую утварь на нужную конфорку Убедитесь что дно сковороды и поверхность зоны приготовления пищи чистые и сухие 3 Коснитесь кнопки нужной конф...

Page 107: ...ите конфорку уменьшением мощности до 0 кнопкой или одновременным касанием на 1 секунду кнопок и При этом мощность автоматически будет уменьшена до 0 Убедитесь в том что на дисплее появляется 0 а затем H а затем 3 Отключите всю конфорку нажав кнопку ON OFF ВКЛ ВЫКЛ 4 Не прикасайтесь к горячей поверхности Буква Н показывает какая конфорка слишком горячая чтобы касаться ее После охлаждения поверхност...

Page 108: ...о следующего значения например 3 0 Когда желаемая мощность замигает нажмите кнопку пауза и удерживайте в течение 5 секунд Раздастся 10 коротких сигналов Настройка завершена Примечание 1 После шага 2 необходимо коснуться кнопок и в течение 3 секунд после сигнала В противном случае придется повторить все пункты начиная с шага 2 2 После завершения настройки дождитесь окончания 10 сигналов Не касайтес...

Page 109: ...приложении hOn и отправьте команду на варочную панель вы услышите два звуковых сигнала и точка дисплея таймера начнет мигать Затем нажмите кнопку Direct cook Прямое приготовление вы услышите один звуковой сигнал и точка дисплея таймера будет установлена Варочная панель будет работать в соответствии с настройками в приложении а в выбранных зонах будет отображаться A В приложении вы получите доступ ...

Page 110: ...вающий на повышение мощности конфорки 3 Функция повышения мощности будет работать 5 минут после чего отключится а конфорка вернется к уровню мощности 9 4 Для отмены функции повышения мощности до истечения 5 минут коснитесь кнопки выбора конфорки Индикатор кнопки замигает А затем коснитесь кнопки повышения мощности конфорка вернется к уровню мощности 9 Ограничения при использовании Четыре зоны были...

Page 111: ...пок работает только кнопка ON OFF ВКЛ ВЫКЛ остальные нет Блокировка кнопок Коснитесь кнопки блокировки Индикатор таймера отобразит Lo Разблокировка кнопок 1 Убедитесь в том что индукционная варочная панель включена 2 Коснитесь и держите кнопку разблокировки 3 Теперь можно пользоваться варочной панелью Если панель управления заблокирована все кнопки кроме кнопки включения будут отключены Можно в лю...

Page 112: ... Перед использованием варочной панели лицам использующим кардиостимуляторы необходимо проконсультироваться с врачом Таймер Таймер можно использовать двумя различными способами Можно использовать таймер для обратного отсчета В этом случае таймер не будет отключать конфорки по истечении заданного времени Можно использовать его как выключатель одной или нескольких конфорок по истечении заданного врем...

Page 113: ...ние кнопок или уменьшает или увеличивает время на 1 минуту соответственно Длительное касание кнопок или уменьшает или увеличивает время на таймере на 10 минут соответственно После 99 время на таймере автоматически вернется к 0 минут 4 После ввода времени сразу же начнется обратный отсчет На дисплее будет показано оставшееся время и индикатор таймера будет мигать 5 секунд ПРИМЕЧАНИЕ Красная точка в...

Page 114: ... ПРИМЕЧАНИЕ Мигающая красная точка возле индикатора уровня мощности указывает конфорку время работы которой показывает таймер Для проверки таймеров других конфорок коснитесь кнопки нужной конфорки Таймер покажет заданное время установлено на 6 минуты установлено на 3 минуты 2 По истечении времени готовки соответствующая конфорка отключится автоматически и на дисплее появится H ПРИМЕЧАНИЕ Для измен...

Page 115: ...т быть горячей 1 Отключите варочную панель выключателем на стене 2 Скребком под углом около 30 удалите загрязнения и переместите их на холодный участок панели 3 Удалите загрязнения кухонным или бумажным полотенцем 4 При ежедневной очистке варочной панели выполняйте пп 2 4 описанные выше Удаляйте остатки пищи и сахаросодержащих продуктов при первой возможности После застывания удалить их со стекла ...

Page 116: ...т треск или другие неприятные звуки Это может быть вызвано конструкцией утвари различное термическое расширение разных металлов Это нормально для кухонной утвари и не является проблемой При работе с большой мощностью индукционная варочная панель может издавать едва слышный писк Он обусловлен самой технологией индукционного нагрева Это нормально Устранить писк можно просто уменьшением мощности нагр...

Page 117: ...выявленной ошибки Код ошибки Возможная причина Способ устранения F3 F4 Неисправность датчика температуры индукционной катушки Свяжитесь с поставщиком F9 FA Неисправность датчика температуры IGBT сборки Свяжитесь с поставщиком E1 E2 Неправильное напряжение питания Проверьте напряжение питания Включите панель после восстановления электроснабжения E3 Перегрев индукционной катушки Свяжитесь с поставщи...

Page 118: ... по усовершенствованию продукции изготовитель оставляет право внесения изменений в документацию и конструкцию изделий без предварительного уведомления Установка Выбор оборудования для монтажа Вырежьте в столешнице отверстие по размеру указанному на рисунке Для установки и использования вокруг отверстия под панель должно быть минимум 5 см свободного места Толщина столешницы или плиты для установки ...

Page 119: ...ором в случае установки над ней варочной поверхности монтаж будет осуществляться с учетом всех требований к наличию зазоров и в соответствии с применимыми стандартами и правилами подходящий изолирующий выключатель обеспечивающий полное отключение от сети питания встроен в постоянную проводку смонтирован и установлен в соответствии с местными правилами и нормами электромонтажа Выключатель должен бы...

Page 120: ...поверхности установлен защитный барьер у пользователя остаётся лёгкий доступ к изолирующему выключателю Перед размещением крепежных кронштейнов Панель необходимо разместить на прочной ровной поверхности можно использовать упаковку Не следует применять силу к выступающим из корпуса панели кнопкам Регулировка положения креплений Прикрепите варочную панель к столешнице 4 креплениями как показано на р...

Page 121: ...ючением варочной панели к электрической сети необходимо проверить следующее 1 домашняя проводка соответствует потребляемой мощности варочной поверхности 2 электрическое напряжение соответствует значениям указанным в табличке технических данных 3 сечение кабеля электропитания соответствует нагрузке указанной в табличке технических данных При подключении варочной панели к электрической сети не допус...

Page 122: ...ющие вещества которые могут негативно влиять на окружающую среду так и базовые элементы которые можно использовать повторно Важно чтобы отходы электрического и электронного оборудования подвергались специальной обработке для правильного удаления и утилизации загрязняющих веществ и восстановления всех материалов Отдельные лица могут сыграть важную роль в обеспечении того чтобы отходы электрического...

Page 123: ...лижайших 5 мм Задняя левая Ø 18 0 см Задняя центральная Ø см Задняя правая Ø 18 0 см Центральная левая Ø см Центральная посередине Ø см Центральная правая Ø см Передняя левая Ø 18 0 см Передняя центральная Ø см Передняя правая Ø 18 0 см Для конфорок некруглой формы длина и ширина конфорки и или зоны нагрева с округлением до ближайших 5 мм Задняя левая Д Ш см Задняя центральная Д Ш см Задняя правая...

Page 124: ...рименимый стандарт EN 60350 2 Приборы электрические кухонные Часть 2 Варочные панели Методы для для измерения производительности Рекомендации по экономии энергии Для достижения максимальной эффективности нагрева утварь необходимо ставить строго по центру конфорки Использование крышки уменьшает время готовки и благодаря удерживанию тепла экономит энергию Для уменьшения времени приготовления использ...

Reviews: