background image


HDCP:

 PG-H1 had enabled HDCP function. Enable this 

function to accept the high video resolution. (You can 
enable this function by press 

MENU/Func/Setup

 to 

HDCP


item as switching to 

“0”

.) 


3.2 Power and Battery 

The device is suited to the


DC 12V 1.25A power adapter 

and 4 inside Re-chargeable batteries. The signals of 
PG-H1’s battery on the lower right are described as below: 
 

„


“ ”: 

The power of battery is charging.


„


“ ”: 

The power of battery is in full charging.


„


“ ”: 

The battery is fault.


)


1.


When the device stands by for about 39 minutes, it 

will sound two short 

“beep”. 

After the two short 

“beep” sounds about 1 minute, the device will sound a 
long 

“beep” 

and shout down automatically. 

        2. When the battery is lower as “ ”, a warming sound 

“beep” 

will be heard and the device will shout down 

immediately.


3.3 MENU Configurations 

)

  T

he figures in this chapter are for 

P01 FLAT 640x480 

@60

 mode reference


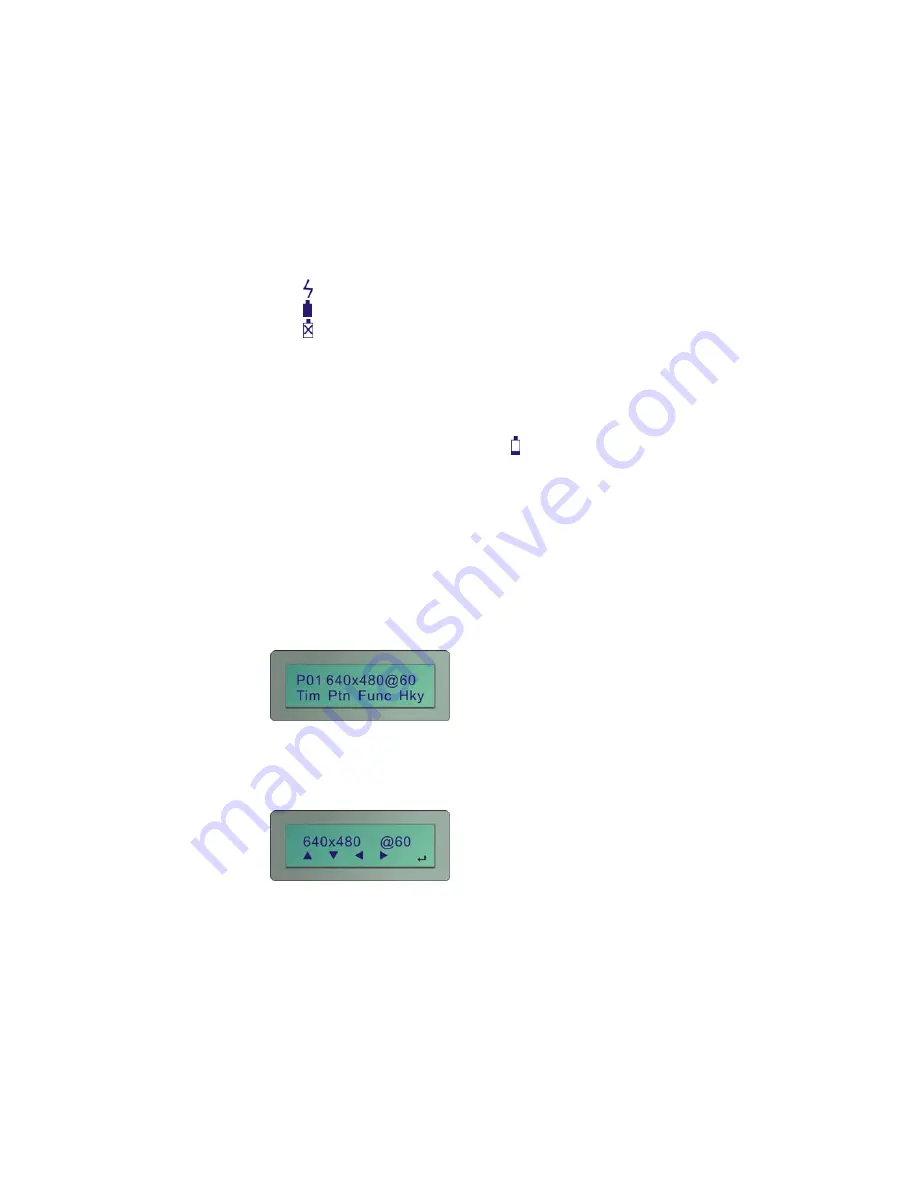
After you power on the PG-H1, please press the 

MENU


indicated key. The 

MENU

 configuration screen will be 

showed as below: 


3.3.1 Tim configuration   

Press the 

Tim

 indicated key, the Tim configuration screen 

will be showed as below: 


Summary of Contents for PG-H1

Page 1: ...y means without written permission from the product manufacturer Changes are periodically made to the information in this document They will be incorporated in subsequent editions The product manufacturer may make improvements and or changes in the product described in this document at any time All the registered trademarks referred to this manual are belonging to their respective companies ...

Page 2: ...inition 5 1 6 3 Power Jack 5 Chapter 2 Connection 6 2 1 Preparation 6 2 1 1 Plugs 6 2 1 2 Plug replacement 6 2 2 Connect PG H1 to Monitor 7 Chapter 3 Operation 8 3 1 Starting Status 8 3 2 Power and Battery 9 3 3 MENU Configurations 9 3 3 1 Tim configuration 9 3 3 2 Ptn configuration 10 3 3 3 Func configuration 11 3 3 4 Hky Hot key configuration 13 Chapter 4 Troubleshooting 15 Appendix A 16 Appendi...

Page 3: ...intain the device by yourself any faults please contact your vendor Provide proper ventilation and air circulation and do not use near water It is better to keep it in a dry environment Only using the power adapter and connection cables that are supported with the device After purchasing and before using the PG H1 first time please charge it continuously for more than 16 hours It is better to char...

Page 4: ...mings up to UXGA 1080P Cost down Single interface easy to use Portable design working time up to 6 8 hours by inside Re chargeable battery Auto Power off on battery mode Provide total 36 patterns Include Color bar Gray Grid Block By 16x2 Character LCD and key buttons easily control 1 4 Specifications Function PG H1 Output Connector HDMI Type A Select Switch 7 LCD Module 16 2 Character Display 1 Ma...

Page 5: ...the different operation configuration will show you different functions of the keys 4 Return Return to up configuration page 5 Power On Off Press at least more than 3 seconds to power on ff the PG H1 6 Power Jack Connect to the DC 12V 1 25A power adapter 1 HDMI Transmission Port 2 LCD Module 3 Function Keys 4 Return 5 Power On Off 6 Power Jack ...

Page 6: ...TMDS Clock 3 TMDS Data2 13 NC 4 TMDS Data1 14 NC 5 TMDS Data1 Shield 15 DDC SCL 6 TMDS Data1 16 DDC SDA 7 TMDS Data0 17 DDC Ground 8 TMDS Data0 Shield 18 5V Power 9 TMDS Data0 19 Hot Plug Detect 10 TMDS Clock 1 6 3 Power Jack Use for the DC 12V 1 25A power adapter The Power Jack is on the right side of the device PG H1 supports 4 replaceable plugs for USA UK Europe and Australia DC plugs Power Jac...

Page 7: ...lease depend on where the location is to exchange the suitable plug US Plug UK Plug AU Plug EU plug 2 1 2 Plug replacement PG H1 supports a power adapter DC 12V 1 25A with a plastic ring to protect the connector Before you to connect the adapter you have to dismantle the plastic ring firstly Refer to the pictures as below to dismantle the plastic ring Caution Please also to pull down the slider to...

Page 8: ...the power source outlet Connect the HDMI 1 2M cable from PG H1 to the monitor Power on the Monitor TV Press the power key of PG H1 for more than 3 seconds to power on off the PG H1 Caution Please power off the Monitor TV before begin the connection HDMI Cable or Twins pair Monitor TV ...

Page 9: ... show you the main screen as below or previous setting values saved in the PG H1 s memory P01 640x480 60 P01 Pattern 01 refer to Appendix B Pattern chart chapter 640x480 Resolution is 640X480 60 Refresh rate is 60Hz The power of battery is charging To the LCD screen lower left will show you the PG H1 operated mode DVI H8 H10 H12 DVI Process PG H1 under DVI mode H8 Process PG H1 under HDMI 8bit mod...

Page 10: ...ing The battery is fault 1 When the device stands by for about 39 minutes it will sound two short beep After the two short beep sounds about 1 minute the device will sound a long beep and shout down automatically 2 When the battery is lower as a warming sound beep will be heard and the device will shout down immediately 3 3 MENU Configurations The figures in this chapter are for P01 FLAT 640x480 6...

Page 11: ...e After press the indicated key the screen will be showed as below Under the H12 mode will not show the timing values as below 1280x1024 85 1400x1050 75 1600x1200 60 1920x1200 60RB 3 3 2 Ptn configuration Press the Ptn indicated key the Ptn configuration screen will be showed as below Switch the Pattern mode with up page refer to Appendix B Pattern chart Switch the Pattern mode with down page refe...

Page 12: ...BLK or WHT blinking frequency value Switch between BLK and WHT options Confirm the changed value 1 Both BLK WHT are the condensations for Black White 2 The bigger Value is set the lower blinking frequency is supported 3 When the value is 001 the indicated key is no any function 3 3 3 Func configuration Press the Func indicated key the Func configuration screen will be showed as below a Setup Press...

Page 13: ...f the PG H1 including Timing Info HTPLG Info HDCP Info Please use the and function keys to switch the Timing Info HTPLG Info HDCP Info Under the Timing Info screen please press the to enter the Timing Info configuration screen including Pixel Clock Horizontal Total Horizontal Active Horizontal Front Porch Horizontal Back Porch Horizontal Sync Width Horizontal Polarity Vertical Total Vertical Activ...

Page 14: ...function keys to switch to the HDCP Info option as below Under the HDCP Info screen please press the to enter the HDCP Info configuration screen as below For the HDCP Info will show you the HDCP status including Rx Attached Read EDID Transmit DVI HDMI Validate BKSV Exchanges KSVs Encryption Ri xxxx 3 3 4 Hky Hot key configuration Press the Hky indicated key the Hky page 1 configuration screen will...

Page 15: ... component output G Green component output B Blue component output Rev Pattern reverse Next page Press the to enter the Hky page 2 configuration screen as below 0 Represent for Enable X Represent for Disable AVM AV Mute OUT Video output On OFF Previous page ...

Page 16: ...ain studio equipment such as monitor cabling and recording equipment b For a TV engineer or technician wants to test and calibrate a DTV monitor during repair c A home theater user wants to get the best results out of the DTV equipment d A studio installer wants to test cables and equipment so that can get the best effect e For the DTV sets seller to show side by side comparisons of quality f For ...

Page 17: ...40x480 85 36 N N 7 720x400 85 35 5 N P 8 800x600 56 36 P P 9 800x600 60 40 P P 10 800x600 72 50 P P 11 800x600 75 49 5 P P 12 800x600 85 56 25 P P 13 848x480 60 33 75 P P 14 1024x768 60 65 N N 15 1024x768 70 75 N N 16 1024x768 75 78 75 P P 17 1024x768 85 94 5 P P 18 1152x864 75 108 P P 19 1280x768 60 RB 68 25 P N 20 1280x768 60 79 5 N P 21 1280x768 75 102 25 N P 22 1280x768 85 117 5 N P 23 1280x96...

Page 18: ...154 P N 34 1280x800 60 83 5 N P 35 1366x768 60 80 N N 36 1440x900 60 106 5 N P 37 1440x1050 60 125 25 N N 38 1680x1050 60 146 25 N P 39 1440x480i 59 27 N N 40 1440x576i 50 27 N N 41 720x480P 59 27 N N 42 720x576P 50 27 N N 43 1280x720P 50 74 25 P P 44 1280x720P 60 74 25 P P 45 1920x1080i 50 74 25 P P 46 1920x1080i 60 74 25 P P 47 1920x1080P 50 148 5 P P 48 1920x1080P 60 148 5 P P RB Reduced Blanki...

Page 19: ...x12 6 COLOR_GRID 7 COLORBAR_1 8 COLORBAR_2 9 COLORBAR_3 10 COLORBAR_4 11 GRAY_8 12 GRAY_16 13 GRAY_32 14 GRAY_64 15 DYNAGRAY 16 GRAY_1 17 COLORGRAY64 18 BWSWING 19 BW2SWING 20 WINDOW_1 21 WINDOW_2 22 WINDOW_3 23 WINDOW_4 24 VLINE_1 25 VLINE_2 26 VLINE_3 27 H Pattern_1 28 H Pattern_2 ...

Page 20: ...19 29 BLOCK_1 30 BLOCK_4x3 31 BLOCK_16x12 32 HLINE_1 33 HLINE_2 34 HLINE_3 ...

Reviews: