background image

XB, HV, HVA, HVAR, ADD, ADDR, DDS, DDP, SXB, SADD  

M0112_NOV 2020

Page 5 of 8

www.CANARM.COM

Canarm Ltd. - Corporate Head Office    

2157 Parkedale Avenue, PO Box 367    Brockville, Ontario   Canada   K6V 5V6 

Tel: (613) 342-5424              Fax: (613) 342-8437               

[email protected]                      

www

.canarm.com 

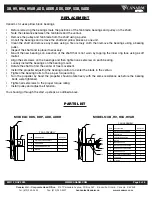
Canarm Ltd. uses pillow block bearings. 
 
•     Before removing the bearings mark the positions of the fan blade, bearings and pulley on the shaft. 
•     Note the clearance between the fan blade and the venturi. 
•     Remove the pulley and fan blade from the shaft using a puller. 
•     Unbolt the bearings and remove the shaft and pillow blocks as one unit. 
•     Clean the shaft and remove any marks using a file or emery cloth then remove the bearings using a bearing 

      puller. 

•     Inspect the shaft and replace if necessary. 
•     Mount the new bearings on a section of the shaft that is not worn by tapping the inner ring face using a soft 

      mallet. 

•     Align the setscrews on the bearings and then tighten one setscrew on each bearing. 
•     Loosely install the bearings on the bearing mount. 
•     Rotate the shaft to find the center of free movement. 
•     Install the propeller adjusting the bearing location to center the blade in the venturi. 
•     Tighten the bearing bolts to the proper torque rating  
•     Turn the propeller by hand the propeller should rotate freely with the same resistance as before the bearing 

       bolts were tightened. 

•     Tighten all setscrews to the proper torque rating 
•     Install pulley and adjust belt tension. 
 
You should go through the start up steps as outlined above. 

REPLACEMENT

PARTS LIST

MODELS: DDS, DDP, ADD, ADDR                                                        

MODELS: XB, HV, HVA, HVAR  

4

3

2

1

MOTOR

1

WELDED FAN ASSEMBLY

PROPELLER BUSHING

FAN ASSEMBLY

PROPELLER

DESCRIPTION

QUANTITY

1

1

1

1

3

2

ITEM

4

DRIVEN SHEAVE BUSHING

MOTOR SHEAVE BUSHING

FAN ASSEMBLY

PILLOW BLOCK BEARINGS

3

DRIVEN SHEAVE

“V” BELTS

FAN SHAFT

PROPELLER

PROPELLER BUSHING

9

11

10

6

8

7

5

4

DESCRIPTION

MOTOR SHEAVE

ITEM

2

1

1

2

2

1

1

1

1

1

1

QUANTITY

1

1

WELDED FAN ASSEMBLY

MOTOR

4

11

9

10

6

8

7

5

2

3

1

Summary of Contents for XB

Page 1: ...ted to a wall require a different wall opening than fans mounted in cabinets or sleeves For specific dimensions refer to the submittal drawing for the specific fan configuration 2 Mount the fan in the...

Page 2: ...vent it from entering the shaft and propeller area 5 Disconnect switches are recommended and should be located near the fan in order to swiftly cut off power in case of an emergency and maintain compl...

Page 3: ...the same time check the sheaves for chips dents or rough surfaces that could damage the belt The correct belt tension is important Too tight a belt will result in excess bearing pressure which can ca...

Page 4: ...pulley Loosen the setscrews on the pulleys and remove from either the motor or fan shaft using a two or three jaw puller Remove any shaft imperfection such as setscrew mark using a file or emery cloth...

Page 5: ...the setscrews on the bearings and then tighten one setscrew on each bearing Loosely install the bearings on the bearing mount Rotate the shaft to find the center of free movement Install the propeller...

Page 6: ...es Improper fan installation Static pressure higher than design MOTOR OVERLOADING Impeller rotating in the wrong direction Improper fan speed Defective motor Fan speed higher than design Filters missi...

Page 7: ...xcess of 50 pounds should also be supported using hanging rods or by supports placed underneath the fan Wall supply fan with cabinet back guard motorized shutter and weather hood The drawing below ill...

Page 8: ...defects in materials and workmanship to the extent that within a period of one year from the date of purchase CANARM Ltd shall either repair or replace at CANARM s option and unit or part thereof retu...

Page 9: ...re diff rente de ceux install s dans un armoire ou manchon Pour les dimensions sp cifiques reportez vous au dessin de soumission pour la configuration sp cifique du ventilateur 2 Montez le ventilateur...

Page 10: ...r dans la zone de l arbre et de l h lic 5 Des sectionneurs sont recommand s et doivent tre localis s pr s du ventilateur afin de couper rapidement l alimentation en cas d urgence et maintenir un contr...

Page 11: ...a courroie est importante Une courroie trop serr e peut causer une pression excessive sur les roulements ce qui peut causer une d faillance pr matur e des roulements et entra ner une surcharge du mote...

Page 12: ...utilisant un extracteur d engrenage deux ou trois m choires Retirez tout imperfection l arbre tel que marque de vis en utilisant une lime ou d une toile meri Installez les poulies de rechange en serra...

Page 13: ...e sur les roulements puis serrez une vis de r glage sur chaque roulement Installez les roulements sans serrer sur le support de roulement Faites tourner l arbre pour trouver le centre du mouvement lib...

Page 14: ...concue SURCHARGE DU MOTEUR Rotation de la turbine dans la mauvaise direction Vitesse incorrecte du ventilateur Moteur d fectueux Vitesse du ventilateur plus lev e qu il est con u Filtres manquants TRO...

Page 15: ...ection arri re volet motoris et hotte tanche Le dessin ci dessous illustre l installation typique d un ventilateur d alimentation avec un cabinet une protection arri re un volet motoris avec interrupt...

Page 16: ...essus s appliquent GARANTIE CANARM Ltd garantit que chaque nouveau ventilateur est exempt de d fauts de mat riaux et de fabrication dans la mesure o dans un d lai d un an compter de la date d achat CA...

Reviews: