


pg. 4
INSTALLATION
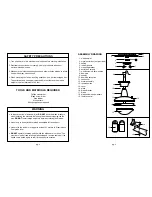
1. Remove and discard the motor support plate (inclusing the screws)
before installing the blade holders (Fig. A)
2. Blades will be attached by using the two holes at the top of the motor.
3. Insert the blade bracket through end of the motor.
Align holes with correct holes in motor, using the two holes.
4. Insert screws through the hole in the bottom of the motor and tighten.
5. Attached blade brackets by inserting screws through holes provided
and tightening.
1. ATTACH THE FAN BLADES
Fig. A
Fig. B
fan
screws & washers
blade bracket
blade
motor support plate
• obtain fan motor
• remove cotter pin and bolt from yoke
• loosen jam screw in yoke until it is flush with the inside surface
• obtain dowrod and canopy (and yoke cover - optional)
• place downrod inside canopy (and yoke cover - optional)
• route wires and safety cable exiting motor through canopy and downrod
• insert bolt through hole in shaft and downrod
*be careful not to damage or cut the fan wires
• secure bolt with cotter pin
• secure downrod in position by tightening jam screws and lock nut
• place glass motor housing onto motor top
• slide yoke cover (optional) over yoke
2. MOUNTING
*NOTE: all set screws must be checked and re-tightened where
necessary after installation.
INSTALLATION
DOWNROD MOUNT
jam screw
lock nut
motor
yoke cover
(optional)
jam screw
yoke
cotter pin
bolt
yoke
jam
screw
pg. 5


