


O K A N A G A N / S A S K A T O O N S P A S
Filling up your Spa
IMPORTANT:
Before filling the spa, it is important to read and
understand the water chemistry section of this manual. Do not
proceed until the water chemistry section is understood and the
source water is tested.
Verify that the spa is in the desired final location. Refer to the
‘Choose a location’ section - once filled, the spa cannot be
moved without draining.
Follow these filling instructions to avoid damage to the spa
pumps:
1. Leave power to the spa off until spa is completely filled.
2. Never leave an unfilled spa exposed to direct sunlight with
out the Spa Cover installed. Resulting damage such as
bubbles and wrinkles in the spa shell and fading of the jet
faces is not covered by the manufacturer’s warranty.
3. Never operate spa pump without water because this could
result in permanent pump and/or heater damage which is
not covered by the manufacturer’s warranty.
4. Remove all warning labels from spa shell.
6. Remove the filter lid, basket and filter cartridge.
7. Inspect all Jets (shipping may cause jets to become loose
or detached). Check to see that the black Drain Valve
(located to the left or right of the front access panel) is closed
IMPORTANT:
Follow the next steps closely to prevent damage
to the Spa Pump.
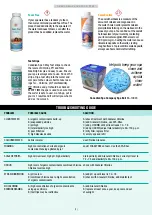
Filter Type:
Glacier Microban Filter SKU: KA-10082
8. Insert garden hose or other clean water source directly into
filter housing. Push hose pipe into filter housing until it
stops. Fill up to middle of the skimmer. Secure hose
placement and turn on water. Filling the spa through the
filter housing prevents an air lock from occurring in the spa
pumps, which is an air pocket preventing the flow of
water through the pump. Permanent damage caused by
running the pump with an air lock (or without water) is not
covered by the manufacturer’s warranty.
9. Check for leaks! Although spas are fully checked at the
factory, shipping and delivery might cause a leak.
10. Before power is applied familiarise yourself with the spa
control operations.
11. Turn water off and remove hose.
12. Reinstall filter cartridge, basket and filter lid.
13. Add start-up Chemicals after power is turned on.
Draining your Spa/Using the drain valve
1. Start by shutting off the electrical breaker connected to
your spa
2. Locate the drain valve at the side of the spa. This valve has
a straightforward locking mechanism that stops the water
from flowing out while you attach a garden hose to the cap.
First using the tab of the cap pull and twist till pipe comes
out
Now with the pipe out turn clockwise till the pipe further
extends out
3. With the valve fully extended, unscrew the cap from the
middle of the valve.
4. Screw in the male end of the garden hose to the valve and
run the hose to your drain location.
5. Once the water has stopped flowing out of the drain valve,
use the wet/dry vacuum to suck out any remaining water
from each jet head
6. Twist valve and push in to CLOSE.
Accessing your spa controls
(5)


