Printed in KOREA
Instruction Guide
Ultra High Resolution
Color Camera
Ultra High Resolution Color Camera
Page 1: ...ources other than those specified Do NOT expose this appliance to rain or moisture This installation should be made by a qualified service person and should conform to all local codes The lightning flash with an arrowhead symbol within an equilateral triangle is intended to alert the user to the presence of uninsulated dangerous voltage within the product s enclosure that may be of sufficient magn...
Page 2: ...ㆍ SPECIAL 30 ㆍ EXIT 36 31 32 32 33 34 34 35 36 36 Troubleshooting 37 Specifications 39 2 Ultra High Resolution Color Camera 3 Ultra High Resolution Color Camera Contents Features Precautions Overview Installation Procedures Front View Side View Bottom View Rear View 04 06 09 13 09 10 11 12 Lens ㆍUsing the auto iris ㆍUsing a C CS mount lens Connecting to a monitor Connecting to power Control via RS...
Page 3: ...o carry out the inspection Stop using your camera when you find it malfunctioning If the camera emits smoke or is unusually hot for a long period a fire may be caused Do not Install the camera on a surface that can not support it If the camera is installed on an inappropriate surface it may fall and cause injury Do not hold plug with wet hands It could cause an electric shock Do not dis assemble t...
Page 4: ...era Be careful not to leave fingerprints on the lens cover Do not install or use the camera in an environment where the humidity is high ㆍIf the camera is exposed to spotlight or an object reflecting strong light smear or blooming may occur ㆍPlease check the power supply satisfies the normal specification before connecting the camera It can cause malfunctions to occur If it gets wet wipe it dry im...
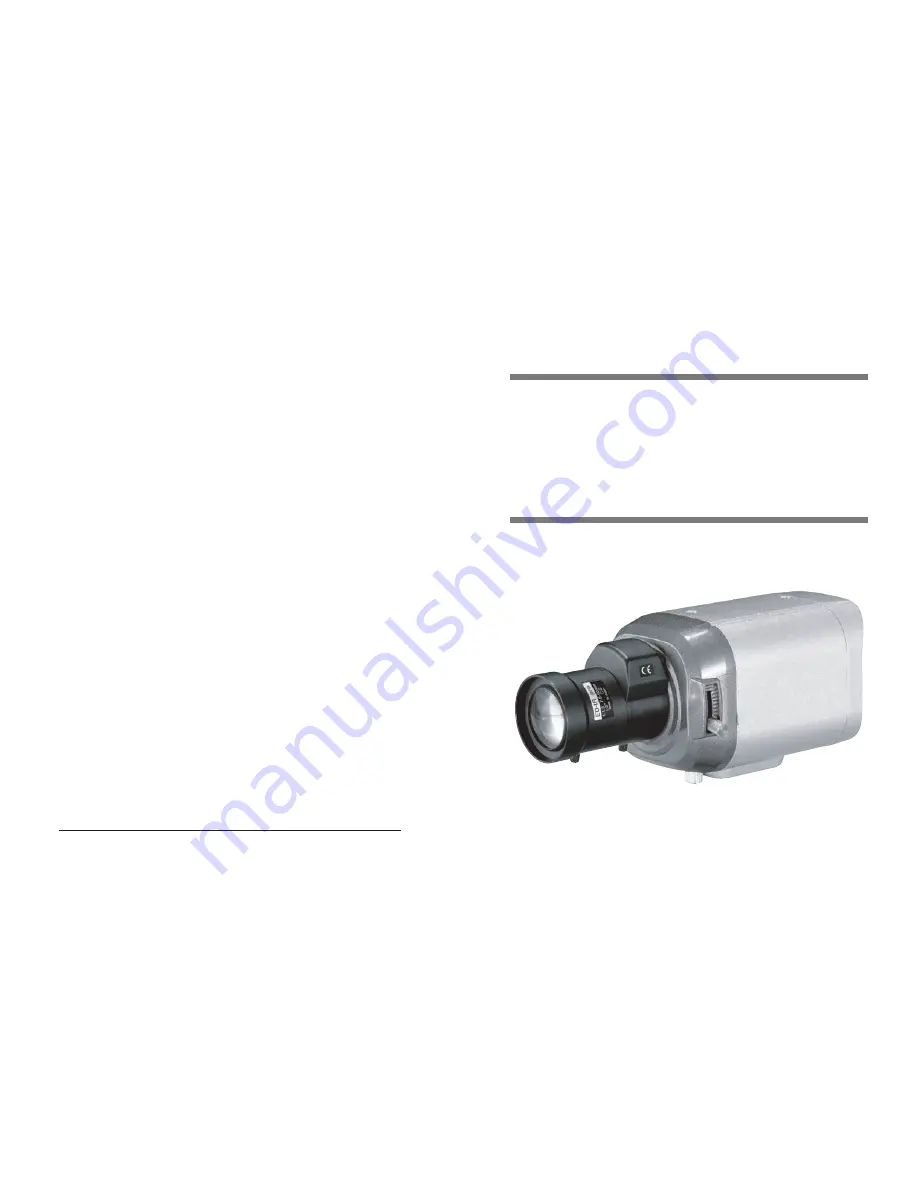
Page 5: ...ounting Bracket to the top of the camera C Mount Lens Adapter Install this adapter to use a C Mount Lens Back Focus Control Lever Adjust Back Focus using this control lever Components and Accessories Overview 2 Auto Iris Lens Connector Plug 3 C Mount Adapter 4 Instruction Manual Front View 1 Ultra High Resolution Day Night CCD Camera ...
Page 6: ...nector Used to connect Auto Iris Lens plug The Tripod Mounting Bracket can be unscrewed and installed on the top or bottom of the camera Make sure to use the Tripod Mounting Bracket when fixing the camera to a bracket or tripod otherwise the camera may be unstable and the internal circuitry of the camera may get damaged Side View Bottom View 1 4 20 UNC 20 THREAD L 4 5mm 0 2mm ISO standard or 0 197...
Page 7: ...prox 8mm approx 2mm Auto iris lens selection switch Used to change between DC or Video depending upon the type of auto iris in use Rear View OSD Setup Buttons ㆍSET Button Displays the menu on the screen Press this button to confirm status or after changing a selected item ㆍUp and Down Button Used to move the cursor up or down in the menu screen to select a desired menu item ㆍLeft and Right Button ...
Page 8: ...Mount or CS Mount This camera is set for a CS Mount Lens by default To install a C Mount Lens a simple modification is required When Using a CS Mount Lens Remove the protective cover from the front of this product and turn the CS Mount Lens clockwise to install it Focus the camera using the CS Mount Lens and Back Focus controls Use a lens threaded as shown in the following figure If the dimensions...
Page 9: ...era to the Monitor DVR Since the connection procedure may differ depending on the type of monitor or peripheral device to be connected refer to the User Manual for the device to be connected Make sure to turn off the device to be connected before making any connections Turn the 75Ω Hi Z switches of interim display devices to the Hi Z position and the switches of any final device to the 75Ω positio...
Page 10: ...make sure to check your model name and specifications before connecting power You can connect power as shown in the following figure Check the standard power requirement before connecting to power Connecting to Power For AC DC power When the resistance value of copper wire is at 20 C 68 F As shown in the table above voltage decreases as the wire gets longer Therefore use of an excessively long ada...
Page 11: ...ettings can now be made The SETUP menu is displayed on the monitor 2 Select a menu item from the list available by using the UP and DOWN buttons ㆍFuntions are selected using up and down buttons ㆍThe selected position is displayed in blue MAIN MENU 1 LENS 2 EXPOSURE 3 WHITE BAL 4 SSDR 5 BACKLIGHT 6 DNR3 7 DAY NIGHT 8 SPECIAL 9 EXIT DC SAVE ATW OFF OFF ON COLOR 20 Ultra High Resolution Color Camera ...
Page 12: ...Adjust the Lens VR adjust the BRIGHTNESS and then check if the screenbrightnesschangesproperly Otherwise adjusttheLensVRagain 1 When the SETUP menu screen is displayed select LENS by using the Up and Down buttons so that the arrow indicates LENS Level VIDEO Adjusts the level of video iris signals the higher the level is the brighter the video looks FOCUS ADJ DC VIDEO To adjust the DC and VIDEO len...
Page 13: ... from 5 3dB to 37dB SENS UP When it is night or dark the camera automatically detects thelightlevelandmaintainsaclearpictureifthismodeisactivated OFF Deactivates the SENS UP function AUTO Activates the SENS UP function Note If you press the SET button in AUTO mode You can adjust brightness by increasing or decreasing the shutter speed X2 X512 Note that the higher the zoom level the brighter the sc...
Page 14: ...images with high contrast between bright and dark spots 1 When the SETUP menu screen is displayed select SSDR by using the Up and Down buttons so that the arrow indicates SSDR 2 Use the Left Right buttons to change the SSDR level in the sub menu according to the contrast between bright and dark spots MAIN MENU 1 LENS 2 EXPOSURE 3 WHITE BAL 4 SSDR 5 BACKLIGHT DC ATW OFF OFF BLC Enables a user to di...
Page 15: ...nse plate observation it needs minimum illumination and fast shutter speed more than 1 200sec Because there can be a difference in the effectiveness of HLC according to the amount of light area in the screen optimize the installation angle for the best HLC performance When dark the HLC is only activated when a bright light exceeding a specific size in NIGHT ONLY mode The HLC is not activated in da...
Page 16: ...e using the Up and Down buttons COLOR The picture is always displayed in color B W The picture is always displayed in black and white You can turn on or off the burst signal on B W mode AUTO The mode is switched to Color in a normal environment but switches to B W mode when ambient illumination is low To set up the switching time for AUTO mode press the SET button You can turn on or off the burst ...
Page 17: ...etheoutputphase ofmultiplecamerasusingthepower synchronizationfunction Line Lock without using a synchronization signal generator INT Internal Synchronization Type L L Power Synchronization Type Line lock Press the Function Setup switch You can select a desired phase from 0 to 359 when select phase Note As the DIS function uses the digital zoom the camera s resolution will decrease DIS doesn t ope...
Page 18: ...motion detection sensitivity is increased to recognize even small movement AREA MODE Determines whether to use the MD area selected in SENSITIVITY SEL POS Determines which of the 4 vertices of each MD area is to be used YPOS Determines the coordinate of the vertical axis for SEL POS XPOS Determines the coordinate of the horizontal axis for SEL POS FILL SET Fills in a selected MD area Fills in a se...
Page 19: ...es do not enable you to solve the problem contact an authorized technician Problem Nothing appears on the screen The image on the screen is dim Check the power connections Check the VIDEO signal line connection Make sure the lens is clean Clean the lens with a soft clean lint free cloth Adjust the monitor contrast brightness controls Re position the camera if necessary The image on the screen is d...
Page 20: ... V 768 H x 494 V 752 H x 582 V 2 1 Interlace INT Horizontal 15 734KHz Vertical 59 94Hz Horizontal 15 625KHz Vertical 50 00Hz 600 TV lines 52dB AGC Off Weight ON NTSC PAL PowerConsumption H Resolution S N Min Illumination White Balance Shutter Speed Sens up Gain Control DNR Motion Detection Privacy Function V REV H REV Freeze Sharpness Day Night DIS Digital Zoom BlemishCompensation Lens Mount BackF...
Page 21: ...NR Motion Detection Privacy Function V REV H REV Freeze Sharpness Day Night DIS Digital Zoom BlemishCompensation Lens Mount BackFocusAdjustment 0 15Lux 40IRE ATW AWC MANUAL 1700 K 11 000 K 1 60 1 50 1 120 000 sec AUTO OFF Selectable x2 x512 LOW HIGH OFF ON OFF 1 32 Level ON OFF 8 Zone ALARM Output ON OFF 12 Zones ON OFF ON OFF ON OFF ON OFF Level Adjustable COLOR Black White AUTO EXT ON OFF ON OFF...
Page 22: ...Printed in KOREA Instruction Guide Ultra High Resolution Color Camera Ultra High Resolution Color Camera ...