background image

9

SM2755

INSTALLING THE WASHING  MACHINE

 CONNECTING THE WATER SUPPLY

The mains water pressure must be between 0.05 and 1.00 Mpa 
(0.5 - 10 bar.)


Before connecting the washing machine, open the valve and allow a certain 

quantity of water to fl ow out in order to clean the pipes of any sand or rust. 


This operation is particularly important in the case where the washing machine 

has been left standing for a long time or when connecting to a new water supply 
system. 


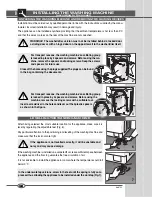
The fi ll hose must be connected to the mains supply using a ¾” threaded con-

nection.

N.B. On electronic washing machines fi tted with a dual solenoid 
valve (hot and cold water), connect the red hose to the hot water 
supply valve and the other hose to the cold water supply valve.  

If a hot water supply is not available, both hoses must be connected to the 
cold supply using the fi tting supplied (see fi g. 9)

  Connect the fi ll hose (fi g. 10).

N.B. Washing machines and condensation type washer/driers 
must be connected to the mains water supply using the new hoses 
provided with the appliance. The old hoses must not be re-used.


During the wash, the water supply valve must be fully open.


The drain hose must be positioned at a height of between 60 cm and 90 cm 

(fi g. 11).


If the water is drained directly into the drainage system, the free end of the 

drain hose must be inserted in a pipe of internal diameter not les than 40 mm.


The drain hose connection to the drainage system must not be hermetically 

sealed, as this would cause a build up of air in the siphon and allow water to 
leak out.


If the wash water is drained into a washbasin, sink or other similar system, the 

free end of the hose must be reinforced at the bend using the bracket supplied 
with the washing machine. Place the hose over the edge of the washbasin and 
anchor the bracket in such as manner that prevents the hose from falling (fi g. 
12). The washbasin outlet must be clean and must allow the water to fl ow freely.

GB

9

11

12

10

8

Summary of Contents for WM747W

Page 1: ...WM747W INSTRUCTION MANUAL WWW CAMPOMATIC COM Made in Italy ...

Page 2: ...N OF THE APPLIANCE 7 INSTALLING THE WASHING MACHINE 8 10 Unpacking the washing machine and removing the locking devices 8 Levelling the washing machine 9 Connecting to the mains water supply 9 Connecting to the mains electricity supply 10 USING THE WASHING MACHINE 10 12 Recommendations prior to use 10 Use of detergents 11 How to remove some stains 12 International clothing care symbols 12 WASHING ...

Page 3: ...h as coins pins nails screws or stones can cause serious damage to the appliance Never wash items that have been soiled with substances containing petrol In the case where stains have been removed using va porising products wait until these substances have fully evaporated from the surface of the material before loading into the washing machine The use and quantities of detergent softener and blea...

Page 4: ...or makes loading and unloading the washing much easier The very high stability of the appliance is the result of constant research by our technicians into the equilibrium of masses in movement A G D Never insert or remove the plug from the mains socket with wet hands When servicing or cleaning the washing machine remember to disconnect it from the mains electricity supply Do not pull the power sup...

Page 5: ...ing the ma chine remove the spacers and locking screws Keep the screws and spacers for future use Close off the holes using the plugs supplied The plugs can be found in the bag containing the documents For transport reasons the washing machine s oscillating group is locked in place by 4 spacers and screws Before using the machine remove the locking screws with a suitable tool Insert a screwdriver ...

Page 6: ...e fill hose fig 10 N B Washing machines and condensation type washer driers must be connected to the mains water supply using the new hoses provided with the appliance The old hoses must not be re used During the wash the water supply valve must be fully open The drain hose must be positioned at a height of between 60 cm and 90 cm fig 11 If the water is drained directly into the drainage system th...

Page 7: ...a rating such that enables them to support the maximum load indicated on the identification plate Once the appliance has been installed it must be connected to the mains supply through a single pole switch The mains supply to which the appliance is connected must be fitted with an earthing system If this is not the case the manufacturer will not be held liable for any incidents that may occur fig ...

Page 8: ...N B When adding detergent to the dispenser remember to avoid any spillage into the softener compartment in that this would create a soapy rinse and stain the fabrics white Vice versa if softener is added to the detergent compartment the quality of the wash will be compromised N B When using a liquid detergent recommended for pro grammes without pre wash proceed as follows remove the baffle from it...

Page 9: ...ten on the packet CHEWING GUM rub ice over the fabric scrape away as much chewing gum as possible and then rub with a piece of cotton soaked in acetone INTERNATIONAL CLOTHING CARE SYMBOLS Before placing the clothes in the washing machine and selecting the wash programme examine the symbols on the manufacturer s label The table reported below will provide a useful guide to reading the symbols PAINT...

Page 10: ...has become trapped between the door and the gasket 4 Place the correct amount of detergent in the appropriate dispenser 2 When using a liquid detergent insert the partition supplied If the Prewash function is required add detergent to compartment 1 Add softener to the compartment marked with the symbol After adding the detergent gently close the detergent drawer 5 Choose and set the desired washin...

Page 11: ...ted GB WASHING INSTRUCTIONS ON OFF KNOB OR BUTTON PROGRAMME TABLE 24 23 NO DRAIN BUTTON EXTRA RINSE BUTTON NO SPIN BUTTON TEMPERATURE LIMIT BUTTON 26 27 25 The washing machine has been designed to reduce water consumption to a minimum Three rinse cycles are normally sufficient For very soft water zones or for those who are allergic to detergent residues press this button and the machine will carry...

Page 12: ...TION PROGRAMS Any posi tion Cotton linen hemp and resistent mixes Fast rinse Whitener schented softener Fast spin Empty and final spin Rinses softener empty and final spin Rinses softener empty and final spin Any posi tion Any posi tion GENTLE ACTION PROGRAMS FOR SYNTHETICS AND MIXES Any posi tion Any posi tion Recom men ded Cotton linen hemp and resistent mixes Cotton linen hemp and resistent mix...

Page 13: ...igned to reduce maintenance to a minimum Nevertheless it is important that it is cleaned regularly Before cleaning make sure that the appliance has been disconnected from the power supply and that the water supply valve has been closed The external structure and the parts of the washing machine in plastic must be cleaned with a soft damp cloth only WARNING Never use chemicals abrasive products alc...

Page 14: ... 1 The drain hose has been installed at the cor rect height 60 90 cm 2 The end of the drain hose is not under water The washing machine does not drain or spin Check that 1 The drain hose is properly connected 2 The drain hose is not kinked 3 The drain filter is not blocked 4 The no spin function has not been selected 5 TheStopwithwaterfunctionhasnotbeenselected The washing machine vibrates and is ...

Reviews: