background image

42

DMX

IT

ALIANO

POLSKI

ESP
AÑOL

FRANCAIS

DEUTSCH

ENGLISH

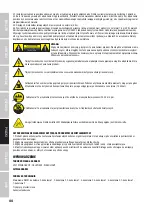
DECLARACIÓN DEL FABRICANTE

GARANTÍA DEL FABRICANTE Y LIMITACIÓN DE RESPONSABILIDAD 

Consulte nuestras condiciones de garantía y limitaciones de responsabilidad en: https://cdn-shop.adamhall.com/media/pdf/MANUFACTU-

RERS-DECLARATIONS_CAMEO.pdf. En caso de necesitar servicio técnico, póngase en contacto con Adam Hall GmbH, Adam-Hall-Str. 1, 

61267 Neu Anspach (Alemania); correo electrónico [email protected]; +49 (0)6081 / 9419-0. 

ELIMINACIÓN CORRECTA DE ESTE PRODUCTO


(Aplicable en la Unión Europea y en los países europeos que dispongan de un sistema de recogida selectiva) El símbolo que aparece 

sobre el producto o en la documentación adjunta indica que al final de la vida útil del equipo, no deberá desecharlo con los demás 

residuos domésticos, con el fin de evitar posibles efectos negativos en el medio ambiente y en la salud humana debidos al vertido 

incontrolado de desechos. La recogida selectiva ayuda a su posterior reciclaje y fomenta la reutilización sostenible de los componentes de 

este equipo. Si es un particular, póngase en contacto con el distribuidor donde adquirió este producto, o con el ayuntamiento, para 

informarse sobre el reciclaje adecuado de este equipo. Si es una empresa, póngase en contacto con su proveedor para informarse sobre los 

términos y condiciones de su contrato de compra-venta. Este producto no debe mezclarse con otros residuos industriales.

Conformidad CE

Adam Hall GmbH declara por la presente que este producto es conforme con las siguientes directivas (según sea aplicable):

R&TTE (1999/5/CE) o RED (2014/53/UE) a partir de junio de 2017

Directiva de baja tensión (2014/35/UE)

Directiva EMC (2014/30/UE)

RoHS (2011/65/UE)

Puede consultar la declaración de conformidad completa en www.adamhall.com. 

También puede solicitarla a [email protected].

Summary of Contents for THUNDERWASH 600 RGBW

Page 1: ...USER S MANUAL BEDIENUNGSANLEITUNG MANUEL D UTILISATION MANUAL DE USUARIO INSTRUKCJA OBSŁUGI MANUALE D USO THUNDERWASH 600 RGBW 3 IN 1 STROBE BLINDER AND WASH LIGHT CLTW600RGBW RGBW ...

Page 2: ...TALLATION ET MONTAGE 29 TECHNOLOGIE DMX 30 CARACTÉRISTIQUES TECHNIQUES 31 DÉCLARATIONS DU FABRICANT 32 PILOTAGE EN MODE DMX 63 66 ESPAÑOL MEDIDAS DE SEGURIDAD 33 34 INTRODUCCIÓN 34 CONEXIONES ELEMENTOS DE MANEJO Y ELEMENTOS DE VISUALIZACIÓN 35 FUNCIONAMIENTO 36 38 INSTALACIÓN Y MONTAJE 39 TECNOLOGÍA DMX 40 DATOS TÉCNICOS 41 DECLARACIONES DEL FABRICANTE 42 CONTROL DMX 63 66 POLSKI ŚRODKI OSTROŻNOŚC...

Page 3: ...tive ground of a power cord 23 If the equipment has been exposed to strong fluctuations in temperature for example after transport do not switch it on immediately Moisture and condensation could damage the equipment Do not switch on the equipment until it has reached room temperature 24 Before connecting the equipment to the power outlet first verify that the mains voltage and frequency match the ...

Page 4: ...Intense LED light source Risk of eye damage Do not look into the light source CAUTION IMPORTANT INFORMATION ABOUT LIGHTING PRODUCTS 1 The product has been developed for professional use in the field of event technology and is not suitable as household lighting 2 Do not stare even temporarily directly into the light beam 3 Do not look at the beam directly with optical instruments such as magnifiers...

Page 5: ...ontrol signal 6 LC DISPLAY The illuminated LCD display shows the currently activated mode main display the menu items in the selection menu and the numerical value or operating mode in certain menu items If there is no input for approx 30 seconds the display automatically returns to the main display If there is no control signal at the DMX input the DMX address will flash in the display in DMX mod...

Page 6: ...is clearly visible in the middle of the display and the DMX mode is displayed on the bottom line System Settings DMX Address 001 DMX Mode 7CH_2 Stand Alone Slave Mode Off On Advanced Settings System Info 001 512 DMX MODE SETTING Press MODE to access the selection menu System Settings Using the UP and DOWN buttons select the menu item DMX Mode dark background and confirm with ENTER A selection box ...

Page 7: ...e 000 010 no function 011 255 approx 1 30 Hz 000 255 Red 000 255 Green 000 255 Blue 000 255 White 000 255 Fade alpha blending Speed 000 100 Brightness 000 100 Jump colour change Speed 000 100 Brightness 000 100 Auto combination of colour blending colour change strobe Speed 000 100 Brightness 000 100 SLAVE MODE Press MODE to access the selection menu System Settings Using the UP and DOWN buttons se...

Page 8: ...ed Green 000 255 calibrate green Blue 000 255 calibrate blue White 000 255 calibrate white Factory Reset Reset to factory settings No Do not perform reset Yes Perform reset System Settings DMX Address 001 DMX Mode 7CH_2 Stand Alone Slave Mode Off On Advanced Settings System Info Advanced Settings Display Invert No Yes Display 30s On Display Contrast 0 50 100 DMX Fail Black Hold LED Calibration Fac...

Page 9: ...le traverse clamp not supplied Secure the device to the fixed securing lug on the device with a suitable safety rope A Important safety notice Overhead mounting requires extensive experience including the calculation of the load limit values of the installation material and regular safety inspection of all installation materials and spotlights If you do not have these qualifications do not attempt...

Page 10: ...t DMX device e g DMX Controller 2 Connect the female 3 pin XLR connector of the DMX cable connected to the first projector to the DMX input male 3 pin socket of the next DMX device In the same way connect the DMX output of this device to the DMX input of the next device and repeat until all devices have been connected Please note that as a rule DMX devices are connected in series and connections c...

Page 11: ...hout bracket 338 x 197 x 87 mm Weight 3 1 kg Additional features Power cable and mounting bracket included MANUFACTURER S DECLARATIONS MANUFACTURER S WARRANTY LIMITATIONS OF LIABILITY You can find our current warranty conditions and limitations of liability at https cdn shop adamhall com media pdf MANUFACTU RERS DECLARATIONS_CAMEO pdf To request warranty service for a product please contact Adam H...

Page 12: ...ept any interference received including interference that may cause undesired operation CE Compliance Adam Hall GmbH states that this product meets the following guidelines where applicable R TTE 1999 5 EC or RED 2014 53 EU from June 2017 Low voltage directive 2014 35 EU EMV directive 2014 30 EU RoHS 2011 65 EU The complete declaration of conformity can be found at www adamhall com Furthermore you...

Page 13: ...ten Sie alle in Ihrem Land geltenden Entsorgungsgesetze Trennen Sie bei der Entsorgung der Verpackung bitte Kunststoff und Papier bzw Kartonagen voneinander 21 Kunststoffbeutel müssen außer Reichweite von Kindern aufbewahrt werden BEI GERÄTEN MIT NETZANSCHLUSS 22 ACHTUNG Wenn das Netzkabel des Geräts mit einem Schutzkontakt ausgestattet ist muss es an einer Steckdose mit Schutzleiter angeschlossen...

Page 14: ...können bestimmte Teile des Gehäuses heiß werden Berühren oder transportieren Sie das Gerät nach einem Einsatz erst nach einer Abkühlzeit von mindestens 10 Minuten Warnung Dieses Gerät ist für eine Nutzung bis zu einer Höhe von maximal 2000 Metern über dem Meeresspiegel bestimmt Warnung Dieses Gerät ist nicht für den Einsatz in tropischen Klimazonen bestimmt Vorsicht Intensive LED Lichtquelle Gefah...

Page 15: ...eleuchtete LC Display zeigt die aktuell aktivierte Betriebsart an Hauptanzeige die Menüpunkte im Auswahl Menü und den Zahlenwert bzw Betriebszustand in bestimmten Menüpunkten Erfolgt innerhalb von circa 30 Sekunden keine Eingabe wechselt die Anzeige im Display automatisch zur Hauptanzeige Liegt kein Steuersignal am DMX Eingang an blinkt im Display die DMX Adresse im DMX Betrieb bzw SLAVE im Slave ...

Page 16: ...sse wird gut sichtbar in der Mitte des Displays angezeigt und in der unteren Zeile die DMX Betriebsart Systems Settings DMX Address 001 DMX Mode 7CH_2 Stand Alone Slave Mode Off On Advanced Settings System Info 001 512 DMX BETRIEBSART EINSTELLEN Durch Drücken der MODE Taste gelangen Sie in das Auswahl Menü System Settings Mit Hilfe der Tasten UP und DOWN wählen Sie nun den Menü Punkt DMX Mode aus ...

Page 17: ...oskop Dimmer 000 255 Strobe 000 010 keine Funktion 011 255 ca 1Hz 30Hz 000 255 Red 000 255 Green 000 255 Blue 000 255 White 000 255 Fade Farbüberblendung Speed 000 100 Brightness 000 100 Jump Farbwechsel Speed 000 100 Brightness 000 100 Auto Kombination aus Farbüberblendung Farbwechsel Stroboskop Speed 000 100 Brightness 000 100 SLAVE BETRIEB Durch Drücken der MODE Taste gelangen Sie in das Auswah...

Page 18: ...ren Green 000 255 Grün kalibrieren Blue 000 255 Blau kalibrieren White 000 255 Weiß kalibrieren Factory Reset Zurücksetzen auf Werksein stellungen No Reset nicht durchführen Yes Reset durchführen Systems Settings DMX Address 001 DMX Mode 7CH_2 Stand Alone Slave Mode Off On Advanced Settings System Info Advanced Settings Display Invert No Yes Display 30s On Display Contrast 0 50 100 DMX Fail Black ...

Page 19: ...Sichern Sie das Gerät mit einem geeigneten Sicherungsseil an der fest am Gerätegehäuse montierten Sicherungsöse A Wichtiger Sicherheitshinweis Überkopfmontage erfordert umfassende Erfahrung einschließlich der Berechnung der Grenzwerte für die Arbeitslast des verwendeten Installationsmaterials und der regelmäßigen Sicherheitsüberprüfung aller Installationsmaterialien und Scheinwerfer Wenn Sie diese...

Page 20: ...che XLR Buchse des ersten DMX Geräts z B DMX Controller 2 Verbinden Sie den weibliche XLR Stecker des an den ersten Scheinwerfer angeschlossenen DMX Kabels mit dem DMX Eingang männliche XLR Buchse des nächsten DMX Geräts Verbinden Sie den DMX Ausgang dieses Geräts in der gleichen Weise mit dem DMX Eingang des nächsten Geräts und so weiter Bitte beachten Sie dass DMX Geräte grundsätzlich seriell ve...

Page 21: ...en Lieferanten und prüfen die ggf vertraglich vereinbarten Konditionen zur Entsorgung der Geräte Dieses Produkt darf nicht zusammen mit anderen gewerblichen Abfällen entsorgt werden TECHNISCHE DATEN Modellbezeichnung CLTW600RGBW Produktart LED Light Typ Strobe Blinder Wash Light Farbspektrum RGBW LED Anzahl 648 LED Typ 0 2W Quad LED Abstrahlwinkel 75 DMX Eingang XLR 3 Pol male DMX Ausgang XLR 3 Po...

Page 22: ...dukt folgenden Richtlinien entspricht soweit zutreffend R TTE 1999 5 EG bzw RED 2014 53 EU ab Juni 2017 Niederspannungsrichtlinie 2014 35 EU EMV Richtlinie 2014 30 EU RoHS 2011 65 EU Die vollständige Konformitätserklärung finden Sie unter www adamhall com Des Weiteren können Sie diese auch unter info adamhall com anfragen ...

Page 23: ...ez séparer plastique papier et carton 21 Les films plastique doivent être mis hors de portée des enfants APPAREILS RELIÉS AU SECTEUR 22 ATTENTION Si le câble de l appareil est muni d un fil de terre il doit être relié à une prise murale avec terre Ne désactivez jamais la mise à la terre d un appareil 23 N allumez pas l appareil immédiatement s il a subi une grande différence de température ambiant...

Page 24: ...l peuvent devenir chaudes Après utilisation ne manipulez ou ne transportez l appareil qu au bout de 10 minutes de refroidissement Attention Cet appareil est conçu pour une utilisation à une altitude maximale de 2000 m au dessus du niveau de la mer Attention Ce produit ne convient pas à une utilisation dans les climats tropicaux Attention Source lumineuse LED intense Risque de lésions oculaires Ne ...

Page 25: ...de fonctionnement actuellement activé écran principal les options du menu de sélection et la valeur numérique ou l état de fonctionnement dans certaines options de menu Au bout d environ 30 secondes d inactivité l écran principal s affiche automatiquement En l absence de signal de commande à l entrée DMX les caractères affichés à l écran l adresse DMX en mode DMX ou la mention SLAVE en mode Slave ...

Page 26: ...e manière bien visible au centre de l écran tandis que les lignes du bas indiquent le mode de fonctionnement DMX Systems Settings DMX Address 001 DMX Mode 7CH_2 Stand Alone Slave Mode Off On Advanced Settings System Info 001 512 RÉGLAGE DU MODE DMX Appuyez sur la touche MODE pour accéder au menu de sélection System Settings Utilisez ensuite les touches UP et DOWN pour sélectionner l option de menu...

Page 27: ...oboscope Dimmer 000 255 Strobe 000 010 non affecté 011 255 env 1 Hz 30 Hz 000 255 Red 000 255 Green 000 255 Blue 000 255 White 000 255 Fade Fondu des couleurs Speed 000 100 Brightness 000 100 Jump Changement des couleurs Speed 000 100 Brightness 000 100 Auto Fondu des couleurs changement des couleurs et stroboscope combinés Speed 000 100 Brightness 000 100 MODE SLAVE Appuyez sur la touche MODE pou...

Page 28: ...lonnage du rouge Green 000 255 Étalonnage du vert Blue 000 255 Étalonnage du bleu White 000 255 Étalonnage du blanc Factory Reset Restauration des réglages usine No Ne pas réinitialiser Yes Réinitialiser Systems Settings DMX Address 001 DMX Mode 7CH_2 Stand Alone Slave Mode Off On Advanced Settings System Info Advanced Settings Display Invert No Yes Display 30s On Display Contrast 0 50 100 DMX Fai...

Page 29: ...en insérant un câble de retenue adapté dans l œillet de sécurité A intégré au boîtier de l appareil Consignes de sécurité importantes Le montage tête en bas requiert des compétences poussées notamment pour le calcul des valeurs limites pour la charge de service le matériel d installation utilisé et le contrôle de sécurité effectué réguliè rement sur l ensemble du matériel d installation et sur le ...

Page 30: ...r projecteur à l entrée DMX connecteur XLR mâle de l appareil DMX suivant Reliez la sortie DMX de cet appareil selon le même méthode à l entrée DMX de l appareil DMX suivant et ainsi de suite Veillez à ce que tous les appareils DMX soient reliés en série et n oubliez pas que les liaisons ne peuvent être partagées sans utiliser de splitter actif Ne pas dépasser le nombre maximal d appareils par cha...

Page 31: ...ros Pilotage par la musique User Colour Stroboscope Mode Colour Fading Colour Jumping Mode Auto Mode Master Slave Paramètres du système Display Invert Display Backlight Display Contrast DMX Fail LED Calibration Factory Reset Éléments de commande MODE ENTER UP DOWN Élément d affichage Écran LCD graphique avec rétroéclairage Tension de fonctionnement 100 240 V CA 50 60 Hz Puissance absorbée 160 W Co...

Page 32: ... PRODUIT Valid in the European Union and other European countries with waste separation Applicable dans l Union Européenne et les autres pays européens pratiquant le tri des déchets La présence de ce symbole sur le produit ou sur la documentation correspondante indique qu en fin de vie le produit ne doit pas être jeté avec les déchets normaux afin d éviter tout dommage à l environnement ou aux per...

Page 33: ... para reciclarlos en sus contenedores respectivos 21 No deje las bolsas de plástico al alcance de los niños PARA LOS EQUIPOS CON TOMA ELÉCTRICA 22 ADVERTENCIA Si el cable eléctrico está provisto de un contacto de protección debe conectarse a una toma eléctrica con conexión a tierra No desactivar nunca esta conexión de protección a tierra del cable eléctrico 23 Si el equipo ha estado expuesto a un ...

Page 34: ...entemente antes de desmontarla realizar trabajos de mantenimiento cargarla u otras manipulaciones 2 ATTENTION Ce symbole correspond à des surfaces chaudes En cours de fonctionnement certaines parties de l appareil peu vent devenir chaudes Après utilisation ne manipulez ou ne transportez l appareil qu au bout de 10 minutes de refroidissement Advertencia Este equipo está diseñado para ser utilizado ...

Page 35: ...a pantalla LCD iluminada muestra el modo operativo activado actualmente pantalla principal las opciones del menú de selección y el valor numérico o estado operativo en determinadas opciones del menú Si durante aproximadamente 30 segundos no se detecta ninguna actividad la indicación en pantalla cambia automáticamente a la pantalla principal Si la entrada DMX no percibe ninguna señal de control en ...

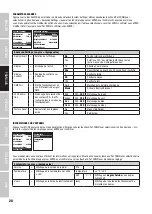
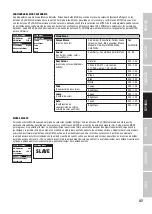
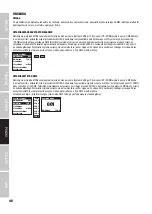
Page 36: ... de inactividad la dirección inicial DMX se muestra con claridad en medio de la pantalla y en la línea inferior aparece el modo DMX Systems Settings DMX Address 001 DMX Mode 7CH_2 Stand Alone Slave Mode Off On Advanced Settings System Info 001 512 CONFIGURACIÓN DEL MODO DMX Pulsando el botón MODE se accede al menú de selección System Settings Con los botones UP y DOWN seleccione ahora la opción de...

Page 37: ...010 sin función 011 255 aprox 1 Hz 30 Hz 000 255 Red 000 255 Green 000 255 Blue 000 255 White 000 255 Fade Superposición de colores Speed 000 100 Brightness 000 100 Jump Cambio de color Speed 000 100 Brightness 000 100 Auto Combinación de superposición de colores cambio de color y estrobo Speed 000 100 Brightness 000 100 MODO ESCLAVO Pulsando el botón MODE se accede al menú de selección System Set...

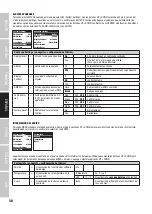
Page 38: ... 000 255 Calibrar rojo Green 000 255 Calibrar verde Blue 000 255 Calibrar azul White 000 255 Calibrar blanco Factory Reset Restablecer los ajustes de fábrica No No restablecer Yes Restablecer Systems Settings DMX Address 001 DMX Mode 7CH_2 Stand Alone Slave Mode Off On Advanced Settings System Info Advanced Settings Display Invert No Yes Display 30s On Display Contrast 0 50 100 DMX Fail Black Hold...

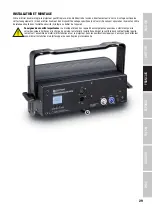
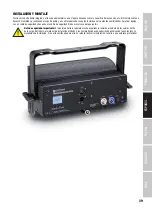
Page 39: ...n el contenido suministrado Sujete el equipo con un cable de seguridad adecuado a la anilla de seguridad fijada a la carcasa del equipo A Nota de seguridad importante El montaje en altura requiere mucha experiencia incluido el cálculo de los valores límite de la carga de trabajo el material de instalación utilizado y las comprobaciones de seguridad periódicas de todos los focos y materiales de ins...

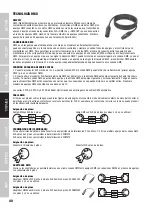
Page 40: ...DMX 2 Conecte ahora el conector XLR hembra del cable DMX del primer foco a la entrada DMX del equipo siguiente conector de chasis macho Conecte la salida DMX de este último equipo a la entrada DMX del equipo siguiente y así sucesivamente Tenga en cuenta que los dispositivos DMX están conectados en serie y que las conexiones no se pueden dividir sin un splitter activo El número máximo de equipos DM...

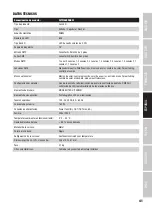
Page 41: ... usuario estrobo modo Colour Fading cambio de color modo Auto modo maestro esclavo Configuración del sistema Giro de la pantalla retroiluminación de pantalla contraste de pantalla DMX Fail calibración de LED restablecimiento de los ajustes de fábrica Elementos de manejo MODE ENTER UP DOWN Elemento de visualización Pantalla gráfica LCD con iluminación Tensión operativa 100 240 V CA 50 60 Hz Consumo...

Page 42: ...tar posibles efectos negativos en el medio ambiente y en la salud humana debidos al vertido incontrolado de desechos La recogida selectiva ayuda a su posterior reciclaje y fomenta la reutilización sostenible de los componentes de este equipo Si es un particular póngase en contacto con el distribuidor donde adquirió este producto o con el ayuntamiento para informarse sobre el reciclaje adecuado de ...

Page 43: ...łączyć i odłączyć od gniazda sieciowego jeśli urządzenie jest aktywne Naprawę takiego urządzenia może wykonać tylko autoryzowany personel specjalistyczny 19 Do czyszczenia urządzenia stosować suchą ściereczkę 20 Przestrzegać obowiązujących w danym kraju przepisów dotyczących usuwania odpadów Podczas utylizacji opakowania oddzielić tworzywo sztuczne od papieru i tektury 21 Worki z tworzywa sztuczne...

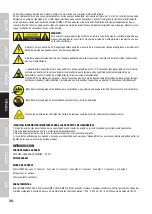
Page 44: ...jkąt równoboczny z symbolem błyskawicy sygnalizuje nieizolowane niebezpieczne napięcie we wnętrzu urządzenia które może spowodować porażenie prądem Trójkąt równoboczny z wykrzyknikiem oznacza ważne wskazówki dotyczące obsługi i konserwacji Ostrzeżenie Ten symbol ostrzega przed gorącymi powierzchniami Podczas użytkowania niektóre elementy mogą się nagrzać Urządzenie można dotykać lub transportować ...

Page 45: ... złącze męskie XLR do podłączenia kontrolera DMX np pulpitu DMX 5 DMX OUT 3 stykowe złącze żeńskie XLR do przekazywania sygnału sterującego DMX 6 WYŚWIETLACZ CIEKŁOKRYSTALICZNY Podświetlany wyświetlacz LCD pokazuje bieżący tryb pracy widok główny pozycje z menu wyboru oraz wartość liczbową lub tryb pracy w poszczególnych pozycjach menu Po ok 30 sekundach bezczynności wyświetlacz automatycznie wrac...

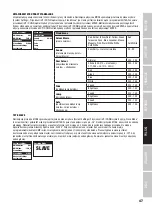
Page 46: ...dres początkowy DMX jest wyraźnie widoczny na środku wyświetlacza a tryb DMX w dolnej linijce Systems Settings DMX Address 001 DMX Mode 7CH_2 Stand Alone Slave Mode Off On Advanced Settings System Info 001 512 USTAWIANIE TRYBU DMX Naciśnięcie przycisku MODE spowoduje przejście do menu wyboru System Settings Przyciskami UP i DOWN wybierz opcję DMX Mode na ciemnym tle i potwierdź wybór przyciskiem E...

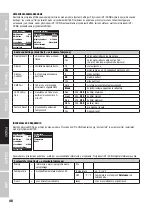
Page 47: ...oboskop Dimmer 000 255 Strobe 000 010 brak funkcji 011 255 ok 1Hz 30 Hz 000 255 Red 000 255 Green 000 255 Blue 000 255 White 000 255 Fade nakładanie się kolorów Speed 000 100 Brightness 000 100 Jump zmiany kolorów Speed 000 100 Brightness 000 100 Auto kombinacja nakładania się kolorów zmian kolorów i stroboskopu Speed 000 100 Brightness 000 100 TRYB SLAVE Naciśnięcie przycisku MODE spowoduje przej...

Page 48: ...dla R G B i W Red 000 255 kalibruj czerwony Green 000 255 kalibruj zielony Blue 000 255 kalibruj niebieski White 000 255 kalibruj biały Factory Reset przywracanie ustawień fabrycznych NO nie wykonuj resetu Yes wykonaj reset Systems Settings DMX Address 001 DMX Mode 7CH_2 Stand Alone Slave Mode Off On Advanced Settings System Info Advanced Settings Display Invert No Yes Display 30s On Display Contr...

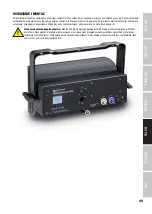
Page 49: ...arty w zestawie Zabezpiecz urządzenie przeciągając odpowiednią linkę przez ucho zabezpieczające przymocowane na stałe do obudowy A Ważna wskazówka bezpieczeństwa Montaż nad głową wymaga dużego doświadczenia w zakresie obliczania limitów obciążenia stosowanych materiałów instalacyjnych oraz okresowych przeglądów bezpieczeństwa wszystkich materiałów instalacyjnych i reflektorów Użytkownik bez odpowi...

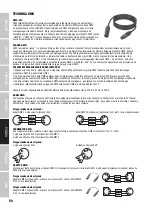
Page 50: ...enia DMX np kontrolera DMX 2 Żeńską wtyczkę XLR kabla DMX podłączonego do pierwszego reflektora podłączyć do wejścia DMX męskie gniazdo XLR następnego urządzenia DMX Wyjście DMX tego urządzenia podłączyć w taki sam sposób do wejścia DMX następnego urządzenia i tak dalej Należy pamiętać że urządzenia DMX podłącza się szeregowo a połączeń nie można rozdzielać bez aktywnego rozdzielacza Maksymalna li...

Page 51: ...ie kabel zasilania i uchwyt montażowy DEKLARACJE PRODUCENTA GWARANCJA PRODUCENTA I OGRANICZENIE ODPOWIEDZIALNOŚCI Nasze aktualne warunki gwarancji i informacje dotyczące ograniczenia odpowiedzialności znajdą Państwo na stronie https cdn shop adamhall com media pdf MANUFACTURERS DECLARATIONS_CAMEO pdf W razie konieczności skorzystania z serwisu proszę skontaktować się z firmą Adam Hall GmbH Adam Ha...

Page 52: ...9 5 WE lub dyrektywa w sprawie urządzeń radiowych 2014 53 UE od czerwca 2017 r dyrektywa niskonapięciowa 2014 35 UE dyrektywa w sprawie kompatybilności elektromagnetycznej 2014 30 UE dyrektywa w sprawie ograniczenia stosowania niektórych niebezpiecznych substancji w sprzęcie elektrycznym i elektronicznym 2011 65 UE Pełna wersja deklaracji zgodności znajduje się na stronie internetowej www adamhall...

Page 53: ...re nel Paese di installazione Al momento di smaltire l imballo separare la plastica dalla carta e dal cartone 21 I sacchetti di plastica devono essere tenuti lontani dalla portata dei bambini DISPOSITIVI CON ALLACCIAMENTO DI RETE 22 ATTENZIONE se il cavo di rete è dotato di contatto di protezione deve essere collegato a una presa di rete con messa a terra Non disattivare mai la connessione di mess...

Page 54: ...rante l impiego Dopo aver usato l apparecchiatura lasciarla raffreddare per almeno 10 minuti prima di toccarla o trasportarla Avvertimento Questo dispositivo è destinato per l utilizzo a un altitudine non superiore ai 2 000 metri sul livello del mare Avvertimento Questo dispositivo non è destinato all uso nei climi tropicali Attenzione Sorgente luminosa a LED di elevata intensità Pericolo di lesio...

Page 55: ... di funzionamento attualmente attivata schermata principale le voci di menu nel menu di selezione e il valore numerico o lo stato di funzionamento in alcune voci di menu Se entro circa 30 secondi non avviene alcuna immissione il display passa automaticamente alla schermata principale In assenza di segnale di controllo in corrispondenza dell ingresso DMX sul display lampeggia l indirizzo DMX se la ...

Page 56: ...ato è ben visibile al centro del display mentre nella riga inferiore viene visualizzata la modalità di funzionamento DMX Systems Settings DMX Address 001 DMX Mode 7CH_2 Stand Alone Slave Mode Off On Advanced Settings System Info 001 512 IMPOSTAZIONE DELLA MODALITÀ DI FUNZIONAMENTO DMX Premendo il tasto MODE si accede al menu di selezione delle impostazioni di sistema System Settings Con i tasti UP...

Page 57: ...55 Stroboscopio 000 010 nessuna funzione 011 255 ca 1Hz 30Hz 000 255 Red 000 255 Green 000 255 Blue 000 255 White 000 255 Fade dissolvenza colori Speed 000 100 Brightness 000 100 Jump cambiamenti colore Speed 000 100 Brightness 000 100 Auto combinazione di dissolvenza colori cambiamenti colore stroboscopio Speed 000 100 Brightness 000 100 MODALITÀ SLAVE Premendo il tasto MODE si accede al menu di ...

Page 58: ...Calibrazione del verde Blue 000 255 Calibrazione del blu White 000 255 Calibrazione del bianco Factory Reset Reset delle impostazioni di fabbrica No non effettuare il reset Yes effettuare il reset Systems Settings DMX Address 001 DMX Mode 7CH_2 Stand Alone Slave Mode Off On Advanced Settings System Info Advanced Settings Display Invert No Yes Display 30s On Display Contrast 0 50 100 DMX Fail Black...

Page 59: ...vo di sicurezza adatto fissare il dispositivo all occhiello di sicurezza A a sua volta ben fissato all alloggiamento del dispositivo Importante avvertenza di sicurezza il montaggio sopratesta richiede una vasta esperienza incluso il calcolo dei valori limite del carico di lavoro il materiale di installazione utilizzato e la verifica periodica della sicurezza di tutti i materiali di installazione e...

Page 60: ... femmina del cavo DMX connesso al primo proiettore DMX con l ingresso DMX presa XLR maschio del successivo dispositivo DMX Analogamente collegare l uscita DMX di questo dispositivo con l ingresso DMX del dispositivo seguente e così via Tenere presente che in linea di principio i dispositivi DMX sono collegati in serie e i collegamenti non si possono condividere senza uno splitter attivo In una cat...

Page 61: ...ra Ingombro L x H x P senza staffe 338 x 197 x 87 mm Peso 3 1 kg Altre caratteristiche Cavo di alimentazione e staffa di montaggio in dotazione DICHIARAZIONI DEL PRODUTTORE MANUFACTURER S WARRANTY LIMITATION OF LIABILITY Le nostre attuali condizioni di garanzia e la limitazione di responsabilità sono consultabili alla pagina https cdn shop adamhall com media pdf MANUFACTURERS DECLARATIONS_CAMEO pd...

Page 62: ...oddisfa le seguenti direttive ove pertinente Direttiva R TTE 1999 5 CE e RED 2014 53 UE da giugno 2017 Direttiva bassa tensione 2014 35 CE Direttiva CEM 2014 30 UE RoHS 2011 65 UE La dichiarazione di conformità completa è reperibile al sito www adamhall com Per ulteriori informazioni è inoltre possibile scrivere a info adamhall com ...

Page 63: ...06 013 Red 014 021 Amber 022 029 Yellow warm 030 037 Yellow 038 045 Green 046 053 Turquoise 054 061 Cyan 062 069 Blue 070 077 Lavender 078 085 Mauve 086 093 Magenta 094 101 Pink 102 109 Warm White 110 117 White 118 125 Cold White 126 128 Colour Jumping Stop 129 192 Colour Jumping Speed slow fast Colour 1 12 193 255 Colour Fading Speed slow fast Colour 1 12 2 CH Mode_2 CH1 Dimmer 000 255 Master Dim...

Page 64: ... CH2 Strobe Colour CH3 000 005 Strobe open 006 010 Strobe closed 011 250 Strobe slow fast 1Hz 30Hz 251 255 Strobe open CH3 Colour Macro 000 005 Colour off 006 013 Red 014 021 Amber 022 029 Yellow warm 030 037 Yellow 038 045 Green 046 053 Turquoise 054 061 Cyan 062 069 Blue 070 077 Lavender 078 085 Mauve 086 093 Magenta 094 101 Pink 102 109 Warm White 110 117 White 118 125 Cold White 126 128 Colour...

Page 65: ...3 127 Strobe Break Effect 5s 1s Very Short Flash Random 128 250 Strobe slow fast 1Hz 30Hz 251 255 Strobe open CH3 Colour Macro 000 005 Colour off 006 013 Red 014 021 Amber 022 029 Yellow warm 030 037 Yellow 038 045 Green 046 053 Turquoise 054 061 Cyan 062 069 Blue 070 077 Lavender 078 085 Mauve 086 093 Magenta 094 101 Pink 102 109 Warm White 110 117 White 118 125 Cold White 126 128 Colour Jumping ...

Page 66: ...ow fast 1Hz 30Hz 251 255 Strobe open CH3 Red 000 255 0 to 100 CH4 Green 000 255 0 to 100 CH5 Blue 000 255 0 to 100 CH6 White 000 255 0 to 100 CH7 Sound Colour CH3 CH6 set CH2 Strobe to value 000 000 005 Sound Control Off 006 255 Sound Control On Low High Mic Sensitivity 7 CH Mode_2 CH1 Dimmer 000 255 Master Dimmer CH2 Strobe Colour CH4 CH7 000 005 Strobe open 006 010 Strobe closed 011 250 Strobe s...

Page 67: ...67 DMX DEUTSCH FRANCAIS ESPAÑOL ENGLISH ITALIANO POLSKI ...

Page 68: ...CAMEOLIGHT COM Adam Hall GmbH Adam Hall Str 1 61267 Neu Anspach Germany Tel 49 0 6081 9419 0 Fax 49 0 6081 9419 1000 web www adamhall com e mail mail adamhall com REV 01 ...

Reviews: