


SERIE
RODEO
11
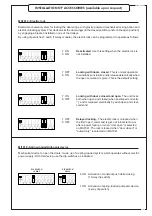
MECHANICAL ADJUSTMENTS
HORIZONTAL ADJUSTMENT R
O
(for Rodeo 2, only)
For fine adjustment (± 4 mm) of
the point where the two door
wings meet, loosen nuts and
bolts D and move the two door
wings at the same time.
To obtain a coarser adjustment,
remove the belt attachment
system by loosening nuts and
bolts E.
After adjustment, tighten the
bolts back down.
TRANSVERSE ADJUSTMENT R
TRANSVERSE ADJUSTMENT R
TRANSVERSE ADJUSTMENT R
TRANSVERSE ADJUSTMENT R
TRANSVERSE ADJUSTMENT R
T
T
T
T
T
The vertical plane of the rollers on the trolleys must be parallel with the beam. If the trolleys are
out of alignment (i.e., if the door wing does not slide easily), proceed as follows:
- Loosen nuts and bolts C
C
C
C
C;
- Align the trolleys with the guide track (for example, by
measuring distance Q between the body of the trolley and the
beam);
- Move the door wing manually to make sure that there is no
mechanical interference between the moving door wing(s)
and non-moving parts/door wings along the entire line of
movement.
- Tighten the bolts firmly
to fasten the trolleys.
VERTICAL ADJUSTMENT R
V
To obtain correct vertical alignment of the door wings, adjust
the trolleys as follows :
- Loosen screws A.
- Turn vertical adjustment screw B until the door wing(s) is/
are as perpendicular to the ground as possible. If the
automation system is being used to power two sliding door
wings, adjust this screw so that no gap is left between the
door wings when they are closed.
- After completing the adjustments, tighten screws A and
move the door wing manually to make sure that there is no
mechanical interference between the moving door wing(s)
and the pavement along the entire line of movement.
If necessary, the entire door wing can be raised by adjusting
both trolleys.
Guide track
Door wing
Profile of beam
Profile of beam
Guide track
Door wing


