CAME PLX V User Manual Download Page 15

Pa

ge


15

 - M

an

ua

FA

0

1

6

2

2-

E

N

 - 0

8

/2

0

2

2 - © C

A

M

E S

.p

.A

. -

Th

e c

on

te

nt

s o

f t

hi

s m

an

ua

l m

ay b

e c

ha

ng

ed

, a

t a

ny t

im

e, a

nd w

ith

ou

t n

ot

ic

e. - T

ra

ns

la

tio

n o

f t

he o

rig

in

al

 in

struction

s

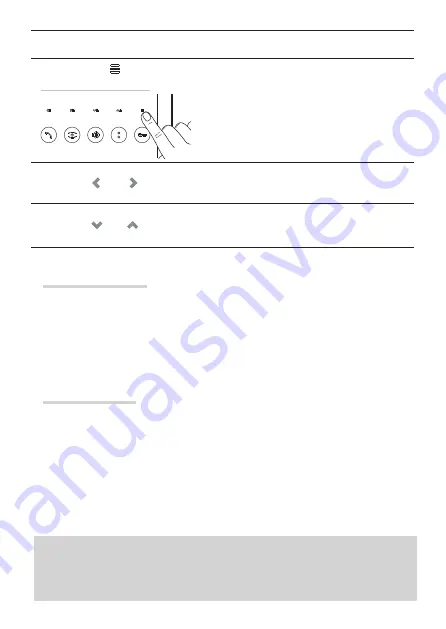
These buttons are used to adjust the brightness, contrast and colour of the display when 
the video is active.

Press this button to open or close the menu.

These buttons are used to set the parameter. 
Press and hold these buttons to skip and speed up 
parameter setting.

These buttons are used to scroll through the 
parameters.

Wait for a few seconds to exit the menu.

Dismantling and disposal. 

Dispose of the packaging and the device responsibly at the end 

of its life cycle, in compliance with the laws in force in the country where the product is used.
The recyclable components are marked with a symbol and the material ID marker.

THESE INSTRUCTIONS MUST BE SUPPLIED WITH THE DEVICE. THE DATA AND INFORMATION CONTAINED IN THEM ARE TO BE 
CONSIDERED AS SUBJECT TO CHANGE AT ANY TIME AND WITHOUT THE NEED FOR ANY ADVANCE WARNING.

Legislative references

This product complies with the applicable standards in force at the time of manufacturing.

FCC 

- This device complies with part 15 of the FCC Rules.

Operation is subject to the following two conditions:
(1) this device may not cause harmful interference / (2) this device must accept any 
interference received, including interference that may cause undesired operation.

Cleaning the device

To clean the device, use a soft, slightly damp cloth only. Wet the cloth with water or an ammonia 
solution. Alternatively, use an oil-based soap (e.g. Marseille soap) or a gentle makeup remover 
(e.g. a cleanser or micellar water).
Always wipe the surface with a damp cloth (wet with just water) after cleaning. Never use 
alcohol-based solutions or solutions containing surfactants.

Summary of Contents for PLX V

Page 1: ...Hands free internal video receiver PLX V PLX V BF USER MANUAL EN English FA01622 EN ...

Page 2: ...tivate communication To send a PANIC SIGNAL to the porter where present press and hold the button for more than 2 seconds The white LED will light up to confirm that the PANIC SIGNAL has been received by the porter The white LED stays on until the porter calls the user back The PANIC SIGNAL takes priority over all other types of call LED key Flashing call in progress On PANIC SIGNAL in progress no ...

Page 3: ...n is configured as an INTERCOM it will serve as INTERCOM 2 If the SECOND FUNCTION is also activated using button 4 it will serve as INTERCOM 5 If the button is configured as an AUX it will serve as AUX 3 The function of this button depends on the configuration set during installation If the button is configured as an INTERCOM it will serve as INTERCOM 3 If the SECOND FUNCTION is also activated using b...

Page 4: ... The contents of this manual may be changed at any time and without notice Translation of the original instructions Standard functions Call in progress Answer a call Communication activated Open the door for the calling entry panel End the call ...

Page 5: ...he original instructions Auto connection Press this button to activate video communication with the entry panel Auto connection is not possible if the line is busy If the line is busy you will hear 3 consecutive beeps Where there are multiple entry panels press this button multiple times to display the entry panels one after the other ...

Page 6: ...notice Translation of the original instructions Video toggling In the event of a simultaneous call on several receivers they will all ring but the video will only be activated on the receivers configured as MASTER Press this button to display the video on a SLAVE receiver Press this button to start audio communication with the entry panel ...

Page 7: ...tone Press this button on the called receiver to activate audio communication During a conversation between internal receivers a call from an entry panel is signalled on the internal receivers by a beep that repeats every 5 seconds When trying to make an intercom call 3 consecutive beeps indicate that the line is busy and the call cannot be made Press the AUX button to activate the desired auxilia...

Page 8: ...nal receiver to which you want to transfer the call To activate audio communication between two internal receivers press this button on the called receiver The entry panel will be put on hold To allow internal receiver 2 to communicate with the entry panel press this button on internal receiver 1 Internal receiver 2 will be able to communicate with the entry panel The internal receiver with the in...

Page 9: ...ter functions These functions are only available if the system has a porter desk Call notification from the porter Request to be called back by the porter Press this button to send a call request signal to the porter The system must be correctly configured When this button LED lights up this means the porter would like to be called back The LED turns off when communication with the porter starts ...

Page 10: ...sounds on the receiver Sending a panic signal to the porter Press and hold this button for 2 seconds to send a PANIC signal to the porter The white LED indicates that the signal has been received by the porter Open gate function status Press and hold the button for a prolonged period to send an open close command to an operator The LED indicates the status of the operator The system must be correc...

Page 11: ...with the entry panel Automatic door release function This function allows you to automatically open the entrance when you press the call button on the entry panel This function is useful for professional practices Press and hold this button for more than 3 seconds to enable disable the function The LED switches on to indicate that the function has been enabled The call ends automatically Configuri...

Page 12: ...d without notice Translation of the original instructions Programming the melody associated with a call from the entry panel Press this button to listen to the melodies in sequence Press this button to select the melody and exit programming Press this button to select the melody and continue programming ...

Page 13: ...and without notice Translation of the original instructions Programming the melody associated with a call from the landing Press this button to listen to the melodies in sequence Press this button to select the melody and exit programming Press this button to select the melody and continue programming ...

Page 14: ... original instructions Adjusting the brightness contrast and colour Programming the number of rings per call Press this button as many times as the number of rings you want from 1 to 12 rings Three seconds after the key was last pressed the selected call is played back with the chosen number of rings Press this button to exit programming ...

Page 15: ...l ID marker THESE INSTRUCTIONS MUST BE SUPPLIED WITH THE DEVICE THE DATA AND INFORMATION CONTAINED IN THEM ARE TO BE CONSIDERED AS SUBJECT TO CHANGE AT ANY TIME AND WITHOUT THE NEED FOR ANY ADVANCE WARNING Legislative references This product complies with the applicable standards in force at the time of manufacturing FCC This device complies with part 15 of the FCC Rules Operation is subject to th...

Page 16: ...sson di Casier Treviso Italy tel 39 0422 4940 fax 39 0422 4941 info came com www came com Page 16 Manual FA01622 EN 08 2022 CAME S p A The contents of this manual may be changed at any time and without notice Translation of the original instructions ...

Reviews: