background image

ZT6: 

transmitters 

Should the transmitter not operate as suggested above,

call CAME helpline 

0115 921 0430

 for technical support.

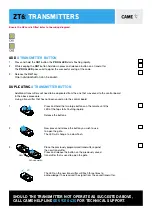
add

 a transmitter button

1. 

Press and hold the 

CH1

 button, the 

PROG. LED 

starts fl ashing rapidly.


2. 

While keeping the 

CH1

 button held down press and release a button on a transmitter


 The 

PROG. LED

 goes solid to signal the successful saving of the code.

3. 

Release the 

CH1

 key.


One individual button can be saved.

duplicating

 a transmitter button


Additional transmitters will need to be duplicated from the one that was saved to the control board 


in the above procedure.


Using a transmitter that has not been saved on to the control board

1. 


Press and hold the two large buttons on the remote until the 


LED at the top starts fl ashing rapidly.


Release the buttons.

2. 


Now press and release the button you wish to use 


to open the gate.


The LED will change to a slow fl ash.

3. 


Place the previously programmed transmitter against 


the new transmitter.


Press and release the button on the previously saved 


transmitter that is used to open the gate.


The LED on the new transmitter will fl ash three times to 


acknowledge it has received the signal from the saved transmitter.

Ensure the AF card is fi tted (refer to the wiring diagram).

NEW

PROGRAMMED

x3

Summary of Contents for BY-3500T

Page 1: ...CAME COM UK BY 3500T kit Complete kit for a sliding gate weighing up to 3500kg max width 23m QUICK SETUP GUIDE TO BE READ IN CONJUNCTION WITH THE FULL INSTRUCTION MANUAL ...

Page 2: ...Pair of Photocells top a433n Tuned Antenna topd4Fks Fixed code Transmitter 1 Kit Contents 2 Safety Instructions 3 Typical Gate Setup 4 Geometry 5 Manual Release Instructions 6 Kit Wiring Diagram 7 Control Panel Quick Start Guide 8 Control Panel Programming Transmitters 9 Control Panel Safety 10 Optional Accessories ...

Page 3: ...ssing through the gate Keep feet away from the bottom of the gate during operation Do not operate the gate by remote control unless they are in view Do not attempt to block or interfere with the gate movement during operation Under no circumstances should you attempt to modify the gate automation system Ensure that your gate is serviced at 3 to 12 month intervals dependent on number of openings by...

Page 4: ... 4 6 OUTSIDE OF GATES INSIDE OF GATES 10 11 12 B Y 3 5 0 0 T 1 BY 3500T Motor 5 Selector Keypad optional 9 Photocell column optional accessory 2 Limit switch fins 6 Photocells on outside of gate posts 10 Slide guides 3 Reception Antenna 7 2nd set of Photocells optional 11 Rack 4 Flashing Light optional 8 Mechanical End Stop not supplied 12 Sensitive safety edge CONTROL PANEL The control panel is i...

Page 5: ... gearmotor to the accessories 5 Prepare a Ø 20 mm tube to run the release cord through A 6 Use Ø 40 mm corrugated tubes to connect the gearmotor to the accessories The number of tubes depends on the type of system and the accessories that are going to be fitted INSTALLATION Please refer to the full manual for installing the motor rack and setting travel end points 1 2mm The rack and pinion should ...

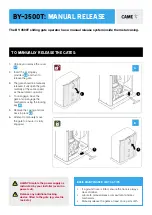
Page 6: ...casing and lock back in place B2 6 Attempt to manually move the gate to ensure it is fully engaged The BY 3500T sliding gate operator has a manual release system inside the metal casing Basic Maintenance Hints Tips If a ground track is fitted ensure the track is always clear of debris Lubricate manual release compartment and key mechanism Manually release the gates at least once per month ALWAYS i...

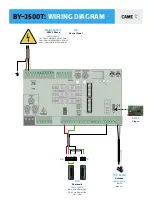
Page 7: ...ble length RX 4 Core 0 5mm Flex TX 4 Core 0 5mm Flex 1m 30m AF43S Plug in 10 2 TX C NC TX 2 TX TOP A433N Antenna Cable length RG58 Max 5m RX Mains Supply 400V 3 Phase Cable length 1m 10m H05RN F 4G x 1 5mm2 10m 20m H05RN F 4G x 2 5mm2 20m 30m H05RN F 4G x 4mm2 ...

Page 8: ... stop Dip switch 10 ON 3 Disable the safety input C1 Dip switch 7 ON 4 Disable safety input CX Dip switch 8 ON 5 Set all other dip switches off 6 Set the motor direction as viewed from the inside of the property looking out The default setting for the motor is left hand opening if the gate is to open to the right the motor and end stop connections must be swapped as below Right hand opening 7 With...

Page 9: ...e one that was saved to the control board in the above procedure Using a transmitter that has not been saved on to the control board 1 Press and hold the two large buttons on the remote until the LED at the top starts flashing rapidly Release the buttons 2 Now press and release the button you wish to use to open the gate The LED will change to a slow flash 3 Place the previously programmed transmitt...

Page 10: ...ill stop and reverse its motion until it reaches its fully closed position again Once the automation has reached the fully closed position it will require another activation from a command device to restart C3 PARTIAL STOP When the automation is in its opening cycle and the safety circuit is triggered the automation will stop If the auto closing option is enabled and the safety is no longer trigge...

Page 11: ...our 806SL 0250 SELB1SDG3 Surface mounted with blue backlighting for 250 users RAL7024 Grey colour HARDWIRED KEYPAD SELECTORS 806SL 0280 SELT1BDG Surface mounted 12 button Bus keypad with blue backlighting RAL7024 Grey colour 806SL 0290 SELT2BDG Flush mounted 12 button Bus keypad with blue backlighting RAL7024 Grey colour 806SL 0370 S0002P External two channel 12 24 V AC DC IP54 control card for ke...

Page 12: ... THIS DOCUMENT AT ANY TIME THE DATA AND INFORMATION SHOWN IN THIS CATALOGUE ARE SUBJECT TO CHANGE WITHOUT OBLIGATION TO GIVE PRIOR NOTICE BY CAME S P A E OE CAME BPT North Unit 1B Sills Road Willow Farm Business Park Castle Donington DE74 2US Tel 0115 921 0430 CAME BPT South Liberta House Maxted Road Maylands Ind Est Hemel Hempstead Herts HP2 7DX Tel 01442 230 800 CAME BPT Ireland Unit 9 The Westw...

Reviews: