background image

Page 

6

 - Manual: 

FA00745-EN

 - ver

1

 - 04/2017 - © C

AME S.p.A. - The data and information shown in this manual ar

e t

o be consider

ed subject t

o change at any time and without the need for any advance warning.

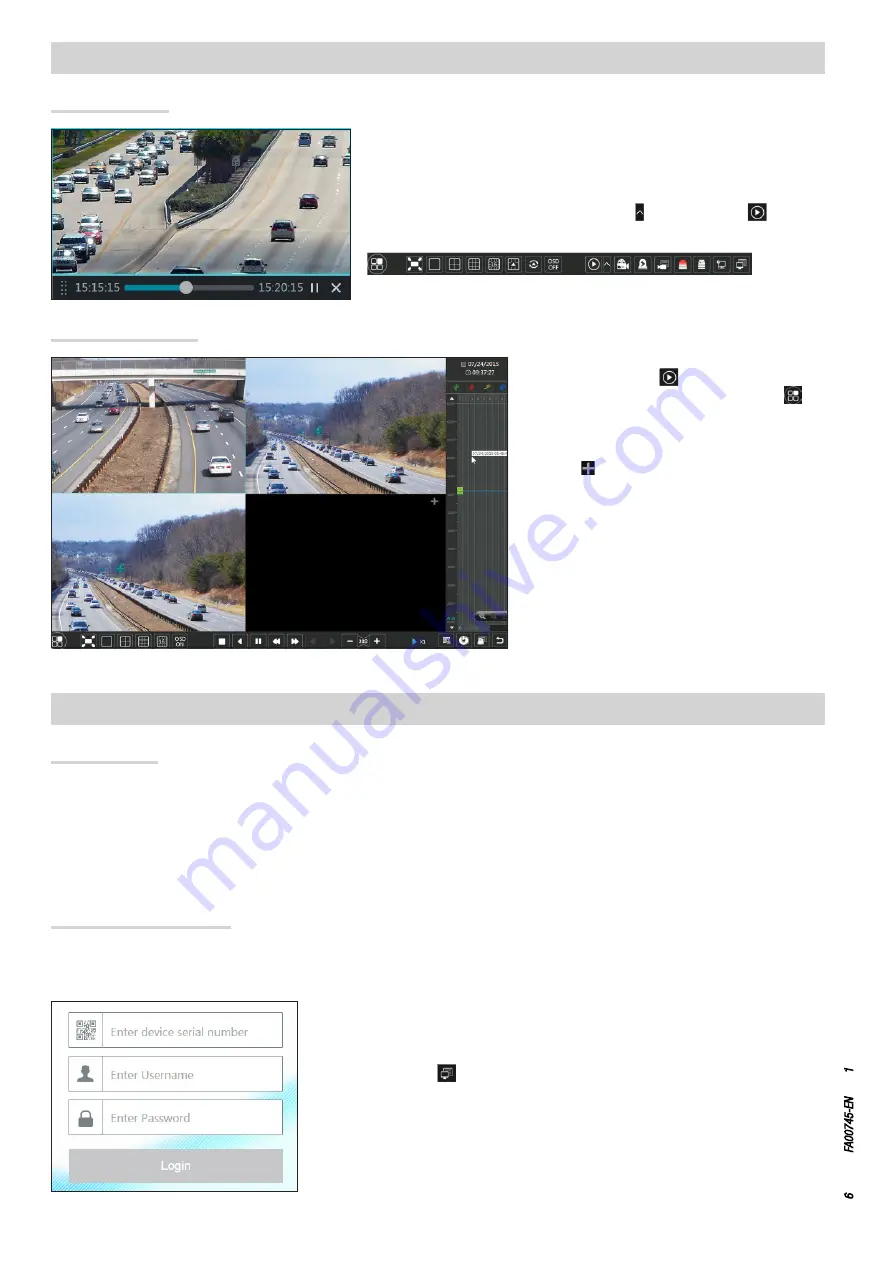
After ActiveX is installed, the login window opens:

Serial No: 

MAC address of NVR

To display the MAC address of the NVR, access Menu 

 Settings 

 Network 

⇨ 

Network status.

Alternatively select the 

 icon on the lower tool bar.

User Name:

 name of user of the NVR (default name is admin).

Password:

 NVR password (password chosen on first startup via the guided setup; the default 

password is 123456).

Remote access can also take place via NVMS1000 software (for PC) or NVMS1200 software (for 
MAC OS).

CONNECTION VIA CLOUD

NAT settings

The NVR must be powered and connected to the network.

1.  Access the Menu 

 Settings 

 Network 

⇨ 

NAT. 

Select the NAT tab.

2.  Enable NAT and if necessary fill in the NAT Server fields, the default NAT Server value is www.autonat.com.

3.  Click APPLY to save the parameters.

Access to NAT server

After completing the NAT settings, it is possible to access the NAT server from the PC (enter http://www.autonat.com in the browser).

If you are accessing NAT for the first time, the ActiveX plugin is automatically downloaded.

Access the playback and recorded material search 
window by pressing icon 

 on the bottom of the 

screen or by selecting PLAYBACK from the menu 

Video cameras can be added manually to the playback 
window.

Select the   icon to make the window appear that lets 
you add a video camera to the views. 

Select the video camera you want and then click ADD to 
add video cameras to the views. 

The files of recordings from the video camera added will 
be played back within the interface.

General playback

By right-clicking with the mouse on the screen that shows the images taken live by 
the video camera you can choose the section of video recorded that you want to see 
immediately from the menu that appears.

The same menu can be called up by pressing icon   that is next to icon 

 on the 

bottom of the screen that shows the images taken live by the video camera.

PLAYBACK

Fast playback

Summary of Contents for 848EA-0120

Page 1: ...English EN Deutsch DE Italiano IT Français FR FA00745M04 MANUALE DI CONFIGURAZIONE E USO XNVR3216H XNVR3316H XNVR3332H XNVR3204PH XNVR3208PH NETWORK VIDEO RECORDER ...

Page 2: ...i Tipo XNVR3204PH XNVR3208PH XNVR3216H XNVR3316H XNVR3332H Ingressi video IP numero canali 4 8 16 16 32 Ingressi audio IP numero canali 4 8 16 16 32 Uscite video HDMI 4K x 2K 1920x1080 1280x1024 1 1 1 1 1 Uscite video VGA 1920x1080 1280x1024 BNC 1 1 1 1 Ingressi Uscite audio RCA 1 1 1 1 1 1 1 1 1 1 Compressione video della registrazione H 265 H 264 H 265 H 264 H 265 H 264 H 265 H 264 H 265 H 264 R...

Page 3: ...p A II contenuti del manuale sono da ritenersi suscettibili di modifica in qualsiasi momento senza obbligo di preavviso Ingresso alimentazione da alimentatore Porta LAN Uscita video VGA Uscita video HDMI Porta USB 3 0 Pannello posteriore XNVR3216H Pannello posteriore XNVR3204PH Pannello posteriore XNVR3208PH Porta USB 2 0 Ingressi uscite audio Ingressi e uscite allarme Porte PoE USO DEL DISPOSITIV...

Page 4: ...re il testo usare il tasto SHIFT SHIFT per inserire le lettere maiuscole e i simboli Premere il pulsante NEXT PROSSIMO per prosegure il setup Configurare data e ora corrette Premere il pulsante NEXT PROSSIMO per prosegure il setup Inserimento parametri di rete Spuntando questa casella il sistema assegna automaticamente un indirizzo IP al dispositivo Se la casella non viene spuntata è necessario in...

Page 5: ...cessario impostare per ogni telecamera l ingresso di allarme che scatena la registrazione l allarme motion che scatena la registrazione e il programmatore orario Per configurare in maniera più accurata le opzioni di registrazione premere l icona Settings Configurazione Record Registrazione Premere il pulsante OK per salvare le impostazioni Aggiungere telecamere Premendo il pulsante viene aggiornat...

Page 6: ...lle viste I file di registrati della telecamera aggiunta verranno riprodotti all interno dell interfaccia CONNESSIONE TRAMITE CLOUD Impostazioni NAT I NVR deve essere alimentato e collegato alla rete 1 Accedere al Menu Settings Configurazione Network Rete NAT Selezionare la scheda NAT 2 Abilitare NAT e compilare se necessario i campi NAT Server Server NAT il valore di default di NAT Server è www a...

Page 7: ...zione seguire la sequenza illustrata nelle immagini che seguono Se si utilizza la connessione tramite DDNS Scrivere all interno della casella il nome Host seguito dal dominio per esempio came autoddns com Se si utilizza la connessione tramite cloud Toccare l icona e scansionare il QR code che si può trovare al menù informazioni dell NVR alla voce QR code In alternativa è possibile scrivere diretta...

Page 8: ...S p A I contenuti del manuale sono da ritenersi suscettibili di modifica in qualsiasi momento senza obbligo di preavviso Il dispositivo appena aggiunto viene mostrato in elenco l icona di colore verde indica che la connessione al videoregistratore è attiva Tornando nella schermata precedente è possibile visualizzare e selezionare i dispositivi connessi L icona permette di aprire la finestra median...

Page 9: ...English EN SETUP AND USER MANUAL XNVR3216H XNVR3316H XNVR3332H XNVR3204PH XNVR3208PH NETWORK VIDEO RECORDER FA00745 EN ...

Page 10: ...ts Technical data Type XNVR3204PH XNVR3208PH XNVR3216H XNVR3316H XNVR3332H IP video inputs number of channels 4 8 16 16 32 IP audio inputs number of channels 4 8 16 16 32 HDMI video outputs 4K x 2K 1920x1080 1280x1024 1 1 1 1 1 VGA video outputs 1920x1080 1280x1024 BNC 1 1 1 1 Audio inputs outputs RCA 1 1 1 1 1 1 1 1 1 1 Video compression of recording H 265 H 264 H 265 H 264 H 265 H 264 H 265 H 26...

Page 11: ...4 8 7 3 Page 3 Manual FA00745 EN ver 1 04 2017 CAME S p A The data and information shown in this manual are to be considered subject to change at any time and without the need for any advance warning USE OF DEVICE Switching NVR on and off Switching on the device Connect the monitor and power supply the blue LED on the front comes on and the device carries out startup A guided procedure lets you se...

Page 12: ...NVR to be used displayed remotely The pre set values for the ports are HTTP port 80 SERVER port 6036 Press the NEXT button to continue with setup Setting up correct date and time Press the NEXT button to continue with setup When starting up the device for the first time it is possible to choose a personalised password that can be changed later When you click on the fields that require text or numb...

Page 13: ...directly to the NVR s PoE ports are addressed and managed automatically Press the NEXT button to continue with setup For MANUAL mode the alarm input that triggers the recording the motion alarm that triggers the recording and the programmer timer must be set for each video camera To set up the recording options more precisely press the icon Settings Record Press the OK button to save the settings ...

Page 14: ...PLY to save the parameters Access to NAT server After completing the NAT settings it is possible to access the NAT server from the PC enter http www autonat com in the browser If you are accessing NAT for the first time the ActiveX plugin is automatically downloaded Access the playback and recorded material search window by pressing icon on the bottom of the screen or by selecting PLAYBACK from th...

Page 15: ...on via DDNS Type the Host name followed by the domain inside the box for example came autoddns com If you are using a connection via Cloud Touch the icon and scan the QR code that you can find in the NVR s information menu under the heading QR code Alternatively you can type the code directly into the Device box CONTROL FROM A MOBILE DEVICE Access via app For iOS or Android smartphones download th...

Page 16: ...ver 1 04 2017 CAME S p A The data and information shown in this manual are to be considered subject to change at any time and without the need for any advance warning The device just added is shown in the list the green icon indicates that the connection to the video recorder is on Go back to the previous screen to display and select the devices connected The icon lets you open the window through ...

Page 17: ...Français FR MANUEL DE CONFIGURATION ET D UTILISATION XNVR3216H XNVR3316H XNVR3332H XNVR3204PH XNVR3208PH ENREGISTREUR VIDÉO EN RÉSEAU FA00745 FR ...

Page 18: ...o réseau numérique à 4 8 16 entrées Données techniques Type XNVR3204PH XNVR3208PH XNVR3216H XNVR3316H XNVR3332H Entrées vidéo IP nombre de canaux 4 8 16 16 32 Entrées audio IP nombre de canaux 4 8 16 16 32 Sorties vidéo HDMI 4K x 2K 1920x1080 1280x1024 1 1 1 1 1 Sorties vidéo VGA 1920x1080 1280x1024 BNC 1 1 1 1 Entrées Sorties audio RCA 1 1 1 1 1 1 1 1 1 1 Compression vidéo de l enregistrement H 2...

Page 19: ...00745 FR vers 1 04 2017 CAME S p A Le contenu de ce manuel est susceptible de subir des modifications à tout moment et sans aucun préavis UTILISATION DU DISPOSITIF Allumer et éteindre le NVR Allumer le dispositif Brancher le moniteur et le bloc d alimentation la led bleue frontale s allume et le dispositif se met en marche Une procédure guidée permet de configurer le dispositif Éteindre le disposi...

Page 20: ... distance Les valeurs prédéfinies pour les ports sont les suivantes HTTP port 80 SERVER port 6036 Configurer la date et l heure correctes Cliquer sur le bouton NEXT SUIVANT pour poursuivre la configuration À la première mise en marche du dispositif il est possible de choisir un mot de passe personnalisé qui pourra de toute façon être modifié par la suite Cliquer dans les champs de saisie de textes...

Page 21: ...rsuivre la configuration Il est nécessaire en cas de modalité MANUELLE de configurer pour chaque caméra l entrée d alarme activant l enregistrement ainsi que l alarme mouvement activant l enregistrement et le programmateur horaire Pour une configuration plus précise des options d enregistrement appuyer sur l icône Settings Configuration Record Enregistrement Appuyer sur le bouton OK pour sauvegard...

Page 22: ...ar défaut de NAT Server est www autonat com 3 Cliquer sur APPLY APPLIQUER pour sauvegarder les paramètres Accès au serveur NAT Au terme des configurations du NAT il est possible d accéder au serveur NAT sur le PC saisir http www autonat com sur le navigateur En cas de premier accès au serveur NAT le réseau télécharge automatiquement le module d extension ActiveX Pour accéder à la fenêtre de reprod...

Page 23: ...m d hôte suivi du domaine ex came autoddns com En cas de connexion via le cloud Toucher l icône et scanner le code QR disponible dans le menu informations du NVR à l option QR code Il est également possible d écrire directement le code dans la case Dispositif CONTRÔLE DEPUIS UN DISPOSITIF MOBILE Accès par app Pour smartphone iOS ou Android télécharger l application Superlive PLUS pour tablette iOS...

Page 24: ...5 FR vers 1 04 2017 CAME S p A Le contenu de ce manuel est susceptible de subir des modifications à tout moment et sans aucun préavis La liste visualise le dispositif venant d être ajouté l icône verte indique que la connexion à l enregistreur vidéo est activée Revenir à la page précédente pour visualiser et sélectionner les dispositifs connectés L icône permet d ouvrir la fenêtre de sélection de ...

Page 25: ...Deutsch DE KONFIGURATIONS UND BEDIENUNGSANLEITUNG XNVR3216H XNVR3316H XNVR3332H XNVR3204PH XNVR3208PH NETZWERKVIDEOREKORDER FA00745 DE ...

Page 26: ...gängen Technische Daten Typ XNVR3204PH XNVR3208PH XNVR3216H XNVR3316H XNVR3332H IP Videoeingänge Anzahl der Kanäle 4 8 16 16 32 IP Audioeingänge Anzahl der Kanäle 4 8 16 16 32 HDMI Videoausgänge 4K x 2K 1920x1080 1280x1024 1 1 1 1 1 VGA Videoausgänge 1920x1080 1280x1024 BNC 1 1 1 1 Audio Ein Ausgänge RCA 1 1 1 1 1 1 1 1 1 1 Videokompression für Aufnahme H 265 H 264 H 265 H 264 H 265 H 264 H 265 H ...

Page 27: ... 48V PoE PORTS 2 6 5 1 4 8 7 3 S 3 Anleitung FA00745 DE Ver 1 04 2017 CAME S p A Der Inhalt dieser Anleitung kann jederzeit und ohne Vorankündigung geändert werden VERWENDUNG DES GERÄTS NVR aus und einschalten Gerät einschalten Den Bildschirm und das Netzteil anschließen die blaue LED vorne geht an und das Gerät startet Mithilfe eines Assistenten können Sie das Gerät installieren Gerät ausschalten...

Page 28: ...NATIVER DNS SERVER ermöglicht die Verwendung Aufruf des NVR über Fernzugriff Die vorgegebenen Werte der Ports sind HTTP Port 80 SERVER Port 6036 Datum und Uhrzeit einstellen Durch Druck auf NEXT WEITER wird die Einstellung wieder aufgenommen Bei der ersten Inbetriebnahme können Sie ein individuelles Passwort wählen dass Sie später ändern können Wenn Sie Felder in die Texte oder Zahlen eingegeben w...

Page 29: ...gesteuert Durch Druck auf NEXT WEITER wird die Einstellung wieder aufgenommen In der MANUELLEN Einstellung müssen Sie für jede Überwachungskamera den die Aufnahme auslösenden Alarmeingang den die Aufnahme auslösenden Motion Alarm und den Stundenplaner einstellen Um die Aufnahmeoptionen präziser einzustellen drücken Sie auf das Symbol Settings Einstellungen Record Aufnahme Mit OK die Einstellungen ...

Page 30: ... APPLY ANWENDEN klicken um die Einstellungen zu speichern Zugriff auf den NAT Server Nachdem Sie den NAT eingestellt haben können Sie über PC auf den NAT Server zugreifen im Browser http www autonat com eingeben Wenn Sie zum ersten Mal auf den NAT zugreifen wird das Plugin ActiveX automatisch heruntergeladen Sie können das Abspiel und Suchfenster der Aufnahmen durch Druck auf das Symbol unten im B...

Page 31: ...Host und die Domain eintragen z B came autoddns com Bei Cloud Verbindung Tippen Sie auf die Symboltaste und tasten Sie den im Info Menü des NVR unter dem Punkt QR Code angegebenen QR Code ab Sie können den Code auch einfach in das Geräte Feld eintragen STEUERUNG ÜBER MOBILGERÄT Zugriff über App Für Smartphone iOS oder Android die App Superlive PLUS herunterladen für Tablet iOS oder Android die App...

Page 32: ...ng FA00745 DE Ver 1 04 2017 CAME S p A Der Inhalt der Anleitung kann jederzeit ohne Vorankündigung geändert werden Das gerade hinzugefügte Gerät wird im Verzeichnis angezeigt wenn das Symbol grün ist wurde die Verbindung zum Videorekorder aktiviert Zurück zum vorherigen Bildschirm können Sie die eingebundenen Geräte aufrufen und auswählen Mit dem Symbol können Sie das Fenster in dem die Anzeigeart...

Reviews: