background image

Problem

Possible Causes

What To Do

Loud noises (other than

Silverware, bottle cap or other 

Remove the splash guard* and remove the object with

those during grinding of

foreign object has fallen into the

long-handled tongs. Replace the splash guard*.

bones and fruit pits)

disposer.

Disposer does not start

Reset button has been tripped.

With the splash guard* removed, check to see if the 

turntable will move freely using a broom handle. If the 

turntable moves freely, replace the splash guard* and 

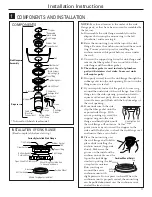
check the reset button to see if it has been tripped. The 

reset button is red and located opposite the discharge 

elbow, near the bottom of the disposer. Push the button 

in until it clicks and remains depressed. If the reset 

button has not been tripped, check for a shorted or 

broken wire connecting to the disposer. Check the 

electrical power switch, fuse box or circuit breaker. 

If wiring and electrical components are intact, the 

unit may have internal problems that require

service or replacement.

Turntable cannot rotate.

If the turntable does not turn freely, check for an 

object lodged between the turntable and the grind 

ring. Dislodge the object by moving the turntable 

with a broom handle. Then remove the object.
If no foreign object is present, there may be internal

problems.

Disposer leaks 

If the leak is at the top, it may be
caused by:
1. Improper seating of sink flange 

(gasket choice, putty or tightening).

2. Support ring not tightened properly.
3. Defective cushion mount.
If the leak is at the discharge elbow, leak
may be caused by improper tightening 
of elbow flange screws.

11

Before you call for service…

www.GEAppliancesCanada.com

Troubleshooting Tips 
Save time and money! Review the chart on this page first
and you may not need to call for service.
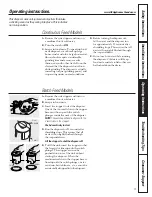
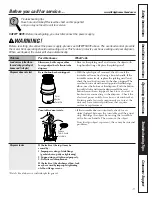
Reset
Button

Serial No.

Remove
Splash Guard

Turntable

WARNING!

Before resetting, disconnect the power supply–please see SAFETY NOTE above. The overload control prevents
the motor from operating should overloading occur. This feature protects your house wiring and your disposer.
When overloaded, the motor will stop automatically.

SAFETY NOTE:

Before investigating, you must disconnect the power supply.

*Batch Feed does not include splash guard.

Consumer Support

Tr

oubleshooting T

ips

Installation Instructions

Safety Instructions

Operating Instructions

Summary of Contents for Disposall GFB762F

Page 1: ...5 Connecting Disposer to Sink Flange 7 Dimensions Typical Installations 8 Dishwasher Connection 6 Operating Instructions Batch Feed Models 9 Care and Maintenance 10 Continuous Feed Models 9 Troubleshooting Tips Before You Call for Service 11 Customer Service Warranty 12 Write the model and serial numbers for your disposall here Model ______________________ Serial ______________________ You can fin...

Page 2: ...poser leave the drain stopper in place to reduce the risk of objects falling into the disposer For proper grounding instructions see the ELECTRICAL CONNECTION portion of this manual 2 Consumer Support Troubleshooting Tips Operating Instructions Installation Instructions Safety Instructions IMPORTANT SAFETY INSTRUCTIONS READ ALL INSTRUCTIONS BEFORE USING WARNING HOW TO CONNECT ELECTRICITY If you ar...

Page 3: ...o the House Current GROUNDING INSTRUCTIONS This appliance must be connected to a grounded metal permanent wiring system or an equipment grounding conductor must be run with the circuit conductors and connected to the equipment grounding terminal or lead on the appliance A If you use BX cable 1 Install the cable connector in the hole 2 Connect white wire to white lead of disposer 3 Connect black wi...

Page 4: ...on of this appliance requires basic mechanical skills Completion time 1 hour Proper installation is the responsibility of the installer Product failure due to improper installation is not covered under the Warranty If you have questions call 1 800 361 3400 or visit our Website at www GEAppliancesCanada com Installation Disposer Instructions WHAT YOU WILL NEED Phillips and flat blade screwdrivers C...

Page 5: ...nge will not move At this point you may want to insert the stopper in the sink and fill with water to check the sink flange seal and insure there are no leaks H Place the mount ring over the sink flange and hold in place while installing the cushion mount large side down Make sure the groove on the inside of the cushion mount fits over the lip on the sink flange similar to putting the lid on a pla...

Page 6: ...QUIRED If you are connecting to a dishwasher complete the following step If a dishwasher is not to be connected go on to Attaching the Discharge Elbow section 1 Connect the dishwasher hose using a hose clamp If the hose size is different you will need a stepped rubber adapter CONNECT HOSE 2 2 Knock out plug CONNECT DISCHARGE ELBOW Connect the discharge elbow to the disposer Make sure all plumbing ...

Page 7: ... Locked Position Mount Ring Locking Detail Check the unit for leaks 24 hours after installation and first operation CHECK FOR LEAKS 4 CONNECTING DISPOSER TO SINK FLANGE 4 Line up the disposer under the sink flange Guide the hopper projections into the mount ring slots Turn the mount ring about 1 4 to the right so that the disposer is temporarily supported 1 Turn the mount ring and the disposer unt...

Page 8: ...eration of the disposer that this dimension be 9 12 depending upon the models listed above to avoid standing water in disposer motor housing 15 7 cm 63 16 13 2cm 53 16 32 2 cm 1211 16 11 4 cm 41 2 3 8 cm 11 2 13 6 cm 53 8 GFC522F GFC532F 3 8 cm 11 2 17 6 cm 615 16 13 6 cm 53 8 19 7 cm 73 4 34 1 cm 137 16 11 4 cm 41 2 GFC1022F 3 81 cm 11 2 18 41 cm 71 4 14 12 cm 59 16 21 59 cm 81 2 40 798 cm 161 16...

Page 9: ...rs that make a clicking sound as they swing into place This indicates normal operation Batch Feed Models A Remove the sink stopper and turn on a medium flow of cold water B Scrape in food waste C Insert the stopper to start the disposer One of the two small slots in the stopper base must line up with the switch plunger inside the neck of the disposer NOTE The oval shaped handle aligns with the 2 s...

Page 10: ...ima bean pods and corn husks require considerable cutting time For this reason you may prefer to place them in the trash can or trash compactor Operating instructions Care and maintenance THE MOTOR IS PERMANENTLY LUBRICATED FOR LIFE DO NOT ATTEMPT TO LUBRICATE YOUR DISPOSER The disposer is self cleaning and scours itself with each use NEVER put lye or chemical cleaners into the disposer as they ca...

Page 11: ...eely check for an object lodged between the turntable and the grind ring Dislodge the object by moving the turntable with a broom handle Then remove the object If no foreign object is present there may be internal problems Disposer leaks If the leak is at the top it may be caused by 1 Improper seating of sink flange gasket choice putty or tightening 2 Support ring not tightened properly 3 Defectiv...

Page 12: ...the functional parts only appearance parts are excluded During this six year extended limited original purchase warranty period you will be responsible for all installation charges relating to the replacement disposer Service trips to your home to teach you how to use the product Improper installation Failure of the product if it is abused misused or used for other than the intended purpose or use...

Reviews: