

5
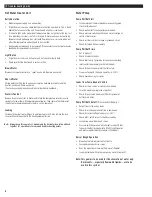
Daily Operation
1. Fill both fresh water tanks.
2. Place one set of tanks (fresh and waste)
into sink cart and connect drain and pump
lines as stated in
Start Up.
3. Push to the back of the sink cart cabinet.
4. Place second set of tanks in front area for
later use and close doors.
Changing Tanks
1. To change to second tank supply, remove
front fresh water tank.
2. Switch drain line nozzle to front
waste tank (B).
3. Switch pump line from empty water tank
to second full tank and place back into its
position in front.
4. Briefly turn on faucet to check that
pump is moving water through system.
If so, close doors. You're ready with
5 more gallons.
Connecting Your Hand Sink Cart to a CamKiosk
®
Note:
you will need one Bridge Connector
(CamKiosk accessory KMC24, sold separately.)
1. With both Hand Sink Cart and CamKiosk positioned the proper distance, place top
bridge so that it engages with handles of both carts.
2. Install clamp pieces so that they fit over underside of handles on either side and
tighten with 4 arm knobs at each slot position.
3. Using
1
⁄
4
" thumb screws, place strap brackets on either side of open space between
carts, look for threaded insert at front corner of each cart, along bottom edge.
4. Position front panel on strap brackets and install
1
⁄
4
" thumb screws into inserts
on bottom edge of panel (leave loose).
5. Going under top bridge, install
1
⁄
4
" x 2
1
⁄
2
" long 3 lobe knobs through slots in top of
front panel and tighten against top bridge’s front section.
6. Once front panel is properly positioned, tighten bottom
1
⁄
4
" thumb screws either
side along bottom edge of panel and both cart bodies.
III. Start-Up and Daily Operations
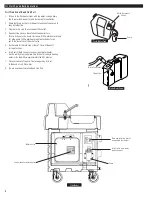
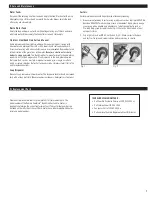
Side View
B
A
Cap filler spout
Waste
Waste
B
A
Side View
Connector
Fill spout
with cap
Fresh
Fresh
To reduce the risk of electric shock, disconnect from power
supply before replacing temperature-limiting device.
Do not plug in electrical power supply to water heater until
tank has been completely filled with water. The heating
elements will burn out if not immersed in water.
Unplug electrical power supply before draining water heater
or removing cover.
Water temperature over
125˚F can cause severe
burns instantly or death
from scalds. Children,
disabled and elderly are at
highest risk of being scalded.
See instruction manual before
setting temperature on water heater.
Check water before washing.
Temperature limiting valves are available
through manufacturer.
The internal parts of this tank have been constructed and
tested by the manufacturer to withstand 400˚F temperature.
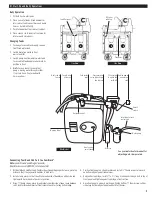
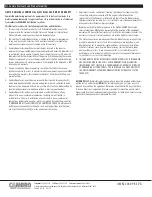
To hot side of
faucet
To cold side
of faucet
Cold water
inlet
On/off
switch
Inlet tube to fresh
water tank
Water pump
Arrester
Hot water outlet
Heat control
on-off knob
Pressure relief
valve & discharge
line to drain
110v switch
& outlet box
with GFI
Outside power
connection
cord
See your water heater manual for
adjusting water temperature.
Warning label
110v Model


