background image

10

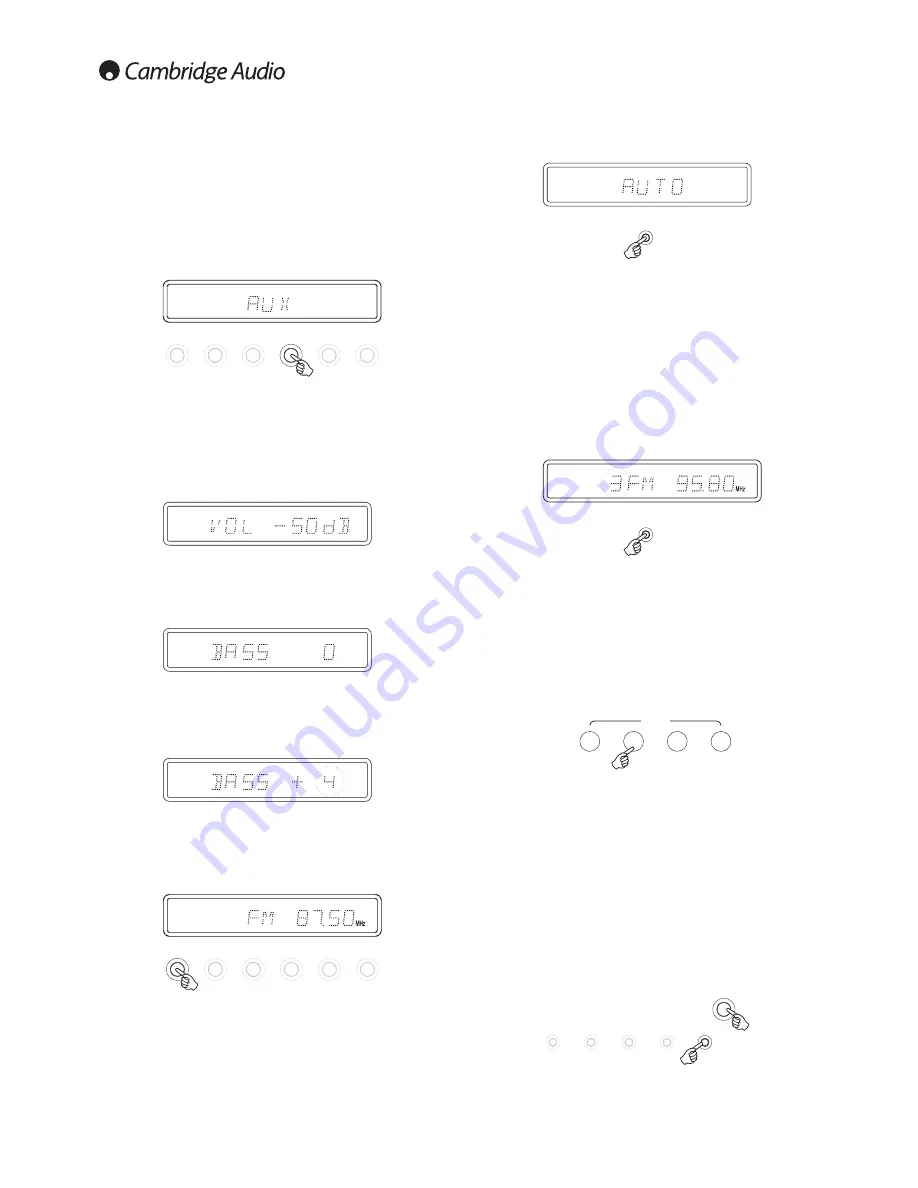
When Auto mode has been selected, press the 

button to scroll down

through the station frequencies or press the 

button to scroll up through

the station frequencies.

The tuner will stop at the first strong signal it finds. To move to another
station simply press the 

or 

button again.

Setting presets

Radio stations can be stored into the memory presets for easy access.
You can store up to 15 presets for each band (i.e. 15 presets for the AM
band plus 15 presets for the FM band).

Tune to the station you wish to store and hold down the Mode/Store
button on the front of the unit. The display on the unit will flash the next
available preset.

Press the Mode/Store button again to store the preset. The available
preset will stop flashing to indicate that the station has been stored.

To change the preset number, simply press and hold the Mode/Store
button to enter store mode then select any preset number you require
with the 

and 

keys then press the Mode/Store button again to

actually save the preset.

To recall a stored preset, simply press the number on the remote control
that corresponds with the preset. Each of the preset buttons can select
two presets. To select the second preset on the button, press the button
again and this will toggle to the second preset.

To load a stored preset from the front of the unit, simply press the number on
the front the unit or remote that corresponds with the preset. To access the
second preset represented by the button, you must press and hold the button.

Note: You can only access stored presets 1-8 on the remote preset
buttons. You can access stored presets 1-10 on the front panel preset
buttons. To access all presets, set the mode to ‘Preset’ mode with the
‘Mode’ button on the remote control or ‘Mode/Store’ button on the front
panel, and use the 

or 

buttons. This will allow access to the full 15

AM stored presets or 15 FM stored presets.

Resetting tuner presets

To clear all stored presets for both AM and FM, press and hold both the
5/10 and Menu buttons at the same time. The unit will display ‘Reset’.
Restart the unit by powering off and on.

After making any connections to your unit, activate the Topaz SR10 by
pressing the On/Off button on the front of the unit.

Setting the source

Press the Source button on the front of the unit corresponding to your
desired source. Alternatively, you may use the appropriate button on the
remote control.

Adjusting the volume

Use either the Volume Up/Down buttons on the remote control, or the
Volume control on the front of your unit system to change the volume
level. The newly selected level will be indicated briefly on the front display.

The volume is displayed in minus dB where 0dB is the highest level.

A progressively larger negative number indicates the volume is being
reduced.

Adjusting the audio settings

Adjustments to the bass, treble and balance can be made as follows:

1. To enter the audio menu. Press either the Menu button on the front of

the unit or on the remote control.

2. Step through the available settings by pressing the Menu button. The

settings available are in order Bass, Treble and Balance.

3. When you wish to make an adjustment for bass, treble or balance,

simply rotate the Volume control or use the Volume control buttons on
the remote control.

4. To exit, wait for five seconds, until the unit returns to normal mode.

Tuning and listening to the built in tuner

Select the Tuner source using the FM/AM button on the front of the unit,
or directly by pressing the FM or AM buttons on the remote.

Repeatedly pressing the FM/AM button on the front of the unit switches
between FM and AM modes.

Note: For ease of tuning on first time use, we recommend that you set the
Topaz SR10 to ‘Auto’ mode. Press the Mode/Store button on the front of
the unit. This button cycles through Preset, Auto and Manual, modes. 

Operating instructions

Speaker  A / B

Phono

MP3 / Aux

BD / DVD

CD

FM / AM

BD / DVD

CD

FM / AM

Speaker A / B

Phono

Mode / Store

Mode / Store

1 / 6

2 / 7

3 / 8

4 / 9

5 / 10

Menu

1 / 6

2 / 7

3 / 8

4 / 9

1/5

2/6

3/7

4/8

Presets

Speaker  A / B

Phono

MP3 / Aux

BD / DVD

CD

FM / AM

Speaker A / B

Phono

MP3 / Aux

BD / DVD

CD

Summary of Contents for Topaz SR10

Page 1: ...Your music our passion SR10 ENGLISH Stereo receiver User s manual 2 ...

Page 2: ...s from the Cambridge Audio range which have been designed to the same exacting standards as this product Your dealer can also supply excellent quality Cambridge Audio interconnects to ensure your system realises its full potential Thank you for taking the time to read this manual we recommend you keep it for future reference Matthew Bramble Cambridge Audio Technical Director and the SR10 design te...

Page 3: ...xposed to dripping or splashing water or other liquids No objects filled with liquid such as vases shall be placed on the unit The lightning flash with the arrowhead symbol within an equilateral triangle is intended to alert the user to the presence of un insulated dangerous voltage within the product s enclosure that may be of sufficient magnitude to constitute a risk of electric shock to persons...

Page 4: ...ir of your Cambridge Audio product it can be returned by your dealer to Cambridge Audio or an authorised Cambridge Audio service agent You will need to ship this product in either its original packaging or packaging affording an equal degree of protection Proof of purchase in the form of a bill of sale or receipted invoice which is evidence that this product is within the warranty period must be p...

Page 5: ...ommended Service port For servicing use only Do not connect anything here as it may result in damage Loudspeaker terminals Two sets of loudspeaker terminals are available A main loudspeaker terminals top row and B secondary switchable loudspeaker terminals bottom row Connect the wires from your left channel loudspeaker to the Left positive and negative terminals and the wires from the right channe...

Page 6: ...es with an impedance of between 32 and 600 ohms are recommended Note Plugging in headphones will automatically mute the loudspeaker outputs Skip Scan buttons The skip scan buttons are used when the FM AM tuner is selected These buttons have different uses depending on the mode selected In Preset mode Steps up or down through the user stored presets In Auto mode Searches for the previous or next av...

Page 7: ...d Manual modes Volume Increases or decreases the volume of the unit Also used to change the bass treble and balance settings when these are selected Skip Used when FM or AM is selected In Preset mode Steps up or down through the user stored presets In Auto mode Search for the previous or next available station with a strong signal In Manual mode Adjusts the frequency in steps for fine tuning Menu ...

Page 8: ...connector or the sound can become weak and phasey with little bass Using bare wire connections Prepare the speaker cords for connection by stripping off approximately 10mm 3 8 or less of the outer insulation More than 10mm could cause a short circuit Twist the wires tightly together so there are no loose ends Unscrew the speaker terminal insert the speaker cable tighten the terminal and secure the...

Page 9: ... to the Front Panel or Remote Control section of this manual for more information on the Speaker A B operation Bi wire connections If your loudspeakers are equipped with two sets of terminals then it is possible to connect them in the bi wire configuration Bi wiring sends the bass and treble frequencies down separate speaker cables resulting in a clearer more focussed sound Note Speaker A and B mus...

Page 10: ...for both AM and FM press and hold both the 5 10 and Menu buttons at the same time The unit will display Reset Restart the unit by powering off and on After making any connections to your unit activate the Topaz SR10 by pressing the On Off button on the front of the unit Setting the source Press the Source button on the front of the unit corresponding to your desired source Alternatively you may us...

Page 11: ...he aerial Ensure that all cable connections are secure particularly ground shield connections for turntables The remote handset will not function Check that the batteries have not expired Ensure that nothing is blocking the remote sensor Over temperature protection The unit has an over temperature and shutdown protection If the unit is continuously used for a long period and over heats the unit wi...

Page 12: ...1 2009 Cambridge Audio Ltd Cambridge Audio is a brand of Audio Partnership Plc Registered Office Gallery Court Hankey Place London SE1 4BB United Kingdom Registered in England No 2953313 www cambridge audio com ...

Reviews: