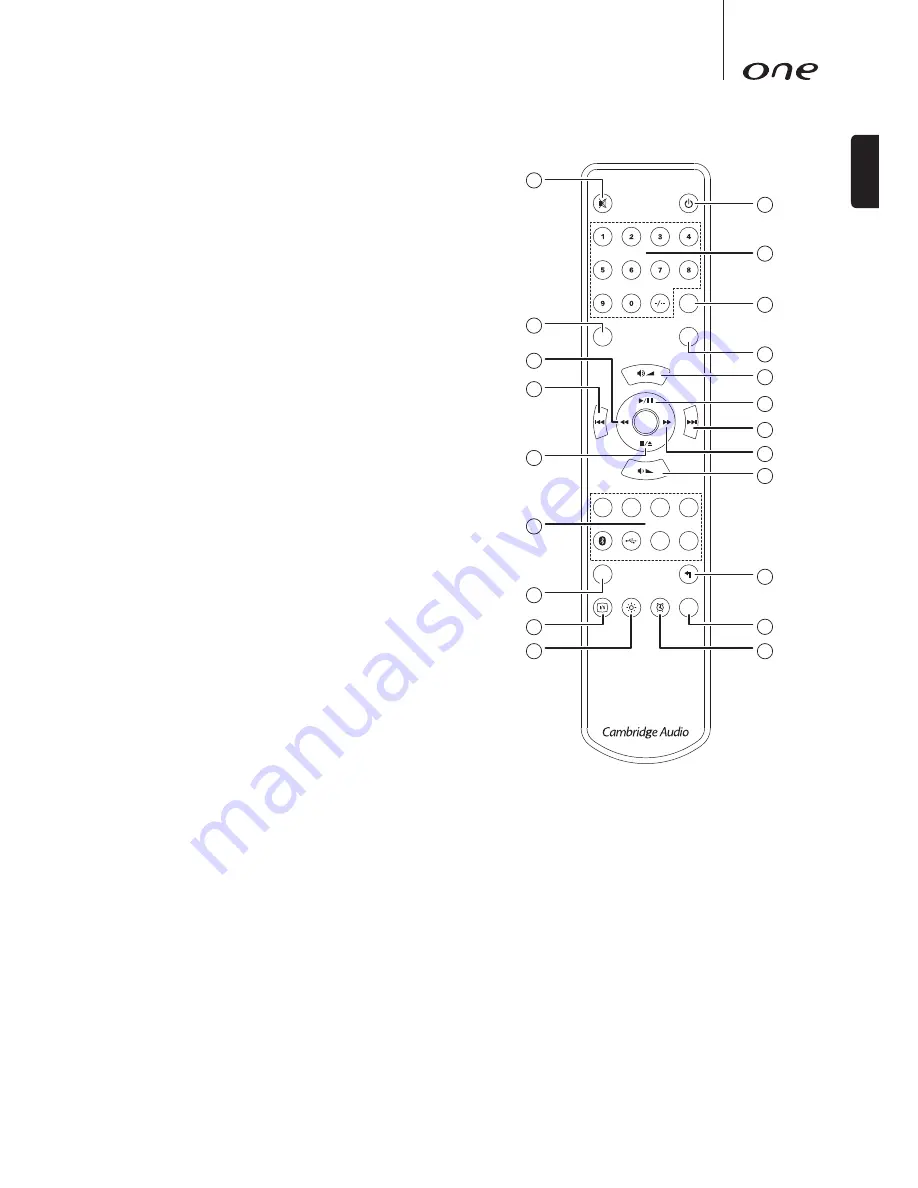
background image

7

ENGLISH

Remote control

The One is supplied with a remote control handset that duplicates the front panel 

control and functions. The supplied AAA batteries must be fitted before the remote 

control can be used.

1. Mute

Press to mute/unmute the speaker outputs.

2. Standby/On

Switches the One between On and low power eco-friendly Standby mode.

3. Numerics

Tuner mode

 – Allows access to stored preset stations. Press the numeric 1–5 

button.

CD mode

 – Enable direct CD track selection. Press the number of the desired track 

to begin playback from the beginning. To select a track number greater than 9, 

press the -/-- button followed by the track number.

4. Prog, 5. Random and 6. Repeat

Press to select various playback modes. Refer to the 'Operating instructions' 

section of this manual for information on the functions of these buttons.

7. Volume Up/Down

Volume adjustment.

8. Scan

Press and hold to scan within the selected track. Hold down for a few seconds 

to increase scan speed. Press the right button to fast forward, the left button to 

rewind.

9. Play/Pause

Press to play/pause CD playback.

10. Skip

Use for skipping between tracks during CD playback or to scroll through available 

station in DAB/FM mode. 

11. Stop/Eject

Press to stop CD playback. Press again to eject the Disc.

12. Source buttons

The 8 source select buttons are used to directly select the input source. 

13. Return

Press to return to the previous menu.

14. Menu

Press to access the main menu.

15. Info

Press to select and view different information on the front panel display. The 

display modes are as follows:
Tuner mode – Radio Text, Transmission group, Time/Date, Signal quality, Program 

type.

16. Sleep

Press to enable and set the sleep function. This will turn the unit off after a 

selected interval.

17. Brightness display

Alters the brightness of the display's backlights. There are two brightness levels 

and an option to switch off the backlight.
When the display is set to Off, nothing will be displayed onscreen until a selection 

is made via the front panel or remote control. The display will then re-activate 

allowing you to browse the menu and make your selection. The display will then 

automatically switch back off after a few seconds if no further selections are made.

18. Alarm

Press to enable and set the alarm function. See later section for further details

1

2

3

4

6

7

9

10

8

7

13

16

18

5

8

10

11

12

14

15

17

Select

Menu

Opt

Coax

CD

Aux

FM

DAB

Sleep

Prog

Random

Repeat

Summary of Contents for one

Page 1: ...Your music our passion CD Receiver User s manual 2 ENGLISH...

Page 2: ...ion protected by copyright All rights are reserved No part of this manual may be reproduced by any mechanical electronic or other means in any form without prior written permission of the manufacturer...

Page 3: ...lled in a manner that makes disconnection of the mains plug from the mains socket outlet or appliance connector from the rear of the unit possible Where the mains plug is used as the disconnect device...

Page 4: ...the power cord the wires should be fitted as shown in this diagram The colours of the wires in the mains lead of this appliance may not correspond with the coloured markings identifying the terminals...

Page 5: ...Please ask your dealer for details 5 Service Normal For dealer use only Switches the One between normal default and service mode Do not change the mode to service mode as damage may result 6 Speaker t...

Page 6: ...e through the main menu Audio Inputs or direct MP3 button on the remote to listen to your portable audio device 6 Source Pressing this button will cycle through different sources CD DAB FM Aux Bluetoo...

Page 7: ...cks during CD playback or to scroll through available station in DAB FM mode 11 Stop Eject Press to stop CD playback Press again to eject the Disc 12 Source buttons The 8 source select buttons are use...

Page 8: ...n active subwoofer is used connect via a standard single RCA phono cable often referred to as a Sub Link Analogue audio connections Note Do not plug in the mains power lead or turn the unit on until a...

Page 9: ...configuration the One is able to work at up to 24 bit 96kHz by declaring to your computer that it can handle any sample rate from 32kHz to 96kHz However in some Windows Mac operating system variants...

Page 10: ...y To select random play simply press the handset Random button once and then the Play button Random play can be cancelled by a further press of the Random button The disc will then continue to play th...

Page 11: ...clock mode 1 Press the Menu button on the remote to access the menu settings 2 Use the buttons on the remote to navigate and select Clock Setup Set Time 3 Adjust the hour using the buttons on the remo...

Page 12: ...l cable connections are secure particularly ground shield connections There is unwanted background noise and interference Move the unit away from other electrical equipment that is likely to cause int...

Page 13: ...Audio is a brand of Audio Partnership Plc Registered Office Gallery Court Hankey Place London SE1 4BB United Kingdom Registered in England No 2953313 www cambridge audio com 2014 Cambridge Audio Ltd...

Reviews: