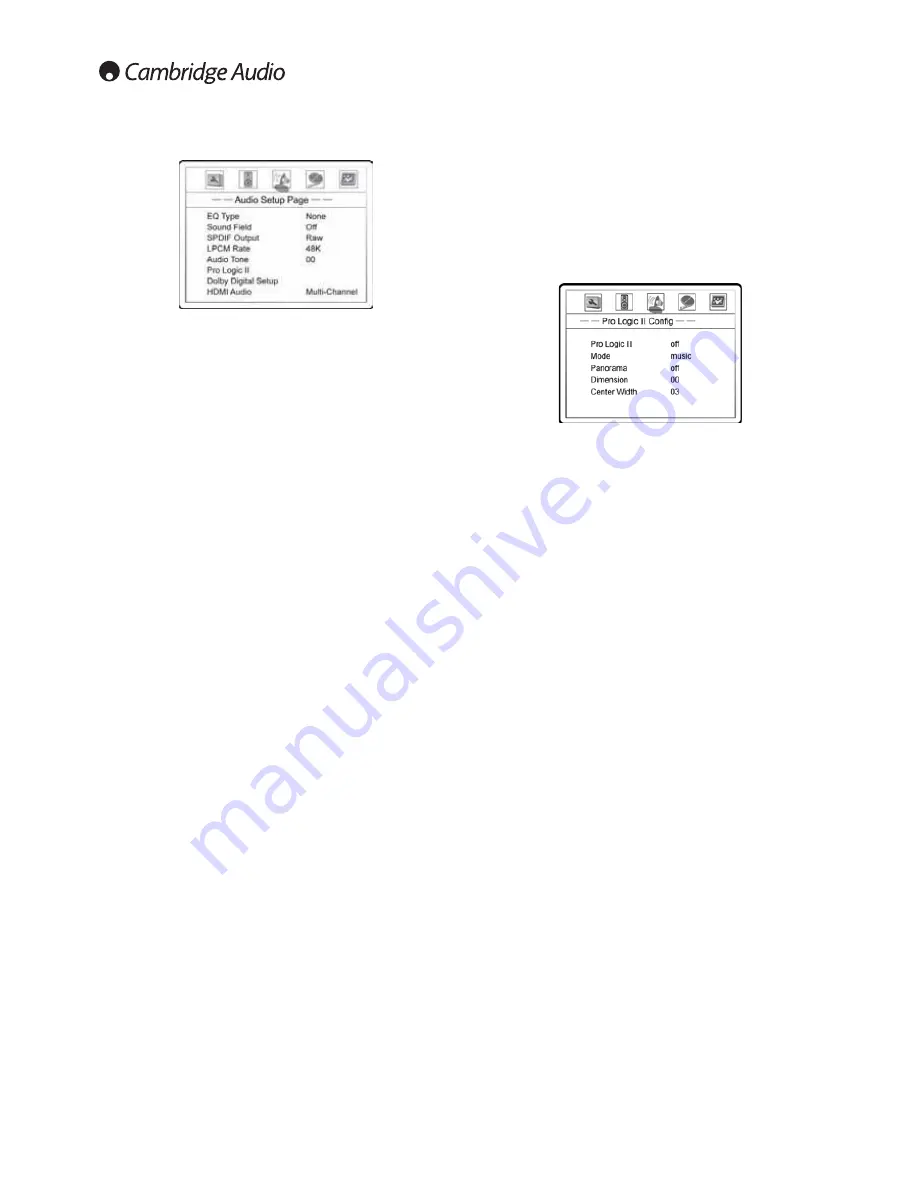
background image

10

6.

Pro Logic II:

Taking a step further than most DVD players, the OPPO

DVD player allows you to configure Dolby Pro Logic II to expand 2-
channel source audio into full 5-channel surround sound. 

Note:

Pro

Logic II functionality is effective only when 

Speaker Setup Page >

Down-mix

is set to 

“5.1ch”

and

SPDIF Output

is set to 

“Raw”

.

• Press the SELECT button to enter the Pro Logic II Config page.

• Press the LEFT ARROW button to exit the Pro Logic II Config page.

A. 

Pro Logic II:

To turn on or off the Pro Logic II processing. The options

are:

On

– Pro Logic II processing is always on

Off

–Pro Logic II processing is disabled

Auto

– Pro Logic II processing is on only when Dolby Pro Logic II

encoded content is detected.

B.

Mode:

To set the processing mode of Pro Logic II. The options are:

Music

– The surround experience is tailored for multi-channel music

playback

Movie

– Emphasis is given to the center channel as two-channel audio

is decoded and played back into your 5.1 system

Pro Logic

– This activates decoding and processing of the original

Dolby Pro Logic processing with mono-surround channel. We
recommend using the Dolby Pro Logic Movie mode in lie of this 4-
channel surround format.

Auto

– Automatically selects processing mode based on the input

format

C.

Panorama (Music mode only):

Turns on

/

off panorama mode. When

turned on, the front stereo audio is partially fed into the surround
channels for an enveloping effect.

D.

Dimension (Music mode only):

Allows gradual adjustment of the

soundfield either towards the front or towards the rear. This is useful
in setting a more even balance from all speakers with some rooms.

E.

Center Width (Music mode only):

To control the width of the center

channel sound effect by blending the center speaker to the left and
right speakers. As the level number increases, the center channel
sound moves toward the left and right speakers.

Audio setup page

1. 

EQ Type (None/Rock/Pop/Live/Dance/Techno/Classic/Soft):

This

sets a corresponding equalization pattern type to the current music
track. 

Note:

These EQ options are not available for SACD, DTS or DVD-

Audio tracks.

2.

Sound Field (Off/Concert/Living/Room/Hall/Bathroom/Cave/Arena/Church):

These allow users to engage fun sound field effects that will alter the
original audio presentation as it was intended. 

Note:

These EQ

options are not available for SACD, DTS or DVD-Audio tracks.

3.

SPDIF Output:

This set the bit stream type of the digital audio output

for use with Dolby Digital and DTS-compatible receivers. The options
are:

Raw

– Passes the encoded multi-channel digital audio unaltered.

Choose this setting if your receiver

/

amplifier is capable of decoding

Dolby Digital and

/

or DTS.

PCM

– Forces down-mixed 2-channel digital audio output. Choose this

setting if your receiver

/

amplifier only supports stereo digital (PCM)

audio.

4.

LPCM Rate:

To set the maximum Linear PCM output frequency. The

options are:

48K

– Supported by most equipment.

96K

– Allows a higher sampling rate and frequency response. Ensure

that the receiver

/

amplifier can support it.

192K

– Allows the highest sampling rate and frequency response.

Ensure that the receiver

/

amplifier can support it and that your dogs

are safely away from the listening area.

Note:

The LPCM rate is selectable only when HDMI Audio is turned off.

5.

Audio Tone (+/-16):

This function raises or lowers the tone (key

/

pitch)

of the audio track. This is useful for playing Karaoke discs and should
not be used for regular music listening or movies.

• Press the SELECT button to show the tone control window.

• Press the LEFT

/

RIGHT ARROW buttons to lower or raise the

tone

/

pitch.

• Press the SELECT button to confirm the setting.

Summary of Contents for DVD89

Page 1: ...ENGLISH DVD player User s manual supplement 2 DVD89 Open Close Play Pause Stop Skip Scan DIGITAL AUDIO DIGITAL AUDIO COMPACT ...

Page 2: ...vailable audio connection 5 Connections for most CD or DVD playback 5 Connectionsfornon DolbyDigital DTSReceivers DVD AudioandSACD 6 Setting up the player Advanced 7 Setup menu options 7 Entering the setup menu system 7 General setup page 7 Speaker setup page 8 Audio setup page 10 Video setup page 11 Preference page 12 ...

Page 3: ...terminology to indicate the location of the desired function Setup Menu Name Menu Item Submenu Item or Selection Setup Menu Name is the actual name of the uppermost setup menu level With the DVD89 Player there are exactly five 5 Setup Menu pages or sections each represented by an icon on the top of the Setup Menu screen They are General Setup Page Speaker Setup Page Audio Setup Page Video Setup Pa...

Page 4: ... TV For most flat panels and DLP LCD or LCoS SXRD D ILA rear projection televisions this will be 720p For CRT rear projection televisions this will likely be 1080i For non HD displays very rare if they have HDMI or DVI this will be 480p If the HDMI input of your TV is only capable of decoding 2 channel digital audio it is recommended that you set Speaker Setup Page Down mix to Stereo This sets the...

Page 5: ...oaxial or optical cable and set the Audio Setup Page SPDIF Output to Raw No additional audio cables will be needed unless you listen to SACD see opposite Use the best available audio connection Audio In Coaxial In Optical In azur 640R AV Receiver Volume Phones Tuning Mode Store DVD Video 1 Stereo Modes Dolby Digital DTS Surround Modes Pro Logic Neo DSP Surround Modes Video Input Type Audio Video S...

Page 6: ...g so enjoy them if you can SR SBR L SL SBL SB C R SW azur 640R AV Receiver Volume Phones Tuning Mode Store DVD Video 1 Stereo Modes Dolby Digital DTS Surround Modes Pro Logic Neo DSP Surround Modes Video Input Type Audio Video S Video Audio Input Type Video 2 Recorder 1 Aux CD Recorder 2 7 1 Direct Standby On Analog Stereo Direct Optical Tuner FM AM Video 3 L R Digital Processing Options Mute AV R...

Page 7: ... is addressed in the Setting up the player Basics section To set the aspect ratio of the DVD player s output image to match your TV select from the following 16 9 Wide 16 9 widescreen sources will be displayed in their native aspect ratio and 4 3 sources will be stretched 16 9 Wide SQZ 16 9 widescreen as well as 4 3 sources will be displayed in their native aspect ratio Please note that in this mo...

Page 8: ...kers almost all speakers qualify to be small Bass frequencies are not passed to the front speakers to reduce possible distortion This is the preferred setting for all systems utilizing a subwoofer 3 Center Speaker To set the sound filtering control for the center speaker The options are Large Choose if the center speaker is full range reproduces down to at least 40Hz and if you do not have a subwo...

Page 9: ...0 inches This DVD player does not support delays for when the distance between the center or surround speakers and the listener are shorter than that between the front speakers and the listener In case the channel delay settings cannot match your speaker configuration please set all distance difference to 0 inch and use your receiver amplifier to set the channel delay if possible 7 Channel Trim To...

Page 10: ...nding the center speaker to the left and right speakers As the level number increases the center channel sound moves toward the left and right speakers Audio setup page 1 EQ Type None Rock Pop Live Dance Techno Classic Soft This sets a corresponding equalization pattern type to the current music track Note These EQ options are not available for SACD DTS or DVD Audio tracks 2 Sound Field Off Concer...

Page 11: ...ollowing options Sharp Enables edge enhancement which is an artificial and picture degrading feature We recommend leaving this off Soft Softens edges by smoothing the image which may cause slight loss of details Off recommended Turns off edge enhancement completely 2 Brightness Adjusts the brightness black level of the video output Press the SELECT button to show the Brightness scale and then use ...

Page 12: ...V The options are Auto No system conversion is performed The output video system is the same as that encoded on the disc This requires a TV that supports NTSC and PAL input PAL When playing PAL encoded discs no system conversion is performed NTSCencoded discs are converted to PAL output NTSC default When playing NTSC encoded Region 1 discs no system conversion is performed PAL encoded discs are co...

Page 13: ...AP21467 1 Cambridge Audio Gallery Court Hankey Place London SE1 4BB England www cambridge audio com 2007 Cambridge Audio Ltd Power ...

Reviews: