background image

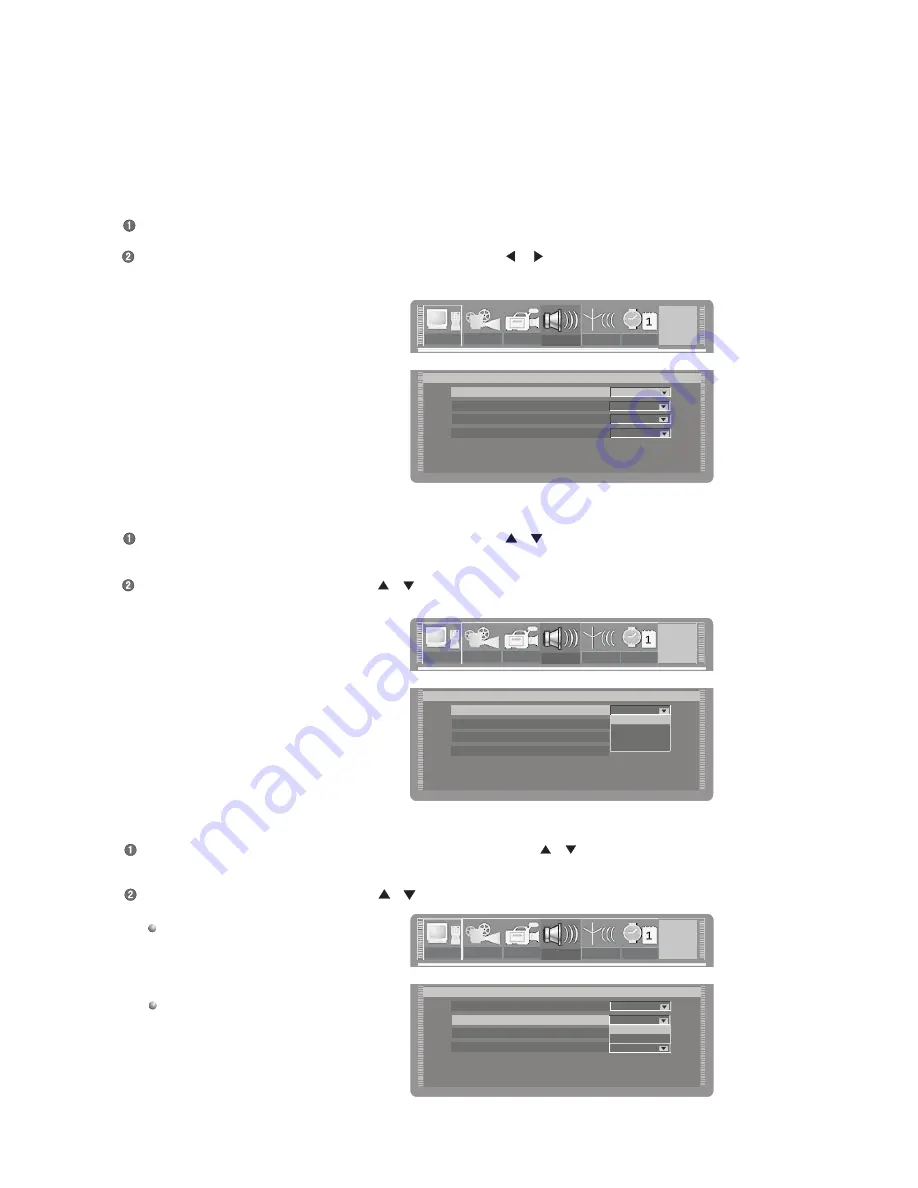
In the language setup menu, select the item "OSD language" by using the [

], [

] buttons, press the [SELECT] button. A pop-up

menu will appear, which is shown as the following illustration:

Select your desired language by using the [

], [

] buttons, press the [SELECT] button to confirm and the OSD language will

change correspondingly.

In the language setup menu, select the item "Menu language" by using the [

], [

] buttons, and then press the [SELECT] button. A

pop-up menu will appear.

Language Setup

OSD language

Menu language

English

English

OFF

Subtitle language

English

Audio language

GNRL

PLAY

REC

LANG

TUNER

CLOCK

Language Setup

OSD language

Menu language

English

English

OFF

Subtitle language

English

Audio language

GNRL

PLAY

REC

LANG

TUNER

CLOCK

GNRL

PLAY

REC

LANG

TUNER

CLOCK

Language Setup

OSD language

Menu language

English

Subtitle language

Audio language

GNRL

PLAY

REC

LANG

TUNER

CLOCK

Language Setup

OSD language

Menu language

English

English

OFF

Subtitle language

English

Audio language

PLAY

REC

LANG

TUNER

CLOCK

Language Setup

OSD language

Menu language

English

Subtitle language

Audio language

GNRL

PLAY

REC

LANG

TUNER

CLOCK

GNRL

PLAY

REC

LANG

TUNER

CLOCK

LANG

English

Spanish
French

German

Language Setup

OSD language

Menu language

English

Norwegian

Subtitle language

Audio language

GNRL

PLAY

REC

LANG

TUNER

CLOCK

Language Setup

OSD language

Menu language

English

English

OFF

Subtitle language

English

Audio language

REC

LANG

TUNER

CLOCK

Language Setup

OSD language

Menu language

English

Subtitle language

Audio language

REC

TUNER

CLOCK

English

Spanish
French

German

Language Setup

OSD language

Menu language

English

Norwegian

Subtitle language

Audio language

GNRL

PLAY

REC

LANG

TUNER

CLOCK

GNRL

PLAY

REC

LANG

TUNER

CLOCK

LANG

Norwegian

Finnic

Original

Language Settings

SYSTEM SETUP

DVD55RWi

To meet the needs of consumers in different regions, this unit is equiped with many kinds of operation interface languages for your selection.

Enter the system setup mode.

In the system setup control bar, move the cursor left and right by the [

], [

] buttons. Select the item "LANG", and then press the

[SELECT] button to enter the language setup menu. The screen displays:

OSD language setup

DVD Menu Language Setup

Select your desired language by using the [

], [

] buttons, then press the [SELECT] button.

If you play DVD discs that support the

selected language, the system will adopt

this language as the DVD menu language.

If the disc does not support the selected

language, the system will use the default

language.

43.

Summary of Contents for DVD55RWI

Page 1: ...Owners Manual DVD Recorder DVD55RWi ...

Page 2: ...fety Precautions Basic Information System Connections Monitoring Mode Recording Mode Manual Recording Recording schedule Chapter Editing Disc Operation Playback MODE System Setup Appendix 1 4 12 15 16 17 20 22 25 27 37 49 ...

Page 3: ... EEC and Electromagnetic Compatibility 89 336 EEC Directives when used according to this instruction manual Plug Fitting Instructions UK only The cord supplied with this appliance is factory fitted with a 13A mains plug fitted with a 3A fuse inside If it is necessary to change the fuse it is important that a 3A one is used If the plug needs to be changed because it is not suitable for your socket ...

Page 4: ...operating instructions Grounding or Polarization In some countries this product may be equipped with a polarized alternating current line plug a plug having one pin wider than the other This plug will fit into the power outlet only one way This is a safety feature If you are unable to insert the plug into the outlet try reversing the plug If the plug still does not fit contact your electrician to ...

Page 5: ...rain or water d If the product does not operate normally by following the operating instructions Adjust only those controls that are covered by the operating instructions as an improper adjustment of other controls may result in damage and will often require extensive work by a qualified technician to restore the product to its normal operation e If the product has been dropped or damaged in any w...

Page 6: ...tion and pre writing the directory zones making necessary Process the directory information of a disc so that it can be played in the normal DVD players A disc that is not finalized or made compatible can only be played in this unit Finalizing a disc refers to the operation to DVD R disc and making compatible refers to the operation to DVD RW Chapter Title The longest section of a picture or a mus...

Page 7: ...ck time Disc Diameter Horizontal Resolution Aspect Ratio Subtitle Audio Sound Quality Function Introduction Multiple languages and subtitles DVD disc can support as many as 8 dubbing languages and 32 subtitle languages Multiple angles DVD disc may support as many as 9 camera angles Multiple story plots Users can select to play desired plots the beginning development or ending of the same disc Mult...

Page 8: ...OLBY DIGITAL AUDIO OUT 2 CH OUT L R R L INPUTS S VIDEO VIDEO 2 CH AUDIO IN R L ANTENNA TV 75 IN OUT SCART OUT COMPOSITE RGB www cambridge audio co uk RISK OF ELECTRIC SHOCK DO NOT OPEN RISK OF ELECTRIC SHOCK DO NOT OPEN CAUTION CLASS 1 LASER PRODUCT LUOKAN 1 LASERLAITE KLASS 1 LASERAPPARAT Manufactured under license from Dolby Laboratories Dolby and the double D symbol are trademarks of Dolby Labo...

Page 9: ... dolby digital sound According the media of the played disc one of them will light The channel number will be shown below the item CHANNEL When is in the status of playing a disc this unit When is in program playback mode this unit When is in random playback mode this unit According to what day today is one of them will light ALL A B If is in repeat disc playback mode this unit If is in repeat AB ...

Page 10: ......

Page 11: ...o the list window or clear the wrong inputted characters in the edit window through the ADD CLEAR button Basic Operations OSD Menu Illustration The illustration below is the OSD menu to play BASIC INFORMATION DVD55RWi 9 1 Control menu bar Control bar is a collection of icons Those icons are presentations of commands or information that needed to finish a function 2 Icons explanation area When high...

Page 12: ......

Page 13: ...al Cable Optical In Amplifier with Dolby Digital or DTS digital decoder Connecting to the Amplifier with DTS or Dolby Digital Decoders Rear Panel BASIC INFORMATION DVD55RWi Please set DIGITAL OUTPUT to LPCM Please refer to System setup Playback settings Digital audio out setup for details 11 ...

Page 14: ...Connecting to the Amplifier with 5 1CH Audio Input Rear Panel SYSTEM CONNECTIONS DVD55RWi Video In Front Subwoofer Surround Centre Amplifier with 5 1CH Audio Input 12 ...

Page 15: ......

Page 16: ......

Page 17: ......

Page 18: ...t the desired source to be recorded Display the recording control menu bar Select recording quality Start recording Stop recording P001 This unit has various external input signal terminals including S video input Composite video input TV tuner input DV input and Stereo audio input The recordable discs of this unit are DVD RW and DVD R There are four recording qualities to be selected including SL...

Page 19: ...TLE CH001 SP 07 01 P001 SP 07 01 16 13 STOP TITLE SP CH001 SP 07 01 P001 SP 07 01 16 13 01 STOP 01 16 13 STOP TITLE 01 P001 01 16 13 STOP TITLE CH001 SP 07 01 P001 01 16 13 STOP TITLE RECORD CH001 SP 07 01 P001 SP 07 01 16 13 01 STOP 01 16 13 STOP TITLE 01 P001 01 16 13 STOP TITLE SP 07 01 P001 01 16 13 TITLE CH001 SP 07 01 P001 SP 07 01 16 13 01 STOP TITLE STOP Recording Process Control To start ...

Page 20: ...on the system will store some information into the disc so the system will display Please wait a moment on the Icons Explanation Area The system will not respond no matter which buttons you press The system will add a new title when you record again after stopping the operation If you record a disc continuosly the entire disc only has one title This function allows you set the end time of the reco...

Page 21: ...e a record scheduler the Item Editor window Item Editor F A V SP Source Quality Start End Once 01 01 0 1 12 10 12 40 Confirm Cance l Item Editor F A V Source Quality Start End Once 12 40 Confirm Cance l F A V CH125 F SV R A V Item Editor F A V Source Quality Start End Once Confirm Cance l EP SLP SP HQ SP SP the record schedule menu Record scheduler Quality Date Start End NO 1 2 3 4 5 6 Setting the...

Page 22: ...SCHEDULE DVD55RWi Move the cursor to select this line and press the SELECT button a pop up list will appear It is shown as follows If you select Weekly please press the SELECT button then move the cursor to the right side of the third line Next press the SELECT button and the OSD will display a list of weekdays so you can select what you need If you select Once confirm by pressing the SELECT butto...

Page 23: ... time of recording This operation is similar to step Highlight the Confirm button in the Item Editor and press the SELECT button to finish the setup 5 minutes before recording if the unit is in use a message dialogue will appear to notify you a scheduled recording is due Please highlight the Confirm button on the dialogue window and press the SELECT button to confirm the cancellation of the record...

Page 24: ...elect item time selecting playback Enter the chapter editing mode Select the Title Selection item by using buttons in the chapter editing control bar 22 CHAPTER EDITING Summary Entering the Chapter Editing Mode Notes Menu Explanation Operation steps Selecting the title to be edited 01 01 01 01 PLA Y NEW C UNHIDE T ICO N 00 01 01 NEW Add a ch apt er ma rke r 01 01 01 01 PLA Y NEW C UNHIDE T ICO N 0...

Page 25: ...e Index When playing the DVD title menu Press the TITLE button when playing In the chapter editing control bar move the cursor by using the buttons to select the Title Index item PLAY PLAY PLAY PLAY CHAPTER EDITING DVD55RWi Selecting the title to be edited continued Select the proper value of the item by using the buttons and press the SELECT button to confirm then the system will start separating...

Page 26: ......

Page 27: ...c Information shows the disc information 2 Finalize a Disc this function can make the disc able to be played in normal players If finalized DVD R the disc is unable to record new contents or modify contents 3 Erase Last Title if you feel the last recorded contents haven t been well recorded you may erase them Only available for DVD RW 4 Disc Erase once this function is performed the disc contents ...

Page 28: ... miss delete It can be unlocked if you want to record new content or make changes on a locked disc Disc locked 5 LOCK FINAL T DEL ERASE LOCK COMP Delete title Deleting the last title now FINAL T PEL ERASE LOCK COMP INFO Warning this operation will delete the last title in the DVD RW disc in the loader and can not be restored later The last title erased 5 T DEL Erase disc Erasing now FINAL T DEL ER...

Page 29: ...Screen displays INVALID Please exit this mode first and then press the PLAY button again In the playback mode the control of the system can be fulfilled by performing menu operation or using function buttons Enter the playback mode Pressing the NAVIGATION button can display or hide the control bar In the Stop mode pressing the NAVIGATION button is not effective When playing the menu of DVD disc pr...

Page 30: ...cts automatically then place the disc with the label side face up Press EJECT button again disc tray retracts Disc information is being read by your player Press PLAY button and playback automatically starts Press the STOP button to stop playing Pressing the STOP button for the first time the player enters the pre stop mode In this mode if you press the PLAY button the player will play the disc fr...

Page 31: ... and the system will enter the sequence playback mode Pressing the PLAY button can also enter the sequence playback mode This unit has many repeat modes repeat title only for DVD repeat chapter only for DVD repeat entire disc SVCD VCD repeat all DVD repeat song and so on In the playback control bar select the Playback Mode Control item by using the and SELECT buttons If the selected value is A B a...

Page 32: ...us window Random Playback Entering the playback mode continued PLAYBACK MODE DVD55RWi This mode allows the system play any desired title chapter or track in the chosen sequence Set the Playback Mode Control item to PROG and press the SELECT button Using the buttons can make the cursor move between the Disc Content window and the Program list window Using the buttons can make the cursor move up and...

Page 33: ... NORMAL 01 04 11 27 01 01 01 02 OFF 00 43 03 Total tities 4 playing now 1 PLAY 05 17 01 01 NORMAL 01 04 11 27 01 01 01 02 OFF 00 43 03 NORMAL 01 04 Total chapters 27 playing now 11 PLAY 05 17 01 01 NORMAL 01 04 11 27 01 01 01 02 OFF 00 43 03 Total tities 4 playing now 1 PLAY 05 17 01 01 NORMAL 01 04 11 27 01 01 01 02 OFF 00 43 03 NORMAL 01 04 Total chapters 27 playing n PLAY 05 17 01 01 NORMAL 01 ...

Page 34: ...2 Selection playback Continued PLAYBACK MODE DVD55RWi Track selection This feature is available to CD Choose the Track Selection item on the playback control bar The numbers below the icons show as current total track number This feature is unavailable with DVD playback Press the SELECT button Use the numerical keys to input the desired track no Press the SELECT button to start playing the track C...

Page 35: ...55RWi The usage of the GOTO Button In playback mode use the GOTO button to confirm every Selected item in the playback control bar you can then input the corresponding values by using the remote control with the method aforesaid The illustration below is an example of playing DVD discs The GOTO button is invalid to some discs This operation is avaliable to non DVD discs and Mp3 The numbers below t...

Page 36: ...lt value can be set in the system setup menu If the word OFF appears below the icon you can set this option in the system setup menu Press the SELECT button to make the Subtitle Selection item change into the input mode Input the value using the numerical keys then press the SELECT button to confirm Using the SUBTITLE button can switch subtitles directly The default option of this item can be set ...

Page 37: ...en playing the JPEG file the menu control bar is shown in the following The meanings of the icons in the menu are as follows 1 Disc Type 2 Playback Mode Control 3 Playback Process Control 4 Control Wipe Mode 5 Control Zoom Mode 6 Pictures Rotating Selection 7 Disc Contents List window 8 Program List window In the control menu the functions of the items 1 2 3 7 8 are similar with the ones when play...

Page 38: ...AY REC LANG TUNER CLOCK General system setup General Setup 1 2 3 4 5 General Setup Screen saver ON Video output format Restore factory settings PAL OK GNRL PLAY REC LANG TUNER CLOCK PLAY REC LANG TUNER CLOCK System Setup Control Bar General Setup Menu PAL Progressive Interlace Interlac e GNRL PLAY REC LANG TUNER CLOCK 6 GNRL REC LANG TUNER CLOCK General system setup General Setup 1 2 3 4 5 General...

Page 39: ...er Progressive Interlace ON Interlace Video output format Restore factory settings PAL OK LANG TUNER CLOCK Progressive Video output General Setup Screen saver Progressive Interlace ON Interlace Video output Video output format Restore factory settings PAL OK GNRL PLAY REC LANG TUNER CLOCK GNRL PLAY REC LANG TUNER CLOCK RGB GNRL Progressive Interlace Interlace Interlace YCbCr RGB RGB SYSTEM SETUP D...

Page 40: ...Playback Setup TV aspect ratio Rating level Pan Scan 16 9 Letter Box Digital audio output Playback Setup Pan Scan REC LANG TUNER CLOCK PLAY GNRL PLAY REC LANG TUNER CLOCK GNRL PLAY REC LANG TUNER CLOCK PLAY OFF Closed captions OFF Closed captions 5 1CH Analog audio output 5 1CH Analog audio output Notes SYSTEM SETUP DVD55RWi Playback settings Display the system setup control bar Move the cursor le...

Page 41: ...confirm This setup is only valid to the TV sets and discs that support the Captions function Rating level setup In the playback setup menu move the cursor up and down by pressing the buttons to select the item Rating level then press the SELECT button The TV screen displays By setting this units authorization rating and password some discs with control grade cannot be played without inputting the ...

Page 42: ...udio output Playback Setup Closed captions 2CH GNRL PLAY REC LANG TUNER CLOCK GNRL PLAY REC LANG TUNER CLOCK PLAY 5 1CH Analogue audio output OFF 5 1CH Rating Level setup continued SYSTEM SETUP DVD55RWi To change the password please highlight the New in the above figure below then press the SELECT button The TV screen will display Select the New password by using the cursor buttons then input the ...

Page 43: ... Auto add chapter marker during recording Record Setup TUNER Auto chapter marker Default source SP Default quality Auto add chapter marker during recording Record Setup ON OFF GNRL PLAY REC LANG TUNER CLOCK GNRL PLAY REC LANG TUNER CLOCK GNRL PLAY REC LANG TUNER CLOCK Auto chapter marker Default source ON SP Default quality Auto add chapter marker during recording Record Setup TUNER Auto chapter m...

Page 44: ...NRL PLAY REC LANG TUNER CLOCK REC F A V SLP EP SP HQ Default Input Signal Sources Selection SYSTEM SETUP DVD55RWi Press the RETURN button to return to the previous menu and proceed with other settings or press the SETUP button to exit There are several kinds of input signal sources they are as the follows Please refer to the Basic Information Illustration of the Front Rear Panel for their position...

Page 45: ...CK LANG English Spanish French German Language Setup OSD language Menu language English Norwegian Subtitle language Audio language GNRL PLAY REC LANG TUNER CLOCK Language Setup OSD language Menu language English English OFF Subtitle language English Audio language REC LANG TUNER CLOCK Language Setup OSD language Menu language English Subtitle language Audio language REC TUNER CLOCK English Spanish...

Page 46: ...uage Menu language English Norwegian Subtitle language Audio language GNRL PLAY REC LANG TUNER CLOCK Language Setup OSD language Menu language English Norwegian Subtitle language Audio language GNRL PLAY REC LANG TUNER CLOCK GNRL REC LANG TUNER CLOCK LANG OFF OFF English Chinese Language Setup OSD language Menu language English Norwegian Subtitle language Audio language PLAY REC TUNER CLOCK LANG O...

Page 47: ...er audio channel Channel A Channel Edit Channel No name Frequency Tvsystem SELECT to modify CH CH to shift channel 0 9 to jump channel Nicam Skip Fine tune P089 CH089 46 25MHz PAL I Yes OK On Note Auto Scan channels Channel Tuning SYSTEM SETUP DVD55RWi This unit is equipped with a TV tuner by which you can receive TV signals Before receiving TV signals you must proceed with the tuning operation Th...

Page 48: ......

Page 49: ......

Page 50: ......

Page 51: ...ord failure No monitoring signal Time recording failure Recording abortion REMEDY 1 Connect the power plug into the wall outlet securely 2 Plug again or change another socket 3 Switch on the power socket 1 Connect cables securely 2 Clean the discs 3 Press the MUTE button again 1 Connect cables securely 2 Reset your TV set s AV TV status 3 Press the IS PS button 1 Press the IS PS button to reset th...

Page 52: ...arket We recommend that you buy quality discs to guarantee a higher successful recording rate Meanwhile we have also tested some brands and the following discs have performed very well during our tests It is recommended that you use a DVD R RW of no higher than 4 speed to record Please keep the recording side of a DVD R RW clean and intact Do not expose the disc to direct sunlight The performance ...

Page 53: ...le discs Recordable discs Recording formats Recording quality Input Output Video characteristics Audio characteristics General Specification Operating temperature Operation humidity Output Input Output Input Composite video input S video input Y C DV camera jack input IEEE1394 i Link RF input Analog audio input Composite video output S video output Y C Component video output Y Pb Cb Cr Pr SCART ou...

Page 54: ...to confirm that you have an unaltered serial number and or you purchased from a CAMBRIDGE AUDIO authorised dealer This Warranty does not cover cosmetic damage or damage due to acts of God accident misuse abuse negligence commercial use or modification of or to any part of the product This Warranty does not cover damage due to improper operation maintenance or installation or attempted repair by an...

Page 55: ......

Page 56: ...J Part 1040 at date of Apparatus claims of US patent nos 4 631 603 4 577 216 4 819 098 and 4 907 093 licensed DTS and DTS Digital Out are trademarks of Digital Theater Systems Inc AP15535 1 For the latest information on Cambridge Audio products visit us at www cambridge audio co uk Made from recyclable material 2004 This product incorporates copyright protection technology that is protected by met...

Reviews: