background image

35

751BD

azur

ENGLISH

For all sources the 751BD up-samples all internally decoded material to
24/192kHz via an Analog Devices SHARC DSP.

This runs our proprietary code from Anagram Technologies which
performs jitter suppression, up-sampling and anti-alias filtering for all 10
analog outputs (7.1 and Dedicated Stereo).

The front panel Filter button allows cycling between three different anti-
alias filters as described below. 

The three different Filter functions are: Linear Phase, Minimum Phase
and Steep. All three filters are optimised specifically for audio playback.
Each offers excellent sound quality but differs subtly in optimisation,
hence we’ve made all three available to you.

Note: For clarity, all diagrams show the theoretical response of the DSP
itself, excluding any analog filtering at the DAC outputs or the anti-aliasing
filter applied during recording and/or mastering of the digital source.  

Filters

-80

-60

-40

-20

0

20

-200

-180

-160

-140

-120

-100

0 0.1 0.2 0.3 0.4 0.5 0.6 0.7 0.8 0.9  1

frequency/FS (input sampling rate)

Magnitude (dB)

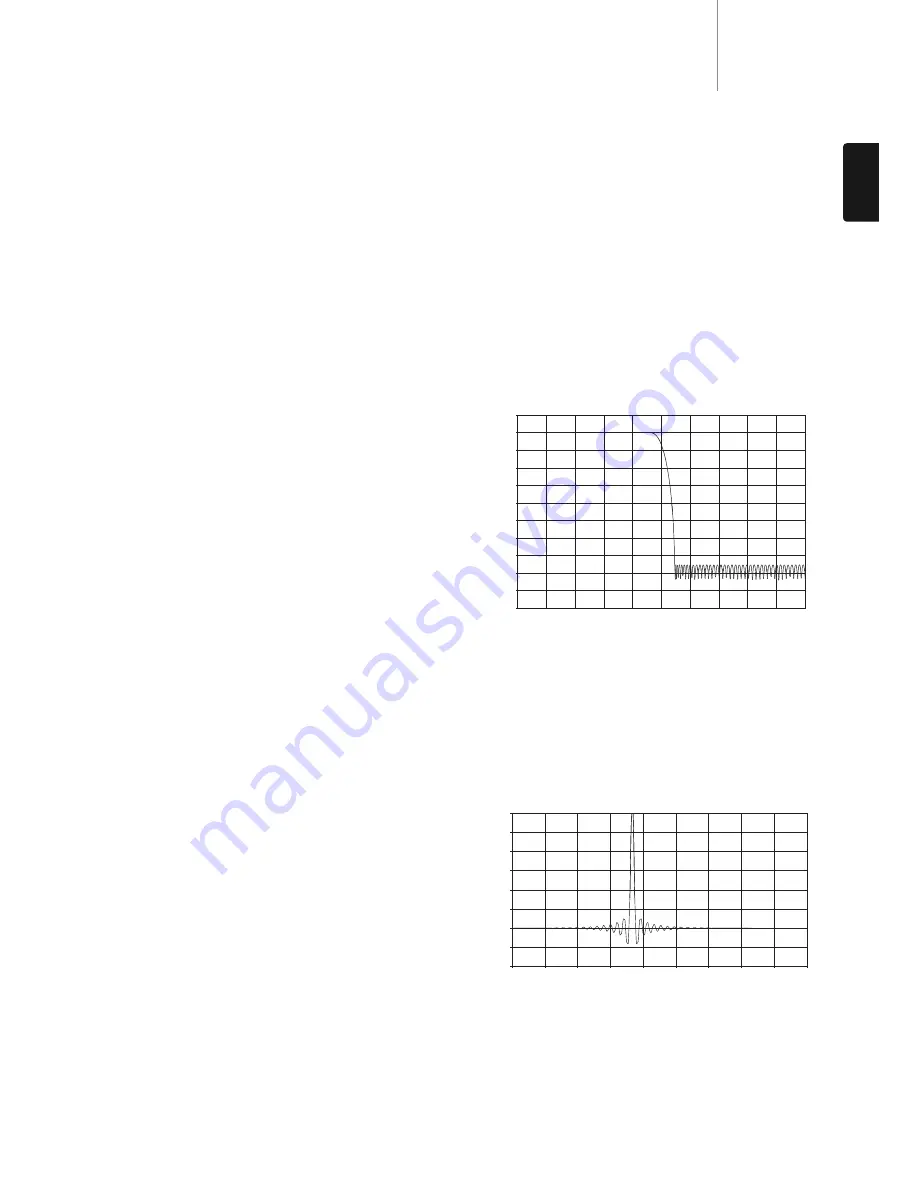
The Linear Phase filter is a highly regarded audio filter offering low ripple
in both the pass and stop bands, and what is known as constant group
delay. Constant group delay means that audio signals of all frequencies
are always delayed by the same amount when passing through the filter.
All audio is therefore fully time-coherent at the output. 

The trade-off with this type of filter is that due to internal feed-forward in
the DSP, its impulse response will exhibit some pre-ringing. In other
words, when excited with a theoretical impulse, the output has both a
small amount of pre- and post-spike amplitude ringing (albeit well
damped).

0 20 40 60 80 100 

120 

140 

160 

180

0

Linear phase impulse response

Linear phase filter frequency response

Time (samples)

Am

plitude

For HDMI 2 & Analog, the Mediatek chipsets in-built scaler is used and
sharpness level can only be set between 0 and +2. The default is level 0.
The higher the level, the sharper the video details are. However, too high
a sharpness level may cause while line etching around objects.

Noise Reduction

– To select whether the player shall apply video noise

reduction processing.

For HDMI 1, the noise reduction level can be set between 0 and 8. The
default is level 0, which turns off noise reduction. When set to level 1,
the QDEO scaler adjusts the picture quality by reducing “mosquito noise”
(artifacts around the outlines of objects) and “block noise” (mosaic-like
patterns caused by video compression). These two noise reduction are
also called Compression Artifacts Reduction (CAR) and have several levels
of aggressiveness. When set to level 2, the player applies the Motion
Adaptive Video Noise Reduction (VNR), which handles the random noise
and the film-grain noise (natural variation of picture intensity caused by
film grain). 

Its level is automatic because there is a noise estimator circuitry in the
video processor that calculates how much noise presents and adjusts
the level of VNR accordingly. When set to a high level between 3 and 4,
the player applies both CAR and Motion Adaptive VNR, with more
aggressive “block noise” reduction at level 4. At level 5, the player applies
aggressive CAR for low quality video content, and adds Motion Adaptive
VNR at level 6. At level 7, the player applies the most aggressive CAR for
very low quality video, and adds Motion Adaptive VNR at level 8.
Remember that excessive noise reduction may cause a loss of detail. We
recommend using the noise reduction function only when you encounter
poorly encoded or compressed video that has apparent noise artifacts. 

For HDMI 2 & Analog, the noise reduction level can be set between 0 and
+3. The default is level 0. When user increases the level, the player
adjusts the picture quality by applying mosquito noise reduction, random
noise reduction and MPEG block noise reduction at the same time. The
higher level user sets, the more aggressive noise reduction functions
apply.

Colour Enhancement (HDMI 1 video output only)

– Used to select a

colour enhancement level (enhance certain colours in the spectrum) of
the video output. It provides the ability to  make more vivid some colours
without causing hue shifts, loss of details or changes in skin tones.

Contrast Enhancement (HDMI 1 video output only)

– Used to select a

colour enhancement level (expands details in the shadows) on the video
output.

Summary of Contents for AZUR 751BD

Page 1: ...Your music our passion 751BD azur ENGLISH Blu ray player User s manual 2 ...

Page 2: ... rights are reserved No part of this manual may be reproduced by any mechanical electronic or other means in any form without prior written permission of the manufacturer All trademarks and registered trademarks are the property of their respective owners Copyright Cambridge Audio Ltd 2011 Manufactured under license from Dolby Laboratories Dolby and the double D symbol are trademarks of Dolby Labo...

Page 3: ...tion Audio in Stereo 5 1 or 7 1 variants In particular support for the true lossless Dolby True HD and DTS HD Master Audio formats provides unprecedented audio fidelity from Blu ray discs The 751BD is also capable of outputting all of these formats as bitstreams over HDMI for decoding in a suitable AV Receiver The analog audio output stages feature both a dedicated Stereo output and a 7 1 output Al...

Page 4: ...type plug A polarized plug has two blades with one wider than the other A grounding type plug has two blades and a third grounding prong The wide blade or the third prong are provided for your safety If the provided plug does not fit into your outlet consult an electrician for replacement of the obsolete outlet 10 Protect the power cord from being walked on or pinched particularly at plugs convenie...

Page 5: ...s ignored In the event of a problem or failure please contact your dealer FCC Statement Caution Exposure to Radio Frequency Radiation The device shall be used in such a manner that the potential for human contact during normal operation is minimized When connecting an external antenna to the device the antenna shall be placed in such a manner to minimize the potential for human contact during norm...

Page 6: ... interference and 2 this device must accept any interference including interference that may cause undesired operation of the device IMPORTANT NOTE IC Radiation Exposure Statement This equipment complies with Canada radiation exposure limits set forth for uncontrolled environments This equipment should be installed and operated with a minimum distance of 20cm between the radiator and your body Thi...

Page 7: ... DVD Should you encounter playback problems and see dirty spots on the disc surface clean the disc with a cleaning cloth Wipe the disc from the centre out along the radial direction Do not wipe the disc in a circular motion Do not use record cleaning sprays or solvents such as benzene thinner and anti static spray Do not attach labels or stickers to discs as this may cause the disc to warp become ...

Page 8: ...deo connections plug the IEC type AC power cable into the rear of the unit and an appropriate mains socket then switch on Your 751BD is now ready for use 7 8 Rear panel connections Ethernet LAN port Used for discs supporting BD Live that provide interactive features when the player is connected to the Internet Future firmware updates may allow other online features to be accessed HDMI output 2 Seco...

Page 9: ...nd playback state etc Please refer to the front panel display section on right for more information Disc tray Use the Open Close button to activate Open Close Allows you to open and close the disc tray for loading of discs Pressing Play will also close the tray and start playing a disc if one is loaded Play Pause Plays the disc and pauses freezes playback Stop Press once to stop playback Pressing ...

Page 10: ...ht Skip Press once to skip forward by one track chapter on the disc Left Skip Press once to skip backward by one track chapter on the disc Colour buttons These button functions vary by the content See later section of the manual A B Repeat Press to mark a segment between A and B for repeated playback The first press marks point A the second press marks point B Press and hold to access Repeat functi...

Page 11: ...on of the manual for more details Refer to the operating instructions supplied with the broadband router or modem or contact the Internet service provider for questions related to setting up of a router or modem Note Only connect the LAN port of the player to an Ethernet port that supports 10BASE T or 100BASE TX Connecting to any other ports or jacks such as a phone jack can damage the player Usin...

Page 12: ...ut stereo digital audio from the Digital Audio connections Do not plug in the mains power lead or turn the unit on until all connections have been made Three types of audio only connection can be made between the 751BD and your stereo AV system AV receiver with 5 1 7 1 analogue inputs Front right speaker Speaker diagram shown for 5 1 channel setup For 7 1 add two rear speakers Surround right speak...

Page 13: ... with single 75 ohm video phono cable RCA RCA 1 2 HDMI cable HDMI cable TV Monitor with HDMI input TV Monitor with HDMI input AV receiver b a HDMI cable Out In In In a b Direct connection to a TV for HDMI 1 Connection to a TV via an AV Receiver for HDMI 1 HDMI High Definition Multi Media Interface is a digital connection that can carry both audio and video in one cable Direct digital transfer of vi...

Page 14: ...ith HDMI input AV Receiver with HDMI 1 3 input HDMI cable HDMI cable HDMI cable In HDMI cable In In a b Connection to a Primary TV Monitor Connection to a Secondary TV Monitor Connection to a TV Monitor Connection to an AV Receiver a b a b a b Both outputs can pass 3D TV signals Set the Primary Output option in the setup menu to HDMI 2 see later section This is necessary to allow HDMI 2 to output ...

Page 15: ...t resolution For the latest generation of 1080p Full HD or True HD TV displays the best output resolution will naturally be 1080p For all other digital televisions this will likely be 720p or 1080i These are general recommendations that work for most users but there can be exceptions Advanced users may want to try all supported resolutions and choose the one that provides the best visual result Th...

Page 16: ...rd Your player is now ready for use You will see a background screen with a Cambridge Audio and Blu ray Disc logo Please follow the rest of the user manual for basic and advanced operations Note In case you are not able to get a picture using the HDMI or component output please connect the player to the TV using the composite video output and then use the Setup Menu to adjust the player settings V...

Page 17: ... the chapter Press three times to access the Display information Slow When playing a BD DVD press the button to pause playback and then press the or button to cycle round the various speeds of slow motion 1 16 1 8 1 4 and 1 2 forwards and backwards and back to normal speed To exit playback press the button Note Certain Blu ray discs utilising the BD Java technology may not support slow playback Pa...

Page 18: ...o the disc title menu Press the Pop Up Menu button to display the chapter menu Depending on the disc one or both menus may not exist 3 Navigate the menu using the Navigation buttons and then press the Enter button to make the selection 4 Press the Return button to return to the previous menu The return location varies by disc Memory and automatic resume The player automatically remembers the curre...

Page 19: ...te Some TV sets do not support one more output resolutions particularly 1080p If an incompatible output resolution is selected you will get a blank screen or an error message In this case please select an output resolution that is supported by the TV In case you are not able to get a picture using the HDMI or component output please connect the player to the TV using the composite video output the...

Page 20: ...B flash drives and flash memory card readers but may not be sufficient for USB hard disks To use the e Sata port an external power supply is needed to power up the e Sata drive Note that the e Sata port does not support hot plugging To avoid damaging your e Sata drive always plug in unplug the e Sata drive when the 751BD is turned off Note This unit supports Mass Storage Class Bulk Transport devices ...

Page 21: ...wser will appear to assist you in navigate the files and folders The first step is to select the Data Disc or USB device that contains the photo files The player will take a moment to read the disc and list the folders and photo files In the photo browser you can perform the following operations Press the or Page buttons to move the cursor and select photo files When a photo file is highlighted by the c...

Page 22: ...le This can be caused by a disc still being played back or interlocking with mutually exclusive setup items Please stop playback or eject the disc before trying to change these setup items If you still cannot access the setup item please check for configuration conflicts and consistency For example if Video Setup 1080p24 Output is set to Off the DVD 24p conversion menu items Auto and Source Direct w...

Page 23: ...f the selected language is available that menu will be shown instead of the default disc menu Audio Language To choose the preferred audio language for DVD and Blu ray Discs If an audio track of the selected language is available on the disc the Audio track will be played back Subtitle Language To choose the preferred subtitle language for DVD If a subtitle of the selected language is available on...

Page 24: ...to no more than 480p 576p for Blu ray Discs the output resolution is limited to no more than 1080i and could be lower if the disc contains an Image Constraint Token 3 3D Mode To choose the video output mode for available 3D content at the HDMI output ports The options are Auto Output 3D if supported both by the disc content and the display The player automatically checks for the existence of 3D co...

Page 25: ...acilitate the player adjusts the 3D image for better visual quality The diagonal size of your TV screen by default it is 46 inches 5 TV Aspect Ratio To set the aspect ratio of the player s output image The options are 4 3 Letterbox Choose this when the display is standard 4 3 A widescreen image is displayed in letterbox format with black borders on top and bottom 4 3 Pan Scan Choose this when the ...

Page 26: ...en it is set at a value between 1 and 5 OSD is shifted towards the vertical center line of the video screen Similar to the subtitle shift setting above the OSD Position feature is helpful to customers using a 2 35 1 Constant Image Height video projection system OSD Mode To select how long the on screen display information such as elapsed or remaining time stays on the TV screen The available optio...

Page 27: ...tandard sample rate up to 48kHz If you play high resolution audio content at the 480p 576p resolution you may get reduced audio resolution incomplete audio channels or even no audio video output at all Choosing a higher output resolution such as 720p or above allows enough bandwidth for all high sample rate audio channels 3 Coaxial Optical Output Used to set the output format for the coaxial optic...

Page 28: ...z Dolby Digital LPCM 2ch Up to 7 1ch 24 bit 7 1ch DTS DTS LPCM up to 7 1ch DTS LPCM 2ch Up to 7 1ch DTS HD High Resolution DTS HD LPCM up to 7 1ch DTS core LPCM 2ch Up to 7 1ch High Resolution DTS HD Master Audio DTS HD LPCM up to 96kHz DTS core LPCM 2ch Up to 7 1ch Master Audio 24 bit 7 1ch or 192kHz 24 bit 2ch Setting Source Format Output Type HDMI Output Coaxial Optical Outputs Analogue Outputs...

Page 29: ... via your A V receiver and surround sound system The following audio format setup options are recommended Secondary Audio Off or On if you need secondary audio HDMI Audio Off SACD Output PCM DSD is not available through the analog audio output HDCD Decoding On Coaxial Optical Output any not in use LPCM Rate Limit any not in use Also set Speaker Configuration in the Audio Processing menu Set Down Mi...

Page 30: ...ource content has more channels the surround back channels will be mixed into the surround channels 7 1Ch This mode enables 7 1ch decoded audio output The number of actual output channels depends on the disc Test Tone Test tone is a special group of artificially created sounds that are used to test your audio speaker system and help to identify any wiring faults By default the Test Tone is set to O...

Page 31: ...rom a calibration disc such as Digital Video Essentials HD Basics and a SPL Sound Pressure Level meter The trim level can be set to 10dB in 0 5dB increments Other Audio Processing Settings 1 Crossover Frequency When the speaker size is set to Small in Speaker Configuration bass frequencies are not passed to the speakers to reduce possible distortion bass frequencies will instead be redirected to th...

Page 32: ...ovides three modes for the HDMI CEC function HDMI 1 2 HDMI CEC is enabled Use this mode if your other devices are compatible with the player HDMI 1 2 Limited HDMI CEC is enabled but the 751BD will only respond to playback control commands It will not respond or issue power on off and input selection commands Use this mode if you do not want the automatic setup function to turn on off your devices ...

Page 33: ...ayer first searches for the last successful wireless settings If any exist a message will pop up as below Use Previous To use the last successful wireless setting A summary of the previous wireless setting will pop up showing information like SSID Service Set Identifier Security Mode and Security Key in asterisk Then a connection test will be automatically performed and the test result shown on the ...

Page 34: ...ferent as HDMI1 uses the Marvell QDEO scaler which has more sophisticated features and algorithms for adjustment as below To change a picture adjustment parameter use the buttons to highlight the parameter and use the buttons to change its value To aid in the adjustment of picture control parameters the picture adjustment menu will be reduced to only show the parameter being adjusted once you pres...

Page 35: ...ects Noise Reduction To select whether the player shall apply video noise reduction processing For HDMI 1 the noise reduction level can be set between 0 and 8 The default is level 0 which turns off noise reduction When set to level 1 the QDEO scaler adjusts the picture quality by reducing mosquito noise artifacts around the outlines of objects and block noise mosaic like patterns caused by video c...

Page 36: ...itude dB Our Steep filter is a linear phase filter that has been optimised for stop band attenuation of close in aliasing images Here we have traded a little attenuation of the very highest frequency response for 44 1kHz sampled material it would be 2dB at 20kHz and a little more pre and post ringing for a very steep attenuation just outside the pass band The Steep filter is able to attenuate aliasin...

Page 37: ... 8377 Samoan 8378 Shona 8379 Somali 8381 Albanian 8382 Serbian 8385 Sundanese 8386 Swedish 8387 Swahili 8465 Tamil 8469 Telugu 8471 Tajik 8472 Thai 8473 Tigrinya 8475 Turkmen 8476 Tagalog 8479 Tonga 8482 Turkish 8484 Tatar 8487 Twi 8575 Ukrainian 8582 Urdu 8590 Uzbek 8673 Vietnamese 8679 Volapuk 8779 Wolof 8872 Xhosa 8979 Yoruba 9072 Chinese 9085 Zulu Code Language Name 7285 Hungarian 7289 Armenia...

Page 38: ...oding MPEG2 MPEG2 HD MPEG4 MPEG4 AVC VC 1 XviD VCD AVCHD MPEG ISO AVI VOB MKV 4 1 JPEG JPEG HD HDMI outputs 1 4a x2 Video NTSC 480i p 720p 1080i p 1080p24 PAL 576i p 720p 1080i p 1080p24 Audio Stereo up to 7 1ch high resolution PCM up to 5 1ch DSD bitstream or decoding to PCM of Dolby Digital Dolby Digital Plus Dolby TrueHD DTS DTS HD High Resolution Audio and DTS HD Master Audio Frequency Respons...

Page 39: ...ereo or other down mix mode No sound from the centre speaker A stereo mode has been selected Remote control is not working The batteries are flat The remote is too far from the unit or out of the effective range Files on a connected USB device do not play If the USB drive is incompatible or the player encounters errors while reading the USB drive or flash memory card the screen displays Device Error...

Page 40: ... Audio is a brand of Audio Partnership Plc Registered Office Gallery Court Hankey Place London SE1 4BB United Kingdom Registered in England No 2953313 www cambridge audio com 2011 Cambridge Audio Ltd AP28003 1 A ...

Reviews: