background image

Chapter 2:  System hardware 

Ethernet cabling 


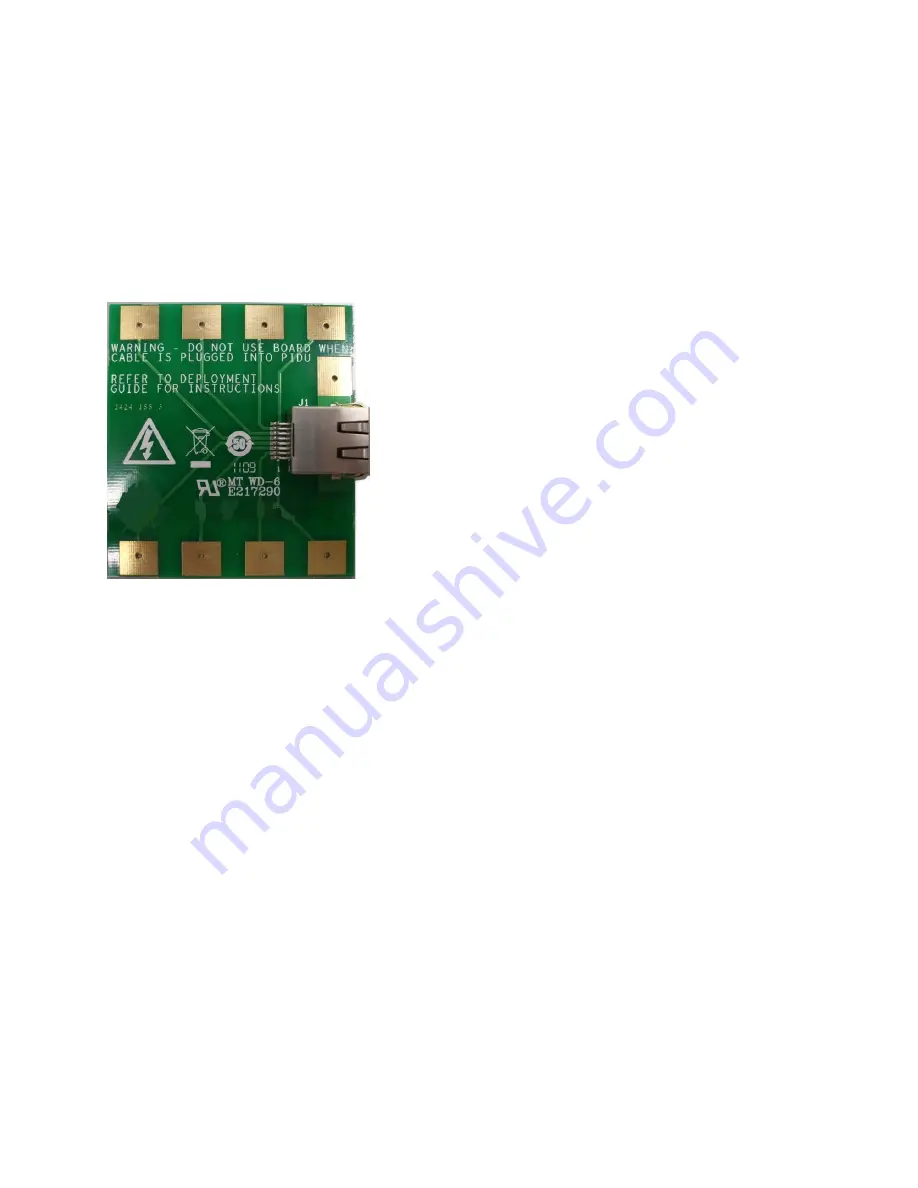
Drop cable tester 

The drop cable tester is an optional item for testing the resistances between the RJ45 pins of the 
drop cable (

Figure 19

). Order it by completing the order form on the support website (see 

Contacting Cambium Networks

 on page 

1)

Figure 19  Drop cable tester 


Indoor Cat5e cable 

To connect the PSU to network terminating equipment, use indoor Cat5e cable. The ODU network 
connection implements automatic MDI/MDI-X sensing and pair swapping, allowing connection to 
networking equipment that requires cross-over cables (MDI-X networks) or straight-through cables 
(MDI Networks). 


Page 

2-26


Summary of Contents for PTP 650 Series

Page 1: ...Cambium PTP 650 Series User Guide System Release 650 01 01 ...

Page 2: ... copyrighted material of Cambium its licensors or the 3rd Party software supplied material contained in the Cambium products described in this document may not be copied reproduced reverse engineered distributed merged or modified in any manner without the express written permission of Cambium Furthermore the purchase of Cambium products shall not be deemed to grant either directly or by implicati...

Page 3: ...4 Avoidance of weather radars 4 External antennas 4 Ethernet networking skills 4 Lightning protection 5 Training 5 Problems and warranty 6 Reporting problems 6 Repair and service 6 Hardware warranty 6 Security advice 7 Warnings cautions and notes 8 Warnings 8 Cautions 8 Notes 8 Caring for the environment 9 In EU countries 9 In non EU countries 9 Chapter 1 Product description 1 1 Overview of the PT...

Page 4: ...egulatory bands 1 13 PTP networks 1 14 Ethernet bridging 1 15 Ethernet ports 1 15 Customer data network 1 16 Network management 1 18 Ethernet loopback mode 1 21 Protocol model 1 21 System management 1 23 Management agent 1 23 IPv6 1 24 Web server 1 25 RADIUS authentication 1 27 SNMP 1 28 Simple Network Time Protocol SNTP 1 28 SNMPv3 security 1 29 System logging syslog 1 32 AES license 1 32 Critica...

Page 5: ... cable and connectors 2 13 Antenna accessories 2 14 FCC and IC approved antennas 2 14 Ethernet cabling 2 20 Ethernet standards and cable lengths 2 20 Outdoor copper Cat5e Ethernet cable 2 21 Cable grounding kit 2 22 Lightning protection unit LPU and grounding kit 2 23 RJ45 connectors and spare glands 2 24 Cable hoisting grip 2 25 Drop cable tester 2 26 Indoor Cat5e cable 2 26 SFP module kits 2 27 ...

Page 6: ...19 Avoidance of weather radars USA only 3 20 Edge channel power reduction 3 20 Link planning 3 21 PTP LINKPlanner 3 21 Range and obstacles 3 21 Path loss 3 22 Adaptive modulation 3 22 Calculating data rate capacity 3 23 Planning for connectorized units 3 25 When to install connectorized units 3 25 Choosing external antennas 3 25 Calculating RF cable length 5 8 GHz FCC only 3 26 Data network planni...

Page 7: ...a throughput capacity tables 3 47 Chapter 4 Legal and regulatory information 4 1 Cambium Networks end user license agreement 4 2 Acceptance of this agreement 4 2 Definitions 4 2 Grant of license 4 2 Conditions of use 4 3 Title and restrictions 4 4 Confidentiality 4 4 Right to use Cambium s name 4 5 Transfer 4 5 Updates 4 5 Maintenance 4 5 Disclaimer 4 6 Limitation of liability 4 6 U S government 4...

Page 8: ...tenna 5 3 Minimum separation distances 5 4 Grounding and lightning protection requirements 5 4 Grounding cable installation methods 5 4 Siting ODUs and antennas 5 4 Installing the ODU and top LPU 5 5 Decide how to mount the ODU and top LPU 5 5 Prepare ODU for mounting 5 6 Integrated ODU 5 7 Connectorized ODU 5 9 Ground the ODU and top LPU 5 10 Install external antennas for a connectorized ODU 5 11...

Page 9: ...6 1 Preparing for configuration and alignment 6 2 Safety precautions 6 2 Regulatory compliance 6 2 Selecting configuration options 6 2 Generating a License Key 6 3 Connecting to the unit 6 5 Configuring the management PC 6 5 Connecting to the PC and powering up 6 6 Using the web interface 6 7 Logging into the web interface 6 7 Using the menu options 6 8 Installation menu 6 10 Starting the Installa...

Page 10: ...or SNMPv3 6 65 Step 4 SNMP User Accounts Configuration for SNMPv3 6 67 Step 5 SNMP Trap Configuration for SNMPv3 6 69 Confirm SNMP Configuration for SNMPv3 6 70 SNMP pages for SNMPv1 2c 6 71 Current SNMP Summary for SNMPv1 2c 6 71 Step 1 SNMP Configuration for SNMPv1 2c 6 71 Step 2 SNMP MIB II System Objects for SNMPv1 2c 6 72 Step 3 SNMP Trap Configuration for SNMPv1 2c 6 73 Confirm SNMP Configur...

Page 11: ...he network 6 95 Upgrading software using TFTP 6 96 Chapter 7 Operation 7 1 System summary and status 7 2 System Summary page 7 2 System Status page 7 3 Rebooting and logging out 7 9 Login Information page 7 9 Reboot Wireless Unit page 7 9 Change Password page 7 10 Logging out 7 11 Alarms alerts and messages 7 12 Alarms 7 12 Email alerts 7 15 Syslog page 7 16 Format of syslog server messages 7 17 C...

Page 12: ...e 7 44 Entering recovery mode 7 44 Upgrading software image 7 46 Resetting IP Ethernet configuration 7 47 Erasing configuration 7 48 Zeroize Critical Security Parameters page 7 50 Rebooting the unit 7 51 Chapter 8 Troubleshooting 8 1 Testing link end hardware 8 2 AC Power Injector LED sequence 8 2 AC DC Enhanced power injector LED sequence 8 2 Ethernet packet test 8 6 Testing the radio link 8 9 No...

Page 13: ...tion For radio equipment installation refer to the following chapter Chapter 5 Installation For system configuration monitoring and fault finding refer to the following chapters Chapter 6 Configuration and alignment Chapter 7 Operation Chapter 8 Troubleshooting Contacting Cambium Networks Support website http www cambiumnetworks com support Main website http www cambiumnetworks com Sales enquiries...

Page 14: ...customer or anyone acting on the customer s behalf to abide by the instructions system parameters or recommendations made in this document Cross references References to external publications are shown in italics Other cross references emphasized in blue text in electronic versions are active links to the references This document is divided into numbered chapters that are divided into sections Sec...

Page 15: ...cific information The USA Federal Communications Commission FCC has asked manufacturers to implement special features to prevent interference to weather radar systems that operate in the band 5600 MHz to 5650 MHz These features must be implemented in all products able to operate outdoors in the band 5470 MHz to 5725 MHz Manufacturers must ensure that such radio products cannot be configured to ope...

Page 16: ...y configure the product using the GUI to avoid operation on channels that should be barred according to the guidelines that are contained in the KDB and explained in detail in this user guide External antennas When using a connectorized version of the product as compared to the version with an integrated antenna the conducted transmit power may need to be reduced to ensure the regulatory limit on ...

Page 17: ...and grounding Installation guidelines for the PTP 650 can be found in Chapter 2 System hardware and Chapter 5 Installation Training The installer needs to have basic competence in radio and IP network installation The specific requirements applicable to the PTP 650 should be gained by reading Chapter 5 Installation and Chapter 6 Configuration and alignment and by performing sample set ups at base ...

Page 18: ...from date of shipment from Cambium Networks or a Cambium distributor Cambium Networks warrants that hardware will conform to the relevant published specifications and will be free from material defects in material and workmanship under normal use and service Cambium shall within this time at its own option either repair or replace the defective product within thirty 30 days of receipt of the defec...

Page 19: ...ctices Security aspects to be considered are protecting the confidentiality integrity and availability of information and assets Assets include the ability to communicate information about the nature of the communications and information about the parties involved In certain instances Cambium makes specific recommendations regarding security practices however the implementation of these recommenda...

Page 20: ...mat Warning Warning text and consequence for not following the instructions in the warning Cautions Cautions precede instructions and are used when there is a possibility of damage to systems software or individual items of equipment within a system However this damage presents no danger to personnel A caution has the following format Caution Caution text and consequence for not following the inst...

Page 21: ...U countries Disposal of Cambium equipment European Union EU Directive 2002 96 EC Waste Electrical and Electronic Equipment WEEE Do not dispose of Cambium equipment in landfill sites For disposal instructions refer to http www cambiumnetworks com support Disposal of surplus packaging Do not dispose of surplus packaging in landfill sites In the EU it is the individual recipient s responsibility to e...

Page 22: ...ey features typical uses product variants and components of the PTP 650 Wireless operation on page 1 6 describes how the PTP 650 wireless link is operated including modulation modes power control and spectrum management Ethernet bridging on page 1 15 describes how the PTP 650 controls Ethernet data in both the customer data and system management networks System management on page 1 23 introduces t...

Page 23: ...f sight LOS near LOS and non LOS propagation condition Its maximum LOS range is 200 km The PTP 650 operates in unlicensed and lightly licensed frequency bands between 4 9 and 5 8 GHz It has a very high spectral efficiency of 10 bps Hz and supports a channel bandwidth of up to 45 MHz The integrated ODU has its own flat plate antenna The connectorized ODU is designed for use with an external antenna...

Page 24: ...nge Up to 200 km Duplexing TDD symmetric and asymmetric Connectivity Ethernet Operating frequencies 4 9 to 5 8 GHz Channel bandwidth 10 20 40 or 45 MHz High spectral efficiency Up to 10 bps Hz Data rate Up to 450 Mbps 45 MHz channel BW Frequency bands The PTP 650 ODU can be configured by the user to operate in the following bands 4900 to 4990 MHz 5470 to 5725 MHz 5725 to 5875 MHz Page 1 3 ...

Page 25: ...etary power over Ethernet and connection to the management and or data networks via 100BASE TX or 1000BASE T Ethernet In the basic configuration this is the only Ethernet connection to the ODU SFP port This provides an optical or copper Gigabit Ethernet interface for out of band local management user data or user data with in band management Aux port This provides an optional power and 100BASE TX ...

Page 26: ... DC supply or when the PSU is needed to operate at extreme temperatures Antennas and antenna cabling Connectorized ODUs require external antennas connected using RF cable Ethernet cabling All configurations require a copper Ethernet Cat5e connection from the ODU PSU port to the PSU Advanced configurations may also require one or both of the following o A copper or optical Ethernet connection from ...

Page 27: ... slave 2 A delay occurs as the master slave burst propagates over the link 3 The slave receives the burst from the master 4 The slave processes the master slave burst 5 The slave transmits a burst to the master 6 A delay occurs as the slave master burst propagates over the link 7 The master receives the burst from the slave 8 The master transmits the next burst to the slave TDD frame parameters Th...

Page 28: ...l selection The PTP 650 series links are capable of transmitting and receiving on the same channel or on different channels In other words the slave master direction may use a different channel from the master slave direction Independent selection of transmit and receive frequencies can be useful in planned networks or for countering interference When links operate in radar avoidance regions each ...

Page 29: ...een the two link directions Symmetric The Master and Slave have equal capacity The PTP 650 series achieves this by allocating an equal Burst Duration for the Master and the Slave 2 1 The capacity in the direction Master to Slave is twice that of the direction Slave to Master The PTP 650 series achieves this by setting the Burst Duration of the Master to twice that of the Slave 1 2 The capacity in ...

Page 30: ...deployments where the amount of free spectrum is limited Each channel is offset in center frequency from its neighboring channel by 10 or 5 MHz Note The Channel Bandwidth must be configured to the same value at both ends of the link Not all channel bandwidths are available in all regulatory bands Spectrum management The spectrum management feature of the PTP 650 Series monitors the available wirel...

Page 31: ...nnel interference Therefore this mode of operation is only recommended for deployments where the installer has a good understanding of the prevailing interference environment Care must also be taken to ensure that the frequency allocations at each end of the link are compatible Fixed frequency mode is not available in regions where radar detection is required by the regulations Adaptive modulation...

Page 32: ...it two different and parallel data streams one on the vertical channel and one on the horizontal channel This doubles the capacity of the PTP 650 Single Payload As the radio channel becomes more challenging the PTP 650 has the ability to detect this and switch to a mode which transmits the same data stream on both vertical and horizontal channels This provides polar diversity and is another key fe...

Page 33: ...nel an available channel This compulsory channel scan will mean that there is at least 60 seconds service outage every time radar is detected and that the installation time is extended by at least 60 seconds even if no radar is found When operating on a channel the spectrum management algorithm implements a radar detection function which looks for impulsive interference on the operating channel If...

Page 34: ...s The PTP 650 license key specifies the country of operation for the ODU and lists the regulatory bands that are licensed by regulators in that country If a license key provides access to more than one regulatory band PTP 650 provides a choice between the available bands In each regulatory band PTP 650 sets the following aspects of wireless operation to comply with the applicable regulations Maxim...

Page 35: ...e PTP links and b RF interference predominantly arises from equipment in the same network Frequency planning is the exercise of assigning operating channels to PTP units so as to minimize RF interference between links Frequency planning must consider interference from any PTP unit to any other PTP unit in the network Low levels of interference normally allow for stable operation and high link capa...

Page 36: ...ge 2 27 Each of the three Ethernet ports can be allocated for customer data or network management in the following ways Disabled The port is not in use for customer data or network management Data Only The port is connected to the customer data network only Data and In Band Management The port is connected to the customer data network and to the management agent of the local ODU Out of Band Local ...

Page 37: ...size for bridged frames in the customer network is 9600 bytes Note There is no requirement for the customer data network to be connected to the same Ethernet port at both ends of a wireless link For example it is possible to connect the Main PSU port to the customer data network at one end of the link and to connect the Aux port to the customer data network at the other end of the link Layer two c...

Page 38: ...ssembled on reception and incomplete Ethernet frames are discarded Wireless link down alert The PTP 650 Series provides an optional indication of failure of the wireless link by means of a brief disconnection of the copper data port or the optical data port allocated to the customer data network The Wireless link down alert can be used to trigger protection switching by Spanning Tree Protocol STP ...

Page 39: ...ckets with a configurable DHCP value in the range 0 to 63 If the management agent is configured to operate in a management VLAN the Ethernet frames will be transmitted with a configurable Ethernet priority in the range 0 to 7 The same DHCP and Ethernet priorities are assigned to all management packets generated by the agent Management frames are multiplexed with customer data frames of the same pr...

Page 40: ...ght be connected to a network management center or to a management terminal of an installer or technician Figure 3 In band management Figure 4 shows one port allocated to Data Only and one allocated to Out of Band Local Management The local management network shown in red is isolated from the customer data network shown in green Management frames are not forwarded over the wireless link The connec...

Page 41: ...provide the function of a dual homed or multi homed host Network designers should take care to ensure that the ODU will not be connected to more than one IP network Further examples of useful port allocation schemes are provided in Chapter 3 System planning Source address learning If Local Packet Filtering is enabled the PTP 650 learns the location of end stations from the source addresses in rece...

Page 42: ...ted or power cycled restoring the previous port configuration and any associated management paths During loopback operation the same frame size restrictions that apply to management traffic are present jumbo frames are not supported and the maximum frame size is restricted to 1536 bytes Loopback is able to loop between Ethernet ports operating at different line rates if required and it is possible...

Page 43: ...Chapter 1 Product description Ethernet bridging Figure 6 Protocol layers between Ethernet and wireless interfaces Figure 7 Protocol layers between external interfaces and the management agent Page 1 22 ...

Page 44: ...Pv6 only Dual IPv4 IPv6 In the dual IPv4 IPv6 mode the IP interface is configured with an IPv4 address and an IPv6 address and can operate using both IP versions concurrently This dual mode of operation is useful when a network is evolving from IPv4 to IPv6 The management agent supports the following application layer protocols regardless of the management agent IP mode Hypertext transfer protocol...

Page 45: ...RFC 2460 and RFC 5722 ICMP for IPv6 PTP 650 supports ICMPv6 as specified in RFC 4443 PTP 650 does not support RFC 4884 multi part messages Addressing The PTP 650 management agent is compatible with the IPv6 addressing architecture specified in RFC 4291 PTP 650 allows static configuration of the following Global unicast address IPv6 prefix length IPv6 default router PTP 650 additionally assigns an ...

Page 46: ...P and HTTPS TLS interfaces Web based management offers a convenient way to manage the PTP 650 equipment from a locally connected computer or from a network management workstation connected through a management network without requiring any special management software The web based interfaces are the only interfaces supported for installation of PTP 650 Web pages The web based management interfaces...

Page 47: ...d by purchase of an optional AES upgrade HTTPS TLS requires installation of a private key and a public key certificate where the common name of the subject in the public key certificate is the IP address or host name of the PTP 650 unit PTP 650 supports certificates with 2048 bit key size HTTPS TLS operation is configured through the web based interfaces using the Security Wizard Details of the se...

Page 48: ... complexity Password complexity configuration additionally allows a pre determined best practice configuration to be set SNMP control of passwords PTP 650 allows the role based and identity based passwords for the web based interface to be updated using the proprietary SNMP MIB This capability is controlled by the SNMP Control of Passwords and is disabled by default SNMP Control of Passwords can b...

Page 49: ...ent is compatible with SNMP v1 SNMP v2c and SNMPv3 using the following Management Information Bases MIBs RFC 1493 BRIDGE MIB dot1dBase group RFC 2233 IF MIB Interfaces group and ifXTable table RFC 3411 SNMP FRAMEWORK MIB snmpEngine group RFC 3412 SNMP MPD MIB snmpMPDStats group RFC 3413 SNMP TARGET MIB snmpTargetObjects group and SNMP NOTIFICATION MIB snmpNotifyTable table RFC 3414 SNMP USER BASED...

Page 50: ...ES Use of AES privacy requires the PTP 650 AES upgrade described in AES license on page 1 32 View based access control model PTP 650 supports the SNMPv3 view based access control model VACM with a single context The context name is the empty string The context table is read only and cannot be modified by users Access to critical security parameters The SNMPv3 management interface does not provide ...

Page 51: ...tored using a file saved from a different unit SNMPv3 Security Management is changed from web based to MIB based The default user configuration is specified in SNMPv3 default configuration MIB based on page 3 37 PTP 650 creates the initial user and template users with localized authentication and privacy keys derived from the passphrase string 123456789 Authentication keys for the templates users ...

Page 52: ...protocols for each of the security roles all users with the same role share a common selection of security level and protocols Web based security configuration is re initialized when any of the following occurs All ODU configuration data is erased The SNMP Engine ID Format has been changed The SNMP Engine ID Format is Internet Address and the Internet Address has been changed The SNMP Engine ID Fo...

Page 53: ...yslog client Users with Security Officer System Administrator or Read Only roles are permitted to review the locally logged event messages AES license PTP 650 provides optional encryption using the Advanced Encryption Standard AES Encryption is not available in the standard PTP 650 system AES upgrades are supplied as an access key purchased from your Cambium Point to Point distributor or solutions...

Page 54: ...interface CSPs can be erased zeroized using the Zeroize CSPs page of the web based interface or by selecting the Zeroize CSPs option in Recovery mode Login information PTP 650 optionally provides details of the most recent successful login and the most recent unsuccessful login attempt for each user of the web based interface Capability upgrades ODUs are shipped with Lite data throughput capabilit...

Page 55: ... upgrade The management agent supports application software upgrade using either the web based interface or the SNMP interface PTP 650 software images are digitally signed and the ODU will accept only images that contain a valid Cambium Networks PTP digital signature The ODU always requires a reboot to complete a software upgrade Note Obtain the application software and this user guide from the su...

Page 56: ...ry mode supports a single IPv4 interface with IP address 169 254 1 1 Recovery mode does not support IPv6 Note When Recovery has been entered through a power on off on cycle the ODU will revert to normal operation if no web access has been made to the unit within 30 seconds This prevents the unit remaining inadvertently in recovery following a power outage Recovery mode options Options in recovery ...

Page 57: ...cribes the hardware components of a PTP 650 link The following topics are described in this chapter Outdoor unit ODU on page 2 2 Power supply units PSU on page 2 8 Antennas and antenna cabling on page 2 13 Ethernet cabling on page 2 20 Page 2 1 ...

Page 58: ...supplied in two configurations integrated attached to its own flat plate antenna or connectorized without an antenna Figure 8 The connectorized ODU is designed to work with externally mounted antennas that have higher gains than the integrated antenna Connectorized units can cope with more difficult radio conditions Figure 8 PTP 650 Series ODUs integrated and connectorized Page 2 2 ...

Page 59: ...ne is for use in ETSI countries EU and the other is for the rest of the world RoW Individual ODUs Each of the parts listed in Table 2 includes the following items One integrated or connectorized ODU With connectorized ODUs only one connectorized ODU mounting bracket Figure 9 Integrated ODUs when sold individually are supplied without mounting brackets Table 2 ODU part numbers Cambium description C...

Page 60: ...C050065H009 PTP 650 Integrated END with AC DC Enhanced Supply FCC IC C050065H010 PTP 650 Connectorized END with AC Supply RoW C050065H011 PTP 650 Connectorized END with AC DC Enhanced Supply RoW C050065H012 PTP 650 Integrated END with AC Supply RoW C050065H013 PTP 650 Integrated END with AC DC Enhanced Supply RoW C050065H014 PTP 650 Connectorized END with AC Supply EU C050065H017 PTP 650 Connector...

Page 61: ...l connectorized ODUs are supplied with a connectorized mounting bracket Table 2 ODUs in kits are supplied with an integrated or connectorized bracket as appropriate Table 3 If separate ODU mounting brackets are required order them from Cambium Networks Table 5 Figure 9 ODU mounting brackets integrated connectorized and extended Table 5 ODU mounting bracket part numbers Pole diameter ODU type Cambi...

Page 62: ...nagement Local loop back between any two ports Figure 10 ODU rear interfaces Table 6 ODU rear interfaces Port name Connector Interface Description PSU RJ45 POE input Proprietary power over Ethernet POE 100 1000BASE T Ethernet Management and or data AUX RJ45 100 1000BASE T Ethernet with 802 3at compliant POE out capability Auxiliary Ethernet port which can be used for example to connect and power a...

Page 63: ...tions Category Specification Dimensions Integrated 370 mm 14 5 in x 370 mm 14 5 in x 95 mm 3 75 in Connectorized 305 mm 12 in x 305 mm 12 in x 105 mm 4 01 in Weight Integrated 5 5 Kg 12 1 lbs including bracket Connectorized 4 3 Kg 9 1 lbs including bracket Temperature 40 C 40 F to 60 C 140 F Wind loading 200 mph 323 kph maximum See ODU wind loading on page 3 11 Humidity 100 condensing Waterproofin...

Page 64: ...The AC DC Enhanced Power Injector right accepts both AC and DC input tolerates a greater temperature range and allows the ODU to support a device on the Aux port such as a video camera or wireless access point It also allows the ODU to provide DC power output Figure 12 PSU 650 PSUs Caution The PSU ODU ports are designed to connect only to PTP 650 ODUs or LPUs Do not connect any other equipment as ...

Page 65: ...Fig 8 N000065L003 UK Line Cord Fig 8 N000065L004 EU Line Cord Fig 8 N000065L005 Australia Line Cord Fig 8 N000065L006 AC Power Injector interfaces The AC Power Injector interfaces are shown in Figure 13 and described in Table 9 Figure 13 AC Power Injector interfaces Table 9 AC Power Injector interface functions Interface Function AC power in AC power input main supply ODU RJ45 socket for connectin...

Page 66: ...s Table 10 AC DC Enhanced Power Injector interface functions Interface Function 100 240V 47 63Hz 1 5A AC power input main supply DC In Alternative DC power supply input DC Out DC power output to a second PSU for power supply redundancy ODU RJ45 socket for connecting Cat5e cable to ODU LAN RJ45 socket for connecting Cat5e cable to network Power green LED Power supply detection Ethernet yellow LED E...

Page 67: ...imensions 137 mm 5 4 in x 56 mm 2 2 in x 38 mm 1 5 in Weight 0 240 Kg 0 5 lbs Temperature 0 C to 40 C Humidity 90 non condensing Waterproofing Not waterproof Altitude Sea level to 5000 meters 16000 ft AC Input Min 90 V AC 57 63 Hz max 264 V AC 47 53 Hz DC output voltage to the ODU 55V 5 AC connector IEC 320 C8 Efficiency Better than 85 efficiency level V Over Current Protection Hiccup current limi...

Page 68: ...ut 90 264 V AC 47 60 Hz Alternative DC Input 37 60 V DC DC Output Voltage For mains input 58 V 2V 0V For DC input Output voltage at maximum rated output current not more than 1 5 V below the DC input voltage Maximum length of DC output cable 3 meters AC Input connector IEC 320 C8 DC Output current 1 7A Efficiency Better than 84 Over Current Protection Hiccup current limiting trip point set between...

Page 69: ...its see Planning for connectorized units on page 3 25 RF cable and connectors RF cable of type CNT 400 is required for connecting the ODU to the antenna N type male connectors are required for connecting the RF cables to the connectorized ODU Two connectors are required per ODU Use weatherproof connectors preferably ones that are supplied with adhesive lined heat shrink sleeves that are fitted ove...

Page 70: ...are constrained by the following limits for single or dual polarization parabolic dish antennas 5 4 GHz 34 9 dBi per polarization or antenna 5 8 GHz up to 37 7 dBi per polarization or antenna Caution Antennas not included in these tables are strictly prohibited for use with the PTP 650 in the specified bands Caution This radio transmitter IC certification number 109AO 50650 has been approved by In...

Page 71: ...ual QuickFire Parabolic QFD2 52 N RK 28 4 Y Gabriel Gabriel 2 foot Standard QuickFire Parabolic QF2 52 N 28 5 Y Gabriel Gabriel 2 foot Standard QuickFire Parabolic QF2 52 N RK 28 5 Y RadioWaves Radio Waves 2 foot Parabolic SP2 5 2 29 Y Andrew Andrew 2 foot Dual Pol Parabolic PX2F 52 29 4 Y Andrew Andrew 2 foot Parabolic P2F 52 29 4 Y Gabriel Gabriel 2 5 foot Standard Dual QuickFire Parabolic QFD2 ...

Page 72: ...dard Dual QuickFire Parabolic QFD4 52 N 34 7 Y Gabriel Gabriel 4 foot Standard Dual QuickFire Parabolic QFD4 52 N RK 34 7 Y Gabriel Gabriel 4 foot Standard QuickFire Parabolic QF4 52 N 34 8 Y Gabriel Gabriel 4 foot Standard QuickFire Parabolic QF4 52 N RK 34 8 Y RadioWaves Radio Waves 4 foot Parabolic SP4 5 2 34 8 Y Andrew Andrew 4 foot Dual Pol Parabolic PX4F 52 34 9 Y Cambium 5 25 5 85 GHZ 4 FT ...

Page 73: ...kFire Parabolic HQF2 52 N 28 2 Y RadioWaves Radio Waves 2 foot Parabolic SP2 2 5 28 3 Y Gabriel Gabriel 2 foot Standard Dual QuickFire Parabolic QFD2 52 N 28 4 Y Gabriel Gabriel 2 foot Standard Dual QuickFire Parabolic QFD2 52 N RK 28 4 Y Gabriel Gabriel 2 foot Standard QuickFire Parabolic QF2 52 N 28 5 Y Gabriel Gabriel 2 foot Standard QuickFire Parabolic QF2 52 N RK 28 5 Y RadioWaves Radio Waves...

Page 74: ...2 N 34 4 Y RadioWaves Radio Waves 4 foot Dual Pol Parabolic SPD4 5 2 34 4 Y Cambium 5 25 5 85 GHZ 4 FT 1 2M DUAL POL H POL V POL RDH4505B 34 4 Y RadioWaves Radio Waves 4 foot Parabolic SP4 2 5 34 6 Y Gabriel Gabriel 4 foot Standard Dual QuickFire Parabolic QFD4 52 N 34 7 Y Gabriel Gabriel 4 foot Standard Dual QuickFire Parabolic QFD4 52 N RK 34 7 Y Gabriel Gabriel 4 foot Standard QuickFire Parabol...

Page 75: ... SINGLE POL RDH4525A 37 6 Y Gabriel Gabriel 6 foot Standard Dual QuickFire Parabolic QFD6 52 N 37 7 Y Gabriel Gabriel 6 foot Standard QuickFire Parabolic QF6 52 N 37 7 Y RadioWaves Radio Waves 6 foot Parabolic SP6 2 5 37 7 Y RadioWaves Radio Waves 6 foot Parabolic SP6 5 2 37 7 Y MARS Flat Plate Dual Pol 23 N Laird 90 Sectorized Dual Pol 17 N Laird 60 Sectorized Dual Pol 17 N KPPA OMNI Dual Pol 13 ...

Page 76: ...t standards supported and the maximum permitted drop cable lengths Note For optical SFP interfaces the Ethernet standards supported and maximum permitted cable lengths are specified in SFP module kits on page 2 27 Table 16 PSU drop cable length restrictions Type of PSU installed Power supply to PSU Ethernet supported 1 Power output to auxiliary device Maximum cable length 2 AC Power Injector AC ma...

Page 77: ...le from the ODU to the linked device Outdoor copper Cat5e Ethernet cable For copper Cat5e Ethernet connections from the ODU to the PSU LPUs and other devices use Cat5e cable that is gel filled and shielded with copper plated steel for example Superior Essex type BBDGe This is known as drop cable Figure 15 Caution Always use Cat5e cable that is gel filled and shielded with copper plated steel Alter...

Page 78: ...h could cause arcing resulting in fire risk and damage to equipment Optical cables do not require grounding One grounding kit Figure 16 is required for each grounding point on the PSU Aux and copper SFP drop cables Order cable grounding kits from Cambium Networks Table 19 Caution To provide adequate protection all grounding cables must be a minimum size of 10 mm2 csa 8AWG preferably 16 mm2 csa 6AW...

Page 79: ...s one near the ODU and the other near the linked device usually at the building entry point Table 20 Table 20 LPU and grounding kit contents Lightning protection units LPUs LPU grounding point nuts and washers ODU to top LPU drop cable 600 mm EMC strain relief cable glands U bolts nuts and washers for mounting LPUs ODU to top LPU ground cable M6 M6 Bottom LPU ground cable M6 M10 ODU to ground cabl...

Page 80: ...required for plugging Cat5e cables into ODUs LPUs PSUs and other devices Order RJ45 connectors and crimp tool from Cambium Networks Table 22 Note The RJ45 connectors and crimp tool listed in Table 22 work with Superior Essex type BBDGe cable as supplied by Cambium Networks They may not work with other types of cable The ODU is supplied with one environmental sealing gland for the drop cable Howeve...

Page 81: ...AMP Mod Plug RJ45 100 pack WB3177 Tyco AMP Crimp Tool WB3211 RJ 45 Spare Grounding Gland PG16 size Qty 10 N000065L033 Cable hoisting grip One or more grips are required for hoisting the drop cable up to the ODU without damaging the gland or RJ45 plug Figure 18 They are not supplied by Cambium Networks Figure 18 Cable hoisting grip Page 2 25 ...

Page 82: ...form on the support website see Contacting Cambium Networks on page 1 Figure 19 Drop cable tester Indoor Cat5e cable To connect the PSU to network terminating equipment use indoor Cat5e cable The ODU network connection implements automatic MDI MDI X sensing and pair swapping allowing connection to networking equipment that requires cross over cables MDI X networks or straight through cables MDI Ne...

Page 83: ...Ethernet SFP Module C000065L010 To compare the capabilities of the two optical SFP modules refer to Table 24 and Table 25 Table 24 Optical 1000BaseLX Ethernet SFP Module part number C000065L008 Core cladding microns Mode Bandwidth at 1310 nm MHz km Maximum length of optical interface Insertion loss dB 62 5 125 Multi 500 550 m 1800 ft 1 67 50 125 Multi 400 550 m 1800 ft 0 07 50 125 Multi 500 550 m ...

Page 84: ...mponents Optical or copper SFP transceiver module Figure 20 Long EMC strain relief cable gland Figure 21 The PTP 650 Series SFP Interface Upgrade Guide License key instructions and unique Access Key Figure 20 Optical or copper SFP transceiver module Figure 21 Long cable gland Page 2 28 ...

Page 85: ...h LC connectors from a specialist fabricator quoting the specification shown in Figure 22 It must be the correct length to connect the ODU to the other device LC connectors should be supplied with dust caps to prevent dust build up Figure 22 Optical optic cable and connector specification Page 2 29 ...

Page 86: ...loss and throughput Planning for connectorized units on page 3 25 describes factors to be taken into account when planning to use connectorized ODUs with external antennas in PTP 650 links Data network planning on page 3 27 describes factors to be considered when planning PTP 650 data networks Network management planning on page 3 31 describes how to plan for PTP 650 links to be managed remotely u...

Page 87: ...ODU with POE interface to PSU In the basic configuration there is only one Ethernet interface a copper Cat5e power over Ethernet POE from the PSU to the ODU PSU port as shown in the following diagrams mast or tower installation Figure 23 wall installation Figure 24 and roof installation Figure 25 Figure 23 Mast or tower installation Page 3 2 ...

Page 88: ...Chapter 3 System planning Typical deployment Figure 24 Wall installation Page 3 3 ...

Page 89: ...Chapter 3 System planning Typical deployment Figure 25 Roof installation Page 3 4 ...

Page 90: ...terfaces connected to the ODU one to the SFP port copper or optical and one to the Aux port as shown in the following diagrams ODU with copper SFP and PSU interfaces Figure 26 ODU with optical SFP and PSU interfaces Figure 27 ODU with Aux and PSU interfaces Figure 28 Figure 26 ODU with copper SFP and PSU interfaces Page 3 5 ...

Page 91: ...Chapter 3 System planning Typical deployment Figure 27 ODU with optical SFP and PSU interfaces Page 3 6 ...

Page 92: ...Chapter 3 System planning Typical deployment Figure 28 ODU with Aux and PSU interfaces Page 3 7 ...

Page 93: ...ocal regulations To adequately protect a PTP 650 installation both ground bonding and transient voltage surge suppression are required Full details of lightning protection methods and requirements can be found in the international standards IEC 61024 1 and IEC 61312 1 the U S National Electric Code ANSI NFPA No 70 1984 or section 54 of the Canadian Electric Code Note International and national sta...

Page 94: ...ne A or Zone B Zone A In this zone a direct lightning strike is possible Do not mount equipment in this zone Zone B In this zone direct EMD lightning effects are still possible but mounting in this zone significantly reduces the possibility of a direct strike Mount equipment in this zone Warning Never mount equipment in Zone A Mounting in Zone A may put equipment structures and life at risk Page 3...

Page 95: ...separated from one another as far as practical ODU and external antenna location Find a location for the ODU and external antenna for connectorized units that meets the following requirements The equipment is high enough to achieve the best radio path People can be kept a safe distance away from the equipment when it is radiating The safe separation distances are defined in Calculated distances an...

Page 96: ...following formulae Force in kilogrammes 0 1045aV2 Where Is a surface area in square meters V wind speed in meters per second Force in pounds 0 0042Av2 Where Is A surface area in square feet v wind speed in miles per hour Applying these formulae to the PTP 650 ODU at different wind speeds the resulting wind loadings are shown in Table 26 and Table 27 Table 26 ODU wind loading Kg Type of ODU Max sur...

Page 97: ... 1 Clause 2 5 Limited Power The Energy Hazard Limit is 240VA PSU location Find a location for the PSU AC Power Injector or AC DC Enhanced Power Injector that meets the following requirements The AC DC Enhanced Power Injector can be mounted on a wall or other flat surface The AC Power Injector can be mounted on a flat surface The PSU is kept dry with no possibility of condensation flooding or risin...

Page 98: ...he drop cable shield must be grounded at spacing between 15 to 22 m 50 to 75 ft This is especially important on towers taller than 45 m 150 ft For roof installations Figure 25 use the following additional criteria The drop cable shield must be bonded to the building grounding system at its top entry point usually on the roof The drop cable shield must be bonded to the building grounding system at ...

Page 99: ... and the copper SFP drop cable requires a top surge protector not a PTP 650 LPU Figure 30 Optical cables do not require LPUs or ground cables Figure 31 The copper SFP drop cable requires a bottom surge protector not a PTP 650 LPU Figure 32 The Aux drop cable may require an LPU near the auxiliary device Figure 30 ODU with PSU Aux and copper SFP interfaces Page 3 14 ...

Page 100: ...Chapter 3 System planning Site planning Figure 31 ODU with PSU Aux and optical SFP interfaces Figure 32 Bottom LPU and surge protector Page 3 15 ...

Page 101: ...pecifications that are specific to a single frequency band Table 28 PTP 650 wireless specifications all variants Item Specification Channel selection Manual selection fixed frequency Dynamic frequency selection DFS or DFS with DSO is available in radar avoidance regions Manual power control To avoid interference to other users of the band maximum power can be set lower than the default power limit...

Page 102: ...dBm or 17 10 x Log Channel width in MHz dBm In the 5 8 GHz band 5725 MHz to 5875 MHz the EIRP must not exceed the lesser of 36 dBm or 23 10 x Log Channel width in MHz dBm Some countries for example the USA impose conducted power limits on products operating in the 5 8 GHz band Conforming to the limits Ensure the link is configured to conform to local regulatory requirements by installing license k...

Page 103: ...t http www sviluppoeconomico gov it images stories mise_extra Allegato 20n19 doc Certain regulations have allocated certain channels as unavailable for use ETSI has allocated part of the 5 4 GHz band to weather radar UK and some other European countries have allocated part of the 5 8 GHz band to Road Transport and Traffic Telematics RTTT systems The number and identity of channels barred by the li...

Page 104: ...ontinually monitor for radar activity on the operating channel If detected it will immediately cease radiating and attempt to find a new channel In DFS regions choose DFS or DFS with DSO Dynamic Frequency Selection DFS Once a channel is selected the unit will only attempt to find an alternative channel if radar activity has been detected on the operating channel DFS with DSO In addition to switchi...

Page 105: ...ctrumbridge com udia home aspx enter the location of the planned link and search for TDWR radars If a TDWR system is located within 35 km 22 miles or has line of sight propagation to the PTP device perform the following tasks Register the installation on http spectrumbridge com udia home aspx Make a list of channel center frequencies that must be barred that is those falling within 30 MHz or 30 MH...

Page 106: ...acles that may affect radio performance Perform a survey to identify all the obstructions such as trees or buildings in the path and to assess the risk of interference This information is necessary in order to achieve an accurate link feasibility assessment The PTP 650 Series is designed to operate in Non Line of Sight NLoS and Line of Sight LoS environments An NLOS environment is one in which the...

Page 107: ...nal Fade Margin The following calculation needs to be performed to judge whether a particular link can be installed capability seasonal fade excess space free L L L L L _ Where Is space free L _ Free Space Path Loss dB excess L Excess Path Loss dB fade L Fade Margin Required dB seasonal L Seasonal Fading dB capability L Equipment Capability dB Adaptive modulation Adaptive modulation ensures that t...

Page 108: ...up the data throughput capacity rates Tx Rx and Both for the required combination of Link Symmetry Link Mode Optimization Modulation Mode Channel Bandwidth The tables contain data rates for PTP 650 Full only 2 The tables contain data rates for links of zero range Use the range adjustment graphs in Data throughput capacity tables on page 3 47 to look up the Throughput Factor that must be applied to...

Page 109: ...ulation procedure for this example is as follows 1 Use Table 52 to look up the data throughput capacity rates Tx 23 Mbits s Rx 23 Mbits s Aggregated 46 Mbits s 2 Use Figure 40 to look up the Throughput Factor for 1 1 TDM 10 MHz Mid and Link Range 60 km The factor is 0 86 3 Multiply the rates from Step 1 by the Throughput Factor from Step 2 to give the throughput capacity of the link Tx 19 8 Mbits ...

Page 110: ... of marginal performance In these areas connectorized ODUs and external antennas should be used Choosing external antennas When selecting external antennas consider the following factors The required antenna gain Ease of mounting and alignment Antenna polarization o For a simple installation process select one dual polarization antenna as the integrated antenna at each end o To achieve spatial div...

Page 111: ...sir le type d antenne et son gain de sorte que la puissance isotrope rayonnée équivalente p i r e ne dépasse pas l intensité nécessaire à l établissement d une communication satisfaisante Calculating RF cable length 5 8 GHz FCC only The 5 8 GHz band FCC approval for the product is based on tests with a cable loss between the ODU and antenna of not less than 1 2 dB If cable loss is below 1 2 dB wit...

Page 112: ...size 9600 bytes Service classes for traffic 8 classes Practical Ethernet rates depend on network configuration and higher layer protocols Over the air throughput is capped to the rate of the Ethernet interface at the receiving end of the link Layer 2 control protocols PTP 650 identifies L2 control protocols from the Ethernet destination address of bridged frames Table 33 Destination address in lay...

Page 113: ...his is a standard IEEE 802 1Q VLAN or provider bridged IEEE 802 1ad VLAN and select the VLAN ID for this VLAN Use of a separate management VLAN is strongly recommended Use of the management VLAN helps to ensure that the ODU management agent cannot be accessed by customers Priority for management traffic Choose the Ethernet and IP DSCP priority for management traffic generated within the ODU manage...

Page 114: ...at network bottlenecks PTP 650 provides eight queues for traffic waiting for transmission over the wireless link Q0 is the lowest priority queue and Q7 is the highest priority queue Traffic is scheduled using strict priority in other words traffic in a given queue is transmitted when all higher priority queues are empty Layer 2 control protocols Select the transmission queue for each of the recogn...

Page 115: ...MPLS TC to the eight PTP 650 queues Daisy chaining PTP 650 links When connecting two or more PTP 650 links together in a network daisy chaining do not install direct copper Cat5e connections between the PSUs Each PSU must be connected to the network terminating equipment using the LAN port To daisy chain PTP 650 links install each ODU to ODU link using one of the following solutions A copper Cat5e...

Page 116: ...rt Up Down Aux Port Up Down SFP Port Up Down Ensure that the following MIBs are loaded on the network management system RFC 1493 BRIDGE MIB RFC 2233 IF MIB RFC 3411 SNMP FRAMEWORK MIB RFC 3412 SNMP MPD MIB RFC 3413 SNMP TARGET MIB RFC 3414 SNMP USER BASED SM MIB RFC 3415 SNMP VIEW BASED ACM MIB RFC 3418 SNMPv2 MIB RFC 3826 SNMP USM AES MIB RFC 4293 IP MIB PTP 650 Series proprietary MIB Note The pr...

Page 117: ... The web based interface may be used to enable or disable generation of each supported SNMP notification or diagnostic alarm Enabling SNMP Enable the SNMP interface for use by configuring the following attributes in the SNMP Configuration page SNMP State default disabled SNMP Version default SNMPv1 2c SNMP Port Number default 161 Page 3 32 ...

Page 118: ...e or two SNTP servers IP address port number and server key Decide whether or not to authenticate received NTP messages using an MD5 signature Planning for HTTPS TLS operation Before starting to configure HTTPS TLS operation ensure that the cryptographic material listed in Table 34 is available Table 34 HTTPS TLS security material Item Description Quantity required Key of Keys An encryption key ge...

Page 119: ...address User Defined Security Banner The banner provides warnings and notices to be read by the user before logging in to the ODU Use text that is appropriate to the network security policy Normally one per link This depends upon network policy Entropy Input This must be of size 512 bits 128 hexadecimal characters output from a random number generator Two per link For greater security each link en...

Page 120: ... sufficient in many applications Selection of web based management for SNMPv3 security disables the MIB based security management PTP 650 does not support concurrent use of MIB based and web based management of SNMPv3 security Web based management of SNMPv3 security Initial configuration of SNMPv3 security is available only to HTTP or HTTPS TLS user accounts with security role of Security Officer ...

Page 121: ...ion and privacy protocols are required identify passphrases for each protocol for each SNMP user It is considered good practice to use different passphrases for authentication and privacy Passphrases must have length between 8 and 32 characters and may contain any of the characters listed in Table 35 Table 35 Permitted character set for SNMPv3 passphrases Character Code Character Code space 32 59 ...

Page 122: ...col PrivProtocol usmDESPrivProtocol StorageType nonVolatile Object Entry 2 Entry 3 Name templateMD5_DES templateSHA_DES SecurityName templateMD5_DES templateSHA_DES AuthProtocol usmHMACMD5AuthProtocol usmHMACSAHAuthProtocol PrivProtocol usmDESPrivProtocol usmDESPrivProtocol StorageType nonVolatile nonVolatile Object Entry 4 Entry 5 Name templateMD5_AES templateSHA_AES SecurityName templateMD5_AES ...

Page 123: ...Table 38 Table 37 Default VACM view trees Object Entry 1 Entry 2 ViewName internet restricted Subtree 1 3 6 1 1 3 6 1 Mask Type included included StorageType nonVolatile nonvolatile Table 38 Default data fill for access table Object Entry 1 Entry 2 GroupName initial initial ContextPrefix SecurityLevel authNoPriv noAuthNoPriv ContextMatch exact exact ReadViewName internet restricted WriteViewName i...

Page 124: ... users are unable to access the web based interface One useful strategy would be to combine RADIUS authentication for normal operation with a single locally authenticated user account for emergency use PTP 650 provides a choice of the following authentication methods CHAP MS CHAPv2 Ensure that the authentication method selected in PTP 650 is supported by the RADIUS server RADIUS attributes If the ...

Page 125: ...ype attributes are absent PTP 650 selects the Read Only role The auth role vendor specific attribute is defined in Table 39 Table 39 Definition of auth role vendor specific attribute Field Length Value Notes Type 1 26 Vendor specific attribute Length 1 12 Overall length of the attribute Vendor ID 4 17713 The same IANA code used for the SNMP enterprise MIB Vendor Type 1 1 auth role Vendor Length 1 ...

Page 126: ...eshold dBm per channel bandwidth Output power dBm Maximum link loss dB per channel bandwidth 10 MHz 20 MHz All bands 10 MHz 20 MHz BPSK 0 63 single 95 7 92 5 27 168 7 165 5 QPSK 0 63 single 90 0 88 4 26 163 0 161 4 QPSK 0 87 single 86 9 84 8 26 159 9 157 8 16QAM 0 63 single 84 7 82 8 25 156 7 154 8 16QAM 0 63 dual 81 8 79 1 25 153 8 151 1 16QAM 0 87 single 80 5 78 1 25 152 5 150 1 16QAM 0 87 dual ...

Page 127: ...166 4 QPSK 0 63 single 87 6 86 1 26 160 6 159 1 QPSK 0 87 single 84 2 82 0 26 157 2 155 0 16QAM 0 63 single 81 6 79 7 25 153 6 151 7 16QAM 0 63 dual 78 4 76 2 25 150 4 148 2 16QAM 0 87 single 77 4 75 0 25 149 4 147 0 16QAM 0 87 dual 74 4 71 7 25 146 4 143 7 64QAM 0 75 single 73 5 71 3 24 144 5 142 3 64QAM 0 75 dual 71 1 68 3 24 142 1 139 3 64QAM 0 92 single 69 6 67 0 24 140 6 138 0 64QAM 0 92 dual...

Page 128: ...6 160 2 158 3 155 0 154 2 16QAM 0 63 single 85 2 83 2 79 9 79 3 25 157 2 155 2 151 9 151 3 16QAM 0 63 dual 81 9 79 6 76 4 76 2 25 153 9 151 6 148 4 148 2 16QAM 0 87 single 81 0 78 7 75 4 74 8 25 153 0 150 7 147 4 146 8 16QAM 0 87 dual 77 9 75 1 72 0 72 1 25 149 9 147 1 144 0 144 1 64QAM 0 75 single 77 7 75 7 72 4 71 7 24 148 7 146 7 143 4 142 7 64QAM 0 75 dual 75 1 72 1 69 1 69 1 24 146 1 143 1 14...

Page 129: ...6 157 8 155 4 152 1 151 7 16QAM 0 63 single 82 6 80 0 76 9 76 4 25 154 6 152 0 148 9 148 4 16QAM 0 63 dual 78 7 76 3 73 4 73 0 25 150 7 148 3 145 4 145 0 16QAM 0 87 single 78 2 75 6 72 3 71 9 25 150 2 147 6 144 3 143 9 16QAM 0 87 dual 74 8 72 0 69 0 68 9 25 146 8 144 0 141 0 140 9 64QAM 0 75 single 74 3 72 0 68 9 68 5 24 145 3 143 0 139 9 139 5 64QAM 0 75 dual 71 3 68 6 65 7 65 6 24 142 3 139 6 13...

Page 130: ...6 160 3 157 5 154 4 154 0 16QAM 0 63 single 85 2 82 5 79 2 78 9 25 157 2 154 5 151 2 150 9 16QAM 0 63 dual 81 4 79 0 75 7 75 3 25 153 4 151 0 147 7 147 3 16QAM 0 87 single 80 6 77 8 74 8 74 6 25 152 6 149 8 146 8 146 6 16QAM 0 87 dual 77 3 74 4 71 4 71 1 25 149 3 146 4 143 4 143 1 64QAM 0 75 single 77 3 74 8 71 7 71 4 24 148 3 145 8 142 7 142 4 64QAM 0 75 dual 74 5 71 5 68 5 68 2 24 145 5 142 5 13...

Page 131: ...6 157 3 154 9 152 0 151 4 16QAM 0 63 single 81 9 79 6 76 6 76 2 25 153 9 151 6 148 6 148 2 16QAM 0 63 dual 78 2 76 0 73 0 72 6 25 150 2 148 0 145 0 144 6 16QAM 0 87 single 77 7 75 0 72 1 71 6 25 149 7 147 0 144 1 143 6 16QAM 0 87 dual 74 0 71 4 69 0 68 2 25 146 0 143 4 141 0 140 2 64QAM 0 75 single 73 8 71 4 68 8 68 2 24 144 8 142 4 139 8 139 2 64QAM 0 75 dual 70 7 68 0 65 7 64 9 24 141 7 139 0 13...

Page 132: ...Table 55 Lite 1 1 IP Table 56 TDM Table 57 2 1 IP Table 58 TDM Table 59 Adaptive IP Table 60 Use the following range adjustment graphs to look up the link range and find the throughput factor that must be applied to adjust the 0 km data throughput rates Link symmetry Link optimization Bandwidth 45 MHz 40 MHz 20 MHz 10 MHz 1 1 IP Figure 33 Figure 34 Figure 35 Figure 36 TDM Figure 37 Figure 38 Figur...

Page 133: ...4 QPSK 0 87 single 30 3 30 3 60 5 27 6 27 6 55 2 QPSK 0 63 single 21 8 21 8 43 5 19 9 19 9 39 7 BPSK 0 63 single 10 9 10 9 21 8 9 9 9 9 19 9 Modulation mode 20 MHz Tx Rx Aggregate 10 MHz Tx Rx Aggregate 256QAM 0 81 dual 100 0 100 0 200 1 50 1 50 1 100 2 64QAM 0 92 dual 84 3 84 3 168 6 42 2 42 2 84 4 64QAM 0 75 dual 68 9 68 9 137 8 34 5 34 5 69 0 16QAM 0 87 dual 53 6 53 6 107 2 26 8 26 8 53 7 16QAM...

Page 134: ... 6 QPSK 0 87 single 27 1 27 1 54 1 24 9 24 9 49 8 QPSK 0 63 single 19 4 19 4 38 9 17 9 17 9 35 8 BPSK 0 63 single 9 7 9 7 19 4 9 0 9 0 17 9 Modulation mode 20 MHz Tx Rx Aggregate 10 MHz Tx Rx Aggregate 256QAM 0 81 dual 96 0 96 0 192 0 49 1 49 1 98 2 64QAM 0 92 dual 80 9 80 9 161 7 41 4 41 4 82 8 64QAM 0 75 dual 66 1 66 1 132 2 33 8 33 8 67 6 16QAM 0 87 dual 51 4 51 4 102 8 26 3 26 3 52 6 16QAM 0 6...

Page 135: ...0 QPSK 0 87 single 40 1 20 1 60 2 36 6 18 3 55 0 QPSK 0 63 single 28 9 14 4 43 3 26 3 13 2 39 5 BPSK 0 63 single 14 4 7 2 21 6 13 2 6 6 19 7 Modulation mode 20 MHz Tx Rx Aggregate 10 MHz Tx Rx Aggregate 256QAM 0 81 dual 133 4 66 7 200 1 66 3 33 2 99 5 64QAM 0 92 dual 112 4 56 2 168 6 55 9 27 9 83 8 64QAM 0 75 dual 91 8 45 9 137 8 45 7 22 8 68 5 16QAM 0 87 dual 71 5 35 7 107 2 35 5 17 8 53 3 16QAM ...

Page 136: ...4 QPSK 0 87 single 37 6 18 8 56 4 34 5 17 3 51 8 QPSK 0 63 single 27 0 13 5 40 5 24 8 12 4 37 2 BPSK 0 63 single 13 5 6 8 20 3 12 4 6 2 18 6 Modulation mode 20 MHz Tx Rx Aggregate 10 MHz Tx Rx Aggregate 256QAM 0 81 dual 130 6 65 3 195 9 66 3 33 2 99 5 64QAM 0 92 dual 110 1 55 0 165 1 55 9 27 9 83 8 64QAM 0 75 dual 89 9 45 0 134 9 45 7 22 8 68 5 16QAM 0 87 dual 70 0 35 0 104 9 35 5 17 8 53 3 16QAM ...

Page 137: ...78 7 QPSK 0 87 single 54 6 5 5 60 1 49 3 5 5 54 7 QPSK 0 63 single 39 3 3 9 43 2 35 4 3 9 39 3 BPSK 0 63 single 19 6 2 0 21 6 17 7 2 0 19 7 Modulation mode 20 MHz Tx Rx Aggregate 10 MHz Tx Rx Aggregate 256QAM 0 81 dual 159 4 39 8 199 2 66 3 33 2 99 5 64QAM 0 92 dual 134 3 33 6 167 9 55 9 27 9 83 8 64QAM 0 75 dual 109 7 27 4 137 2 45 7 22 8 68 5 16QAM 0 87 dual 85 4 21 3 106 7 35 5 17 8 53 3 16QAM ...

Page 138: ...K 0 87 single 17 0 17 0 34 0 15 0 15 0 30 0 QPSK 0 63 single 12 0 12 0 24 0 11 0 11 0 22 0 BPSK 0 63 single 6 0 6 0 12 0 6 0 6 0 12 0 Modulation mode 20 MHz Tx Rx Aggregate 10 MHz Tx Rx Aggregate 256QAM 0 81 dual 56 0 56 0 112 0 28 0 28 0 56 0 64QAM 0 92 dual 47 0 47 0 94 0 24 0 24 0 48 0 64QAM 0 75 dual 39 0 39 0 78 0 19 0 19 0 38 0 16QAM 0 87 dual 30 0 30 0 60 0 15 0 15 0 30 0 16QAM 0 63 dual 22...

Page 139: ...K 0 87 single 15 0 15 0 30 0 14 0 14 0 28 0 QPSK 0 63 single 11 0 11 0 22 0 10 0 10 0 20 0 BPSK 0 63 single 5 0 5 0 10 0 5 0 5 0 10 0 Modulation mode 20 MHz Tx Rx Aggregate 10 MHz Tx Rx Aggregate 256QAM 0 81 dual 54 0 54 0 108 0 28 0 28 0 56 0 64QAM 0 92 dual 45 0 45 0 90 0 23 0 23 0 46 0 64QAM 0 75 dual 37 0 37 0 74 0 19 0 19 0 38 0 16QAM 0 87 dual 29 0 29 0 58 0 15 0 15 0 30 0 16QAM 0 63 dual 21...

Page 140: ...QPSK 0 87 single 22 0 11 0 33 0 21 0 10 0 31 0 QPSK 0 63 single 16 0 8 0 24 0 15 0 7 0 22 0 BPSK 0 63 single 8 0 5 0 13 0 7 0 5 0 12 0 Modulation mode 20 MHz Tx Rx Aggregate 10 MHz Tx Rx Aggregate 256QAM 0 81 dual 75 0 37 0 112 0 37 0 19 0 56 0 64QAM 0 92 dual 63 0 31 0 94 0 31 0 16 0 47 0 64QAM 0 75 dual 51 0 26 0 77 0 26 0 13 0 39 0 16QAM 0 87 dual 40 0 20 0 60 0 20 0 10 0 30 0 16QAM 0 63 dual 2...

Page 141: ...QPSK 0 87 single 21 0 11 0 32 0 19 0 10 0 29 0 QPSK 0 63 single 15 0 8 0 23 0 14 0 7 0 21 0 BPSK 0 63 single 8 0 5 0 13 0 7 0 5 0 12 0 Modulation mode 20 MHz Tx Rx Aggregate 10 MHz Tx Rx Aggregate 256QAM 0 81 dual 73 0 37 0 110 0 37 0 19 0 56 0 64QAM 0 92 dual 62 0 31 0 93 0 31 0 16 0 47 0 64QAM 0 75 dual 50 0 25 0 75 0 26 0 13 0 39 0 16QAM 0 87 dual 39 0 20 0 59 0 20 0 10 0 30 0 16QAM 0 63 dual 2...

Page 142: ... 0 QPSK 0 87 single 31 0 5 0 36 0 28 0 5 0 33 0 QPSK 0 63 single 22 0 3 9 25 9 20 0 3 9 23 9 BPSK 0 63 single 11 0 2 0 13 0 10 0 2 0 12 0 Modulation mode 20 MHz Tx Rx Aggregate 10 MHz Tx Rx Aggregate 256QAM 0 81 dual 89 0 22 0 111 0 37 0 19 0 56 0 64QAM 0 92 dual 75 0 19 0 94 0 31 0 16 0 47 0 64QAM 0 75 dual 61 0 15 0 76 0 26 0 13 0 39 0 16QAM 0 87 dual 48 0 12 0 60 0 20 0 10 0 30 0 16QAM 0 63 dua...

Page 143: ...0 QPSK 0 87 single 8 0 8 0 16 0 8 0 8 0 16 0 QPSK 0 63 single 6 0 6 0 12 0 6 0 6 0 12 0 BPSK 0 63 single 5 0 5 0 10 0 5 0 5 0 10 0 Modulation mode 20 MHz Tx Rx Aggregate 10 MHz Tx Rx Aggregate 256QAM 0 81 dual 28 0 28 0 56 0 14 0 14 0 28 0 64QAM 0 92 dual 24 0 24 0 48 0 12 0 12 0 24 0 64QAM 0 75 dual 19 0 19 0 38 0 10 0 10 0 20 0 16QAM 0 87 dual 15 0 15 0 30 0 8 0 8 0 16 0 16QAM 0 63 dual 11 0 11 ...

Page 144: ...0 0 QPSK 0 87 single 8 0 8 0 16 0 7 0 7 0 14 0 QPSK 0 63 single 5 0 5 0 10 0 5 0 5 0 10 0 BPSK 0 63 single 5 0 5 0 10 0 5 0 5 0 10 0 Modulation mode 20 MHz Tx Rx Aggregate 10 MHz Tx Rx Aggregate 256QAM 0 81 dual 27 0 27 0 54 0 14 0 14 0 28 0 64QAM 0 92 dual 23 0 23 0 46 0 12 0 12 0 24 0 64QAM 0 75 dual 19 0 19 0 38 0 9 0 9 0 18 0 16QAM 0 87 dual 14 0 14 0 28 0 7 0 7 0 14 0 16QAM 0 63 dual 10 0 10 ...

Page 145: ... 0 QPSK 0 87 single 11 0 6 0 17 0 10 0 5 0 15 0 QPSK 0 63 single 8 0 5 0 13 0 7 0 5 0 12 0 BPSK 0 63 single 5 0 5 0 10 0 5 0 5 0 10 0 Modulation mode 20 MHz Tx Rx Aggregate 10 MHz Tx Rx Aggregate 256QAM 0 81 dual 37 0 19 0 56 0 19 0 9 0 28 0 64QAM 0 92 dual 31 0 16 0 47 0 16 0 8 0 24 0 64QAM 0 75 dual 26 0 13 0 39 0 13 0 6 0 19 0 16QAM 0 87 dual 20 0 10 0 30 0 10 0 5 0 15 0 16QAM 0 63 dual 14 0 7 ...

Page 146: ... 0 QPSK 0 87 single 11 0 5 0 16 0 10 0 5 0 15 0 QPSK 0 63 single 8 0 5 0 13 0 7 0 5 0 12 0 BPSK 0 63 single 5 0 5 0 10 0 5 0 5 0 10 0 Modulation mode 20 MHz Tx Rx Aggregate 10 MHz Tx Rx Aggregate 256QAM 0 81 dual 37 0 18 0 55 0 19 0 9 0 28 0 64QAM 0 92 dual 31 0 15 0 46 0 16 0 8 0 24 0 64QAM 0 75 dual 25 0 13 0 38 0 13 0 6 0 19 0 16QAM 0 87 dual 20 0 10 0 30 0 10 0 5 0 15 0 16QAM 0 63 dual 14 0 7 ...

Page 147: ...0 QPSK 0 87 single 15 0 5 0 20 0 14 0 5 0 19 0 QPSK 0 63 single 11 0 3 9 14 9 10 0 3 9 13 9 BPSK 0 63 single 5 0 2 0 7 0 5 0 2 0 7 0 Modulation mode 20 MHz Tx Rx Aggregate 10 MHz Tx Rx Aggregate 256QAM 0 81 dual 45 0 11 0 56 0 19 0 9 0 28 0 64QAM 0 92 dual 38 0 9 0 47 0 16 0 8 0 24 0 64QAM 0 75 dual 31 0 8 0 39 0 13 0 6 0 19 0 16QAM 0 87 dual 24 0 6 0 30 0 10 0 5 0 15 0 16QAM 0 63 dual 17 0 5 0 22...

Page 148: ...lanning Data throughput capacity tables Figure 33 Range adjustment for PTP 650 symmetry 1 1 optimization IP bandwidth 45 MHz Figure 34 Range adjustment for PTP 650 symmetry 1 1 optimization IP bandwidth 40 MHz Page 3 63 ...

Page 149: ...lanning Data throughput capacity tables Figure 35 Range adjustment for PTP 650 symmetry 1 1 optimization IP bandwidth 20 MHz Figure 36 Range adjustment for PTP 650 symmetry 1 1 optimization IP bandwidth 10 MHz Page 3 64 ...

Page 150: ...anning Data throughput capacity tables Figure 37 Range adjustment for PTP 650 symmetry 1 1 optimization TDM bandwidth 45 MHz Figure 38 Range adjustment for PTP 650 symmetry 1 1 optimization TDM bandwidth 40 MHz Page 3 65 ...

Page 151: ...anning Data throughput capacity tables Figure 39 Range adjustment for PTP 650 symmetry 1 1 optimization TDM bandwidth 20 MHz Figure 40 Range adjustment for PTP 650 symmetry 1 1 optimization TDM bandwidth 10 MHz Page 3 66 ...

Page 152: ...lanning Data throughput capacity tables Figure 41 Range adjustment for PTP 650 symmetry 2 1 optimization IP bandwidth 45 MHz Figure 42 Range adjustment for PTP 650 symmetry 2 1 optimization IP bandwidth 40 MHz Page 3 67 ...

Page 153: ...Chapter 3 System planning Data throughput capacity tables Figure 43 Range adjustment for PTP 650 symmetry 2 1 optimization IP bandwidth 20 MHz Page 3 68 ...

Page 154: ...Chapter 3 System planning Data throughput capacity tables Figure 44 Range adjustment for PTP 650 symmetry 2 1 optimization IP bandwidth 10 MHz Page 3 69 ...

Page 155: ...Chapter 3 System planning Data throughput capacity tables Figure 45 Range adjustment for PTP 650 symmetry 2 1 optimization TDM bandwidth 45 MHz Page 3 70 ...

Page 156: ...anning Data throughput capacity tables Figure 46 Range adjustment for PTP 650 symmetry 2 1 optimization TDM bandwidth 40 MHz Figure 47 Range adjustment for PTP 650 symmetry 2 1 optimization TDM bandwidth 20 MHz Page 3 71 ...

Page 157: ...Chapter 3 System planning Data throughput capacity tables Figure 48 Range adjustment for PTP 650 symmetry 2 1 optimization TDM bandwidth 10 MHz Page 3 72 ...

Page 158: ...Chapter 3 System planning Data throughput capacity tables Figure 49 Range adjustment for PTP 650 adaptive optimization IP bandwidth 45 MHz Page 3 73 ...

Page 159: ...Chapter 3 System planning Data throughput capacity tables Figure 50 Range adjustment for PTP 650 adaptive optimization IP bandwidth 40 MHz Page 3 74 ...

Page 160: ...Chapter 3 System planning Data throughput capacity tables Figure 51 Range adjustment for PTP 650 adaptive optimization IP bandwidth 20 MHz Page 3 75 ...

Page 161: ...Chapter 3 System planning Data throughput capacity tables Figure 52 Range adjustment for PTP 650 adaptive optimization IP bandwidth 10 MHz Page 3 76 ...

Page 162: ...The following topics are described in this chapter Cambium Networks end user license agreement on page 4 2 contains the Cambium and third party license agreements for the PTP 650 Series products Compliance with safety standards on page 4 23 lists the safety specifications against which the PTP 650 has been tested and certified It also describes how to keep RF exposure within safe limits Compliance...

Page 163: ... TERMS OF THIS AGREEMENT Definitions In this Agreement the word Software refers to the set of instructions for computers in executable form and in any media which may include diskette CD ROM downloadable internet hardware or firmware licensed to you The word Documentation refers to electronic or printed manuals and accompanying instructional aids licensed to you The word Product refers to Cambium ...

Page 164: ...y either i make 1 copy of the transportable part of the Software which typically is supplied on diskette CD ROM or downloadable internet solely for back up purposes or ii copy the transportable part of the Software to a PC hard disk provided you keep the original solely for back up purposes If the Documentation is in printed form it may not be copied If the Documentation is in electronic form you ...

Page 165: ...n consent Unauthorized copying of the Software or Documentation or failure to comply with any of the provisions of this Agreement will result in automatic termination of this license Confidentiality You acknowledge that all Software and Documentation contain valuable proprietary information and trade secrets and that unauthorized or improper use of the Software and Documentation will result in irr...

Page 166: ... conditioned upon transferee paying all applicable license fees and agreeing to be bound by this Agreement Updates During the first 12 months after purchase of a Product or during the term of any executed Maintenance and Support Agreement for the Product you are entitled to receive Updates An Update means any code in any form which is a bug fix patch error correction or minor enhancement but exclu...

Page 167: ...WARRANTY EVEN IF CAMBIUM NETWORKS HAS BEEN ADVISED OF THE POSSIBILITY OF SUCH DAMAGES Some states do not allow the exclusion or limitation of incidental or consequential damages so the above exclusion or limitation may not apply to you IN NO CASE SHALL CAMBIUM S LIABILITY EXCEED THE AMOUNT YOU PAID FOR THE PRODUCT U S government If you are acquiring the Product on behalf of any unit or agency of t...

Page 168: ... duties or obligations hereunder is null and void Governing law This Agreement is governed by the laws of the United States of America to the extent that they apply and otherwise by the laws of the State of Illinois Assignment This agreement may not be assigned by you without Cambium s prior written consent Survival of provisions The parties agree that where the context of any provision indicates ...

Page 169: ...ice appear in supporting documentation and that the name of CMU and The Regents of the University of California not be used in advertising or publicity pertaining to distribution of the software without specific written permission CMU AND THE REGENTS OF THE UNIVERSITY OF CALIFORNIA DISCLAIM ALL WARRANTIES WITH REGARD TO THIS SOFTWARE INCLUDING ALL IMPLIED WARRANTIES OF MERCHANTABILITY AND FITNESS ...

Page 170: ... copyright 2001 2003 Cambridge Broadband Ltd All rights reserved Redistribution and use in source and binary forms with or without modification are permitted provided that the following conditions are met Redistributions of source code must retain the above copyright notice this list of conditions and the following disclaimer Redistributions in binary form must reproduce the above copyright notice...

Page 171: ...NG BUT NOT LIMITED TO THE IMPLIED WARRANTIES OF MERCHANTABILITY AND FITNESS FOR A PARTICULAR PURPOSE ARE DISCLAIMED IN NO EVENT SHALL THE COPYRIGHT HOLDERS OR CONTRIBUTORS BE LIABLE FOR ANY DIRECT INDIRECT INCIDENTAL SPECIAL EXEMPLARY OR CONSEQUENTIAL DAMAGES INCLUDING BUT NOT LIMITED TO PROCUREMENT OF SUBSTITUTE GOODS OR SERVICES LOSS OF USE DATA OR PROFITS OR BUSINESS INTERRUPTION HOWEVER CAUSED...

Page 172: ...edistributions in binary form must reproduce the above copyright notice this list of conditions and the following disclaimer in the documentation and or other materials provided with the distribution Neither the name of Cisco Inc Beijing University of Posts and Telecommunications nor the names of their contributors may be used to endorse or promote products derived from this software without speci...

Page 173: ...Y OUT OF THE USE OF THIS SOFTWARE EVEN IF ADVISED OF THE POSSIBILITY OF SUCH DAMAGE OpenSSL Copyright c 1998 2008 The OpenSSL Project All rights reserved Redistribution and use in source and binary forms with or without modification are permitted provided that the following conditions are met 1 Redistributions of source code must retain the above copyright notice this list of conditions and the fo...

Page 174: ...library is free for commercial and non commercial use as long as the following conditions are adhered to The following conditions apply to all code found in this distribution be it the RC4 RSA lhash DES etc code not just the SSL code The SSL documentation included with this distribution is covered by the same copyright terms except that the holder is Tim Hudson tjh cryptsoft com Copyright remains ...

Page 175: ... OF THE USE OF THIS SOFTWARE EVEN IF ADVISED OF THE POSSIBILITY OF SUCH DAMAGE The license and distribution terms for any publically available version or derivative of this code cannot be changed i e this code cannot simply be copied and put under another distribution license including the GNU Public License Zlib Copyright 1995 2005 Jean loup Gailly and Mark Adler This software is provided as is w...

Page 176: ... our efforts or the library will fulfil any of your particular purposes or needs This library is provided with all faults and the entire risk of satisfactory quality performance accuracy and effort is with the user libpng versions 0 97 January 1998 through 1 0 6 March 20 2000 are Copyright 1998 1999 Glenn Randers Pehrson and are distributed according to the same disclaimer and license as libpng 0 ...

Page 177: ...being the original source 3 This Copyright notice may not be removed or altered from any source or altered source distribution The Contributing Authors and Group 42 Inc specifically permit without fee and encourage the use of this source code as a component to supporting the PNG file format in commercial products If you use this source code in a product acknowledgment is not required but would be ...

Page 178: ...ware without specific prior written permission THIS SOFTWARE IS PROVIDED BY THE AUTHOR AS IS AND ANY EXPRESS OR IMPLIED WARRANTIES INCLUDING BUT NOT LIMITED TO THE IMPLIED WARRANTIES OF MERCHANTABILITY AND FITNESS FOR A PARTICULAR PURPOSE ARE DISCLAIMED IN NO EVENT SHALL THE AUTHOR BE LIABLE FOR ANY DIRECT INDIRECT INCIDENTAL SPECIAL EXEMPLARY OR CONSEQUENTIAL DAMAGES INCLUDING BUT NOT LIMITED TO ...

Page 179: ... limited to software source code documentation source and configuration files Object form shall mean any form resulting from mechanical transformation or translation of a Source form including but not limited to compiled object code generated documentation and conversions to other media types Work shall mean the work of authorship whether in Source or Object form made available under the License a...

Page 180: ...o make have made use offer to sell sell import and otherwise transfer the Work where such license applies only to those patent claims licensable by such Contributor that are necessarily infringed by their Contribution s alone or by combination of their Contribution s with the Work to which such Contribution s was submitted If You institute patent litigation against any entity including a cross cla...

Page 181: ...ave executed with Licensor regarding such Contributions 6 Trademarks This License does not grant permission to use the trade names trademarks service marks or product names of the Licensor except as required for reasonable and customary use in describing the origin of the Work and reproducing the content of the NOTICE file 7 Disclaimer of Warranty Unless required by applicable law or agreed to in ...

Page 182: ...late notice with the fields enclosed by brackets replaced with your own identifying information Don t include the brackets The text should be enclosed in the appropriate comment syntax for the file format We also recommend that a file or class name and description of purpose be included on the same printed page as the copyright notice for easier identification within third party archives Copyright...

Page 183: ...tock may not be used to endorse or promote products derived from this software without specific prior written permission THIS SOFTWARE IS PROVIDED BY THE COPYRIGHT HOLDERS AND CONTRIBUTORS AS IS AND ANY EXPRESS OR IMPLIED WARRANTIES INCLUDING BUT NOT LIMITED TO THE IMPLIED WARRANTIES OF MERCHANTABILITY AND FITNESS FOR A PARTICULAR PURPOSE ARE DISCLAIMED IN NO EVENT SHALL MICHAEL BOSTOCK BE LIABLE ...

Page 184: ...0950 1 07 2nd Edition CAN CSA C22 2 No 60950 22 07 EU EN 60950 1 2006 Amendment 12 2011 EN 60950 22 International CB certified to IEC 60950 1 2005 modified IEC 60950 22 2005 modified Electromagnetic compatibility EMC compliance The PTP 650 complies with European EMC Specification EN301 489 1 with testing carried out to the detailed requirements of EN301 489 4 Note For EN 61000 4 2 1995 to 2009 Ele...

Page 185: ...the general population See the Health Canada web site at http www hc sc gc ca ewh semt pubs radiation 99ehd dhm237 limits limites_e html and Safety Code 6 EN 50383 2002 to 2010 Basic standard for the calculation and measurement of electromagnetic field strength and SAR related to human exposure from radio base stations and fixed terminal stations for wireless telecommunication systems 110 MHz 40 G...

Page 186: ...e for distance yields Calculated distances and power compliance margins Table 63 shows calculated minimum separation distances recommended distances and resulting margins for each frequency band and antenna combination These are conservative distances that include compliance margins At these and greater separation distances the power density from the RF field is below generally accepted limits for...

Page 187: ...6 3 25 Note Gain of antenna in dBi 10 log G The regulations require that the power used for the calculations is the maximum power in the transmit burst subject to allowance for source based time averaging At 5 4 GHz and EU 5 8 GHz the products are generally limited to a fixed EIRP which can be achieved with the Integrated Antenna The calculations above assume that the maximum EIRP allowed by the r...

Page 188: ...rized version of the product and in order to reduce potential radio interference to other users the antenna type and its gain should be so chosen that the Effective Isotropically Radiated Power EIRP is not more than that permitted for successful communication Type approvals The system has been tested against various local technical regulations and found to comply The frequency band in which the sy...

Page 189: ...s 5 8 GHz Region Regulatory approvals USA FCC 47 CFR Part 15 C Canada IC RSS 210 Issue 8 Annex 8 or latest Denmark Radio Interface 00 007 Eire ComReg 02 71R4 Germany Order No 47 2007 Iceland ETSI EN302 502 v1 2 1 Finland ETSI EN302 502 v1 2 1 Greece ETSI EN302 502 v1 2 1 Liechtenstein ETSI EN302 502 v1 2 1 Norway REG 2009 06 02 no 580 Portugal ETSI EN302 502 v1 2 1 Serbia ETSI EN302 502 v1 2 1 Spa...

Page 190: ...CC IC product labels FCC IDs and Industry Canada Certification Numbers are reproduced on the product labels Figure 53 and Figure 54 Figure 53 FCC and IC certifications on integrated ODU product label Figure 54 FCC and IC certifications on connectorized ODU product label 4 9 GHz FCC and IC notification The system has been approved under FCC Part 90 and Industry Canada RSS 111 for Public Safety Agen...

Page 191: ...CC notification This device complies with part 15 of the US FCC Rules Operation is subject to the following two conditions 1 This device may not cause harmful interference and 2 This device must accept any interference received including interference that may cause undesired operation 5 8 GHz IC notification RSS GEN issue 3 7 1 3 Licence Exempt Radio Apparatus This device complies with Industry Ca...

Page 192: ...h case the user may be required to take adequate measures If this equipment does cause interference to radio or television reception refer to Radio and television interference on page 8 10 for corrective actions EU product labels The European R TTE directive 1999 5 EC Certification Number is reproduced on the product labels Figure 55 and Figure 56 Figure 55 European Union certification on integrat...

Page 193: ...ible for obtaining any national licenses required to operate this product and these must be obtained before using the product in any particular country Caution This equipment operates as a secondary application so it has no rights against harmful interference even if generated by similar equipment and must not cause harmful interference on systems operating as primary applications Hereby Cambium N...

Page 194: ...r Injector Installing an SFP Ethernet interface on page 5 23 describes how to install an optical or copper Cat5e Ethernet interface from the ODU SFP port to a connected device Installing an Aux Ethernet interface on page 5 32 describes how to install a copper Cat5e Ethernet interface from the ODU Aux port to a connected device Supplemental installation information on page 5 33 contains detailed in...

Page 195: ...safety certification and may cause a safety hazard Grounding and protective earth The Outdoor Unit ODU must be properly grounded to protect against lightning It is the user s responsibility to install the equipment in accordance with national regulations In the USA follow the requirements of the National Electrical code NFPA 70 2005 and 780 2004 Installation of Lightning Protection Systems In Cana...

Page 196: ...put Some installations will also require an additional circuit breaker or isolation switch to be fitted in the DC supply External cables Safety may be compromised if outdoor rated cables are not used for connections that will be exposed to the outdoor environment For outdoor copper Cat5e Ethernet interfaces always use Cat5e cable that is gel filled and shielded with copper plated steel Alternative...

Page 197: ...s Grounding conductor runs are as short straight and smooth as possible with bends and curves kept to a minimum Grounding cables must not be installed with drip loops All bends must have a minimum radius of 203 mm 8 in and a minimum angle of 90 A diagonal run is preferable to a bend even though it does not follow the contour or run parallel to the supporting structure All bends curves and connecti...

Page 198: ...Chapter 5 Installation Installing the ODU and top LPU Installing the ODU and top LPU Decide how to mount the ODU and top LPU Page 5 5 ...

Page 199: ... between 50 and 75 mm 2 and 3 inches a For an integrated ODU use the integrated mounting bracket Cambium part number N000065L031 b For a connectorized ODU use the connectorized mounting bracket supplied with the ODU alternatively use the integrated ODU bracket If pole diameter is either 90 mm 3 5 inches or 115 mm 4 5 inches c For both integrated and connectorized ODUs use the extended mounting bra...

Page 200: ...g point b Tighten both ODU grounding bolts to a torque of 5 Nm 3 9 lb ft a ODU ground cables b ODU ground cable tightened Integrated ODU 1 a Fix the mounting plate to the back of the ODU at an angle of 45 degrees to the vertical using the bolts and washers provided Tighten the four bolts to a torque setting of 5 Nm 4 lb ft b Fix the bracket body to the mounting plate using the M8 bolt a Fix the mo...

Page 201: ... bracket strap a Back to back LPU b Separate LPU Caution Do not reverse the ODU bracket strap as this arrangement may lead to failure of the assembly 4 Adjust the elevation E and azimuth A of the unit to achieve initial alignment Tighten all three M8 ODU bracket bolts to a torque setting of 14 Nm 11 lb ft Do not over tighten the bolts as this may lead to failure of the assembly Page 5 8 ...

Page 202: ... Nm 4 lb ft a Receptacles for bracket bolts b Mounting plate fixed 2 Hoist the ODU up to its position on the mounting pole 3 a For back to back LPU mounting fix the ODU to the pole using the LPU b For separate LPU mounting fix the ODU to the pole using the bracket strap c Back to back LPU d Separate LPU 4 Tighten the mounting bolts to a torque setting of 7 Nm 5 5 lb ft Do not over tighten the bolt...

Page 203: ...t 2 Fasten the ODU grounding cable to the top LPU using the M6 small lug Tighten both nuts to a torque of 5 Nm 3 9 lb ft Locking nut Washer M6 lug Washer Nut Toothed washer M6 lug to ODU 3 Select a tower or building grounding point within 0 3 meters 1 ft of the ODU bracket Remove paint from the surface and apply anti oxidant compound Fasten the ODU grounding cable to this point using the M10 large...

Page 204: ...d 30010195001 and N type connectors Cambium part number 09010091001 Tighten the N type connectors to a torque setting of 1 7 Nm 1 3 lb ft 3 If the ODU is mounted indoors install lightning arrestors at the building entry point 4 Form drip loops near the lower ends of the antenna cables These ensure that water is not channeled towards the connectors 5 If the ODU is mounted outdoors weatherproof the ...

Page 205: ... the Cambium grounding kit part number 01010419001 8 Fix the antenna cables to the supporting structure using site approved methods Ensure that no undue strain is placed on the ODU or antenna connectors Caution Ensure that the cables do not flap in the wind as flapping cables are prone to damage and induce unwanted vibrations in the supporting structure Page 5 12 ...

Page 206: ...es of Cat5e cable are not supported by Cambium Networks Cambium Networks supply this cable Cambium part numbers WB3175 and WB3176 RJ45 connectors Cambium part number WB3177 and a crimp tool Cambium part number WB3211 The LPU and grounding kit contains a 600 mm length of this cable Install the ODU to top LPU drop cable Fit glands to the ODU to top LPU drop cable Fit EMC strain relief cable glands w...

Page 207: ...PSU port and LPU 1 a Plug the RJ45 connector into the socket in the unit ensuring that it snaps home b Fit the gland body to the RJ45 port and tighten it to a torque of 5 5 Nm 4 3 lb ft a b 2 a Fit the gland nut and tighten until the rubber seal closes on the cable b Do not over tighten the gland nut as there is a risk of damage to its internal components a b Correct Incorrect Page 5 14 ...

Page 208: ...of the gland body When the tension in the gland body is released a gap opens at the point show Unscrew the gland body b Use a small screwdriver to press the RJ45 locking tab then remove the RJ45 connector a b Install the main drop cable Warning The metal screen of the drop cable is very sharp and may cause personal injury ALWAYS wear cut resistant gloves check the label to ensure they are cut resi...

Page 209: ...fall The minimum requirement is one hoisting grip for each 60 m 200 ft of cable Cut to length and fit hoisting grips 1 Cut the main drop cable to length from the top LPU to the bottom LPU 2 Slide one or more hoisting grips onto the top end of the drop cable 3 Secure the hoisting grip to the cable using a special tool as recommended by the manufacturer Terminate with RJ45 connectors and glands Caut...

Page 210: ...intain tension on the hoisting grip during hoisting Loss of tension can cause dangerous movement of the cable and result in injury or death to personnel Do not release tension on the grip until after the grip handle has been fastened to the supporting structure Do not apply any strain to the RJ45 connectors Caution Do not lay the drop cable alongside a lightning air terminal 1 Hoist the top end of...

Page 211: ... using the cable grounding kit Cambium part number 01010419001 Install the bottom LPU to PSU drop cable Install the bottom LPU Install the bottom LPU ground it and connect it to the main drop cable 1 Select a mounting point for the bottom LPU within 600 mm 24 in of the building entry point Mount the LPU vertically with cable glands facing downwards 2 Connect the main drop cable to the bottom LPU b...

Page 212: ... a cable gland at the LPU end Warning The metal screen of the drop cable is very sharp and may cause personal injury ALWAYS wear cut resistant gloves check the label to ensure they are cut resistant ALWAYS wear protective eyewear ALWAYS use a rotary blade tool to strip the cable not a bladed knife Caution Check that the crimp tool matches the RJ45 connector otherwise the cable or connector may be ...

Page 213: ...sured resistance To pass test resistance must be Circle Pass or Fail Additional tests and notes Pins 1 and 2 Ohms 20 Ohms 60 Ohms 1 Pass Fail Resistances must be within 10 of each other 2 Circle Pass or Fail Pass Fail Pins 3 and 6 Ohms 20 Ohms 60 Ohms 1 Pass Fail Pins 4 and 5 Ohms 20 Ohms 60 Ohms 1 Pass Fail Pins 7 and 8 Ohms 20 Ohms 60 Ohms 1 Pass Fail Pin 1 and screen ODU ground K Ohms 100K Ohms...

Page 214: ...e damaged due to the non standard techniques employed to inject DC power into the Ethernet connection between the PSU and the ODU Do not plug any device other than a Cambium PTP 650 PSU into the PSU port of the ODU Plugging any other device into the PSU port of the ODU may damage the ODU and device Installing the AC Power Injector Follow this procedure to install the AC Power Injector Cambium part...

Page 215: ...sing the four screw holes circled 2 Form a drip loop on the PSU end of the LPU to PSU drop cable The drip loop ensures that any moisture that runs down the cable into the cabinet or enclosure cannot enter the PSU 3 a Undo the retaining screw hinge back the cover and plug the drop cable into the port b Close the cover and secure with the screw c When the system is ready for network connection conne...

Page 216: ...from the SFP module kit This is described in the following procedures o Fitting the long cable gland on page 5 25 o Inserting the SFP module on page 5 26 o Connecting the cable on page 5 29 o Fitting the gland on page 5 30 o Removing the cable and SFP module on page 5 31 Optical cables do not require LPUs or ground cables At the remote end of an SFP drop cable use an appropriate termination for th...

Page 217: ...Chapter 5 Installation Installing an SFP Ethernet interface Figure 57 ODU with copper Cat5e connections to all three Ethernet ports Page 5 24 ...

Page 218: ...nents over the LC connector at the ODU end as shown below Copper Cat5e SFP interface Disassemble the long cable gland and thread its components over the RJ45 connector at the ODU end as shown below 1 Disassemble the gland 2 Thread each part onto the cable the rubber bung is split 3 Assemble the spring clip and the rubber bung the clips go inside the ring Page 5 25 ...

Page 219: ...terface 4 Fit the parts into the body and lightly screw on the gland nut do not tighten it Optical Copper Inserting the SFP module To insert the SFP module into the ODU proceed as follows 1 Remove the blanking plug from the SFP port of the ODU Page 5 26 ...

Page 220: ... 5 Installation Installing an SFP Ethernet interface 2 Insert the SFP module into the SFP receptacle with the label up Optical Copper 3 Push the module home until it clicks into place Optical Copper Page 5 27 ...

Page 221: ...Chapter 5 Installation Installing an SFP Ethernet interface 4 Rotate the latch to the locked position Optical Copper Page 5 28 ...

Page 222: ...he fiber optic cable does not twist during assembly especially when fitting and tightening the weatherproofing gland Do not insert the power over Ethernet drop cable from the PSU into the SFP module as this will damage the module 1 Remove the LC connector dust caps from the ODU end optical cable only 2 Plug the connector into the SFP module ensuring that it snaps home Optical Copper Page 5 29 ...

Page 223: ...d 1 Fit the gland body to the SFP port and tighten it to a torque of 5 5 Nm 4 3 lb ft 2 Fit the gland nut and tighten until the rubber seal closes on the cable Do not over tighten the gland nut as there is a risk of damage to its internal components Correct Incorrect Page 5 30 ...

Page 224: ...remove the module without disconnecting the cable otherwise the locking mechanism in the ODU will be damaged 1 Remove the cable connector by pressing its release tab before pulling it out Optical Copper 2 Rotate the latch to the unlocked position Extract the module by using a screwdriver Optical Copper Page 5 31 ...

Page 225: ...tion Adapt the installation procedures in this chapter as appropriate for the Aux interface noting the following differences At the remote end of the Aux drop cable use an appropriate termination for the connected device for example a video camera or wireless access point If the connected device is outdoors not in the equipment building or cabinet adapt the grounding instructions as appropriate Gr...

Page 226: ... are not included in the above topics such as how to strip cables create grounding points and weatherproof connectors Stripping drop cable When preparing drop cable for connection to the PTP 650 ODU or LPU use the following measurements When preparing drop cable for connection to the PTP 650 PSU without a cable gland use the following measurements Page 5 33 ...

Page 227: ...ble grounding kit Cambium part number 01010419001 To identify suitable grounding points refer to Drop cable grounding points on page 3 13 1 Remove 60 mm 2 5 inches of the drop cable outer sheath 2 Cut 38mm 1 5 inches of rubber tape self amalgamating and fit to the ground cable lug Wrap the tape completely around the lug and cable 3 Fold the ground wire strap around the drop cable screen and fit ca...

Page 228: ... surplus from the cable ties 5 Cut a 38mm 1 5 inches section of self amalgamating tape and wrap it completely around the joint between the drop and ground cables 6 Use the remainder of the self amalgamating tape to wrap the complete assembly Press the tape edges together so that there are no gaps Page 5 35 ...

Page 229: ...ur layers of PVC tape always overlapping at half width Wrap the layers in alternate directions top to bottom then bottom to top The edges of each layer should be 25mm 1 inch above A and 25 mm 1 inch below B the previous layer 9 Prepare the metal grounding point of the supporting structure to provide a good electrical contact with the grounding cable clamp Remove paint grease or dirt if present App...

Page 230: ...ype connector Use this procedure to weatherproof the N type connectors fitted to the connectorized ODU and external antenna if recommended by the antenna manufacturer 1 Ensure the connection is tight A torque wrench should be used if available 2 Wrap the connection with a layer of 19 mm 0 75 inch PVC tape starting 25 mm 1 inch below the connector body Overlap the tape to half width and extend the ...

Page 231: ... stretching it so that it will wrap completely around the connector and cable 6 Press the tape edges together so that there are no gaps The tape should extend 25 mm 1 inch beyond the PVC tape 7 Wrap a layer of 50 mm 2 inch PVC tape from bottom to top starting from 25 mm 1 inch below the edge of the self amalgamating tape overlapping at half width Page 5 38 ...

Page 232: ...C tape always overlapping at half width Wrap the layers in alternate directions Second layer top to bottom Third layer bottom to top Fourth layer top to bottom Fifth layer bottom to top The bottom edge of each layer should be 25 mm 1 inch below the previous layer 9 Check the completed weatherproof connection Page 5 39 ...

Page 233: ...orrect power supply that is not in the range 37V to 60V DC is connected to the DC input terminals one or both fuses may blow Both fuses are 3 Amp slow blow for example Littlefuse part number 0229003 To replace these fuses undo the retaining screw and hinge back the cover as indicated Note No other fuses are replaceable in the AC DC Enhanced Power Injector Note The AC Power Injector does not contai...

Page 234: ... topics Preparing for configuration and alignment on page 6 2 Connecting to the unit on page 6 5 Using the web interface on page 6 7 Installation menu on page 6 10 System menu on page 6 21 Management menu on page 6 39 SNMP pages for SNMPv3 on page 6 61 SNMP pages for SNMPv1 2c on page 6 71 Security menu on page 6 75 Aligning antennas on page 6 87 Other configuration tasks on page 6 95 Page 6 1 ...

Page 235: ... the following guidelines Never work in front of the antenna when the ODU is powered Always power down the PSU before connecting or disconnecting the drop cable from the PSU ODU or LPU Regulatory compliance All applicable radio regulations must be followed while configuring the units and aligning the antennas For more information refer to Compliance with radio regulations on page 4 27 Caution If t...

Page 236: ...dule kits on page 2 27 To allow Med up to 250 Mbps or Full up to 450 Mbps throughput capability Purchase an access key from Cambium Networks Table 67 Cambium will email one Access Key for each upgrade purchased To allow 128 bit or 256 bit AES encryption Purchase an access key from Cambium Networks Table 67 Cambium will email one Access Key for each upgrade purchased Table 67 Capability upgrades Ca...

Page 237: ...stem Status page Go to the Cambium Support web page see Contacting Cambium Networks on page 1 and navigate to the Cambium Networks License Key Generator Complete the required fields including MAC Address and Country For SFP capability AES encryption and data throughput upgrades only enter the Access Key Submit the web form Cambium will send the License Key by email Page 6 4 ...

Page 238: ...nd power it up Configuring the management PC Use this procedure to configure the local management PC to communicate with the PTP 650 Procedure 1 Select Properties for the Ethernet port In Windows 7 this is found in Control Panel Network and Internet Network Connections Local Area Connection 2 Select Internet Protocol TCP IP 3 Click Properties Page 6 5 ...

Page 239: ...and power up the PTP 650 Procedure 1 Check that the ODU and PSU are correctly connected 2 Connect the PC Ethernet port to the LAN port of the PSU using a standard not crossed Ethernet cable 3 Apply mains or battery power to the PSU The green Power LED should illuminate continuously 4 After about 45 seconds check that the orange Ethernet LED starts with 10 slow flashes 5 Check that the Ethernet LED...

Page 240: ...edure 1 Start the web browser from the management PC 2 Type the IP address of the unit into the address bar The factory default IP address is 169 254 1 1 Press ENTER The web interface menu and System Summary page are displayed 3 On the menu click System The login page is displayed with Password only the default or with Username and Password if identity based user accounts have been enabled 4 Enter...

Page 241: ...30 SFP Configuration SFP Configuration page on page 6 33 Save and Restore Save Restore Configuration page on page 6 34 Spectrum Management Spectrum Management page on page 7 20 Barring channels on page 7 31 Statistics System Statistics page on page 7 32 Comparing actual to predicted performance on page 6 94 Wireless Port Counters Wireless Port Counters page on page 7 37 Test Ethernet packet errors...

Page 242: ...n Information Login Information page on page 7 9 Web Properties Webpage Properties page on page 6 49 SNMP SNMP pages for SNMPv3 on page 6 61 SNMP pages for SNMPv1 2c on page 6 71 Email Email Configuration page on page 6 52 Diagnostic Alarms Diagnostic Alarms page on page 6 54 Time Time Configuration page on page 6 55 Syslog Syslog page on page 7 16 Syslog Configuration Syslog Configuration page on...

Page 243: ...s will be infringed To bar these channels follow the procedure Barring channels on page 7 31 Starting the Installation Wizard To start the Installation Wizard on the menu click Installation The response depends upon the state of the unit If the unit is newly installed the Software License Key page is displayed Continue at Software License Key page on page 6 12 If the unit is armed for alignment th...

Page 244: ...rmed Figure 58 Disarm Installation page top and bottom of page shown To disarm the unit click Disarm Installation Agent Current Installation Summary page Menu option Installation Figure 59 This page is displayed only when unit is not armed Figure 59 Current Installation Summary page top and bottom of page shown Click Continue to Installation Wizard Page 6 11 ...

Page 245: ...nfigure the unit with a new License Key and to review the capabilities of an installed License Key The Capability Summary section is not displayed until a License Key is submitted and accepted Ensure that Licenses Keys are available Generating a License Key on page 6 3 Figure 60 Software License Key page showing a Mid license Page 6 12 ...

Page 246: ...ite and Mid licenses only select one of the following options o If License Full Capability Trial Status is Available Figure 60 to start the full capability trial period set Activate Full Capability Trial License to Yes o If License Full Capability Trial Status is Active Figure 61 to suspend the full capability trial period set Stop Full Capability Trial License to Yes o If License Full Capability ...

Page 247: ...igure 63 Use this page to update the IP interface attributes Figure 63 Interface Configuration page showing Dual IPv4 and IPv6 Review and update the attributes they are repeated in the LAN Configuration page Table 71 To continue with the Installation Wizard click Next or Submit Interface Configuration Page 6 14 ...

Page 248: ...lation Figure 64 This page is part of the Installation Wizard Use it to update the wireless attributes Figure 64 Wireless Configuration page Procedure Update the attributes Table 69 To save any changes and continue with the Installation Wizard click Next or click Submit Wireless Configuration Page 6 15 ...

Page 249: ...etermines how paired ODUs will recognize each other Link Access Each ODU must be configured with Target MAC Address equal to the MAC Address of the other unit Link Name Access Both ODUs must be configured with the same Link Name Target MAC Address Only displayed when Access Method is set to Link Access This is the MAC Address of the peer unit that will be at the other end of the wireless link This...

Page 250: ...set to Master Adaptive Allows link symmetry to vary dynamically in response to offered traffic load This is not supported in the following cases Where radar avoidance is mandated in the region Link Mode Optimization is set to TDM Traffic 2 to 1 1 to 1 or 1 to 2 There is a fixed division between transmit and receive time in the TDD frame of the master ODU The first number in the ratio represents th...

Page 251: ...rk of synchronized PTP 650 units where some of the units are operating on the same frequency When this type of network is designed the Color Code values are normally specified in the link planning report In all other cases Cambium Networks recommend that Tx Color Code and Rx Color Code are left at the default value of A The value of Tx Color Code MUST always match the value of Rx Color Code at the...

Page 252: ...To implement automatic ranging select a value that corresponds to the estimated maximum range of the link Auto 0 to 40 km 0 to 25 miles Auto 0 to 100km 0 to 62 miles Auto 0 to 200km 0 to 125 miles Target Range During alignment the wireless units use the approximate link distance entered in Target Range to calculate link range The main advantage of Target Range mode is that it reduces the time take...

Page 253: ...tom of page shown Procedure To undo or correct any updates click Back To confirm the updates and arm the installation click Confirm Configuration and Reboot and click OK to reboot the unit If IP Address Subnet Mask or Gateway IP Address have been changed reconfigure the local management PC to use an IP address that is valid for the network Refer to Configuring the management PC on page 6 5 If IP A...

Page 254: ... Menu option System Configuration Figure 66 Use this page to enable AES encryption and to review and update key wireless attributes of the unit Figure 66 System Configuration page Caution Configuring link encryption over an operational link will necessitate a service outage Therefore the configuration process should be scheduled during a period of low link utilization Page 6 21 ...

Page 255: ...essages fault logs and other system outputs IPv4 or IPv6 The unit is identified using its IPv4 or IPv6 Address These options are only available when IP Version is set to Dual IPv4 and IPv6 in the in the LAN Configuration page Table 71 Master Slave Mode Master The unit is a Master that is it controls the point to point link and its maintenance On startup the Master transmits until a link with the S...

Page 256: ...ied in the installation report PTP LINKPlanner This may be higher than the alignment value Antenna Gain Only displayed when the ODU is connectorized Gain of the remote antenna Cable Loss Only displayed when the ODU is connectorized Loss in the ODU antenna RF cable If there is a significant difference in length of the RF cables for the two antenna ports then the average value should be entered EIRP...

Page 257: ... Menu option System Configuration LAN Configuration Figure 67 Use this page to control how users connect to the PTP 650 web interface either from a locally connected computer or from a management network Figure 67 LAN Configuration page showing Dual IPv4 and IPv6 Page 6 24 ...

Page 258: ...and auto negotiation are not compatible a mixed configuration will cause a duplex mismatch resulting in greatly reduced data capacity The Auto Neg Advertisement or Forced Configuration data rates must be within the capability of the Ethernet link partner otherwise loss of service will occur Procedure 1 Review and update the attributes IP Interface Table 71 Main PSU or Aux Port Table 72 Bridging Ta...

Page 259: ...l address This address is used by the family of Internet protocols to uniquely identify this unit on a network IPv6 Prefix Length Length of the IPv6 subnet prefix default 64 bits IPv6 Gateway Address The IPv6 address of a computer on the current network that acts as an IPv6 gateway A gateway acts as an entrance and exit to frames from and to other networks It is usual to use the link local address...

Page 260: ...ce of the local unit and if the wireless link is established the remote unit Ensure that the local and remote units have different IP addresses Out of band Local Management The port handles local management data only It can be used to access the web interface of the local unit Only one port can be allocated to customer data At least one port must be allocated to management data Ethernet Loopback M...

Page 261: ...that is within the capability of the Ethernet link partner Use the same setting for the Ethernet link partner Forced Configuration Only displayed when Auto Negotiation is set to Disabled This forces the speed and duplex setting of the Ethernet interface Over the air throughput will be capped to the rate of the Ethernet interface at the receiving end of the link Select a data rate that is within th...

Page 262: ... data or management port or over the wireless link as appropriate If the end station address is unknown then management traffic is transmitted at the Ethernet port and over the wireless link In out of band local management mode management frames are not transmitted over the wireless link and so address learning is not active Data Port Pause Frames Controls whether the bridge tunnels or discards La...

Page 263: ...Configuration Figure 68 or Figure 69 Use this page to control the quality of service configuration Classification may be based on fields in the Ethernet header Layer 2 or in the network header Layer 3 The unit recognizes two network layer protocols IP and MPLS Figure 68 QoS Configuration page Ethernet Page 6 30 ...

Page 264: ...Chapter 6 Configuration and alignment System menu Figure 69 QoS Configuration page IP MPLS Page 6 31 ...

Page 265: ... link Table 74 QoS Configuration attributes Attribute Meaning Bridge The classification of each layer 2 control protocol L2CP to an egress queue at the wireless port MRP CFM R APS EAPS Priority Scheme Ethernet Classification is based on fields in the Ethernet header Layer 2 IP MPLS Classification is based on fields in the network header Layer 3 IP includes IPv4 and IPv6 Unknown Protocol Only displ...

Page 266: ...n This page is only available when the ODU detects an optical Figure 70 or copper Figure 71 SFP module in the SFP port Use it to configure the way in which the unit connects to the network via the SFP interface Figure 70 SFP Configuration page optical SFP module Figure 71 SFP Configuration page copper SFP module Page 6 33 ...

Page 267: ...e the same setting for the Ethernet link partner Forced Configuration Only displayed when SFP Port Auto Negotiation is set to Disabled This forces the speed and duplex setting of the Ethernet interface Over the air throughput will be capped to the rate of the Ethernet interface at the receiving end of the link Select a data rate that is within the capability of the Ethernet link partner Use the sa...

Page 268: ... only guaranteed to work if the installed software version has not been changed since the configuration file was saved This is why the configuration should always be saved immediately after upgrading the software version Note The license key is restored automatically if the configuration file is saved and then loaded on the same unit However the license key is not restored if the configuration fil...

Page 269: ...t Number Encryption Algorithm Encryption Key SNMP Control Of HTTP And Telnet SNMP Control of Passwords Procedures To save the configuration o Click Save Configuration File o Save the file using the format MAC mm mm mm_IP iii iii iii iii cfg where mm mm mm is MAC address of unit and iii iii iii iii is Internet address of unit IPv4 or IPv6 depending on IP address label To restore the configuration o...

Page 270: ... the link Limited operation may sometimes be possible with dissimilar software versions but such operation is not supported by Cambium Networks Caution If the link is operational upgrade the remote end of the link first then upgrade the local end Otherwise the remote end may not be accessible Preparation Go to the Cambium Support web page see Contacting Cambium Networks on page 1 and navigate to P...

Page 271: ...e to the folder containing the downloaded software image and click Open 4 Click Upload Software Image The Software Upgrade Confirmation page is displayed 5 Click Program Software Image into Non Volatile Memory The Progress Tracker page is displayed On completion the Software Upgrade Complete page is displayed 6 Click Reboot Wireless Unit then click OK to confirm The unit reboots with the new softw...

Page 272: ...ement menu This section describes how to configure web based management of the PTP 650 unit Web Based Management page Menu option Management Web Figure 74 Use this page to configure web based management of the unit Figure 74 Web Based Management page Page 6 39 ...

Page 273: ... HTTPS is configured The port number for HTTPS access A value of zero means the wireless unit uses the default port HTTP Access Enabled No The unit will not respond to any requests on the HTTP port Yes The unit will respond to requests on the HTTP port Remote management via HTTPS is not affected by this setting HTTP Port Number The port number for HTTP access A value of zero means the wireless uni...

Page 274: ...de a secure means to update passwords from a central network manager Disabled Passwords for identity based user accounts can be updated only via the web based interface default TFTP Client Disabled The unit will not respond to any TFTP software download requests Enabled Software can be downloaded via TFTP as described in Upgrading software using TFTP on page 6 96 Debug Access Enabled Yes Cambium T...

Page 275: ...e network operator s security policy The Identity Based User Accounts option allows multiple users from one to ten to access the unit with one of three levels of access Security Officer System Administrator and Read Only If Identity Based User Accounts are Enabled this procedure may only be performed by a Security Officer Note Local User Account Names Roles and Passwords are critical security para...

Page 276: ...Chapter 6 Configuration and alignment Management menu Figure 76 Local User Accounts page Identity Based User Accounts enabled Page 6 43 ...

Page 277: ...t minutes A value of zero disables this feature Minimum Password Change Period The minimum time that elapses before a user is allowed to change a password minutes A value of zero disables this feature Password Expiry Period The time that elapses before a password expires days A value of zero disables this feature Maximum Number of Login Attempts The maximum number of login attempts with incorrect ...

Page 278: ...s The maximum number of consecutive repeated alphabetic numeric and special characters permitted in passwords For example if all values are set to 2 then aaa XXX 999 and will be rejected but aa XX 99 or will be accepted 2 Maximum Consecutive Characters The maximum number of consecutive lowercase uppercase and numeric characters permitted in passwords For example if all values are set to 5 then ALF...

Page 279: ...cters used in password construction The only characters permitted in a password are a z A Z 0 9 and any of the special characters entered here Table 79 Identity based user accounts attributes Attribute Meaning Name Enter a user name Role Select a role from the list Security Officer System Administrator or Read Only Password Enter a password for the user Passwords must comply with the complexity ru...

Page 280: ...ntication RADIUS authentication is only available when PTP 650 is configured for Identity based User Accounts and when RADIUS servers are connected to the network Figure 77 RADIUS Configuration page Note Only users with Security Officer role are permitted to configure RADIUS authentication Note When RADIUS is enabled the Security Officer may disable all user accounts Page 6 47 ...

Page 281: ...alue to zero disables the timer RADIUS Server Retries Number of times the PTP 650 will retry after a RADIUS server fails to respond to an initial request RADIUS Server Timeout Time in seconds the PTP 650 will wait for a response from a RADIUS server Authentication Method Method used by RADIUS to authenticate users Authentication Server 1 and 2 RADIUS Server Status The status of the RADIUS server T...

Page 282: ...hared Secret Confirm Shared secret confirmation Webpage Properties page Menu option Management Web Web Properties Figure 78 Use this page to control the display of the web interface Figure 78 Webpage Properties page Procedure Update the attributes Table 81 Click Apply Properties Page 6 49 ...

Page 283: ...ge popup help is displayed Send HTTPS Close Notify Alerts Only displayed when HTTPS is configured Controls whether or not the HTTPS server sends TLS Close Notify Alerts before it shuts down each socket Disabled TLS Close Notify Alerts are not sent before closing each socket This is the default because these alerts can cause problems with some browsers e g Internet Explorer Enabled TLS Close Notify...

Page 284: ...stem Configuration page Table 70 IPv4 ipAddress ipv4Address IPv6 ipAddress ipv6Address if not blank or ipv6LinkLocalAddress ipv4Address IPv4 Address of the ODU as set in the LAN Configuration page Table 71 ipv6Address IPv6 Address of the ODU as set in the LAN Configuration page Table 71 ipv6LinkLocalAddress IPv6 Auto Configured Link Local Address of the ODU This cannot be updated but it can be vie...

Page 285: ...ansfer Protocol SMTP email messages to notify the system administrator when certain events occur Figure 79 Email Configuration page Procedure Update the attributes Table 83 Click Submit Updated Configuration The Configuration Change Reboot dialog is displayed Click Reboot Wireless Unit and click OK The reboot progress message is displayed On completion the unit restarts Page 6 52 ...

Page 286: ...r Port Number The SMTP Port Number is the port number used by the networked SMTP server By convention the default value for the port number is 25 SMTP Source Email Address The email address used by the PTP 650 Series to log into the SMTP server This must be a valid email address that will be accepted by your SMTP Server SMTP Destination Email Address The email address to which the PTP 650 Series w...

Page 287: ...gnment Management menu Diagnostic Alarms page Menu option Management Diagnostic Alarms Figure 80 Use this page to select which diagnostic alarms will be notified to the system administrator Figure 80 Diagnostic Alarms page Page 6 54 ...

Page 288: ... alarms These alarms are described in Alarms on page 7 12 Click Submit Updated Configuration Time Configuration page Menu option Management Time Figure 81 and Figure 82 Use this page to set the real time clock of the PTP 650 Figure 81 Time Configuration page SNTP disabled Page 6 55 ...

Page 289: ...Chapter 6 Configuration and alignment Management menu Figure 82 Time Configuration page SNTP enabled Page 6 56 ...

Page 290: ...ting to a networked time server Set Time Set hours minutes and seconds Set Date Set year month and day Time Zone Set the time zone offset from Greenwich Mean Time GMT To set the clock to UTC time set Time Zone to GMT 00 00 Daylight Saving Disabled There is no offset for daylight saving time Enabled System clock is moved forward one hour to adjust for daylight saving time To set the clock to UTC ti...

Page 291: ... Server 1 and 2 SNTP Server Status Status message reflecting the state of communications with the SNTP server SNTP Server Internet Address The IPv4 or IPv6 Address of the networked SNTP server SNTP Server Port Number The port number of the networked SNTP server By convention the default value for the port number is 123 SNTP Server Authentication Protocol Authentication protocol to be used with thi...

Page 292: ...GMT 00 00 Daylight Saving Disabled Daylight saving adjustments will not be applied to the time Enabled Daylight saving adjustments will be applied to the time according to local rules To set the clock to UTC time set Daylight Saving to Disabled Syslog Configuration page Menu option Management Syslog Syslog configuration Figure 83 Use this page to configure system logging Only users with Security O...

Page 293: ...tribute Meaning Syslog State When system logging is enabled log entries are added to the internal log and optionally transmitted as UDP messages to one or two syslog servers Syslog Client Enabled Event messages are logged Disabled Event messages are not logged Syslog Client Port The client port from which syslog messages are sent Syslog Server 1 and 2 Syslog Server Internet Address The IPv4 or IPv...

Page 294: ...col version 3 SNMPv3 traps using the SNMP Wizard Current SNMP Summary for SNMPv3 Menu option Management SNMP Figure 84 Use this page to review the current SNMP configuration and start the SNMP Wizard Figure 84 Current SNMP Summary page when SNMP is disabled Procedure Review the summary If any updates are required click Continue to SNMP Wizard Page 6 61 ...

Page 295: ...Part of the SNMP Wizard Figure 85 Use this page to enable SNMP select SNMPv3 and configure access to the SNMP server Figure 85 Step 1 SNMP Configuration page for SNMPv3 Procedure Set SNMP State to Enabled Set SNMP Version to v3 The page is redisplayed with SNMPv3 attributes Update the attributes Table 87 Click Next Page 6 62 ...

Page 296: ...rform SNMP management Only displayed when SNMP Access Control is set to Enabled SNMP Version SNMP protocol version v1 2c or v3 SNMP Security Mode MIB based SNMPv3 security parameters are managed via SNMP MIBs Web based SNMPv3 security parameters are not available over SNMP but instead are configured using the SNMP Accounts page as described in Step 3 SNMP User Policy Configuration for SNMPv3 on pa...

Page 297: ... 1 SNMP Configuration page o If Web based go to Step 3 SNMP User Policy Configuration for SNMPv3 on page 6 65 o If MIB based go to Confirm SNMP Configuration for SNMPv3 on page 6 70 Table 88 Step 2 SNMP MIB II System Objects attributes for SNMPv3 Attribute Meaning Sys Contact The name of the contact person for this managed node together with information on how to contact this person Sys Name An ad...

Page 298: ... administrator and Read only Procedure Update the attributes Table 89 Click Next Figure 87 Step 3 SNMP User Policy Configuration page for SNMPv3 Table 89 Step 3 SNMP User Policy Configuration attributes for SNMPv3 Attribute Meaning Security Level Defines the security level and associated protocols that are required to allow SNMP users to access the PTP 650 No Auth No Priv Users are not required to...

Page 299: ...0 1 Secure Hash Algorithm SHA 1 is used Privacy Protocol The privacy protocol to be used to access the PTP 650 via SNMP This is disabled when Security Level is set to No Auth No Priv or Auth No Priv DES Data Encryption Standard DES symmetric encryption protocol AES Advanced Encryption Standard AES cipher algorithm Note A user configured to use AES privacy protocol will not be able to transmit and ...

Page 300: ...SNMP User Accounts Configuration page for SNMPv3 Procedure Update the individual user attributes Table 90 for up to 10 SNMP users Click Next Table 90 Step 4 SNMP User Accounts Configuration attributes for SNMPv3 Attribute Meaning Name Name to be used by the SNMP user to access the system Role Selects which of the two web based security profiles are applied to this user System administrator or Read...

Page 301: ...ivacy protocol Length must be between 8 and 32 characters May contain spaces The Auth Passphrase is hidden when Security Level for this user s Role is set to No Auth No Priv The Priv Passphrase is hidden when Security Level for this user s Role is set to No Auth No Priv or Auth No Priv Passphrase Confirm Passphrase must be reentered to confirm it has been correctly typed Page 6 68 ...

Page 302: ...MP Wizard Figure 89 This page is only displayed when SNMP Security Mode is set to Web based in the Step 1 SNMP Configuration page Use this page to configure the events that will generate SNMP traps and to set up trap receivers Figure 89 Step 5 SNMP Trap Configuration page for SNMPv3 Procedure Update the attributes Table 91 Click Next Page 6 69 ...

Page 303: ...MP server trap receiver This is normally the network management system but it may be a separate trap receiver SNMP Trap Port Number The server port at which SNMP traps are received SNMP Trap User Account The user name and associated protocols to use when sending SNMP traps to the server Confirm SNMP Configuration for SNMPv3 Menu option Management SNMP Part of the SNMP Wizard Figure 90 Use this pag...

Page 304: ...c Menu option Management SNMP Figure 84 Use this page to review the current SNMP configuration and start the SNMP Wizard Procedure Review the summary If any updates are required click Continue to SNMP Wizard Step 1 SNMP Configuration for SNMPv1 2c Menu option Management SNMP Part of the SNMP Wizard Figure 91 Use this page to enable SNMP select SNMPv1 2c and configure access to the SNMP server Figu...

Page 305: ...Address 1 2 3 A list of up to three IPv4 or IPv6 Addresses permitted to perform SNMP management Only displayed when SNMP Access Control is set to Enabled SNMP Version SNMP protocol version v1 2c or v3 SNMP Community String The SNMP community string acts like a password between the network management system and the distributed SNMP clients PTP 650 ODUs Only if the community string is configured cor...

Page 306: ...ges for SNMPv1 2c Step 3 SNMP Trap Configuration for SNMPv1 2c Menu option Management SNMP Part of the SNMP Wizard Figure 92 Figure 92 Step 3 SNMP Trap Configuration page for SNMPv1 2c Procedure Update the attributes Table 93 Click Next Page 6 73 ...

Page 307: ...r 1 or 2 SNMP Trap Internet Address The IPv4 or IPv6 Address of the SNMP server trap receiver This is normally the network management system but it may be a separate trap receiver SNMP Trap Port Number The server port at which SNMP traps are received Confirm SNMP Configuration for SNMPv1 2c Menu option Management SNMP Part of the SNMP Wizard Figure 93 Use this page to review and confirm the update...

Page 308: ... Procedure 1 Ensure that the following cryptographic material has been generated Key Of Keys TLS Private Key and Public Certificates for the correct IP address User Defined Security Banner Random Number Entropy Input 2 Order the necessary AES capability upgrade generate a license key and enter it on the Software License Key page Software License Key page on page 6 12 3 Identify the Port numbers fo...

Page 309: ...option Security Displayed only when AES encryption is enabled by license key Figure 94 Use this page to review the current security configuration of the unit Figure 94 Security Configuration Wizard page Procedure To continue with the Security Wizard click Continue to Security Wizard Page 6 76 ...

Page 310: ...izard Figure 95 Use this page to enter a Key of Keys to encrypt all critical security parameters CSPs before they are stored in non volatile memory Figure 95 Step 1 Enter Key of Keys page Caution Erasing or changing the key of keys erases all CSPs Procedure Enter and confirm the generated Key of Keys Click Next Page 6 77 ...

Page 311: ... this occurs put the unit into recovery mode and erase all configuration settings For more information refer to Recovery mode on page 7 44 Procedure If a valid TLS private key exists then an SHA 1 thumbprint of the key is displayed If this key is correct then take no action Otherwise click Browse and select the generated private key file der If a valid TLS public certificate exists then an SHA 1 t...

Page 312: ...t of the Security Wizard Figure 97 Use this page to enter a banner that will be displayed every time a user attempts to login to the wireless unit Figure 97 Step 3 Enter User Security Banner page Procedure Update the User Defined Security Banner optional Set the Acknowledgement to No or Yes Click Next Page 6 79 ...

Page 313: ...curity Part of the Security Wizard Figure 98 Use this page to choose whether or not to display information about previous login attempts when the user logs into the web interface Figure 98 Step 4 Enter Login Information Settings page Procedure Set Display Login Information to No or Yes Click Next Page 6 80 ...

Page 314: ...e to enter entropy input to seed the internal random number algorithm Figure 99 Step 5 Random Number Entropy Input page Procedure If valid entropy input exists then an SHA 1 thumbprint of the input is displayed If this input is correct then take no action Otherwise enter the generated input in the Entropy Input and Confirm Entropy Input fields Click Next Page 6 81 ...

Page 315: ... is used to encrypt all traffic over the PTP 650 wireless link Figure 100 Step 6 Enter Wireless Link Encryption Key page Procedure Select the applicable value in the Encryption Algorithm field If a valid encryption key exists then an SHA 1 thumbprint of the key is displayed If this key is correct then take no action Otherwise enter the generated key in the Wireless Link Encryption Key and Confirm ...

Page 316: ... Figure 101 Use this page to configure network management of the PTP 650 using one or more of the following methods HTTPS HTTP Telnet or SNMP Figure 101 Step 7 Enter HTTP and Telnet Settings page Caution If HTTPS HTTP Telnet and SNMP are all disabled management access will be impossible until the unit is placed in recovery mode Page 6 83 ...

Page 317: ... default port Telnet Access Enabled No The unit will not respond to any requests on the Telnet port Yes The unit will respond to requests on the Telnet port Telnet Port Number The port number for Telnet access Zero means use the default port SNMP Control of HTTP And Telnet Disabled Neither HTTP nor Telnet can be controlled remotely via SNMP Enabled Both HTTP and Telnet can be controlled remotely v...

Page 318: ... menu Step 8 Commit Security Configuration Menu option Security Part of the Security Wizard Figure 102 Use this page to review and confirm the updated security configuration of the unit Figure 102 Step 8 Commit Security Configuration page Page 6 85 ...

Page 319: ...ffect Note If the Key of keys is entered or modified in the Security Wizard user accounts are reset when Commit Security Configuration and Reboot is clicked It is then necessary to reconfigure them Zeroize CSPs page Menu option Security Zeroize CSPs Figure 103 Use this page if it is necessary to zeroize Critical security parameters CSPs Figure 103 Zeroize CSPs page Procedure Click Zeroize CSPs and...

Page 320: ...hat the management PC is connected to the local unit powered up and logged on as described in Connecting to the unit on page 6 5 4 Power up the remote unit 5 Log into the local unit as described in Logging into the web interface on page 6 7 Checking that the units are armed Use this procedure to confirm that the units are in the armed state ready for alignment In the armed state the modulation mod...

Page 321: ...e integrated ODU at 45 degrees to the vertical as shown in Installing the ODU and top LPU on page 5 5 To achieve best results make small incremental changes to elevation and azimuth Caution The action of tightening the mounting bolts can alter antenna alignment This can be helpful when fine tuning alignment but it can also lead to misalignment To prevent misalignment continue to monitor receive si...

Page 322: ...ck this data and update the prediction as necessary 7 Once the antennas have been aligned correctly tighten the integrated ODU or connectorized antenna mountings To ensure that the action of tightening does not alter antenna alignment continue to monitor received signal level Aligning separate antennas for spatial diversity Use this procedure if a connectorized ODU is installed at either site with...

Page 323: ...er reach The tones and their meanings are described in Table 95 In each of the states detailed in the table align the unit to give the highest pitch tone The term wanted signal refers to that of the peer unit being installed Table 95 ODU installation tones State Name Tone Description State Description Pitch Indication Free Channel Search Regular beep Executing band scan N A Scanning Slow broken to...

Page 324: ...ar signals before transmitting If a radar signal is detected during any of the installation phases a further compulsory 60 seconds channel scan will take place as the master unit attempts to locate a new channel that is free of radar interference Ranging The PTP 650 Series does not require the user to enter the link range The Master unit typically takes less than 60 seconds to determine the length...

Page 325: ...t is Up Registering Searching or Acquiring While slowly sweeping the antenna monitor the trace of receive power over the last three minutes Monitor the Receiver Power Bar bottom right Green signifies that the wireless link is up and red signifies all other states Monitor the Wireless Install Metric top right This is the instantaneous receive power in dBm 110 Note To access the PDA version of the g...

Page 326: ...d Clear unwanted installation information from the various systems statistics Store the link range for fast link acquisition on link drop Enable higher data rates Note After 24 hours the units will be disarmed automatically provided that they are armed and that the link is up Procedure Select menu option Installation The Disarm Installation page is displayed Figure 58 Click Disarm Installation Age...

Page 327: ... of performance PTP LINKPlanner provides the prediction in the form of an installation report Procedure Select menu option System Statistics The System Statistic page is displayed Figure 106 Monitor the following attributes o Link Loss o Transmit Data Rate o Receive Data Rate Figure 106 Statistics to be monitored after alignment For more information on the System Statistics page refer to System St...

Page 328: ... reachable from the network management system by opening the web interface to the management agent or by requesting ICMP echo response packets using the Ping application For in band management test that both units are reachable from one PC If the network management system is remote from the sites either ask co workers at the management center to perform this test or use remote login to the managem...

Page 329: ... for the unit at 10 10 10 10 to the IPv4 address 10 10 10 1 enter this command snmpset_d exe v 2c c public 10 10 10 10 iso 3 6 1 4 1 17713 7 9 19 0 a 10 10 10 1 tFTPServerPortNumber This setting is optional The port number of the TFTP server from which the TFTP software upgrade file name will be retrieved default 69 tFTPSoftwareUpgrade FileName The filename of the software upgrade to be loaded fro...

Page 330: ...so 3 6 1 4 1 17713 7 9 9 0 tFTPSoftwareUpgradeStatus Text This describes the status of the TFTP software upgrade process including any error details For example enter this command snmpget_d exe v 2c c public 10 10 10 10 iso 3 6 1 4 1 17713 7 9 10 0 tFTPSoftwareUpgradeStatus AdditionalText This is used if tFTPSoftwareUpgradeStatusText is full and there are more than 255 characters to report It cont...

Page 331: ...eless Ethernet bridge The following topics are described in this chapter System summary and status on page 7 2 Rebooting and logging out on page 7 9 Alarms alerts and messages on page 7 12 Spectrum management on page 7 20 System statistics on page 7 32 Recovery mode on page 7 44 Page 7 1 ...

Page 332: ...ck that the Wireless Link Status is Up on both units If it is not Up review any uncleared system alarms these are displayed below the System Clock attribute Whenever system alarms are outstanding a yellow warning triangle is displayed on the navigation bar For more information refer to Alarms on page 7 12 Table 98 System Summary attributes Attribute Meaning Wireless Link Status Current status of t...

Page 333: ... The system clock presented as local time allowing for zone and daylight saving if set System Status page Menu option Status Figure 108 This page provides a detailed view of the operation of the PTP 650 link from both the wireless and network perspectives Figure 108 System Status page The two PTP 650 Series units are arranged in a master and slave relationship The roles of the units in this relati...

Page 334: ...ze of 63 ASCII characters Software Version The version of PTP 650 software installed on the equipment Hardware Version The PTP 650 hardware version Formatted as vvvv where vvvv is the version of the printed circuit card Regulatory Band This is used by the system to constrain the wireless to operate within regulatory regime of a particular band and country The license key provides the capability to...

Page 335: ...C Address The MAC Address of the peer unit If the link is down this is set to Not available Remote Internet Address The Internet Address of the peer unit To open the web interface of the peer unit click on the hyperlink If the link is down this is set to Not available Depending on the settings of IP Version Table 71 and IP Address Label Table 70 this may be either an IPv4 or an IPv6 address Wirele...

Page 336: ...nk Loss dB x T P Transmit power of the remote wireless unit dBm x R P Received signal power at the local unit dBm x x R T g g Antenna gain at the remote and local units respectively dBi The antenna gain of the PTP 650 Series 23 5 dBi is used unless one or both of the units is a Connectorized version For connectorized ODUs the link loss calculation is modified to allow for the increased antenna gai...

Page 337: ...eters by default but can be changed to miles by updating the Distance Units attribute to imperial as described in Webpage Properties page on page 6 49 Table 100 Receive Modulation Mode Detail values and meanings Value Meaning Running At Maximum Receive Mode The link is operating at maximum modulation mode in this channel and maximum throughput has been obtained Running At User Configured Max Modul...

Page 338: ...ed By The Wireless Conditions The radio is running at the maximum achievable modulation mode given the current wireless conditions shown by the vector error The radio is capable of reaching a higher modulation mode if wireless conditions vector error improve Page 7 8 ...

Page 339: ...on page Menu option Management Web Login Information Figure 109 Use this page to show recent successful and unsuccessful login attempts on this account Figure 109 Login Information page Reboot Wireless Unit page Menu option System Reboot Figure 110 Use this page to reboot the ODU or view a list of previous reboot reasons Figure 110 Reboot Wireless Unit page Page 7 9 ...

Page 340: ...unit restarts Figure 111 Reboot confirmation pop up Change Password page Menu option Change Password Figure 112 Use this page to change a personal password Figure 112 Change Password page System Administration example Note A security officer can change the passwords of other users using the User Accounts page as described in Local User Accounts page on page 6 42 Procedure Enter and confirm the new...

Page 341: ...t To maintain security always log out at the end of a session on the menu click Logout The unit will log out automatically if there is no user activity for a set time but this depends upon Auto Logout Period in the Webpage Properties page Figure 78 Page 7 11 ...

Page 342: ...m all web pages Procedure Click the warning triangle or menu option Home to return to the System Summary page and view the alarms If the warning triangle disappears when it is clicked it indicates that the outstanding alarms have been cleared The example in Figure 113 shows the warning triangle in the navigation bar and an alarm displayed in the System Summary page The alarms are defined in Table ...

Page 343: ...bration and must be returned to the factory using the RMA process for re calibration Incompatible Regulatory Bands The two linked units have different Regulatory Bands To clear this alarm obtain and install license keys for the correct country and select the same Regulatory Band at each end of the link Incompatible Master and Slave The master and slave ends of the wireless link are different hardw...

Page 344: ...Port Configuration Mismatch Ethernet fragments runt packets have been detected when the SFP port is in full duplex This indicates an auto negotiation or forced configuration mismatch SFP Port Disabled Warning The SFP port link has been administratively disabled via the SNMP Interface SFP Port Status The SFP port link is down The most likely cause is that the unit has no Ethernet cable plugged into...

Page 345: ...n the full capability trial period Activated when seven days or less of the trial period remain Capacity Variant Mismatch The link ends are different capability variants for example one is Full and the other is Med Email alerts The management agent can be configured to generate alerts by electronic mail when certain events occur The alerts are defined in Table 102 Table 102 Email alerts Alert Mean...

Page 346: ...4 Use this page to view the local log of event messages Figure 114 Syslog local log Note For more information about system logging refer to System logging syslog on page 1 32 describes the system logging feature Syslog Configuration page on page 6 59 describes how to enable system logging Page 7 16 ...

Page 347: ...P650 CO SP configuration status event configuration configuration SC SP attribute name SC SP Web user SNMP user SNTP SC SP was previous value SC SP now new value SC status status SC SP attribute name SC SP was previous value SC SP now new value SC event event SC SP identifier SC SP event message content SC Configuration and status messages Configuration and status messages contain all of the relev...

Page 348: ...4 auth_login_locked security 4 info 6 auth_logout kernel 0 warning 4 cold_start PTP wireless bridge has reinitialized reason reset reason SC security 4 warning 4 License_update License Key updated SC syslog 5 warning 4 log_full Syslog local flash log is 90 full SC syslog 5 warning 4 log_wrap Syslog local flash log has wrapped SC security 4 info 6 radius_auth RADIUS user user name SC SP server 1 2 ...

Page 349: ..._idle Telnet user user name SC SP from IP address SC SP port port number SC local6 22 info 6 telnet_login local6 22 warning 4 telnet_login_failed local6 22 info 6 telnet_logout local6 22 info 6 tftp_complete TFTP software upgrade finished SC local6 22 info 6 tftp_failure TFTP software upgrade failed reason reason SC local6 22 info 6 tftp_start TFTP software upgrade started SC NTP 12 info 6 time_au...

Page 350: ...itor the radio spectrum usage of the PTP 650 link Spectrum Management page Menu option System Spectrum Management Figure 115 and Figure 116 Use this page to view and configure spectrum usage The width of the vertical green bar represents the channel width 10 MHz illustrated Figure 115 Spectrum Management page master unit Page 7 20 ...

Page 351: ...the slave so that both master and slave keep identical copies of spectrum management configuration It is therefore possible to swap master and slave roles on an active PTP 650 link without modifying Spectrum Management configuration The default channelization can be modified by varying the lower center frequency attribute in the installation wizard as described in Wireless Configuration page on pa...

Page 352: ...on radar regions when DSO is enabled The default configuration of symmetric operation constrains the link to operate symmetrically using the same transmit and receive channels When in symmetric mode the slave unit will always follow the master If the master moves to a new channel the slave will hop to the same channel When the Point to Point link is configured as an asymmetric link both the master...

Page 353: ...ll continue to use the current active channel Default 85 dBm Channel Bandwidth not configurable This shows the value of the variable channel bandwidth selected Interpreting the spectrum management plots The Spectrum Management pages at the master and slave Figure 115 and Figure 116 display two graphical plots Local Receive Channel Spectrum Peer Receive Channel Spectrum A more detailed example of o...

Page 354: ...the channel The individual channel metrics are displayed using a colored bar and an I bar The colored bar represents the channel state Table 105 Table 105 Channel states represented in the spectrum management plot Color State Meaning Green Active The channel is currently in use hosting the Point to Point wireless link Orange Interference The channel has interference above the interference threshol...

Page 355: ...gnal interference and gives an indication of the average interference level measured during the quantization period The metric is not very good at predicting intermittent interference and is included to show the spread between the Mean of Means the 99 9 Percentile and the Peak of Means Lower horizontal bar 99 9 Percentile of the Means The value of mean interference measurement which 99 9 of all me...

Page 356: ... Spectrum Management Fixed Frequency Mode page Channel barring is disabled in fixed frequency mode it is not required as dynamic channel hopping is prohibited in this mode The only controls available to the master are the Page Refresh Period and Interference Threshold attributes They will have no effect on the operation of the wireless link and will only effect the generation of the channel spectr...

Page 357: ...nel spectrum graphics Extra color coding of the interference histogram is provided Table 107 When operating with RTTT Road transport and Traffic Telematics Avoidance enabled or other regulatory restrictions on channel usage the page contains the following additional information All channels marked with a no entry symbol with their associated statistics colored black are the prohibited channels The...

Page 358: ... the interference threshold Blue Available This channel has an interference level below the interference threshold and is considered by the Spectrum Management algorithm suitable for hosting the Point to Point link Dark grey Barred The system administrator has barred this channel from use Because the low signal levels encountered when a unit is powered up in a laboratory environment prior to insta...

Page 359: ...Bar This channel has been barred from use by the local region regulator Viewing the active channel history Use this procedure to view the active channel history This is a time series display of the channels used by the PTP 650 Series over the last 25 hours Procedure Select the Active Channel History hyperlink from the Spectrum Management page An example of the active channel history display is sho...

Page 360: ...hannel Separation plot The time series plot is displayed Figure 122 This plot displays the results of all previous measurement quantization periods up to a maximum of 132 periods The colored lines represent interference measurements Table 108 Figure 122 Spectrum management time series plot Table 108 Interference represented in the time series plot Color Meaning GREEN Peak of Means interference mea...

Page 361: ...d channels based on the instructions in Avoidance of weather radars USA only on page 3 20 Procedure Log into the master unit Select menu option System Spectrum Management The Spectrum Management page is displayed Click on the appropriate channel center frequencies on the Local or Peer channel spectrum plots The example in Figure 123 shows how to bar one channel 5822 MHz When the confirmation dialo...

Page 362: ...ure 124 contains eight diagnostic attributes that are presented as arrays of four elements Table 109 Figure 124 System Histograms section of the System Statistics page The element arrays represent the following Max The maximum value measured over the last hour Mean The mean of a set of values recorded at one second intervals over the last hour Min The minimum value measured over the last hour Late...

Page 363: ...follows Peer_Tx_Power dBm Local_Rx_Power dBm 2 x Antenna_Pattern dBi Signal Strength Ratio The Signal Strength Ratio calculated over a one hour period is Power received by the vertical antenna input dB Power received by the horizontal antenna input dB This ratio is presented as max mean min and latest The max min and latest are true instantaneous measurements the mean is the mean of a set of one s...

Page 364: ... the mean of a set of one second means Histogram Measurement Period The time over which the system histograms were collected System counters The System Counters section of the System Statistics page Figure 125 contains Data Port Counters Table 110 Management Agent Counters Table 111 and Wireless Port Counters and Performance Information Table 112 Figure 125 System Counters section of the System St...

Page 365: ...s Port Counters and Performance Information Attribute Meaning Tx Frames Total number of good frames the bridge has sent for transmission by the wireless interface Rx Frames Total number of good frames the bridge has received from the wireless interface Link Symmetry Ratio between transmit and receive time in the TDD frame The first number is the time allowed for the transmit direction and the seco...

Page 366: ...et Bridging Status attribute has been set to Enabled Byte Error Ratio The ratio of detected Byte errors to the total number of bytes since the last system reboot This measurement is made continually using null frames when there is no user data to transport Counter Measurement Period The time over which the system counters were collected Other attributes The bottom section of the System Statistics ...

Page 367: ...se this page to check the Ethernet performance of the wireless bridge Figure 127 Wireless Port Counters page Procedure Review the attributes Table 114 To change the refresh period update the Counter Page Refresh Period attribute and click Submit Page Refresh Period To reset all counters to zero click Reset System Counters Page 7 37 ...

Page 368: ...Class Tx Drops Q0 Q7 Number of transmitted frames dropped for each Traffic Class Rx Drops Q0 Q7 Total number of frames dropped due to the lack of sufficient capacity in the receive buffer for each Traffic Class Main Port Counters page Menu option System Statistics Main Port Counters Figure 128 Use this page to check the Ethernet performance of the PSU port The displayed counters vary depending on ...

Page 369: ...r of transmit frames dropped Rx Frames With Crc Error Total number of received frames with CRC errors Tx Rx Broadcasts Total number of good transmitted and received broadcast packets Rx Frames Undersize Total number of frames received that are less than 64 bytes Tx Rx Frames 64 Bytes Total number 64 byte frames transmitted and received Tx Rx Frames xxxx to yyyy Bytes Total number of frames transmi...

Page 370: ... Review the attributes Table 116 To change the refresh period update the Counter Page Refresh Period attribute and click Submit Page Refresh Period To reset all counters to zero click Reset System Counters Table 116 Aux Port Counters attributes Attribute Meaning Tx Rx Frames Total number of frames transmitted and received over the interface This includes both good and bad frames Rx Frames With Crc...

Page 371: ... Update the attributes Table 117 To change the refresh period update the Counter Page Refresh Period attribute and click Submit Page Refresh Period To reset all counters to zero click Reset System Counters Table 117 SFP Port Counters attributes Attribute Meaning Tx Rx Frames Total number of frames transmitted and received over the interface This includes both good and bad frames Rx Frames With Crc...

Page 372: ...s the System Histogram attributes in the System Statistics page Table 109 Tick the required Trace Selection boxes Max Mean and Min Update the Page Refresh Period as required The default period is 3600 seconds 1 hour To monitor the performance of a link in real time select a much shorter period for example 60 seconds Click Plot Selected Diagnostic The selected diagnostic trace is displayed in the g...

Page 373: ...wn list Click Generate Diagnostics The Generate Downloadable Diagnostics page is redisplayed with the name of the generated CSV file Click on the CSV file name and save the CSV file to the hard drive of the local computer Open the CSV file in MS Excel and use it to generate reports and diagrams The CSV file contains at most 5784 entries recorded over a 32 day period o 3600 entries recorded in the ...

Page 374: ...l switch back to normal operation if no access has been made to the recovery web page within 30 seconds Procedure 1 Apply power to PSU for at least 10 seconds 2 Remove power for 5 seconds 3 Re apply power to the PSU 4 When the unit is in recovery mode access the web interface by entering the default IP address 169 254 1 1 The Recovery Image Warning page is displayed 5 Click on the warning page ima...

Page 375: ...rsion The software version of the recovery operating system permanently installed during manufacture Recovery Reason The reason the unit is operating in Recovery mode for example Invalid or corrupt image Unknown usually means there has been a power outage MAC Address The MAC address of the unit programmed during manufacture Page 7 45 ...

Page 376: ...on page 7 48 Zeroize Critical Security Parameters Use this option to reset encryption keys and the system administrator password Refer to Zeroize Critical Security Parameters page on page 7 50 Reboot Use this option to reboot the unit Refer to Rebooting the unit on page 7 51 Upgrading software image Use this option to restore a working software image from the Recovery Options page Figure 133 Proce...

Page 377: ...or link fails to recover refer to Testing link end hardware on page 8 2 Resetting IP Ethernet configuration Use this option to reset IPv4 IPv6 and Ethernet configuration back to defaults from the Recovery Options page Figure 133 Note This procedure resets the IP Version attribute to IPv4 It also resets the IPv6 configuration Procedure 1 Click Reset IP Ethernet Configuration back to factory default...

Page 378: ...played click OK 5 The unit will now reboot The unit should now start up in normal mode but with the IP and Ethernet configuration reset to factory defaults If the unit fails to recover refer to Testing link end hardware on page 8 2 Erasing configuration Use this option to erase the entire configuration of the unit from the Recovery Options page Figure 133 Page 7 48 ...

Page 379: ...displayed 2 Click OK The erase confirmation page is displayed 3 Click Reboot When the confirmation message is displayed click OK 4 The unit reboots and starts up in normal mode but with all configuration erased If the unit fails to start up refer to Testing link end hardware on page 8 2 Page 7 49 ...

Page 380: ... this option to zeroize the critical security parameters CSPs of the unit from the Recovery Options page Figure 133 Procedure 1 Click Zeroize Critical Security Parameters The confirmation pop up box is displayed 2 Click OK The zeroize CSPs confirmation page is displayed Page 7 50 ...

Page 381: ...unit fails to recover refer to Testing link end hardware on page 8 2 Rebooting the unit Use this option to reboot the unit from the Recovery Options page Figure 133 Procedure Click Reboot When the Are you sure you want to REBOOT this unit message is displayed click OK The unit will now reboot The unit should now start up in normal operational mode If the unit fails to start up refer to Testing lin...

Page 382: ...nication is lost or after a lightning strike The following topics are described in this chapter Testing link end hardware on page 8 2 describes how to test the link end hardware either when it fails on startup or after a lightning strike Testing the radio link on page 8 9 describes how to test the link when there is no radio communication or when it is unreliable or when the data throughput rate i...

Page 383: ...e confirm that the mains supply is working for example check the plug and fuse if fitted If the power supply is working report a suspected PSU fault to Cambium Networks If the Power LED does illuminate perform Test resistance in the drop cable on page 5 20 AC DC Enhanced power injector LED sequence For the AC DC Enhanced power injector the expected power up LED sequence is The Power green LED illu...

Page 384: ...ed by a wiring error on the drop cable or a faulty ODU Action Remove the ODU cable from the PSU Check that pins 4 5 and 7 8 are not crossed with pins 1 2 and 3 6 Check that the resistance between pins 1 8 is greater than 100K ohms If either check fails replace or repair the ODU cable Ethernet LED did not blink 10 times Meaning The ODU flashes the LED on the AC DC Enhanced Power Injector 10 times t...

Page 385: ... test fails replace or repair the cable that connects the PSU to the LPU or ODU Ethernet LED blinks ten times then stays off Meaning There is no Ethernet traffic between the PSU and ODU Action The fault may be in the LAN or ODU cable Confirm that Ethernet traffic is connected to the AC DC injector LAN port confirm the cable is not faulty replace if necessary If the LAN connection to the AC DC powe...

Page 386: ...on Refer to Recovery mode on page 7 44 Power LED is on Ethernet LED blinks randomly Meaning Both LEDs are in their normal states implying that the PSU is receiving power from the AC DC outlet and there is normal Ethernet traffic between the PSU and ODU Action If in spite of this a fault is suspected in the link end hardware If the Ethernet connection to the network is only 100BASE TX when 1000BASE...

Page 387: ...Chapter 8 Troubleshooting Testing link end hardware Ethernet packet test Follow the Ethernet packet test flowchart Figure 134 and procedures below Figure 134 Ethernet packet test flowchart Page 8 6 ...

Page 388: ...rk equipment The test has passed if the rate of packet errors reported by the managed Ethernet switch or router is less than 10 in 1 million packets Test ping packet loss Using a computer it is possible to generate and monitor packets lost between the PSU and the ODU This can be achieved by executing the Command Prompt application which is supplied as standard with Windows and MAC operating system...

Page 389: ...s use the ping6 command ping n 1000 l 1500 ipaddress where ipaddress is the IP address of the PTP 650 ODU under test If the computer is running a MAC operating system this is achieved by typing ping c 1000 s 1492 ipaddress where ipaddress is the IP address of the PTP 650 ODU under test 6 Record how many Ping packets have been lost This is reported by Command Prompt on completion of the test The te...

Page 390: ...variant 7 Check Master Slave status for each unit and ensure that one unit is Master and the other unit is slave 8 Check that the link is not obstructed or the ODU misaligned 9 Check the DFS page at each end of the link and establish that there is a quiet wireless channel to use 10 If there are no faults found in the configuration and there is absolutely no wireless signal retry the installation p...

Page 391: ...etermined by turning the equipment off and on attempt the following corrective actions Realign or relocate the antenna Increase the separation between the affected equipment and antenna Connect the ODU and PSU power supply into a power outlet on a circuit different from that to which the receiver is connected Contact Cambium Point to Point for assistance Page 8 10 ...

Page 392: ... CSP Critical Security Parameter DC Direct Current DER Distinguished Encoding Rules DES Data Encryption Standard DFS Dynamic Frequency Selection DHCP Dynamic Host Configuration Protocol DSCP Differentiated Services Code Point DSO Dynamic Spectrum Optimization EAPS Ethernet Automatic Protection Switching EIRP Equivalent Isotropic Radiated Power EMC Electromagnetic Compatibility EMD Electro Magnetic...

Page 393: ...Protocol IPSec Internet Protocol Security ISM Industrial Scientific and Medical ITPE Initial Transmit Power Estimate KDB Knowledge Database L2CP Layer Two Control Protocols LACP Link Aggregation Control Protocol LLDP Link Layer Discovery Protocol LAN Local Area Network LOS Line of Sight clear line of sight and Fresnel zone is clear LPU Lightning Protection Unit MAC Medium Access Control Layer MDI ...

Page 394: ...Personal Computer PEAP Protected Extensible Authentication Protocol PIDU Powered Indoor Unit POE Power over Ethernet PSU Power Supply Unit PTP Point to Point QAM Quadrature Amplitude Modulation QoS Quality of Service QPSK Quadrature Phase Shift Keying R APS Ring Automatic Protection Switching RADIUS Remote Authentication Dial In Service RAM Random Access Memory RF Radio Frequency RFC Request for C...

Page 395: ...ssion Control Protocol TDD Time Division Duplexing TDM Time Division Multiplexing TDWR Terminal Doppler Weather Radar TGB Tower Ground Bus bar TLS Transport Layer Security UNII Unlicensed National Information Infrastructure URL Universal Resource Location USM User based Security Model UTC time Coordinated Universal Time UTP Unshielded Twisted Pair UV Ultraviolet VACM View based Access Control Mode...

Reviews: