background image

cnRanger 800 BBU Hardware Overview

18

Cambium description

Cambium part number

CPRI SFP+ Module (10Gbps)

SFP-10G-SR

RRH CPRI Fiber Cable- 2 meter

N000000L131A

Figure 5:

10 Gbps Optical SFP+ transceiver module

Optical cable and connectors

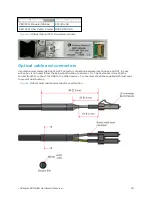
Use cambium recommended optical SFP cable for connection between junction box and DUT. In case
juntion box is not used, follow the below specficiation to order a LC-LC optical cable. It must be the
correct length to connect the ODU to the other device. LC connectors should be supplied with dust caps
to prevent dust build up.

Figure 6:

Optical optic cable and connector specification

Summary of Contents for cnRanger

Page 1: ...QUICK START GUIDE cnRanger System Release 2 1 ...

Page 2: ...ngly any copyrighted material of Cambium its licensors or the 3rd Party software supplied material contained in the Cambium products described in this document may not be copied reproduced reverse engineered distributed merged or modified in any manner without the express written permission of Cambium Furthermore the purchase of Cambium products shall not be deemed to grant either directly or by i...

Page 3: ...cable and connectors 18 Installing Sync In Sync Out Cables on the cnRanger 800 BBU 19 Installing a GPS antenna on the cnRanger 800 BBU 19 Supported GPS antennas 19 2 GHz 3 GHz cnRanger RRH Hardware Overview 20 2 GHz cnRanger 220 RRHhardware overview 20 3 GHz cnRanger 210 RRH hardware overview 20 2 GHz 3 GHz cnRanger RRH LED details 21 2 GHz 3 GHz cnRanger RRH Antenna interface 24 Mounting to 2LTE ...

Page 4: ...nRanger 101 SM hardware overview 47 cnRanger 101 SM LED details 48 Mounting cnRanger 101 SM 49 cnRanger 201 SM hardware overview 52 cnRanger 201 SM LED details 52 Installing cnRanger 201 SM 53 Powering Up 56 CBRS 58 Configure Management PC 58 Quick link setup 58 Operating in the EU 58 Frequency bands maximum operating power safe distance 58 EU operation restrictions requirements for authorization ...

Page 5: ...mbium Networks cnRanger platform equipment This Quick Start Guide is provided to assist operators in acquiring a high level understanding of the cnRanger series platform hardware installation methods initial login procedures and safety warranty information ...

Page 6: ...s of devices cnRanger 800 BBU 2 GHz 3 GHz cnRanger RRH Connectorized Sector Antenna and 2 GHz 3 GHz cnRanger SM Outdoor mounted radio equipment 2 GHz 3 GHz cnRanger RRH and 2 GHz 3 GHz cnRanger SM are alternatively referred to as outdoor units or ODUs cnRanger 800 BBU installation requires an additional environmental enclosure All cnRanger equipment is intended for professional applications for fi...

Page 7: ...sponsible for l Familiarity with current applicable national regulations including radio regulations electrical installation regulations surge protection regulations and working at heights regulations l Installation in accordance with Cambium Networks instructions l Confirming that the equipment settings are compliant with national or regional regulations l Familiarity with training material avail...

Page 8: ... deploy Cambium Networks power injectors in an outdoor environment 12 Structures equipment and people must be protected against electrostatic discharge l By siting equipment in a lightning protection zone l By installation of appropriate lightning conductors to conduct the surge current to ground via a separate preferential solid path l Ground bonding and transient voltage surge suppression is rec...

Page 9: ...n overcurrent protection and supply wiring Appropriate consideration of equipment nameplate ratings should be used when addressing this concern E Reliable Earthing Reliable earthing of rack mounted equipment should be maintained Particular attention should be given to supply connections other than direct connections to the branch circuit e g use of power strips AVERTISSEMENT Instructions de montag...

Page 10: ...ects to the network backhaul via Ethernet and to the 2 GHz cnRanger 220 RRH units via CPRI fiber optic cable Note This product meets the UL cUL 62368 IEC 62368 edition 2 specification and the radio housings are designed to be rain tight cnRanger 800 BBU interfaces overview Figure 1 cnRanger 800 BBU Front View Figure 2 cnRanger 800 BBU Rear view On the Front l 4 SFP CPRI ports for Remote Radio Head...

Page 11: ...ured for 30 72MHZ clock output l 1 77inch LCD display module for Status information On the Rear l PSU port cnRanger 800 BBU LED details Table 1 cnRanger 800 BBU LED details LED Name LED Color Behaviour Status Indication Power Red Blinking When cnRanger 800 BBU is under factory defaults Red Steady ON Power ON Status Red Blinking Steady ON Indicates Alarm Red OFF System Status OK ETH1 Green Blinking...

Page 12: ...Activity CPRI 1 4 Red Blinking ON Fault Yellow Green Blinking Steady ON Activity cnRanger 800 BBU rack mounting instructions Follow the below instructions to install cnRanger 800 BBU on a rack 1 Assemble bracket on both side left side and right side with M4 fastener using torque screw driver by applying 3 0Nm torque ...

Page 13: ...cabinet snap and M6 cage nut at three square slots of 1U on both side of the rack where you will be installing the cnRanger 800 BBU 3 Attach the cnRanger 800 BBU to the rack using the six mounting screws by applying 3 0Nm torque 4 Mounted cnRanger 800 BBU is ready ...

Page 14: ...verview 14 Installing power supply unit PSU and powering up the cnRanger 800 BBU 1 Connect AC terminals L N E on the PSU as shown in Figure 3 2 Connect DC output to V V terminals on the PSU as shown in Figure 4 Figure 3 Figure 4 ...

Page 15: ...rity Reversing the connections will damage the BBU 3 Connect a 4 pin terminal block supplied with cnRanger 800 BBU as per the connectivity Attach cable cord to the 4 pin terminal block 4 Insert 4 pin terminal block into the cnRanger 800 BBU power connector on the rear side ...

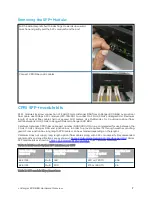
Page 16: ...ains supply must be turned off before servicing or disconnecting power conductors on the cnRanger 800 BBU or PSU Warning cnRanger 800 BBU and PSU contain unprotected conductors carrying lethally high voltage improper handling will result in electric shock or serious burns Installing SFP SFP modules on cnRanger 800 BBU Inserting the SFP module 1 Slide the module into the CPRI port gently 2 Press th...

Page 17: ... cable part number N000000L131A is recommended for use between the 2 GHz 3 GHz cnRanger RRH and junction box in order to provide optimal fit through weather proofing gland From junction box long length CPRI cables can be extended depending on the lengths Cambium does not supply long length optical fiber cables along with SFP module kits Recommended cable lengths and specifications are as shown in ...

Page 18: ...tical cable and connectors Use cambium recommended optical SFP cable for connection between junction box and DUT In case juntion box is not used follow the below specficiation to order a LC LC optical cable It must be the correct length to connect the ODU to the other device LC connectors should be supplied with dust caps to prevent dust build up Figure 6 Optical optic cable and connector specific...

Page 19: ...UT port of first cnRanger 800 BBU to Sync OUT of second cnRanger 800 BBU may damage the port Installing a GPS antenna on the cnRanger 800 BBU The following information describes the recommended tools and procedures to mount the GPS antenna Supported GPS antennas Table 4 Supported GPS antenna Description Part Number External GPS Antenna N000900L030A l Connect GPS Antenna to GPS_ANT port on the cnRa...

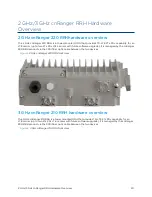
Page 20: ... It is managed by the cnRanger 800 BBU product via the CPRI fiber optic cable between the two devices Figure 1 2 GHz cnRanger 220 RRH front view 3 GHz cnRanger 210 RRH hardware overview The 3 GHz cnRanger 210 RRH is a tower mounted ODU that provides TD LTE 2Tx 2Rx capability for an LTE carrier up to two 2Tx 2Rx LTE carriers with future software upgrade It is managed by the cnRanger 800 BBU product...

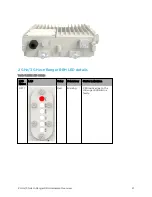
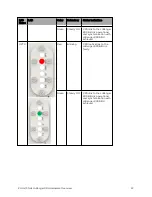
Page 21: ... cnRanger RRH Hardware Overview 21 2 GHz 3 GHz cnRanger RRH LED details Table 5 RRH LED details LED Name LED Color Behaviour Status Indication OPT1 Red Blinking CPRI optical link to the cnRanger 800 BBU is faulty ...

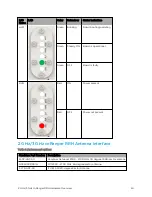
Page 22: ...en Steady ON CPRI link to the cnRanger 800 BBU is operational and synchronization with cnRanger 800 BBU achieved OPT0 Red Blinking CPRI optical link to the cnRanger 800 BBU is faulty Green Steady ON CPRI link to the cnRanger 800 BBU is operational and synchronization with cnRanger 800 BBU achieved ...

Page 23: ...e Overview 23 LED Name LED Color Behaviour Status Indication VSWR Red Blinking ON VSWR alarm Red OFF No VSWR ACT Green Blinking Data activity is ongoing OFF No Data activity is ongoing Orange ON Connection OK OFF Connection is faulty ...

Page 24: ...ional Green OFF Board is faulty RUN Red ON Power present Red OFF Power not present 2 GHz 3 GHz cnRanger RRH Antenna interface Table 6 Antenna part options Cambium Part Number Description 2LTE ANT 90 Cambium Networks 2300 2700 MHz 110 degree 16 dBi sector antenna N025000D001A MTI 2300 2700 MHz 65 degree sector antenna 3 LTE ANT 90 17 dBi 90 120 degree Sector Antenna ...

Page 25: ...low instructions to mount 2 GHz cnRanger 220 RRH to 2LTE ANT 90 antenna 1 Loosen the M10 bolts and tighten the bolt to 1Nm torque 2 Place the radio mounting clamp to radio holder clamp insert M8x12mm bolt and tighten to 4Nm torque 3 Assemble the N type cable to 2 GHz cnRanger 220 RRH ...

Page 26: ...4 Place the radio mounting clamp to radio holder clamp insert M8x12mm bolt and tighten to 4 Nm torque 5 Place 2 GHz cnRanger 220 RRH product to the rear side of antenna 6 Place M8 nut to the 2 GHz cnRanger 220 RRH product and tighten to 5Nm torque ...

Page 27: ...Hz cnRanger RRH Hardware Overview 27 7 Connect N type cable of 2 GHz cnRanger 220 RRH product to antenna L L and R R 8 Connect the grounding cable to 2 GHz cnRanger 220 RRH and tighten the screw to 2 5Nm torque ...

Page 28: ...htly tilt the mounting bracket to fix the 2 GHz cnRanger 220 RRH 9 Assemble the antenna and the 2 GHz cnRanger 220 RRH integrated product to the pole and tighten to 8Nm torque 10 The antenna can be adjusted between 5 to 10 The electrical down tilt is 2 ...

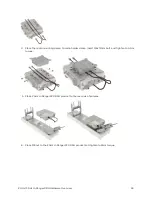
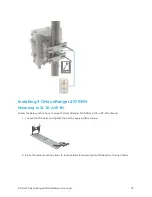
Page 29: ...ing 2 GHz cnRanger 220 RRH on the pole Follow the below instructions to mount 2 GHz cnRanger 220 RRH on the pole to connect with N025000D001A antenna 1 Place sheet metal clamp to 2 GHz cnRanger 220 RRH and tighten with M5 screws by using 5Nm torque max ...

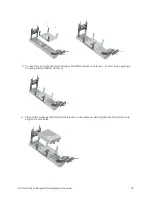
Page 30: ...30 2 Assemble M8 bolts to aluminum clamp and tighten with M8 nut by using 3 Nm torque max 3 Assemble aluminum clamp to 2 GHz cnRanger 220 RRH and tighten with M8 bolt by using 5Nm torque max 4 Assemble pole holder clamp to 2 GHz cnRanger 220 RRH ...

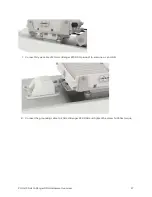
Page 31: ...dware Overview 31 5 Assemble 2 GHz cnRanger 220 RRH unit to the pole Align a pole holder clamp as per the pole size and tighten with M8 nut by using 8Nm torque 6 Assemble 2 GHz cnRanger 220 RRH to the pole as shown in below figure ...

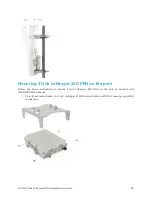
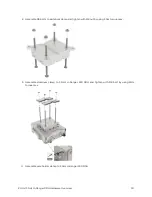
Page 32: ...0 RRH Mounting to 3LTE ANT 90 Follow the below instructions to mount 3 GHz cnRanger 210 RRH to 3LTE ANT 90 antenna 1 Loosen the M10 bolts and tighten the bolt by applying 1Nm torque 2 Place the radio mounting clamp to radio holder clamp and tighten M8 Nuts to a torque of 6Nm ...

Page 33: ... 3 Connect N type cable of 3 GHz cnRanger 210 RRH product to antenna L L and R R by applying a Coupling torque 135Ncm 12 lbs in 4 Place 3 GHz cnRanger 210 RRH to the bracket on the antenna Hand tighten the M5 bolts to help align all four M5 bolts ...

Page 34: ...rview 34 5 Assemble the N type cable to 3 GHz cnRanger 210 RRH by applying a Coupling torque 135Ncm 12 lbs in 6 Connect the cable glands 7 Connect the grounding cable to 3 GHz cnRanger 210 RRH as shown and tighten the screw to 2 5Nm torque ...

Page 35: ...rdware Overview 35 8 Once the antenna and the 3 GHz cnRanger 210 RRH integrated pole mount units are ready to mount to the pole 9 Assemble the antenna and the RRH integrated product to the pole and tighten by applying 8Nm torque ...

Page 36: ...2 GHz 3 GHz cnRanger RRH Hardware Overview 36 10 The antenna can be adjusted between 5 to 10 The electrical down tilt is 2 ...

Page 37: ...ring Up 2 GHz 3 GHz cnRanger RRH 2 GHz 3 GHz cnRanger RRH is powered through an AC power injector installed at the bottom of the tower DC Junction Box with surge protection and grounding guidelines need to be followed for powering up 2 GHz 3 GHz cnRanger RRH Connect ground at multiple points on the mast is shown in Figure 1 Instruction for using the Raycap Junction box refer RKEDC 8465 PF 48_ 320 ...

Page 38: ...r RRH 38 1 Connect the power connector to 2 GHz cnRanger 220 RRH 2 Grounding 2 GHz cnRanger 220 RRH Connecting 2 GHz cnRanger 220 RRH power cable to Junction Box Following instruction how to connect 2 GHz cnRanger 220 RRH power cable to the junction box ...

Page 39: ...e cable 48V_GND to RTN connector to the junction box 3 Connect silver wire chassis to GND connector to the junction box 3 GHz cnRanger 210 RRH DC power cable Power cord for outdoor application with 2 conductors and drain wire 16AWG or thicker Please refer to the connection diagram for polarity Figure 2 3 GHz cnRanger 210 RRH DC power cable ...

Page 40: ...er 220 RRH using DC power cable N000000L130A as shown in Figure 3 Cable comes with pre crimped 3 wire terminal block on one end to connect to Junction Box and 2 GHz cnRanger 220 RRH power connector on the other end Figure 3 DC Power Cable Table 7 LPU_ RRH power Cable Cambium description Cambium part number RRH DC power cable 2 meter N000000L130A ...

Page 41: ...Connecting cnRanger 800 BBU and 2 GHz 3 GHz cnRanger RRH 41 Installing SFP Module on the 2 GHz cnRanger 220 RRH 1 Open the back cover on the 2 GHz cnRanger 220 RRH ...

Page 42: ...Connecting cnRanger 800 BBU and 2 GHz 3 GHz cnRanger RRH 42 2 Insert SFP Module in optical fiber port 3 Use RRH CPRI optical fiber N000000L131A cable to connect from junciton box to RRH ...

Page 43: ... 4 Open the cap on the weather proofing gland on the external port 5 Remove LC patch cord connector clip before insertint the fiber optic cable into the weather proofing gland 6 Insert the fiber cable in to the weather proofing gland one fiber strand at a time ...

Page 44: ...nd 2 GHz 3 GHz cnRanger RRH 44 7 Put LC connector clip back on the cable 8 Create a service loop on the fiber cable and tighten the weather proofing gland 9 Make sure 2 GHz cnRanger 220 RRH back plate is installed back on the unit ...

Page 45: ...cnRanger 800 BBU and confirm the Ethernet activity LED blinks Configure PC Ethernet interface 1 On the PC configure the Ethernet port for a static IP address using the 168 254 1 X range avoiding 169 254 0 0 and 169 254 1 1 For example 169 254 1 3 2 Enter a subnet mask of 255 255 255 0 3 Leave the default gateway blank 4 Using a web browser navigate to factory default web address 169 254 1 1 and lo...

Page 46: ...e required bandwidth LTE band frequency power and external gain settings in accordance with allocated regulatory licensing and then click the Save button To apply these changes reboot the unit Note For further information on cnRanger 800 BBU setup refer cnRanger User Guide ...

Page 47: ...ew 47 2 GHz 3 GHz cnRanger SM Hardware Overview cnRanger 101 SM hardware overview SIM Slot The SIM slot is used for inserting SIM card Ethernet Port The Ethernet port is used to connect to power and connect to the subscriber Ethernet network ...

Page 48: ...teady ON LTE is attached Blue Blinking Searching for LTE network Blue OFF Not able to attach to LTE network Orange Steady ON SIM issue Orange Blinking SIM detection in process Orange OFF SIM is detected and working properly It turns to blue once LTE is attached LTE SINR Status When CPE connects to Base station the 3D LEDs become signal quality indicators according to SINR or other pre defined qual...

Page 49: ...Name LED Color Behaviour Status Indication Blue Steady ON 18dB SINR 23dB Blue Steady ON 23dB SINR Mounting cnRanger 101 SM 1 Assemble the radio to the pole mounting bracket 2 Secure pole mounting bracket with M8 nut and bolt by applying 3 0 Nm torque ...

Page 50: ...2 GHz 3 GHz cnRanger SM Hardware Overview 50 3 Insert hose clamps through pole mounting bracket and clamp to pole by applying 3 0 Nm torque 4 Remove cap and connect RJ 45 cable to the radio ...

Page 51: ...2 GHz 3 GHz cnRanger SM Hardware Overview 51 5 Align radio to required angle by tilting up and down The maximum radio tilting angle is 40 with an incremental of 10 Secure radio with max 5 0 Nm torque ...

Page 52: ...ally increases range and coverage while reducing the cost and complexity typically associated with LTE networks cnRanger 201 SM LED details Table 7 cnRanger 201 SM LED details LED Name LED Color Behaviour Status Indication Power Status Blue Steady ON Device is ON AC is plugged in Blue OFF Device is OFF AC is not plugged in or device is faulty ...

Page 53: ...network Orange Steady ON SIM issue Orange Blinking SIM detection in process LTE SINR Status When CPE connects to Base station the 3D LEDs become signal quality indicators according to SINR LTE SINR 1 SINR 2 SINR 3 SINR 4 Blue OFF 5 dB 5 dB CINR 10 dB Blue Steady ON Blue Steady ON 10 dB CINR 20 dB Blue Steady ON 20 dB CINR Installing cnRanger 201 SM Assemble the Pole Mount bracket to the dish mount...

Page 54: ...o the pole mounting with the two M8 screws by applying 5 Nm torque 3 Assemble the dish to pole mounting bracket Rotate and align dish tabs to the pole bracket assembly 4 Assemble the radio to dish assembly as shown below a n Insert the the radio 1 through the dish and bracket 2 b n Insert rear housing 3 and secure with two screws 4 by applying 2 Nm torque to lock the assembly together ...

Page 55: ...2 GHz 3 GHz cnRanger SM Hardware Overview 55 5 Attach Dish assembly to pole mounting and secure with M8 nuts by applying 10 Nm torque 6 Remove cap and connect RJ45 cable to the radio ...

Page 56: ...n radio to required angle by tilting up and down The maximum radio tilting angle is 20 with an incremental of 10 Secure radio by applying 8 0 Nm torque Powering Up Follow the below procedure to power up the device using PoE adapter as shown in Figure 1 ...

Page 57: ...er Figure 1 Installation of Tyndall 101 to PoE adapter 3 Connect the power cord to the adapter and then plug the power cord into a power outlet as shown in Figure 2 Once powered ON the Power LED should illuminate continuously on the PoE Adapter Figure 2 Installation of adapter to power outlet Note Shielded Category 5 or above cabling should be used for all outdoor wired Ethernet connections and sh...

Page 58: ...he static Tyndall factory default address a Assign a static address on the 169 254 0 0 16 subnet other than 169 254 1 1 It is recommended to use 169 254 1 3 b Assign a subnet mask of 255 255 0 0 c Leave the default gateway blank Quick link setup Initial device configuration is performed over the Ethernet Interface using Tyndall GUI To configure using 2 GHz 3 GHz cnRanger SM 1 Open the web browser ...

Page 59: ...n the equipment and humans is 110cm l For cnRanger 800 BBU products deployed in the EU there is no minimum safe distance Obtain a license from your national licensing authority before deployment The license should specify the permitted frequency bandwidth and the maximum power to be used Set up equipment accordingly EU operation restrictions requirements for authorization for use l This equipment ...

Page 60: ...pment WEEE directive Caution Please do not dispose of Electronic and Electric Equipment or Electronic and Electric Accessories with your household waste In some countries or regions collection systems have been set up to handle waste of electrical and electronic equipment In European Union countries please contact your local equipment supplier representative or Cambium Networks Support Centre for ...

Page 61: ...s around the world our PMP access network solutions prove themselves day in and day out in residential access leased line replacement video surveillance and smart grid infrastructure applications Cambium Networks solutions are proven respected leaders in the wireless broadband industry We design deploy and deliver innovative data voice and video connectivity solutions that enable and ensure the co...

Reviews: