background image

6

Calix ODC-80 Installation Guide

Proprietary Information: Not for use or disclosure except by written agreement with Calix.

© 2001-2003 Calix. All Rights Reserved.

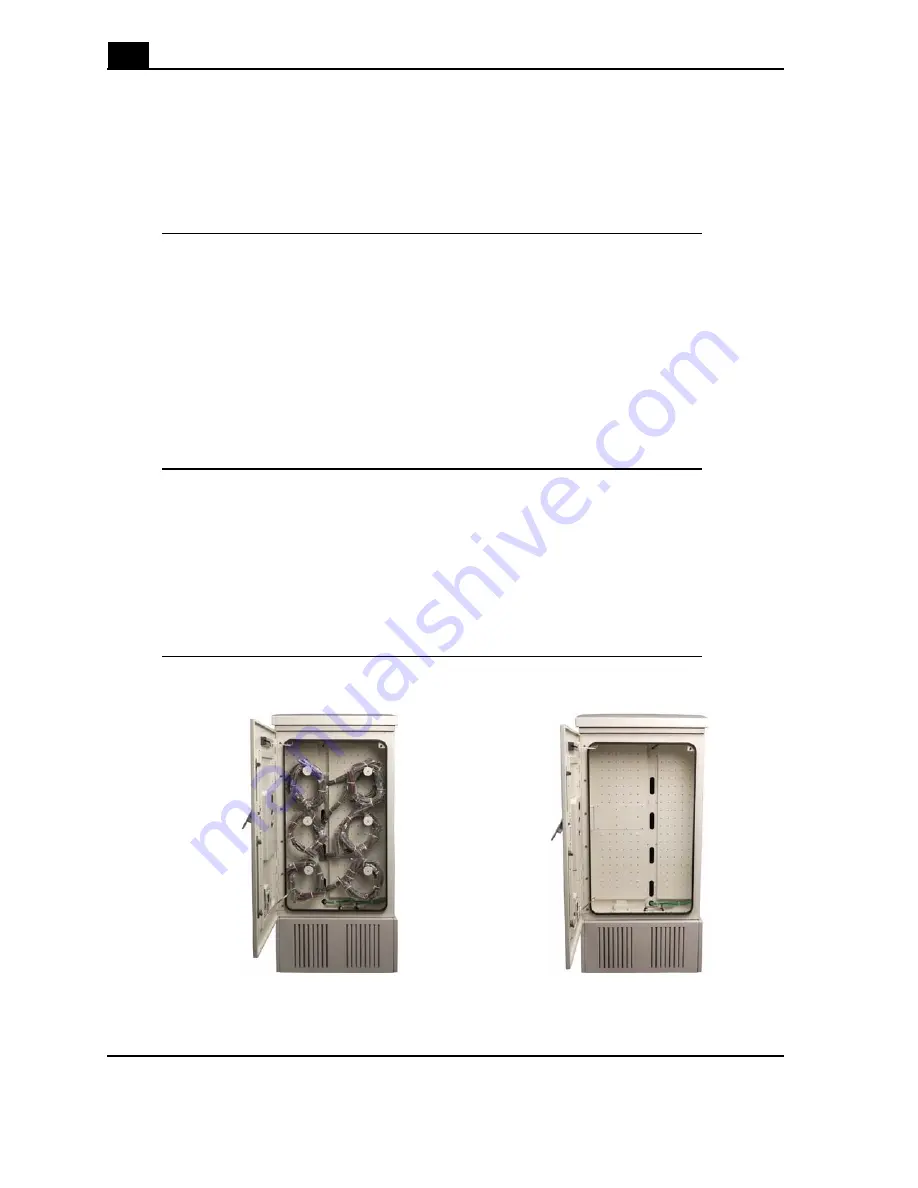
Side splice access

The side compartments of the ODC-80 provide access to entry and splicing areas for 
subscriber fiber, copper cable, AC entry, and ground.

Fiber splicing in the right side compartment

The fiber splice compartment is on the right side as you face the cabinet. This 
compartment contains:

Entry plates for subscriber fiber

Access holes for equipment fiber

Pegboard panel for the mounting of fiber splice trays and fiber distribution 
cassettes supporting up to 1920 fibers

AC power and ground entry

Copper splicing in the left side compartment

The copper splice compartment is on the left side as you face the cabinet. This 
compartment contains:

Entry plates for subscriber copper cable

Access holes for equipment copper cable

Pegboard panel for the mounting and splicing of 1920 copper lines

Side views of the ODC-80

Left side

Right side


Copper splice compartment with 

terminated service cables.

Fiber splice compartment ready to receive 

fiber and accessories.

Summary of Contents for ODC-10

Page 1: ...Calix ODC 80 Installation Guide July 2003 Part 220 00029 Rev 11...

Page 2: ......

Page 3: ...r access 7 Opening and closing compartment doors 8 Battery access 9 Cooling Fan Access 11 Installation Prerequisites 13 Site requirements 13 Cable requirements 14 What you need to bring 15 What you ge...

Page 4: ...riber cables 43 Install the fiber holders 47 Install the fiber 50 Install other fiber and cable management accessories 54 Installing Plug in Cards 55 Install the Calix C7 AMP plug in card 55 Install t...

Page 5: ...larm 80 GMT fuse fail alarm 81 Low battery alarm 82 Low voltage disconnect alarm 83 Rectifier major alarm 84 Rectifier minor alarm 85 Troubleshooting and Replacing Outdoor Cabinet Hardware 87 Failed c...

Page 6: ......

Page 7: ...1 Chapter Before You Begin Installing the ODC 80...

Page 8: ......

Page 9: ...x C7 shelves and delivering up to 1920 lines of copper and fiber service ODC 80 description You can configure the Calix ODC 80 for copper service fiber service or a combination of both You can also mi...

Page 10: ...ix 2001 2003 Calix All Rights Reserved ODC 80 specifications ODC 80 dimensions Parameter Size standard Size metric width 86 inches 218 centimeters depth 35 inches 84 centimeters height 72 inches 183 c...

Page 11: ...The front of the ODC 80 provides access to the equipment compartments for 4 Calix C7 shelves and power distribution equipment Equipment in the front compartment Equipment in the front compartments of...

Page 12: ...plates for subscriber fiber Access holes for equipment fiber Pegboard panel for the mounting of fiber splice trays and fiber distribution cassettes supporting up to 1920 fibers AC power and ground ent...

Page 13: ...All Rights Reserved Rear access The rear of the ODC 80 provides access to the copper protection compartments and the backs of 4 Calix C7 shelves Copper protection in the rear compartments The copper p...

Page 14: ...1 Insert and turn the key to release the door handle 2 Pull the handle up to unlatch the door 3 Swing the door open until the retainer latch engages to hold the door in place 4 Pull out the door alar...

Page 15: ...front to service the batteries in the sliding trays Use the rear to access the battery temperature sensors and seismic fasteners Procedure to remove a battery compartment panel Step Action 1 Insert th...

Page 16: ...place a battery compartment panel Step Action 1 Reattach the grounding strap to the panel 2 Align the tabs at the bottom of the panel with the cutouts in the bottom of the battery compartment and tilt...

Page 17: ...ning bolts The ODC 80 roof is held in place by 3 retaining bolts at the front of the cabinet Procedure to open the roof of the cabinet Step Action 1 Open the front and side cabinet doors to access the...

Page 18: ...the cabinet Step Action 1 Hold the front edge of the roof and press the release button on the support arm then lower the roof 2 Open the front and side cabinet doors to access the underside of the ro...

Page 19: ...pport the Calix ODC 80 Install a ground rod or similar grounding device with a maximum resistance to ground of 20 ohms near the pad site See the Calix ODC 80 Pour In Place Template Instructions if you...

Page 20: ...e minimum Leave 6 feet of cable above the top of the pad Follow National Electric Code NEC and local codes when installing AC power Recommended copper subscriber cable requirements Leave 8 to 10 feet...

Page 21: ...r MS2 splice tool Customer supplied materials for cabling You need to bring the following materials to install cabling copper pigtail with MS2 terminators long enough to get to your cross connect box...

Page 22: ...able entry plate 4 inch quantity 4 cable entry plate containing two 2 inch feed tubes quantity 2 security hex key for door access 8mm quantity 1 brackets for holding third party rack mount fiber and c...

Page 23: ...2 Chapter Placing the ODC 80 on a Pad...

Page 24: ......

Page 25: ...ation of mounting studs The ODC 80 is fastened with 5 mounting studs in the locations shown Procedure to unpack the ODC 80 Step Action 1 Remove the cardboard shipping box 2 Remove the front and rear b...

Page 26: ...straps with a minimum length of 6 feet The minimum working load for each strap must be 3 000 lbs 1361 kg Procedure to prepare the cabinet for placement on a pad Step Action 1 In the splice compartmen...

Page 27: ...t to a pad Step Action 1 While suspended align the holes in the cabinet base with the mounting studs in the pad 2 Open the fiber splice compartment door and align the AC conduit with the splice compar...

Page 28: ...pt by written agreement with Calix 2001 2003 Calix All Rights Reserved 6 Attach the air inlet ducts to the left and right sides at the front of the battery compartment Repeat at the rear of the cabine...

Page 29: ...lix 2001 2003 Calix All Rights Reserved Seal the cabinet Procedure to seal the cabinet Step Action 1 Remove the lifting details from the sides of the cabinets 2 Cap the lift mount holes with the hole...

Page 30: ......

Page 31: ...3 Chapter Installing Power Subscriber Cables and Equipment...

Page 32: ......

Page 33: ...tion 1 Route the main ground cable to the splice compartment and cut the cable to sufficient length to reach the ground bar at the right side of the cabinet 2 Remove a knockout from the ground cable e...

Page 34: ...nt with Calix 2001 2003 Calix All Rights Reserved Procedure to test the cabinet ground Step Action 1 In the splice compartment attach one lead from an Ohm meter to the terminal lug of the ground cable...

Page 35: ...r input The Calix outdoor cabinet requires a 240 220 VAC power feed with 60 Amp service DANGER High voltage may be present Do not turn on the main power to the cabinet until the installation is comple...

Page 36: ...on 1 At the AC Load Center in the front equipment compartment switch all breakers to the off position 2 Remove the metal AC Load Center front panel Note Do not remove the plastic cover 3 In the right...

Page 37: ...ss feed in the splice compartment wall to reach the AC Load Center 6 Reinstall the wall plate and pegboard Step Action Step Action 1 At the AC Load Center in the front of the cabinet switch all breake...

Page 38: ...power Procedure to connect AC power cables Step Action 1 At the AC Load Center in the front of the cabinet switch all breakers to the off position 2 If the cabinet Main breaker is used as the primary...

Page 39: ...tral c verify that the volt meter reads between 110 and 120 VAC 4 Using a volt meter test between L2 and neutral a place one lead on L2 b place the other lead on the neutral c verify that the volt met...

Page 40: ...nder that ships with the cabinet Description of the 60 AMP power shelf The Calix 60 AMP power shelf contains an alarm control unit on the left and slots for four rectifier modules on the right Each re...

Page 41: ...3 Slide the new module into the slot and tighten the front bolts to secure the module in place 4 On the Alarm Control Unit set the matching RFA DIS switch to the right for each rectifier module insta...

Page 42: ...on 1 Check that main power to the cabinet is ON then at the AC load center set the Rectifier A Rectifier B and Main breakers to ON 2 Using a volt meter test between the V and V receptacles on the fron...

Page 43: ...mends using Dynasty 125 AH batteries Procedure to prepare for battery installation Step Action 1 Check that main power to the cabinet is ON then at the AC load center set the Rectifier A Rectifier B a...

Page 44: ...flat washer c battery temperature sensor d battery wire terminal lug 5 Attach the bolts from step 4 to the positive black battery terminal bolt at the rear of battery drawers 1 and 3 Ensure that the b...

Page 45: ...iagram to the right to see a sample of the wiring diagram for one battery tray DANGER The black battery lead is positive and the red battery lead is negative 8 Using a volt meter test the battery conn...

Page 46: ...he rectifier output to the batteries a place the red volt meter lead on the red negative battery lead b place the black volt meter lead on the black positive battery lead c verify that the volt meter...

Page 47: ...ON 2 Verify that the optional Metallic Services Protection modules have been installed if ordered prior to installing the fan tray 3 Remove the fan tray from its packaging 4 Hold the fan tray from ben...

Page 48: ...e shelf filter Step Action 1 If you have not already done so remove the filter from its packaging 2 Lift the fan tray handle up to disengage its locking mechanism and rotate it out to its upright and...

Page 49: ...per subscriber cables into the copper splice compartment on the left side of the ODC 80 then terminate the cables to the factory installed equipment cables Install copper protection modules in the cop...

Page 50: ...lide a 4 cold shrink tube down the subscriber cable with the loose pull tab of the cold shrink removable core feeding from the bottom of the tube through to the top 4 Wrap mastic tape from the install...

Page 51: ...he main ground bar 2 On the factory installed subscriber cable remove the cover from one cable binder 3 On the outside plant cable remove the opposite cover from the matching cable binder 4 Use the ap...

Page 52: ...ots corresponding to your configuration The sample image shows 320 modules installed in 2 copper protection panels Your configuration may differ Calix outdoor cabinets ship with labels to indicate whi...

Page 53: ...s per cassette one cassette holder supports a total of 72 fiber connections Jumper options From the front of a Calix C7 optical plug in card you can run a fiber jumper to a fiber distribution cassette...

Page 54: ...er tray one splice tray holder supports a total of 120 fiber splices All the trays install and stack in the same way Fiber jumper and pigtail options From the front of a Calix C7 optical plug in card...

Page 55: ...served Procedure to install the fiber splice tray holder and trays Step Action 1 Choose where you want the fiber splice tray holder to attach to the pegboard 2 Hold the fiber splice tray to the pegboa...

Page 56: ...ute the fiber cable up through a cable entry hole in the bottom of the side splice compartment Leave 8 10 feet of cable hanging out of the cabinet 2 Slide a 2 fiber cable entry plate down the fiber ca...

Page 57: ...cing equipment 2 Splice fibers from the cable to fiber jumpers following the instructions for your splice equipment 3 Place the spliced fiber in a fiber splice tray routing the fiber as shown 4 Place...

Page 58: ...the fiber distribution cassette holder s See the fiber distribution cassette holder procedure 4 When optical plug in cards are installed terminate the fibers using jumpers from the front of the plug i...

Page 59: ...e strength member from the fiber cable through the strain relief clamp and tighten the clamp to support the fiber 3 Wrap mastic tape from the installation kit around the fiber cable at the location wh...

Page 60: ...Reserved Install other fiber and cable management accessories Calix ships each cabinet with brackets that you can use to mount equipment or accessories in the splice compartment Description of the acc...

Page 61: ...k located on the inside of the Calix C7 door on the lower left corner Procedure to install the AMP card Step Action 1 If you have not already done so remove the AMP card from its packaging and remove...

Page 62: ...56 Calix ODC 80 Installation Guide Proprietary Information Not for use or disclosure except by written agreement with Calix 2001 2003 Calix All Rights Reserved AMP installation view...

Page 63: ...he end of a fiber optic cable Light output from a fiber optic cable is invisible to the human eye However it can destroy the retina of the eye Procedure to install a RAP card Step Action 1 If you have...

Page 64: ...ck located on the inside of the Calix C7 door on the lower left corner Procedure to install a Calix C7 metallic plug in card Step Action 1 If you have not already done so remove the card from its pack...

Page 65: ...stalling or removing the plug in cards always wear the electro static discharge ESD wristband provided Plug the wristband cable into the ESD jack located on the inside of the Calix C7 door on the lowe...

Page 66: ...he card ejector up into the locked position 5 Remove the fiber protector cover from the top front of the card 6 Identify the appropriate fiber cable assignments for each optical card from the labels a...

Page 67: ...face that you use to configure and monitor all of the Calix C7 nodes on a network With the Calix iMS you can view a diagram of your network topology configure all aspects of a Calix C7 network manage...

Page 68: ...r details on configuring Ethernet log on parameters see the full documentation in the Calix C7 iMS Guide Calix factory settings for the front Ethernet port The Calix C7 ships with the front Ethernet p...

Page 69: ...n the Start menu click Settings then click Network And Dial up Connections then right click Local Area Connection and click Properties 2 On the Local Area Connection Properties dialog box do the follo...

Page 70: ...message Click Grant Always after reviewing the security message Procedure to start the Calix iMS from the front Ethernet E1 port Step Action 1 Start Internet Explorer then in the Address box enter 19...

Page 71: ...th Calix 2001 2003 Calix All Rights Reserved Start up view of your network The first time you log in to a new Calix C7 network you will see the following An empty Work Area with no network topology On...

Page 72: ...ary AMP must reside in the Management Maintenance slot of a shelf within the node Procedure to define nodes in the network Step Action 1 On the Tools menu click Network Wizard to start the wizard 2 In...

Page 73: ...Click Assign to create the node and display it in the Current Nodes area 5 Repeat steps 2 4 to create additional nodes 6 In the lower left corner of the Current Nodes area click from the list of shelv...

Page 74: ......

Page 75: ...4 Chapter Maintaining and Troubleshooting the ODC 80...

Page 76: ......

Page 77: ...al damage leakage or bulging Replace any battery displaying any defect before the batteries are placed back in service Load Test each battery to verify that ample current is available to maintain the...

Page 78: ...if possible per local site practices Check all outside plant copper connections for complete and secure connection Ensure that all cable management accessories provide a clean appearance Replace any f...

Page 79: ...ct Calix support for assistance with a resolution Inspect all gaskets around the doors and the roof to ensure a tight secure fit Inspect outside surfaces Clean and inspect the outside of the cabinet f...

Page 80: ......

Page 81: ...5 00 NEND Clearing output You will see this message once the alarm has been cleared from the system TID 000 01 09 10 08 15 00 A 001 REPT EVT ENV N2 1 POWER CL 9 10 8 15 00 Description Severity The AC...

Page 82: ...MN BATTCB NSA 9 10 9 15 00 NEND Clearing output You will see this message once the alarm has been cleared from the system TID 000 01 09 10 09 20 00 A 001 REPT EVT ENV N2 1 BATTCB CL 9 10 8 15 00 Desc...

Page 83: ...10 10 15 00 001 REPT ALM ENV N2 1 MN FUSE NSA 9 10 10 15 00 NEND Clearing output You will see this message once the alarm has been cleared from the system TID 000 01 09 10 10 45 00 A 001 REPT EVT ENV...

Page 84: ...the alarm has been cleared from the system TID 000 01 09 10 11 55 00 A 001 REPT EVT ENV N2 1 HITEMP CL 9 10 11 55 00 Description Severity The over temperature HITEMP alarm indicates that the outdoor c...

Page 85: ...net guide for this number If the equipment is producing less heat than what is budgeted for equipment in the cabinet go to step 7 If the equipment is producing more heat than what is budgeted for equi...

Page 86: ...REPT ALM ENV N2 1 MN OPENDR NSA 9 10 17 15 00 NEND Clearing output You will see this message once the alarm has been cleared from the system TID 000 01 09 10 17 15 00 A 001 REPT EVT ENV N2 1 OPENDR C...

Page 87: ...following message displays TID 000 01 09 10 12 15 00 001 REPT ALM ENV N2 1 MN FUSE NSA 9 10 12 15 00 NEND Clearing output You will see this message once the alarm has been cleared from the system TID...

Page 88: ...will see this message once the alarm has been cleared from the system TID 000 01 09 10 13 15 00 A 001 REPT EVT ENV N2 1 BATTERY CL 9 10 13 15 00 Description Severity The low battery BATTERY alarm indi...

Page 89: ...ut You will see this message once the alarm has been cleared from the system TID 000 01 09 10 14 15 00 A 001 REPT EVT ENV N2 1 LVD CL 9 10 14 15 00 Description Severity The low voltage disconnect LVD...

Page 90: ...15 00 001 REPT ALM ENV N2 1 MJ RECT NSA 9 10 15 15 00 NEND Clearing output You will see this message once the alarm has been cleared from the system TID 000 01 09 10 15 15 00 A 001 REPT EVT ENV N2 1...

Page 91: ...ssage displays TID 000 01 09 10 16 15 00 001 REPT ALM ENV N2 1 MN RECT NSA 9 10 15 15 00 NEND Clearing output You will see this message once the alarm has been cleared from the system TID 000 01 09 10...

Page 92: ......

Page 93: ...fy cooling fan operation as part of regular cabinet maintenance An over temperature condition will occur as the result of a failed cooling fan Step Action 1 Locate the HX Fan Test near the temperature...

Page 94: ...odule and slide it backward then up to remove 4 Disconnect the two power cables by pressing both sides of the cable plug toward the center then pulling the plug out 5 Replace the old cooling fan modul...

Page 95: ...to install or replace a rectifier module ON Push a switch to the right to enable alarm monitoring for that slot In the illustration switches 1 and 3 are ON OFF Push a switch to the left to disable al...

Page 96: ...on 1 Check that main power to the cabinet is ON then at the AC load center set the Rectifier A Rectifier B and Main breakers to ON 2 Using a volt meter test between the V and V receptacles on the fron...

Page 97: ...wer to OFF 2 Place the batteries into each battery drawer 3 Clean the battery terminals and apply No Ox anti corrosion grease to each 4 Thread a lock washer a flat washer the battery temperature compe...

Page 98: ...0 in lbs or 12 4 n m 7 Use an insulated wrench to connect the battery leads according to the wiring diagram on the inside of the battery compartment door panel Click the diagram to the right to see th...

Page 99: ...lling AC power Do not turn on the main power to the cabinet until the power installation is complete Procedure to replace a circuit breaker Step Action 1 Set the main circuit breakers for the cabinet...

Page 100: ...panel Fuse ratings in the DC Distribution panel Procedure to replace a fuse Fuse Type Fuse Rating Calix C7 shelves 20 Amp Heat exchanger fans and other equipment 5 Amp Step Action 1 Remove the defect...

Page 101: ...ld be installed prior to initial battery installation Step Action 1 If not already removed disconnect and remove all batteries To open the front and rear battery compartment panels see the procedure t...

Page 102: ...allation Guide Proprietary Information Not for use or disclosure except by written agreement with Calix 2001 2003 Calix All Rights Reserved View of the battery heater The battery heater is highlighted...

Page 103: ...5 Chapter Reference...

Page 104: ......

Page 105: ...ss hours Use phone FAX or web for immediate assistance from the TAC Normal business hours are 7 00 am to 7 00 pm PST Monday through Friday After hours and on holidays Contact the Calix TAC by phone an...

Page 106: ......

Page 107: ...lbs Equipped with Dynasty batteries 3 900 lbs Environmental Ambient temperature 40 C to 52 C per GR 487 Cooling Integrated air to air cooling system with DC fans Power Power feed 220 240 VAC single ph...

Page 108: ...o 6 RUs of 19 rack space available in splice chamber for 3rd party passive equipment Generator Connector Optional 60 or 100 Amp Pin Sleeve type connectors field installable Meets IEC standards 309 1 3...

Reviews: