background image

AUX

USB

QUICKSTARTGUIDE

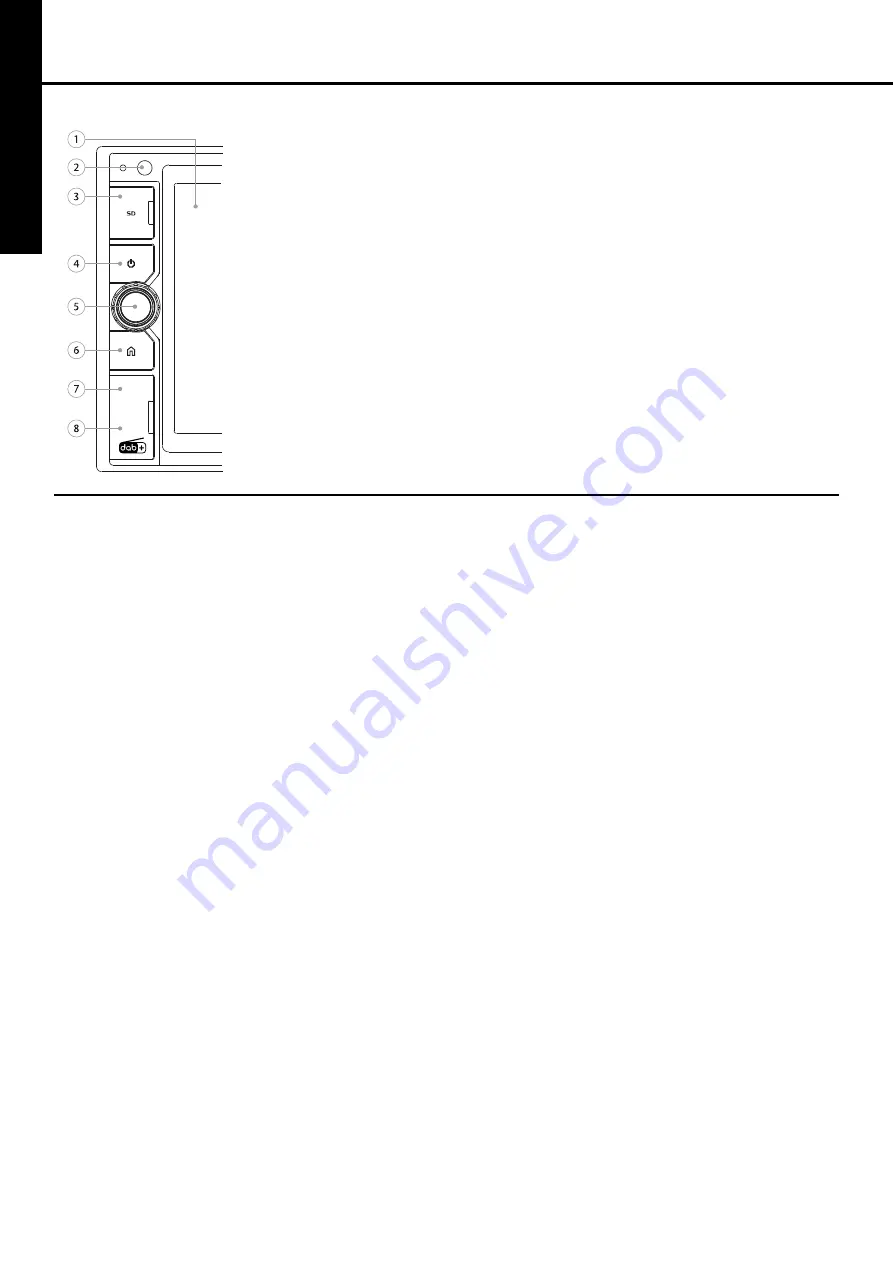
1. 

Display

6.5” TFT-LCD touch screen

2. 

IR sensor

:  Remote control IR sensor

3. 

SD

Micro SD card reader 

(max. 32GB) 

- behind the cover cap

4. 

Power

Press to turn the unit ON. 


When ON, press once to turn the display OFF


(During TFT off, the video out signal will be available so that the 


connected monitor will show the screen of the unit.)


Press the button again to turn the display back ON


Press and hold the button again to turn the unit OFF

5. 

VOL/SEL

:  - Rotate for volume adjustment or adjust settings


- Push to enter the audio menu

6. 

HOME

Go to "HOME"-screen (main menu)

7. 

AUX

3.5mm Jack-in


- behind the cover cap

8. 

USB

Standard USB port 

(max. 32GB) 

- behind the cover cap

ENGLISH

Unit buttons and connections:

Basic operations

Home screen

Push the [HOME] button (6) to show the main menu. On the home 

screen you can choose the available modes (RADIO / USB / SD / 

Bluetooth

 / AUX) or enter the SWC / EQ or SETTING menu.

Sound Control

• Volume

  Turn the [VOL] button (5) to adjust the volume level.


•  Audio settings

  By pushing the [SEL] button (5) you will enter the audio menu and you  

  can adjust BASS / TREBLE / BALANCE / FADER Etc. 

  Push to choose and rotate to adjust.


  Note: when an EQ preset is chosen the bass and treble control are    


not available.


•  Other Audio Settings

  Settings like preset equalizer, loudness or subwoofer ON/OFF can be  

  set by tapping the “EQ” icon on the main menu.

Day/night display mode

Tap the onscreen Sun button in the top bar to increase brightness. 

Tap again to reduce brightness during night time. 

Tap again to black out the screen.

Setup

Enter the setup menu by tapping the [SETTING] icon on the main menu. 

Tap the items you would like to set. You can adjust audio, date and time, 

language, calibration, etc.

Radio operations

Band

Tap the onscreen [BAND] button to choose FM1, FM2, FM3, AM1 or 

AM2. On each band up to 6 presets can be stored.


Radio Seek Function

In Radio Mode, touch and hold the 

7

 or 

8

 button to adjust seek the 

frequency automatically. Tap the button to adjust the radio frequency 

manually step-by-step.


Save preset stations

There are six numbered preset buttons on the screen (P1-P6), which 

can store and recall stations for each band. Tune in to the station you 

want to store, touch and hold any key from P1-P6 until you hear a beep. 

The station will be saved in the designated number.
After saving the stations, you can listen to short intros of each preset by 

touching the [SCAN] button.

RDS 

AF, TA, PTY are the RDS functions. Tap the onscreen buttons to turn 

these functions ON/OFF.


Note: RDS might not be available in every country.

DAB operations

• Tap the SEARCH button to search all the available DAB stations.

• Tap the LIST button (on the bottom left corner) to see the list of all the  

  available DAB stations.

• Tap the 

7

 or 

8

 button to select the previous or next available DAB    

 station.

• If you would like to save a desired DAB station, press and hold the    

  empty slot on the station list on the left. The station name will

  be shown indicating that the desired station is saved. You can save up  

  to 10 stations. Tap the name of the station any time to reach

  the desired station.

• Tap the BACK or HOME button in the top right corner to return  


  to the main user interface.

•  Antenna installation instructions are in the back of this manual

Bluetooth operations

Pairing

Activate 

Bluetooth

 on your mobile phone, and search for available de-

vices. Select “RMD801DAB-BT Caliber”, password "0000". 

If successful connected the 

Bluetooth

 logo stays ON, if not this logo 

keeps flashing.

Dial pad

Touch the dial pad to dial the number you would like to call. Touch the 

[CALL] (green) button to send the number.

Call list

Displays your phonebook and call history, if you've given permission.

A2DP

Press the [MUSIC] button to enter the A2DP page to control playing 

music of your cell phone using the onscreen controls (available if you 

device supports A2DP).

Incoming calls

• Answer call: 

push the green horn at an incoming call

• End call: 

push the red horn

• 

Reject call: 

push the red horn at an incoming call

USB/SD operations

Plug the USB/SD card into the USB/SD port. The unit will start playing 

the contents automatically.

Audio playback

To control the audio playback, use the onscreen buttons.

Summary of Contents for RMD 801DAB-BT

Page 1: ...RMD 801DAB BT QUICKSTARTGUIDE GB F D I E P SW PL GR CZ SK NL ...

Page 2: ...Rear left speaker Green Black B4 Battery 12V Yellow B5 Antenna power Remote Blue White B6 Panel light Orange White optional B7 ACC Red B8 Ground Black RCA CONNECTIONS Yellow row Video in Video input Video out Video output Back cam Input backup camera White row AUX in L Audio input left channel RCA out L Audio output rear left Sub 1 out Subwoofer out 1 mono Red row AUX in R Audio input right channe...

Page 3: ...reo separation 35dB 1 KHz AM MW Radio Frequency range 522 1620 KHz Europe DAB TUNER Frequency Range 174 240MHz Antenna type Screen mount Male SMA connector Active with separate 12V power supply wire Note connect the antenna power supply wire to the remote antenna wire blue white of the head unit Bluetooth Supports A2DP and AVRCP profile Bluetooth range up to 10 meters without barrier Transmission ...

Page 4: ...requency manually step by step Save preset stations There are six numbered preset buttons on the screen P1 P6 which can store and recall stations for each band Tune in to the station you want to store touch and hold any key from P1 P6 until you hear a beep The station will be saved in the designated number After saving the stations you can listen to short intros of each preset by touching the SCAN...

Page 5: ...obile 12V applications Use for other than its designed application may result in fire electric shock or other injury Halt use immediately if a problem appears Failure to do so may cause personal injury or damage to the product Return it to your authorized Caliber dealer or the nearest Caliber Service Centre for repairing Product cleaning Use a soft dry cloth for periodic cleaning of the product Fo...

Page 6: ...l y a six touches de pré sélection numérotées sur l écran P1 P6 pouvant en registrer et mémoriser des stations pour chaque bande Syntonisez la station que vous souhaitez enregistrer appuyez et maintenez enfoncée n importe quelle touche entre P1 et P6 jusqu à ce que vous entendiez un bip La station sera sauvegardée dans le numéro désigné Après avoir sauvegardé les stations vous pouvez écouter de co...

Page 7: ...ntérieur et d entraîner un incendie Utilisez ce produit pour des applications mobiles de 12 V Toute autre utilisation qu à des fins d applications prévues peut entraîner un incendie un risque d électrocution ou d autres blessures Cessez toute utilisation immédiatement en cas de problèmes Le non respect de ces consignes peut entraîner des blessures corporelles ou endommager le produit Retournez cel...

Page 8: ...peichern Es gibt sechs nummerierte Vorbelegungstasten auf dem Bildschirm P1 P6 auf denen Sender für jedes Frequenzband gespeichert oder abgerufen werden können Stellen Sie den Sender ein den Sie speichern möchten und halten Sie eine der Schaltflächen P1 P6 gedrückt bis Sie einen Signalton hören Der Sender wird unter der gewählten Nummer gespeichert Nach dem Speichern der Sender können Sie die vorg...

Page 9: ...stau im Gerät kommen und es besteht Feuergefahr Das Gerät nur an ein 12 V Bordnetz in einem Fahrzeug anschließen Andernfalls besteht Feuergefahr die Gefahr eines elektrischen Schlages oder anderer Verletzungen Das Gerät nicht weiterbenutzen wenn ein Problem auftritt Andernfalls kann es zu Verletzungen oder Schäden am Gerät kommen Geben Sie das Gerät zu Reparaturzwecken an einen autorisierten Calib...

Page 10: ...lizzabili per salvare e richiamare le stazioni in ogni banda Sintonizzarsi sulla stazione che si desidera salvare tenere premuto un tasto P1 P6 qualsiasi e attendere il segnale acustico La stazione è salvata al numero indicato Dopo aver salvato le stazioni è possibile ascoltare le brevi intro di ciascun predefinito toccando il pulsante RICERCA RDS AF TA e PTY sono le funzioni RDS Toccare i pulsant...

Page 11: ...ventole né ostruire pannelli di aerazione Il mancato rispetto di questa indicazione potrebbe causare il surriscaldamento interno e provocare incendi Utilizzare il prodotto su veicoli con batteria da 12 V Un utilizzo diverso da quello indicato potrebbe provocare incendi scosse elettriche o infortuni Interrompere immediatamente l utilizzo in caso di problemi Il mancato rispetto di questa indicazione...

Page 12: ... estación que desee almacenar mantenga presionada cualquier tecla entre P1 y P6 hasta que oiga un sonido de bip La estación se almacenará en el número designado Tras guardar las estaciones podrá escuchar breves introducciones de cada ajuste preestablecido con tan solo tocar el botón SCAN RDS Las funciones RDS son AF TA y PTY Toque los botones en pantalla para activar o desactivar estas funciones N...

Page 13: ... puede provocar que se caliente el interior y se produzca fuego Utilice este producto con aplicaciones móviles de 12 V Utilizarlo para un propósito diferente del fin para el que fue diseñado puede provocar fuego choques eléctricos y otras lesiones Interrumpa inmediatamente su uso si surge algún problema No hacerlo podría provocar lesiones personales y daños en el producto Devuélvalo a su distribui...

Page 14: ...r estações para cada banda Sintonize a estação que deseja armazenar toque e mantenha premida qualquer tecla de P1 P6 até que oiça um apito A estação será guardada no número indicado Após guardar as estações pode listar pequenas introduções de cada pré definição ao tocar no botão SCAN RDS AF TA PTY são as funções RDS Toque nos botões do ecrã para ligar desligar estas funções Nota O RDS poderá não e...

Page 15: ...lação de calor e pode resultar em incêndio Utilize este produto para aplicações móveis de 12V Utilização com outros aplicativos pode resultar em incêndio choque elétrico ou outros ferimentos Pare imediatamente a sua utilização se aparecer um problema Não fazer isso pode causar ferimentos ou danos ao produto Devolva o ao seu revendedor autori zado ou ao Centro de Assistência Caliber mais próximo pa...

Page 16: ...tioner för varje band Ställ in stationen som du vill spara tryck och håll ned valfri tangent från P1 P6 tills du hör ett pip Stationen kommer att sparas i det angivna numret När du har sparat stationerna kan du lyssna på korta intron av varje förinställd sta tion genom att trycka på SCAN knappen RDS AF TA och PTY är RDS funktionerna Tryck på knapparna på skärmen för att sätta PÅ AV dessa funktione...

Page 17: ...aneler Det kan göra att värme alstras inuti apparaten och kan orsaka brand Använd denna produkt för mobila 12 V applikationer Annan användning än avsett bruk kan leda till brand elektriska stötar eller andra skador Stoppa bruk omedelbart om ett problem visas Underlåtenhet att göra detta kan leda till personskador eller skador på produkten Returnera den till en auktoriserad Caliber återförsäljare e...

Page 18: ...wywać i wywoływać wybrane stacje radiowe Dostroić stację a następnie dotknąć i przytrzymać dowolny przycisk od P1 P6 aż pojawi się krótki dźwięk Stacja radiowa zostanie zachowana pod wybranym numerem Po zachowaniu stacji można posłuchać krótkich zapowiedzi każdej z nich dotykając przycisk SCAN RDS AF TA i PTY to funkcje systemu RDS Dotknąć odpowiednie przyciski ekranowe aby włączyć lub wyłączyć żą...

Page 19: ...ażenia prądem elektrycznym Nie zasłaniać otworów wentylacyjnych lub paneli grzewczych Może to spowodować nagrzanie wnętrza urządzenia oraz pożar Produkt stosować jedynie do mobilnych zastosowań 12 V Stosowanie do celów innych niż zalecane może doprowadzić do pożaru porażenia prądem elektrycz nym lub innych obrażeń Natychmiast wyłączyć gdy wystąpi problem podczas korzystania z produktu Niezastosowa...

Page 20: ...ých môžete uložiť a vyvolať stanice pre každé pásmo Nalaďte stanicu ktorú chcete uložiť dotknite sa a podržte ktorékoľvek tlačidlo od P1 P6 až kým nezačujete pípnutie Stanica sa uloží do určeného čísla Po uložení staníc si môžete vypočuť krátke úvody každej predvoľby tak že sa dotknete tlačidla SCAN RDS AF TA PTY sú funkcie RDS Poklepaním na tlačidlá tieto funkcie zapnete vypnete Poznámka RDS nemu...

Page 21: ...tracie otvory alebo panely chladiča Ak tak urobíte môže to viesť k nahromadeniu tepla vo vnútri čo môže viesť k požiaru Tento výrobok používajte pre mobilné 12 V aplikácie Iné ako stanovené použitie môže viesť k požiaru poraneniu elektrickým prúdom alebo inému poraneniu Ak sa vyskytne problém okamžite ukončite používanie Nedodržanie tohto pokynu môže spôsobiť poranenie osôb alebo poškodenie výrobk...

Page 22: ...ήτων Αγγίξτε το πλήκτρο για να ρυθμίσετε χειροκίνητα τη ραδιοφωνική συχνότητα βήμα προς βήμα Αποθήκευση προεπιλεγμένων σταθμών Υπάρχουν έξι αριθμημένα προεπιλεγμένα κουμπιά στην οθόνη P1 P6 στα οποία μπορείτε να αποθηκεύετε σταθμούς για κάθε ζώνη και να τους ανακαλείτε Συντονιστείτε στο σταθμό που θέλετε να αποθηκεύσετε και κρατήστε πατημένο ένα κουμπί από P1 P6 μέχρι να ακουστεί ένα ηχητικό σήμα ...

Page 23: ...εί πρόβλημα σταματήστε αμέσως να χρησιμοποιείτε το προϊόν Σε αντίθεση περίπτωση μπορεί να προκληθεί τραυματισμός ή βλάβη στο προϊόν Επιστρέψτε το στον εξουσιοδοτημένο αντιπρόσωπο Caliber ή στο πλησιέστερο κέντρο σέρβις της Caliber για επισκευή ΚΑΘΑΡΙΣΜΟΣ ΠΡΟΙΟΝΤΟΣ Χρησιμοποιήστε ένα μαλακό στεγνό πανί για τον καθαρισμό του προϊόντος Για πιο δύσκολους λεκέδες βρέξτε το πανί μόνο με νερό Οποιαδήποτε...

Page 24: ... stap hand matig naar de frequentie te zoeken Voorkeuzezenders opslaan Per band staan er 6 locaties P1 P6 op het scherm waaronder je een zender kan opslaan en mee kan oproepen Ga naar de zender welke je op wilt slaan druk en houdt locatie P1 P6 vast tot een pieptoon gehoord wordt Het station is dan opgeslagen onder het gekozen nummer Na het opslaan van diverse stations onder de voorkeuze locaties ...

Page 25: ...k dit product voor mobiele 12V toepassingen Gebruik voor andere toepassingen kan leiden tot brand elektrocutie of andere verwondingen Zet onmiddelijk het gebruik stop wanneer zich een probleem voordoet Doet u dit niet dan kan dit leiden tot letsel of schade aan het product Breng het toestel ter repara tie terug naar uw bevoegde Caliber dealer Schoonmaken van het product Gebruik een zachte droge do...

Page 26: ... 2014 53 EU RED och 2011 65 EU RoHS PL Niniejszym Caliber oświadcza źe RMD801DAB BT jest zgodne z zasadniczymi wymaganiami oraz innymi stosownymi postanowie niami Dyrektywy 2014 53 EU RED i 2011 65 EU RoHS DK Undertegnede Caliber erklærer hermed at følgende udstyr RMD801DAB BT overholder de væsentlige krav og øvrige relevante krav i direktiv 2014 53 EU RED og 2011 65 EU RoHS EE Käesolevaga kinnita...

Page 27: ... purple white Parking green Male SMA Attach to the metal of the car frame Please note It s not necessary to remove any paint Remove the cover of the A post Place the antenna on the windshield near the A post 12V remote Stick the transparant part of the antenna on the windshield and put the black part on the metal frame DAB ANTENNA INSTALLATION ...

Page 28: ...WWW CALIBEREUROPE COM CALIBER EUROPE BV Kortakker 10 4264 AE Veen The Netherlands ...

Reviews: