


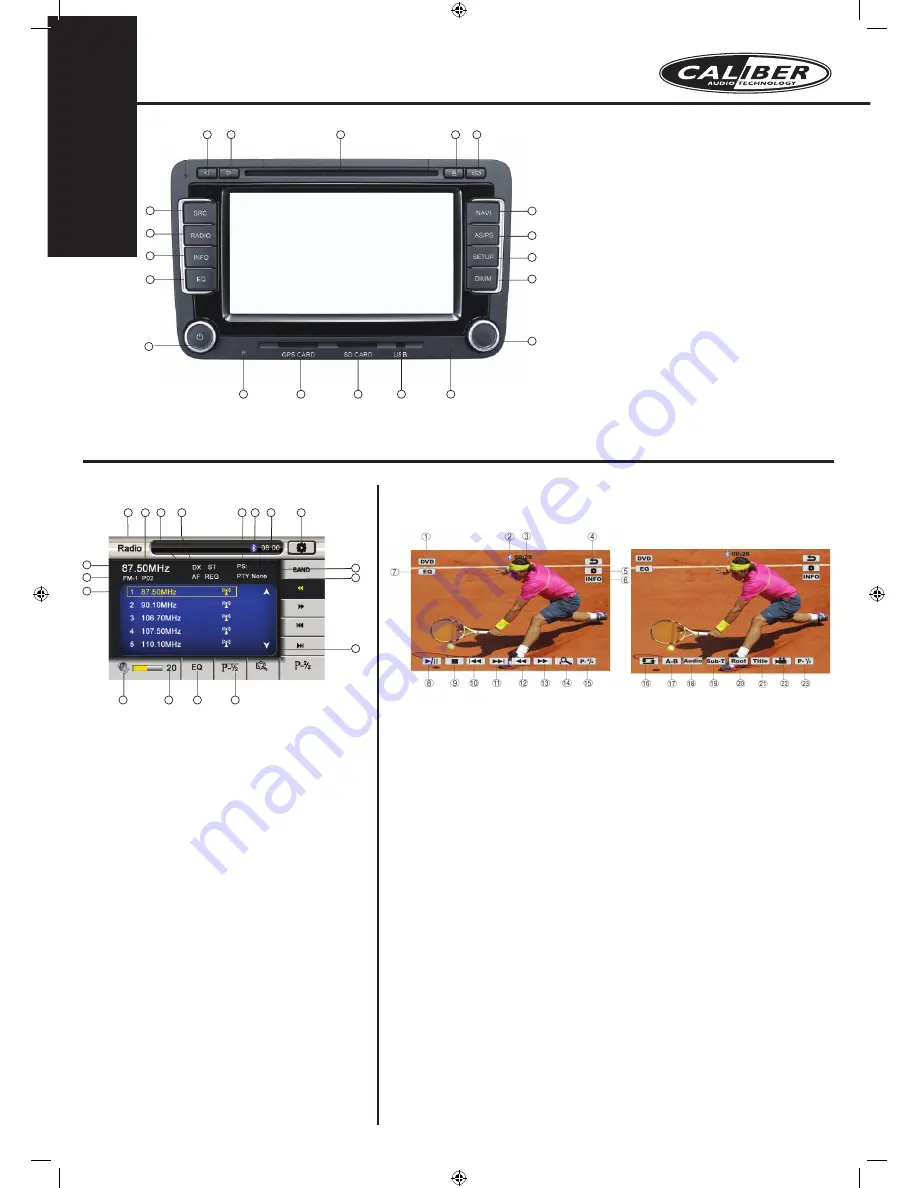
1.
SRC (Mode switching) Press to switch the mode.
2. RADIO
3. INFO (Show the play information)
4. EQ (Sound effect adjusting)
5. VOL/POW (Volume control/Power)
6. Receiving window of remote control signal
7. GPS SD card slot (Navigation);
8. SD card slot
9. USB port
10. Reset
11. Pause/play/Select
12. Screen brightness adjusting key
13. Setup, press to enter the setup menu;
14. AS/PS
15. NAVI
16. Audio switching key. Press this key to enable/
disable the navigation sound;
17. Enter/Eject, press to enter/eject the disc;
19. Disc slot
21. Next
22. Previous
ENGLISH
MCD901 QUICKSTART GUIDE
1. Name of current mode: Click to return to the main
interface.
2. The current radio frequency
3. AF indication
4. LOC/DX (LOC: Short distance/DX: Long distance);
when LOC function is enabled, only those radio
channels with strong signal and excellent receiving
state are received.
5. Bluetooth status icon
6. The current system time
7. PS indication
8. Menu
9. Stereo indication
10. REG indication
11. Page Up/Down of preset radio frequency list
12. The playing indicator of current radio
13. The current radio band
14. The preset radio frequency: Click any one of the
frequency to listen; or press it for about 3 seconds
to save
(10 preset radio channels are available for each
band)
15. Volume indicator: You can adjust the volume by the
VOL button.
16. Volume bar
17. EQ: Click to enter the EQ setup interface
18. Page up/down, if selected the AF, TA and PTY settings
will be displayed
RADIO INTERFACE WITH RDS:
1. Mode switching key: Click to return to main interface.
2. Bluetooth icon
3. Playing time
4. Exit: Click to return to the current play interface.
5. Menu
6. Click to view the play information
7. EQ: Click to enter the EQ setup interface.
8. Play/Pause
9. Stop(Click to stop in the state of Breakpoint Memory; double click to stop
completely); long press for above 2 seconds to switch to OPEN mode, then, the
disc is ejected automatically.
10. Click to play the previous chapter
11. Click to play the next chapter
12. Fast backwards (Click to switch among the speed of x2, x4,x8, and x16)
13. Fast forwards (Click to switch among the speed of x2, x4,x8, and x16)
14. Video zoom in: There are three grades of zoom
15. Page up/down (Click to turn to page 1 if the current page is page 2, see Picture 5)
16. Repeat (Click to switch among Chapter Repeat, Title Repeat, and Off)
17. Section repeat (First click to select the start point A and click again to select the
end point, then, the system will repeat playing between point A and B. Click again
to disable this function)
18. Audio switching key (Click to switch among different languages and audio. This key
is invalid if the DVD disc has only one audio track)
19. Subtitle switching key (If the DVD disc contains many kinds of subtitles, you can
switch the subtitle of different languages by clicking this key when playing)
20. Root
21. Title
22. Angle switching key
23. Page up/down (Click to turn to page 2 if the current page is page 1, see Picture5)
VIDEO PLAYBACK (CD/DVD/USB/SD/IPOD
TM
)
22
21
19
17
16
15
14
13
12
11
10
9
8
7
6
5
4
3
2
1
1
2
3
4
7
5
6
8
9
10
11
18
17
16
15
14
13
12
Summary of Contents for MCD901
Page 1: ...MCD901 QUICKSTART GUIDE...
Page 3: ......


