background image

12

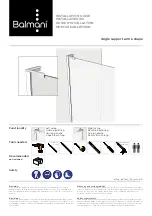
Fissare la boccola a muro N con il tassello 
e la vite fornite (12.1).
Inserire il tirante M nella boccola (il tirante 
si può tagliare a misura se necessario) e 
fissarlo con il grano (12.2). Incastrare il 
tirante M nel montante centrale di battuta.

Fit the N bushing to the wall through the 
plug and the screw supplied (12.1).
Insert the M tie-rod into the bushing (the 
tie-rod can becut to measure if required) 
and fix it through the key (12.2). Wedge 
the tie-rod in the central closing upright.

Fixer la bague au mur N à l'aide de la 
cheville et des vis fournies (12.1).
Insérer le tirant M dans la bague (le tirant 
peut etre taillé sur mesure si necéssaire) et 
le fixer à l'aide de la vis sans bout (12.2). 
Encaisser le tirant dans le montant central 
de fermeture.

N

M

N

12.1

12.2

Summary of Contents for BITHIA

Page 1: ...and 3 mm allen wrenches neutral and transparent silicone Pour un montage correct suivre attentivement les instructions suivantes Outils nécessaires perceuse mèche à béton Ø 6 mm tournevis cruciforme vis à six pans mm 2 5 mm 3 silicone neutre transparente Calibe S r l 40050 Monteveglio Bo Italy 08 EN14428 Parete doccia realizzata in acciaio inox e cristallo temperato Pulibilità Passa Resistenza agl...

Page 2: ...ge sur des receveurs irréguliers ou pas planaires Calibe ne garantit pas le fonctionnement correct de la cabine Manovrare con cautela le parti vetrate poiché trattandosi di cristalli temperati l urto con una superficie dura potrebbe causare la frantumazione del cristallo secondo le norme UNI EN 14428 The glass panels are to be handled with caution since bumping with hard parts may cause the temper...

Page 3: ...cis où l on veut placer la cabine positionner le montant H à environ 1 1 5 cm du bord extérieur du receveur et le fixer parfaitement à la verticale au moyen des fiches et des vis fournies 1 1 1 1 1 H 2 Inserire nel montante H il fisso laterale F e inserire le viti bombate M5 Utilizzando le asole presenti sul montante a muro portare il montante ad angolo W a circa 1 cm dal filo esterno del piatto d...

Page 4: ...sarlo perfettamente verticale 3 1 Position upright A at around 1 cm to the external border of the shower tray and fix it in a perfectly vertical position 3 1 Positionner le montant A à environ 1 cm du bord extérieur du receveur et le fixer parfaitement à la verticale 3 1 3 3 1 F A ...

Page 5: ...cal F D 4 4 1 Inserire il profilo di tenuta L nell apposito scasso presente nel montante centrale di battuta 5 1 Una volta completata l installazione il profilo dovrà trovarsi nella posizione indicata nella figura 5 2 Insert seal profile L in the notch found on the central closing upright 5 1 Once you have finished installing the profile will have to be in the position shown at fig 5 2 Insérer le ...

Page 6: ...right A 6 2 Insérer le montant D déjà incluant les pivots des charnières 6 1 dans le montant à mur A Insérer le profilé d étanchéité L dans la fissure située dans le montant A 6 2 6 1 6 2 7 Incastrare il tirante V nei due scassi presenti nella parte superiore dei montanti ai lati della porta 7 1 Wedge tie rod V into the two grooves on the upper side of the uprights at the door sides 7 1 Emboîtez l...

Page 7: ...posizionato correttamente nei montanti altrimenti è possibile registrare la battuta del cristallo sul montante con le asole presenti nel montante D ATTENZIONE NON MODIFICARE IL POSIZIONAMENTO DELLE CERNIERE SUL CRISTALLO PER REGISTRARE LA PORTA Insert the hinges that have been fitted in the opening panel into upright A pivots 9 1 If step 8 has been carried out correctly the opening panel will alre...

Page 8: ...the corner upright Si la porte n est pas parfaitement en ligne avec le montant de fermeture on peut la regler en agissant sur les oeillets du montant D et eventuellement sur celles qui se trouvent sur le montant en angle 11 Procedere al montaggio del tirante centrale segnare in corrispondenza del montante centrale dove posizionare la boccola a muro Mount the central tie rod mark in the central upr...

Page 9: ...h the plug and the screw supplied 12 1 Insert the M tie rod into the bushing the tie rod can becut to measure if required and fix it through the key 12 2 Wedge the tie rod in the central closing upright Fixer la bague au mur N à l aide de la cheville et des vis fournies 12 1 Insérer le tirant M dans la bague le tirant peut etre taillé sur mesure si necéssaire et le fixer à l aide de la vis sans bo...

Page 10: ...e siliconer correctement le profilé appliqué à la partie INFERIEURE de la vitre fixe on peut soulever la vitre et appliquer la silicone entre profilé et receveur ensuite ABAISSER le profilé Eliminer la silicone excédante ATTENZIONE Per garantire una buona tenuta dell acqua e una sicura stabilità della struttura è molto importante eseguire la siliconatura come indicato WARNING to guarantee optimal ...

Page 11: ...dalla quale potrebbe uscire l acqua Complete by silicone sealing outside the structure both vertically and horizontally Seal any crack that may cause water to leak Compléter en siliconant l extérieur de la structure soit en vertical et en horizontal Reboucher toute fissure qui puisse causer une perte d eau 14 ...

Reviews: