background image

25

Pouring the Deck

It is recommended that all electrical hook ups and all plumbing be completed 

before  pouring  the  concrete.  Make  certain  all  electrical  inspections  on 

lights,  bonding  and  all  other  electrical  work  have  been  completed  and 

checked off by the local inspectors prior to proceeding with your concrete 

or finish work. It is a good idea to run the spa for at least 24 hours before 

pouring  the  concrete  to  insure  there  are  no  leaks.  We  understand  you 

want to enjoy your spa now, but a 24-hour period with your spa running will 

let you know of any problems before they will be extremely hard to fix.

The type of decking you have selected will have determined the grade of 

the spa. If you are pouring a regular deck up to the spas coping, then the 

top of the coping should be 4” above the surrounding area. In either event, 

it is recommended to dig out an area around the spa exposing the flange 

of the coping and just under it. This is important, as concrete should be 

packed under and over the flange of the spa, as the deck is poured. This 

will lock the spa into the concrete and provide for a much stronger bond 

of the spa to the deck. It will also eliminate cracking of the deck where it 

meets the spa. 
When setting your outside forms, remember you want any water from rain 

or splash out to run off the deck, not into the spa. If your deck is going to tie 

into an existing deck, than some type of drain system should be planned to 

handle the run off. Proper drainage planning is very important. 

An experienced concrete finisher should always be used when pouring 

spa  decks,  especially  when  you  are  doing  a  cantilevered  deck,  as  the 

forms must be taken off at the proper time to allow finishing of the inside 

of the form. 

Summary of Contents for Avalon A726B

Page 1: ......

Page 2: ...ormation and or assistance please contact L M S Customer Service Department 1462 East Ninth Street Pomona CA 91766 Toll Free 1 800 CAL SPAS Fax 1 909 629 3890 www calspas com Contents Pre Delivery and...

Page 3: ...e responsibility for any performance or warranty issues and may void portions of their warranty as a result For this reason we strongly recommend they hire an experienced professional for their instal...

Page 4: ...oing this you will have a place to change clothes and not be uncomfortable Consider your privacy In a cold weather climate bare trees won t provide much privacy Think of your spa s surroundings during...

Page 5: ...n cycles does not make too much noise for spa owners and or neighbors Ensure the equipment can be easily serviced for filter cleaning and periodic inspections in the location chosen If you are using a...

Page 6: ...ure the structure will support the weight of 150 pounds per square foot To properly identify the weight of your new spa when full remember water weighs 8 33 lbs per gallon For example an average 8 spa...

Page 7: ...ontact points Be sure not to seal the bottom off and making a sealed box You will need adequate water drainage for escape under the spa A gravel beds around the concrete base will help with this Site...

Page 8: ...in order to provide an unobstructed passageway to the installation location Plan the Delivery Route Consider the following when planning your delivery route Check the width of gates doors and sidewal...

Page 9: ...equate preparations Special Circumstances The use of a crane for delivery and installation may become necessary if you are unable to provide an adequate delivery route It is used primarily to avoid in...

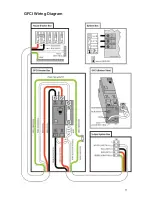
Page 10: ...contractor and approved by a local building electrical inspector GFCI and Wiring Requirements The power supplied to the spa must be on a dedicated GFCI protected circuit as required by ANSI NFPA 70 wi...

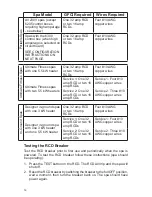
Page 11: ...1 One 50 amp GFCI Service 2 One 30 amp GFCI Service 1 Four 8 AWG copper wires Service 2 Three 8 AWG copper wires Fitness Pro 4700 spa Service 1 swim side One 60 amp GFCI Service 1 Four 8 AWG copper wi...

Page 12: ...uring the 6300 Control System The 6300 control system requires higher power than other 240V sys tems Dip switch 10 is factory set in the ON position This causes the heater to shut off when any pump is...

Page 13: ...11 GFCI Wiring Diagram...

Page 14: ...it before next usage All 120V spas must have a GFCI This can be either a 20 amp GFCI receptacle or a GFCI cord and plug kit as shown at right CKIT110 P N ELE09700086 Testing the GFCI Breaker Test the...

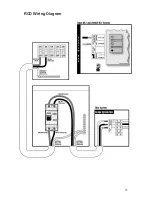
Page 15: ...ctrical circuit must be installed by an electrical contractor and approved by a local building electrical inspector RCD and Wiring Requirements The power supplied to the spa must be on a dedicated RCD...

Page 16: ...ce 2 One 32 amp RCD or two 16 amp RCDs Service 2 Three 10 AWG copper wires In Ground Spas Designer in ground spas with one 3 kW heater One 32 amp RCD or two 16 amp RCDs Four 10 AWG copper wires Design...

Page 17: ...15 RCD Wiring Diagram...

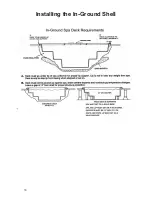
Page 18: ...16 Installing the In Ground Shell...

Page 19: ...ow is typical for a system with two pumps with external heater and external filter Designer Spa Specifications DIJ401 DIJ406 Equipment pack weight 250 lbs DIJ407 Equipment pack weight 300 lbs 2 5 HP h...

Page 20: ...18...

Page 21: ...ked during water testing at the factory This is done to assist installers in properly identifying the installation We still recommend that the installers verify plumbing lines prior to gluing This can...

Page 22: ...and below ground installations In most cases the use of flexible PVC plumbing is acceptable when properly buried in trenches Most water plumbing lines are 2 or larger and must be schedule 40 or heavie...

Page 23: ...ion 3 loom NOTE This connection must be kept dry We recommend that a waterproof junction box be used in installations where moisture could penetrate this terminal connector Lay out the extension loom...

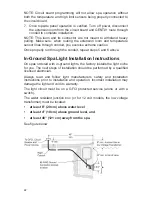
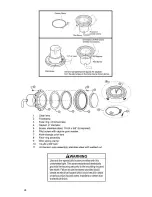
Page 24: ...h the conduit repeat steps 5 and 6 above In Ground Spa Light Installation Instructions On spas ordered with in ground lights the factory installs the light niche for you The next steps of installation...

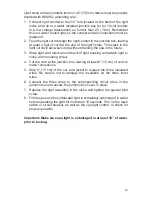
Page 25: ...slack around back of light housing and attach light to 3 niche with mounting screw Cut the cord at the junction box leaving at least 6 15 cm of cord to 4 make connections Strip 6 15 cm of the out cor...

Page 26: ...24...

Page 27: ...the coping should be 4 above the surrounding area In either event it is recommended to dig out an area around the spa exposing the flange of the coping and just under it This is important as concrete...

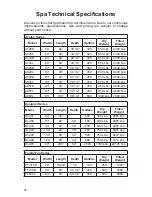
Page 28: ...4B 93 93 39 1 2 450 900 Lbs 4648 Lbs A844L 93 93 39 1 2 450 900 Lbs 4648 Lbs A857B 93 93 39 1 2 450 900 Lbs 4648 Lbs A857L 93 93 39 1 2 450 900 Lbs 4648 Lbs A969L 93 130 39 1 2 800 1200 Lbs 7864 Lbs D...

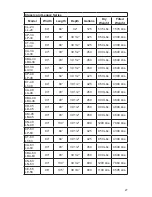
Page 29: ...2 425 850 Lbs 4390 Lbs CT 48 LT 48 84 84 39 1 2 425 850 Lbs 4390 Lbs CA 48 LA 48 93 93 39 1 2 450 900 Lbs 4648 Lbs CBA 48 LBA 48 93 93 39 1 2 450 900 Lbs 4648 Lbs CD 45 LD 45 93 93 39 1 2 450 900 Lbs...

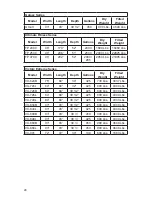
Page 30: ...e Series Model Width Length Depth Gallons Dry Weight Filled Weight VX 624B 76 84 34 325 730 Lbs 3437 Lbs VX 724L 84 84 32 425 800 Lbs 4340 Lbs VX 726B 84 84 39 1 2 425 800 Lbs 4340 Lbs VX 726L 84 84 3...

Page 31: ...29...
Page 32: ...LTR20081024 Rev B 6 12 08 L M S Customer Service Department 1462 East Ninth Street Pomona CA 91766 Toll Free 1 800 CAL SPAS Fax 1 909 629 3890 www calspas com...

Reviews: