background image

   9

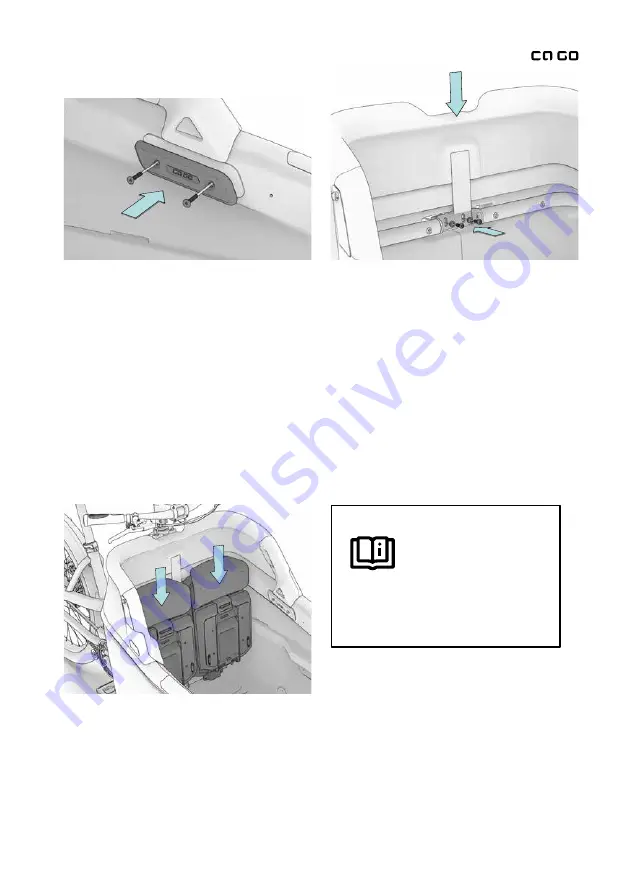
Finally, the Ergonomic-Child-Seats can now be reinstalled (Fig. 10).

Fig. 8

Fig. 9

Screw the side plates of the Ortho-Safety-Collar, including the plastic covers, 
back on using the M6 countersunk head screws, but do not fully tighten the 
connections yet (Fig. 8).


As the next step, the M6 screws can be screwed in. To do this, press down at 
the centre of the Ortho-Safety-Collar so that it sits flush on the edge of the 
transport box, then tighten the M6 screws to 5–8 Nm (Fig. 9). Now also tighten 
the side plates of the Ortho-Safety-Collar to 5–8 Nm.

Fig. 10

You can find more information in 
the assembly instructions for the 
Ergonomic-Child-Seat by Ca Go.

Summary of Contents for Ortho-Safety-Collar

Page 1: ...EN Ortho Safety Collar Assembly instructions...

Page 2: ...al information 4 Intended use 5 Scope of delivery 6 Installation 7 General notes on care 10 Statutory warranty guarantee 11 The present assembly instructions is the translation of the original assembl...

Page 3: ...Separate instructions Refers you to other assembly instructions for your FS200 Life which describe the respective assembly step in more detail if needed Caution Warns you about incorrect behaviour tha...

Page 4: ...FS200 Life It increases the child s safety during transport and also serves as a convenient headrest should your child fall asleep during the ride with your Ca Go Fig 1 Fig 2 The Ortho Safety Collar...

Page 5: ...using bicycle helmets Intended use The Ortho Safety Collar is not compatible with the Life Soft Top nor with the transport box lid The screw connections should be checked for tight seat at regular in...

Page 6: ...e Ortho Safety Collar consists of several individual parts EPP moulded sheet metal components and screw connections It is delivered pre assembled Fig 3 Assembly requires the following additional tools...

Page 7: ...d in the box they have to be removed before installing the Ortho Safety Collar To do this remove the two M6 screws 5 mm Allen key and lift out the Ergonomic Child Seats Fig 4 You can find more informa...

Page 8: ...The holes of the connection plates must be positioned above the threads in the transport box Fig 7 Fig 5 Fig 6 Fig 7 Remove the M6 screws at the transport box frame steerer tube 5 mm Allen key Fig 5...

Page 9: ...tighten the connections yet Fig 8 As the next step the M6 screws can be screwed in To do this press down at the centre of the Ortho Safety Collar so that it sits flush on the edge of the transport box...

Page 10: ...ses water is all that is needed to do the job If needed you can use a mild detergent such as dishwashing liquid or hand soap General notes on care Never use aggressive cleaning agents acids or solvent...

Page 11: ...applies You can find more details on the warranty on our website www cagobike com en warranty Export to the USA and Canada is not permitted product liability If you have questions concerning this use...

Page 12: ...serves the right to change product specifications without prior notice Typographical errors mistakes and modifications reserved Version of 03 2023 Reproduction reprint and translation as well as any u...

Reviews: