


Dynaco ST-70 Restoration Module
Assembly, Installation, and Adjustment Manual
Page 5
CAE Dynaco Driver Restoration Module PC-3R – R0: 7-02
5.
After you have desoldered all of the wires from the original Dynaco driver board
(PC-3) remove it by removing the four (4) 4-40 nuts from the bottom of the board.
The board should fall loose (if not identify if any other wires still remain).
6.
Remove the two (2) 470K ohm connected to the audio input connector tabs. These
resistors are no longer necessary.
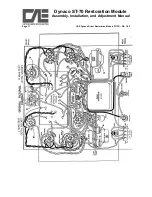
C . Installation of the New CAE Stereo 70 Driver Board (CAE-PC-3R)
1.
Locate the CAE replacement Driver board (PC-3R) and orient it so that the TWO
330K ohm 3 Watt resistors are near the rear of the amplifier (nearest the amp
center). The board should be mounted so that the top surface of the PC Board
rests inside the Dynaco ST-70 chassis cutout (as per the original). Be careful not
to capture any wires and secure the board in places with the original 4, 4-40
screws/nuts.
2.
Begin reconnecting the wires originally removed for the original Dynaco PC-3
board to the corresponding terminal on the CAE replacement Board (PC-3R). I
suggest placing the stripped and tinned wire into the hole in the board and then
quickly soldering the wire to the terminal. Be sure to inspect each connection as
discussed before. As you complete each wire, remove its masking tape identifier.
Although I have designed the replacement board’s terminals to be very near the
original board, some amplifiers may have been constructed so that lengthening
may be required.
3.
Once completed, inspect each connection again and carefully look for signs of
melted insulation near adjacent wires.