background image

1-29

Chapter 1

18.

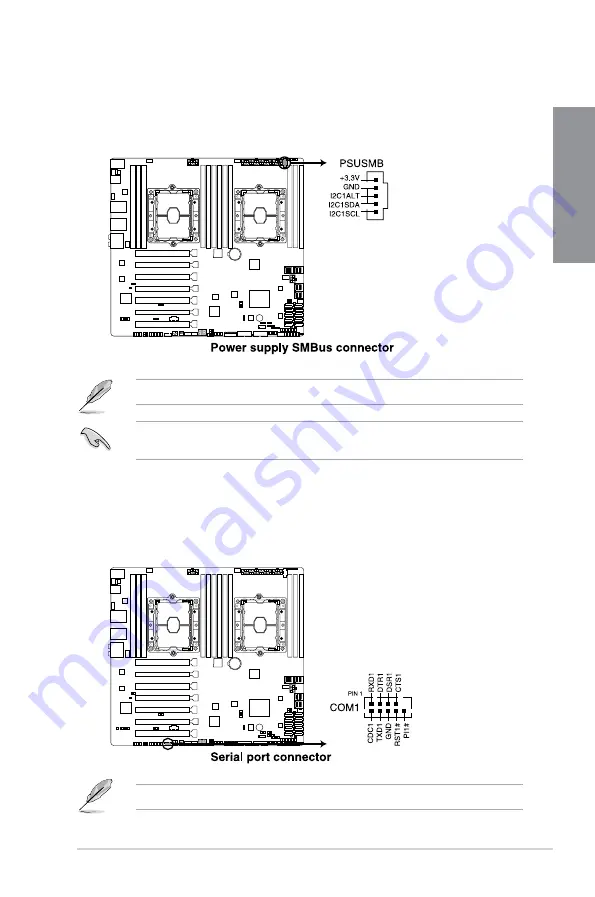
Serial port connector (10-1 pin COM1)

This


connector


is


for


a


serial


(COM)


port.


Connect


the


serial


port


module


cable


to


this

connector,


then


install


the


module


to


a


slot


opening


at


the


back


of


the


system


chassis.

17.

Power Supply SMBus connector (5-pin PSUSMB)

This


connector


allows


you


to


connect


SMBus


(System


Management


Bus)


to


the


PSU

(power


supply


unit)


to


read


PSU


information.


Devices


communicate


with


an


SMBus

host


and/or


other


SMBus


devices


using


the


SMBus


interface.

The


COM


module


is


purchased


separately.

This connector functions only when you enable the  ASMB card.

Power supply is required to meet PMBus specification and customized BMC FW may 

be needed. Please contact  if your need further support

Summary of Contents for Deep Learning Box Rack

Page 1: ...Technical Specification Deep Learning Box Rack...

Page 2: ...1 1 7 Jumpers 1 10 1 1 8 Onboard LEDs 1 15 1 1 9 Internal connectors 1 18 Chapter 2 Basic Installation 2 1 Building your PC system 2 1 2 1 1 CPU and heatsink installation 2 1 2 1 2 Motherboard instal...

Page 3: ...our area If you are not sure about the voltage of the electrical outlet you are using contact your local power company If the power supply is broken do not try to fix it by yourself Contact a qualifie...

Page 4: ...te a task IMPORTANT Instructions that you MUST follow to complete a task NOTE Tips and additional information to help you complete a task Typography Bold text Indicates a menu or an item to select Ita...

Page 5: ...al x8 x8 link 2 x PCIe 3 0 x 16 slot x8 link VGA Aspeed AST2500 64MB VGA Port with Bracket Supports VGA with Max Resolution 1920 x 1200 60Hz Multi GPU support Supports NVIDIA 4 Way SLI Technology Supp...

Page 6: ...io connector AAFP Supports up to 32 Bit 192kHz playback Audio Feature DTS Connect DTS Headphone X Premium Japanese made audio capacitors Provide warm natural Unique de pop circuit Reduces start up pop...

Page 7: ...pport additional 2 x USB 2 0 ports 4 x U 2 connectors 1 x M 2 Socket 3 10 x SATA 6 0Gb s connectors Gray 2 x CPU Fan connectors 4 pin 7 x Chassis Fan connectors 4 pin 5 x front 2 x rear 1 x Serial Por...

Page 8: ...ith fast response time SafeSlot Designed Protect your graphics card Investment BIOS Features 256 Mb Flash ROM UEFI BIOS PnP WfM2 0 SMBIOS 2 6 1 ACPI 3 0 EZ Flash Utility CrashFree Technology Manageabi...

Page 9: ...b s cables 1 x VGA bracket cable 1 X USB 2 0 bracket cable Accessories 1 x M 2 screws kit 1 x 4 Way SLI bridge 1 x 3 Way SLI bridge 1 x SLI bridge 1 x COM port brackets 1 X I O Shield Application DVD...

Page 10: ...in the table above are not included in the motherboard package PC chassis Power supply unit Intel LGA3647 compatible CPU Fan Intel LGA3647 CPU DIMM SATA hard disk drive Graphics card Phillips cross s...

Page 11: ...ges to avoid touching the ICs on them Whenever you uninstall any component place it on a grounded antistatic pad or in the bag that came with the component Before you install or remove any component e...

Page 12: ...Chapter 1 Product Introduction Chapter 1 Refer to 1 1 9 Internal connectors and 2 3 1 Rear I O connection for more information about rear panel connectors and internal connectors 1 1 2 Motherboard lay...

Page 13: ...1 20 14 System panel connector 20 1 pin PANEL1 1 26 15 Serial General Purpose Input Output connector 6 1 pin SGPIO1 1 31 16 TPM connector 14 1 pin TPM1 1 20 17 Clear RTC RAM 3 pin CLRTC1 1 10 18 ME fo...

Page 14: ...ing or if you see any damage to the PnP cap socket contacts motherboard components will shoulder the cost of repair only if the damage is shipment transit related Keep the cap after installing the mot...

Page 15: ...re efficient memory cooling system to support a full memory load 12 DIMMs or overclocking condition Always install the DIMMS with the same CAS Latency For an optimum compatibility we recommend that yo...

Page 16: ...P P P P 12 DIMMs P P P P P P P P P P P P Dual CPU configuration You can refer to the following recommended memory population for a dual CPU Single CPU configuration must be installed on CPU1 A1 B1 C1...

Page 17: ...r removing expansion cards Failure to do so may cause you physical injury and damage motherboard components Slot No Slot Description 1 PCIe x16_1 slot 2 PCIe x16_2 slot 3 PCIe x16_3 slot 4 PCIe x16_4...

Page 18: ...mend that you provide power when running CrossFireX or SLI mode PCI Express 3 0 operating mode Slot No Single VGA 2 way SLI CrossFireX 3 way SLI CrossFireX 4 way SLI CrossFireX 1 x16 x16 2 3 x16 singl...

Page 19: ...ettings to enhance system performance 1 Power on button The motherboard comes with a power on button that allows you to power up or wake up the system The button also lights up when the system is plug...

Page 20: ...OFF the computer and unplug the power cord 2 Move the jumper cap from pins 1 2 default to pins 2 3 Keep the cap on pins 2 3 for about 5 10 seconds then move the cap back to pins 1 2 3 Plug the power...

Page 21: ...jumpers allow you to enable or disable DDR4 DIMM thermal sensing event pin 3 SATADOM power setting 3 pin DOM1_PWR1 This jumper allows SATA5 and SATA6 to support SATADOM which do not need external powe...

Page 22: ...r 3 pin SMART_PSU1 This jumper allows you to select PSU PMBus version Set to pins 1 2 for PMBus set to pins 2 3 for others 5 ME firmware force recovery setting 3 pin ME_RCVR1 This jumper allows you to...

Page 23: ...etting 3 pin PCH_MFG1 This jumper allows you to update the BIOS ME block 7 VGA controller setting 3 pin VGA_SW1 This jumper allows you to enable or disable the onboard VGA controller Set to pins 1 2 t...

Page 24: ...1 14 Chapter 1 Product Introduction Chapter 1 8 IPMI SW setting 3 pin IPMI_SW1 This jumper allows you to select which protocol in the GPU sensor to function...

Page 25: ...you should shut down the system and unplug the power cable before removing or plugging in any motherboard component The illustration below shows the location of the onboard LED 2 Location LED LOCLED1...

Page 26: ...ce connected to the onboard SATA or SATA SAS add on card causes the rear panel LED to light up 4 Baseboard Management Controller LED BMCLED1 for BMC only The BMC LED works with the ASMB management dev...

Page 27: ...ays the system status Refer to the Q Code table on the next page for details The Q Code LEDs provide the most probable cause of an error code as a starting point for troubleshooting The actual cause m...

Page 28: ...h the Intel Rapid Storage Technology enterprise Intel RSTe through the onboard Intel C621 chipset These connectors are set to AHCI Mode by default If you intend to create a Serial ATA RAID set using t...

Page 29: ...to this connector 4 Hard disk activity LED connector 4 pin HDLED1 This LED connector is for the storage add on card cable connected to the SATA or SAS add on card The read or write activities of any...

Page 30: ...ities and ensures platform integrity The TPM module is purchased separately 5 Chassis intrusion connector 2 pin INTRUSION1 These leads are for the intrusion detection feature for chassis with intrusio...

Page 31: ...connector 16 1 pin VGA_HDR1 This connector supports the VGA High Dynamic Range interface 8 U 2 connectors U 2_1 U 2_2 U 2_3 U 2_4 This motherboard comes with U 2 connectors which support PCIe 3 0 x4...

Page 32: ...his socket supports M Key and type 22110 2280 2260 2242 storage devices This socket supports PCIe and SATA modes The M 2 NGFF device is purchased separately 10 VROC_KEY connector 4 pin VROC_KEY1 This...

Page 33: ...ard 11 USB 2 0 connector 10 1 pin USB78 These connectors are for USB 2 0 ports Connect the USB module cable to any of these connectors then install the module to a slot opening at the back of the syst...

Page 34: ...r rear panel ports With an installed USB 3 0 module you can enjoy all the of USB 3 0 including faster data transfer speeds of up to 5 Gb s faster charging time for USB chargeable devices optimized pow...

Page 35: ...e of each cable matches the ground pin of the connector The CPU_FAN connector supports the CPU fan of maximum 1A 12 W fan power DO NOT forget to connect the fan cables to the fan connectors air inside...

Page 36: ...aker The speaker allows you to hear system beeps and warnings 4 Hard disk drive activity LED 2 pin HDLED This 2 pin connector is for the HDD Activity LED Connect the HDD Activity LED cable to this con...

Page 37: ...ity LED 2 pin LAN1_LED LAN2_LED These connectors are for the Gigabit LAN activity LEDs on the front panel 3 Locator LED 2 pin LOCATORLED1 2 pin LOCATORLED2 These connectors are for the locator LED1 an...

Page 38: ...with a higher power output when a system with more power consuming devices The system may become unstable or may not boot up if the power is inadequate If you want to use two or more high end PCI Expr...

Page 39: ...5 pin PSUSMB This connector allows you to connect SMBus System Management Bus to the PSU power supply unit to read PSU information Devices communicate with an SMBus host and or other SMBus devices us...

Page 40: ...ector is used for the Intel VMD function and sensor readings 20 System Management Bus SMBUS connector 5 1 pin SMBUS1 This connector controls the system and power management related tasks This connecto...

Page 41: ...nterprise SGPIO interface that controls the LED pattern generation device information and general purpose data 22 BMC connector 14 1 pin ASMB9 for BMC only The BMC connector on the motherboard support...

Page 42: ...lot MSD1 for BMC only Your motherboard supports SD Memory Card v2 00 SDHC v3 00 SDXC Some memory cards may not be compatible with your motherboard Ensure that you use only compatible memory cards to p...

Page 43: ...d the socket contacts are not bent Contact your retailer immediately if the PnP cap is missing or if you see any damage to the PnP cap socket contacts motherboard components will shoulder the cost of...

Page 44: ...e CPU and heatsink assembly in only one correct orientation DO NOT force the CPU and heatsink assembly into the socket to prevent damaging the CPU pins on the socket The heatsink screws are T30 models...

Page 45: ...pter 2 1 Install the Q Shield to the chassis rear I O panel 2 Place the motherboard into the chassis ensuring that its rear I O ports are aligned to the chassis rear I O panel 2 1 2 Motherboard instal...

Page 46: ...Chapter 2 Basic Installation Chapter 2 3 Place nine 9 screws into the holes indicated by circles to secure the motherboard to the chassis DO NOT overtighten the screws Doing so can damage the motherbo...

Page 47: ...2 5 Chapter 2 To remove a DIMM 2 1 3 DIMM installation...

Page 48: ...lation Chapter 2 2 1 4 ATX power connection DO NOT connect the 6 pin power plug only the motherboard may overheat under heavy usage Ensure to connect the 8 pin power plug or connect both the 8 pin and...

Page 49: ...2 7 Chapter 2 2 1 5 SATA device connection OR...

Page 50: ...2 8 Chapter 2 Basic Installation Chapter 2 2 1 6 Front I O connector USB 2 0 AAFP To install USB 2 0 connector To install front panel audio connector USB 3 0 To install USB 3 0 connector...

Page 51: ...2 9 Chapter 2 2 1 7 Expansion card installation To install PCIe x16 cards...

Page 52: ...ton for three seconds until the Flashback LED blinks three times indicating that the BIOS Flashback function is enabled Do not unplug portable disk power system or press the CLR_CMOS button while BIOS...

Page 53: ...and your USB 3 1 devices to USB 3 1 ports for faster and better performance for your devices and Refer to the tables on the next page for LAN port LEDs and audio port definitions Rear panel connector...

Page 54: ...Blinking Data activity Green 1 Gbps connection Orange Blinking then steady Ready to wake up from S5 mode Audio 2 4 6 or 8 channel configuration Port Headset 2 channel 4 channel 6 channel 8 channel Li...

Page 55: ...2 13 Chapter 2 2 3 2 Audio I O connections Audio I O ports Connect to Headphone and Mic Connect to Stereo Speakers Connect to 2 Speakers...

Page 56: ...2 14 Chapter 2 Basic Installation Chapter 2 Connect to 4 Speakers Connect to 6 Speakers Connect to 8 Speakers...

Page 57: ...T While the tests are running the BIOS beeps refer to the BIOS beep codes table or additional messages appear on the screen If you do not see anything within 30 seconds from the time you turned on the...

Reviews: