background image

Cadillac CTS/CTS-V Owner Manual (GMNA-Localizing-MidEast-9369309) -

2016 - crc - 7/30/15

In Brief

11

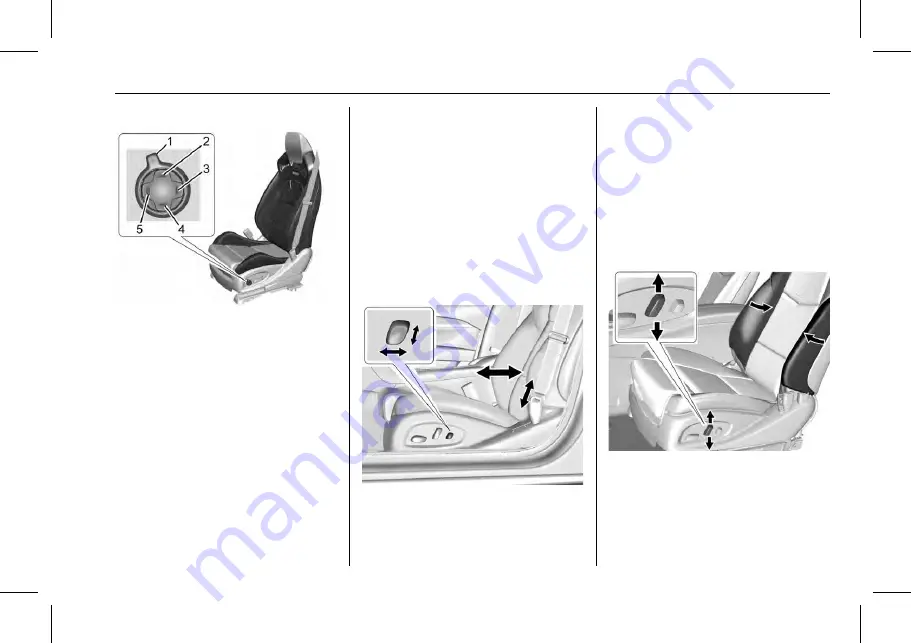
V-Series Seat Adjustment

High Performance Seat

1. Feature Select
2. Up
3. Rearward
4. Down
5. Forward

.

Move Feature Select (1) to
display seat adjustments on the
center stack. Press and release
or hold to scroll through
features.

.

Press Up (2) to make upward
adjustments of the selected
feature.

.

Press Rearward (3) to make
rearward adjustments of the
selected feature.

.

Press Down (4) to make
downward adjustments of the
selected feature.

.

Press Forward (5) to make
forward adjustments of the
selected feature.

See

Power Seat Adjustment

0

54

.

Lumbar Adjustment

Base Seat

To adjust the lumbar and bolster
support, if equipped:

.

Press and hold the adjustment
control forward or rearward to
increase or decrease lumbar
support.

.

Press and hold the adjustment
control up or down to increase or
decrease seatback bolster
support, if equipped.

Bolster Adjustment

If equipped, to increase or decrease
the seatback bolster support, press
and hold the recliner control up
and down.

See

Lumbar Adjustment

0

56

.

Summary of Contents for 2016 CTS

Page 1: ...22990214_US CTS CTS V MID EAST English C M Y CM MY CY CMY K 2k16_CS6_Cadillac_CTS_22990214_US ai 1 7 29 2015 8 08 20 AM...

Page 2: ...duction 2 In Brief 5 Keys Doors and Windows 28 Seats and Restraints 51 Storage 100 Instruments and Controls 103 Lighting 155 Infotainment System 163 Climate Controls 169 Driving and Operating 178 Vehi...

Page 3: ...el variants country specifications features applications that may not be available in your region or changes subsequent to the printing of this owner manual Refer to the purchase documentation relatin...

Page 4: ...instructions or information 0 Shown when there is more information on another page see page Vehicle Symbol Chart Here are some additional symbols that may be found on the vehicle and what they mean 9...

Page 5: ...Cadillac CTS CTS V Owner Manual GMNA Localizing MidEast 9369309 2016 crc 7 30 15 4 Introduction 2 NOTES...

Page 6: ...Wiper Washer 18 Climate Controls 18 Transmission 19 Starting the Engine 20 Vehicle Features Infotainment System 20 Steering Wheel Controls 20 Cruise Control 20 Driver Information Center DIC 21 Forwar...

Page 7: ...Cadillac CTS CTS V Owner Manual GMNA Localizing MidEast 9369309 2016 crc 7 30 15 6 In Brief Instrument Panel...

Page 8: ...t Seats 0 60 If Equipped 11 Dual Automatic Climate Control System 0 169 12 Instrument Panel Storage 0 100 Wireless Charging Pad If Equipped Out of View See Wireless Charging 0 109 13 Traction Control...

Page 9: ...saving stop start system to shut off the engine and help conserve fuel When the brakes are applied and the vehicle is at a complete stop the engine may turn off When the brake pedal is released or th...

Page 10: ...arking lamps will turn on Remote start can be extended Canceling a Remote Start To cancel a remote start do one of the following Press and hold until the parking lamps turn off Turn on the hazard warn...

Page 11: ...k above the license plate when the RKE transmitter is in range See Remote Keyless Entry RKE System Operation 0 29 and Trunk 0 39 Windows The driver power window switches control all the windows The pa...

Page 12: ...selected feature Press Down 4 to make downward adjustments of the selected feature Press Forward 5 to make forward adjustments of the selected feature See Power Seat Adjustment 0 54 Lumbar Adjustment...

Page 13: ...forward or rearward Press Up 2 or Down 4 to adjust lumbar support up or down Cushion Bolster To adjust cushion bolster support if equipped Press and release or hold Feature Select 1 to scroll to bolst...

Page 14: ...rearward to recline Tilt the top of the control forward to raise See Reclining Seatbacks 0 57 Memory Features The SET 1 2 and B Exit buttons on the driver door are used to manually store and recall m...

Page 15: ...s of the button the seat will change to the next lower setting and then to the off setting The indicator lights next to the buttons indicate three for the highest setting and one for the lowest If the...

Page 16: ...irbag and knee airbag under certain conditions No other airbag is affected by the passenger sensing system See Passenger Sensing System 0 77 The passenger airbag status indicator lights on the overhea...

Page 17: ...5 Steering Wheel Adjustment To adjust the steering wheel 1 Pull the lever down 2 Move the steering wheel up or down 3 Pull or push the steering wheel closer or away from you 4 Pull the lever up to loc...

Page 18: ...ed ON Turns the lamp on Reading Lamps There are front and rear reading lamps on the overhead console and over the rear passenger doors These lamps come on when any door is opened To manually turn the...

Page 19: ...For intermittent wipes move the windshield wiper lever to INT Turn the x INT band up for more frequent wipes or down for less frequent wipes If equipped with Rainsense and the feature is enabled in ve...

Page 20: ...Temperature Controls 3 Fan Control 4 SYNC Synchronized Temperature 5 A C Mode Air Conditioning 6 Climate Control Selection Application Tray Button 7 Rear Rear Climate Control Touch Screen 8 Air Delive...

Page 21: ...al for information on the radio audio players phone navigation system and voice or speech recognition if equipped It also includes information on settings Steering Wheel Controls The infotainment syst...

Page 22: ...ve between the interactive display zones in the cluster Press S to go back to the previous menu SEL Press to open a menu or select a menu item Press and hold to reset values on certain screens See Dri...

Page 23: ...h moving vehicles in the side blind zone or spot areas or with vehicles rapidly approaching these areas from behind The LCA warning display will light up in the corresponding outside side mirror and w...

Page 24: ...r seat pulses may occur if very close to an object The vehicle may also have the Front Parking Assist system See Assistance Systems for Parking or Backing 0 225 Automatic Parking Assist APA If equippe...

Page 25: ...ee Ignition Positions 0 193 and Retained Accessory Power RAP 0 197 The driver side switch 1 operates the sunroof Vent Press and release the rear of the switch 1 to vent the sunroof The sunshade will a...

Page 26: ...See Ride Control System Messages 0 142 Press the TCS StabiliTrak button Y again to turn on both systems See Traction Control Electronic Stability Control 0 206 The vehicle has Driver Mode Control and...

Page 27: ...any time other than after the oil is changed It cannot be reset accurately until the next oil change The oil life system can also be reset as follows 1 Turn the ignition on with the engine off 2 Full...

Page 28: ...69309 2016 crc 7 30 15 In Brief 27 Keep vehicle tires properly inflated Combine several trips into a single trip Replace the vehicle s tires with the same TPC Spec number molded into the tire s sidewa...

Page 29: ...x Mirrors 43 Power Mirrors 44 Heated Mirrors 44 Reverse Tilt Mirrors 44 Interior Mirrors Interior Rearview Mirrors 45 Automatic Dimming Rearview Mirror 45 Windows Windows 45 Power Windows 46 Sun Visor...

Page 30: ...t If there is a decrease in the RKE operating range Check the distance The transmitter may be too far from the vehicle Check the location Other vehicles or objects may be blocking the signal Check the...

Page 31: ...0 147 When remotely unlocking the vehicle at night the headlamps and back up lamps will come on for about 30 seconds to light your approach to the vehicle The turn signal indicators may flash to indi...

Page 32: ...ck unlock button is pressed again within five seconds all passenger doors will unlock Driver Door Shown Passenger Similar Pressing the lock unlock button will cause all doors to lock if any of the fol...

Page 33: ...th a weak transmitter battery see Door Locks 0 35 Programming Transmitters to the Vehicle Only RKE transmitters programmed to the vehicle will work If a transmitter is lost or stolen a replacement can...

Page 34: ...ssage displays in the DIC 1 Press the button on the side of the transmitter near the bottom and pull the key out 2 Separate the two halves of the transmitter using a flat tool inserted into the bottom...

Page 35: ...Remote Start 1 Press and release Q on the RKE transmitter 2 Immediately press and hold for at least four seconds or until the turn signal lamps flash This confirms the request to remote start the veh...

Page 36: ...s increased if the doors are not locked So all passengers should wear safety belts properly and the doors should be locked whenever the vehicle is driven Young children who get into unlocked vehicles...

Page 37: ...r door the first press unlocks that door press again within five seconds to unlock all passenger doors See Remote Keyless Entry RKE System Operation 0 29 Key Cylinder Access To access the key cylinder...

Page 38: ...can only be turned on when the Unlocked Door Anti Lockout feature has been turned off When Q is pressed on the power door lock switch with the door open a chime will sound three times indicating that...

Page 39: ...inside If an RKE transmitter is detected and the number of RKE transmitters inside has not reduced the driver door will unlock and the horn will chirp three times Lockout Protection can be manually o...

Page 40: ...n the body and the trunk hatch or liftgate Engine exhaust contains carbon monoxide CO which cannot be seen or smelled It can cause unconsciousness and even death If the vehicle must be driven with the...

Page 41: ...ulling on the handle Do not use the handle as a tie down Rear Seat Pass Through Use the rear seat pass through door when transporting long items To open pull down the rear seat armrest Pull the lever...

Page 42: ...rm system is disarmed On Solid Vehicle is secured during the delay to arm the system Fast Flash Vehicle is unsecured A door the hood or the trunk is open Slow Flash Alarm system is armed Arming the Al...

Page 43: ...e To avoid setting off the alarm by accident Lock the vehicle after all occupants have left the vehicle and all doors are closed Always unlock a door with the RKE transmitter or use the Keyless Access...

Page 44: ...the ignition modes will not change with the other transmitter your vehicle needs service If the ignition does change modes the first transmitter may be faulty See the dealer It is possible for the imm...

Page 45: ...hile folding They are accidentally manually folded or unfolded They do not stay in the unfolded position They vibrate at normal driving speeds To reset the power folding mirrors fold and unfold the mi...

Page 46: ...r Rearview Mirrors Adjust the rearview mirror for a clear view of the area behind the vehicle Do not spray glass cleaner directly on the mirror Use a soft towel dampened with water Automatic Dimming R...

Page 47: ...ch down to lower the window Pull the switch up to raise it Retained Accessory Power RAP allows the use of the power windows after the ignition has been turned off See Retained Accessory Power RAP 0 19...

Page 48: ...ramming the Power Windows If the vehicle battery has been recharged or disconnected or is not working the front power windows will need to be reprogrammed for the express up feature to work Before rep...

Page 49: ...down to block glare Detach the sun visor from the center mount to pivot to the side window or if equipped extend along the rod Rear Window Sunshade If equipped with a rear window sunshade the switch i...

Page 50: ...e sunroof vent Express Open Express Close With the sunroof in the vent position push the rear of the switch 1 a second time to express open the sunroof Press the front of the switch to express close t...

Page 51: ...k This could cause an issue with sunroof operation or noise It could also plug the water drainage system Periodically open the sunroof and remove any obstacles or loose debris Wipe the sunroof seal an...

Page 52: ...are 70 Replacing Safety Belt System Parts after a Crash 70 Airbag System Airbag System 71 Where Are the Airbags 73 When Should an Airbag Inflate 74 What Makes an Airbag Inflate 75 How Does an Airbag R...

Page 53: ...a crash Do not drive until the head restraints for all occupants are installed and adjusted properly If equipped with base seats adjust the head restraint so that the top of the restraint is at the sa...

Page 54: ...d with high performance seats the front seat outboard head restraints are not removable Rear Seats The vehicle s rear seats have adjustable head restraints in the outboard seating positions The height...

Page 55: ...adjust the lumbar support see Lumbar Adjustment 0 56 Some vehicles are equipped with a Safety Alert Seat This feature activates a vibrating pulse alert in the driver seat to help the driver avoid cra...

Page 56: ...o adjust lumbar support for high performance seats if equipped High Performance Seat Press and release or hold Feature Select 1 to scroll to lumbar support on the center stack Press Forward 5 or Rearw...

Page 57: ...port on the center stack Press Forward 5 or Rearward 3 to adjust back support forward or rearward Lumbar Adjustment Base Seat If equipped to increase or decrease the lumbar support press and hold the...

Page 58: ...sh on the support to lengthen or shorten Release the lever to lock in place Reclining Seatbacks Base Seat To adjust the seatback Tilt the top of the control rearward to recline Tilt the top of the con...

Page 59: ...ight Then sit well back in the seat and wear the safety belt properly Do not have a seatback reclined if the vehicle is moving Memory Seats The SET 1 2 and B Exit buttons on the driver door are used t...

Page 60: ...ehicles the Driver ID may be displayed for the first few ignition cycles Easy Exit Recall If programmed on in the vehicle personalization menu the Easy Exit feature recalls the previously stored B Exi...

Page 61: ...at pulls or pushes air through the seat The air is not cooled When this feature is off the heated and ventilated seat symbols on the buttons are white When a heated seat is turned on the symbol turns...

Page 62: ...rn on The heated or ventilated seats are canceled when the ignition is turned on Press the heated or ventilated seat button to use the heated or ventilated seats after the vehicle is started The heate...

Page 63: ...is not moving To fold the seatback 1 Disconnect the rear safety belt mini latch using a key in the slot on the mini buckle and let the belt retract 2 Unlock the seatback using the vehicle key in the c...

Page 64: ...the cylinder 4 Reconnect the center safety belt mini latch to the mini buckle Do not let the belt twist 5 Pull on the center safety belt to make sure the mini latch is secure 6 Repeat the steps to ra...

Page 65: ...door Safety Belts This section of the manual describes how to use safety belts properly It also describes some things not to do with safety belts Warning Do not let anyone ride where a safety belt can...

Page 66: ...elts That is why wearing safety belts makes such good sense Questions and Answers About Safety Belts Q Will I be trapped in the vehicle after a crash if I am wearing a safety belt A You could be wheth...

Page 67: ...or even fatal injuries Wear the shoulder belt over the shoulder and across the chest These parts of the body are best able to take belt restraining forces The shoulder belt locks if there is a sudden...

Page 68: ...s you more slowly If the webbing locks in the latch plate before it reaches the buckle tilt the latch plate flat to unlock 3 Push the latch plate into the buckle until it clicks Pull up on the latch p...

Page 69: ...e Shoulder Belt Height Adjuster The vehicle has a shoulder belt height adjuster for the driver and right front passenger seating positions Adjust the height so the shoulder portion of the belt is on t...

Page 70: ...ants Although the safety belt pretensioners cannot be seen they are part of the safety belt assembly They can help tighten the safety belts during the early stages of a moderate to severe frontal near...

Page 71: ...oing its job See your dealer to have it repaired Torn or frayed safety belts may not protect you in a crash They can rip apart under impact forces If a belt is torn or frayed get a new one right away...

Page 72: ...d side impact airbag for the front outboard passenger Seat mounted side impact airbags for the second row outboard passengers A roof rail airbag for the driver and the passenger seated directly behind...

Page 73: ...it unnecessarily close to any airbag as you would be if sitting on the edge of the seat or leaning forward Safety belts help keep you in position before and during a crash Always wear a safety belt ev...

Page 74: ...r side instrument panel The driver knee airbag is below the steering column The front outboard passenger knee airbag is below the glove box Driver Side Shown Passenger Side Similar The seat mounted si...

Page 75: ...il airbag will be blocked When Should an Airbag Inflate This vehicle is equipped with airbags See Airbag System 0 71 Airbags are designed to inflate if the impact exceeds the specific airbag system s...

Page 76: ...f the vehicle that is struck Roof rail airbags are designed to inflate in moderate to severe side crashes depending on the location of the impact In addition these roof rail airbags are designed to in...

Page 77: ...ontact with you may be warm but not too hot to touch There may be some smoke and dust coming from the vents in the deflated airbags Airbag inflation does not prevent the driver from seeing out of the...

Page 78: ...crash sensing and diagnostic module which records information after a crash See Vehicle Data Recording and Privacy 0 342 and Event Data Recorders 0 342 Let only qualified technicians work on the airba...

Page 79: ...oard passenger airbag s no system is fail safe No one can guarantee that an airbag will not inflate under some unusual circumstance even though the airbag s are off Secure rear facing child restraints...

Page 80: ...ation If the On Indicator Is Lit for a Child Restraint The passenger sensing system is designed to turn off the front outboard passenger airbags if the system determines that an infant is present in a...

Page 81: ...the vehicle and have the person remain in this position for two to three minutes after the on indicator is lit Warning If the front outboard passenger airbag is turned off for an adult sized occupant...

Page 82: ...seat immediately If the airbag readiness light is lit do not install a child restraint or allow anyone to occupy the seat See Airbag Readiness Light 0 119 for important safety information The on indi...

Page 83: ...e Any object such as an aftermarket seat heater or a comfort enhancing pad or device installed under or on top of the seat fabric could also interfere with the operation of the passenger sensing syste...

Page 84: ...d Restraints Older Children Older children who have outgrown booster seats should wear the vehicle safety belts The manufacturer instructions that come with the booster seat state the weight and heigh...

Page 85: ...crash children who are not buckled up can strike other people who are buckled up or can be thrown out of the vehicle Older children need to use safety belts properly Warning Never allow more than one...

Page 86: ...if it is wrapped around a child s neck If the shoulder belt is locked and tightened around a child s neck the only way to loosen the belt is to cut it Never leave children unattended in a vehicle and...

Page 87: ...compatible with the motor vehicle in which it will be used For most basic types of child restraints there are many different models available When purchasing a child restraint be sure it is designed...

Page 88: ...the back of the infant The harness system holds the infant in place and in a crash acts to keep the infant positioned in the restraint Forward Facing Child Seat A forward facing child seat provides r...

Page 89: ...can move around in a collision or sudden stop and injure people in the vehicle Be sure to properly secure any child restraint in the vehicle even when no child is in it Securing the Child within the C...

Page 90: ...ditional passengers or child restraints Adjacent seating positions should not be used if the child restraint prevents access to or interferes with the routing of the safety belt Wherever a child restr...

Page 91: ...combined weight is more than 29 5 kg 65 lbs The following explains how to attach a child restraint with these attachments in the vehicle Not all vehicle seating positions or child restraints have lowe...

Page 92: ...attached Others require the top tether always to be attached Be sure to read and follow the instructions for your child restraint Lower Anchor and Top Tether Anchor Locations Rear Seat I Top Tether An...

Page 93: ...he LATCH System Warning If a LATCH type child restraint is not attached to anchors or with the safety belt the child restraint will not be able to protect the child correctly In a crash the child coul...

Page 94: ...ear seat see Where to Put the Restraint 0 88 This system is designed to make the installation of child restraints easier When using lower anchors do not use the vehicle s safety belts Instead use the...

Page 95: ...ether route the tether over the seatback If the position you are using has an adjustable headrest or head restraint and you are using a single tether raise the headrest or head restraint and route the...

Page 96: ...ible with this vehicle If the child restraint has the LATCH system see Lower Anchors and Tethers for Children LATCH System 0 89 for how and where to install the child restraint using LATCH If a child...

Page 97: ...ism use it to secure the vehicle safety belt 5 If the child restraint has a top tether follow the child restraint manufacturer s instructions regarding the use of the top tether See Lower Anchors and...

Page 98: ...d facing child restraint in the front outboard passenger seat always move the seat as far back as it will go It is better to secure the child restraint in a rear seat See Passenger Sensing System 0 77...

Page 99: ...t could be quickly unbuckled if necessary 5 To tighten the belt push down on the child restraint pull the shoulder portion of the belt to tighten the lap portion of the belt and feed the shoulder belt...

Page 100: ...airbags are off the off indicator in the passenger airbag status indicator will come on and stay on when the vehicle is started If a child restraint has been installed and the on indicator is lit see...

Page 101: ...ning Do not store heavy or sharp objects in storage compartments In a crash these objects may cause the cover to open and could result in injury Instrument Panel Storage Touch the bottom of the climat...

Page 102: ...ry Power RAP 0 197 Power Retractable Cover Anti Pinch Feature If any object is in the path of the power cover when it is active the cover will stop at the obstruction and auto reverse to a preset posi...

Page 103: ...equipped there is a power outlet inside Additional Storage Features Cargo Tie Downs The cargo tie downs can be used to secure small loads inside the trunk Convenience Net If equipped the convenience...

Page 104: ...KA Light 124 Vehicle Ahead Indicator 124 Traction Off Light 125 StabiliTrak OFF Light 125 Traction Control System TCS StabiliTrak Light 125 Engine Coolant Temperature Warning Light 126 Tire Pressure L...

Page 105: ...Move the steering wheel up or down 3 Pull or push the steering wheel closer or away from you 4 Pull the lever up to lock the steering wheel in place Power Tilt and Telescoping Wheel If equipped the c...

Page 106: ...ect the wiper speed HI Use for fast wipes LO Use for slow wipes INT Intermittent Wipes Rainsense Wipe Sensitivity Control If Rainsense is turned off move the lever up to INT for intermittent wipes the...

Page 107: ...sitivity Control When enabled move the windshield wiper lever to INT Turn the x INT band on the wiper lever to adjust the sensitivity Turn the band up for more sensitivity to moisture Turn the band do...

Page 108: ...the Time To set the time 1 Press the SETTINGS screen button and press Time and Date 2 Press Set Time and press or to increase or decrease hours minutes and AM or PM Press 12Hr or 24Hr for 12 or 24 hou...

Page 109: ...circuit breaker is operating properly If this does not resolve your problem see your dealer It is possible to replace the factory power outlet with a cigar lighter receptacle if desired This requires...

Page 110: ...ot detected The power outlet is not designed for the following and may not work properly if this equipment is plugged in Equipment with high initial peak wattage such as compressor driven refrigerator...

Page 111: ...between the phone and charger remove the phone and allow the metallic object to cool before removing it from the charging pad to prevent burns To charge a mobile device 1 Open the climate control sys...

Page 112: ...enough to cause an expensive repair or replacement Paying attention to the warning lights and gauges could prevent injury Some warning lights come on briefly when the engine is started to indicate the...

Page 113: ...Cadillac CTS CTS V Owner Manual GMNA Localizing MidEast 9369309 2016 crc 7 30 15 112 Instruments and Controls Instrument Cluster Base Level with Auto Stop...

Page 114: ...Cadillac CTS CTS V Owner Manual GMNA Localizing MidEast 9369309 2016 crc 7 30 15 Instruments and Controls 113 Uplevel Balanced Configuration Shown...

Page 115: ...Performance configuration has two interactive display zones Use the five way control on the right side of the steering wheel to move between the different display zones and scroll through the differen...

Page 116: ...eractive display zones on the cluster 2 Press SEL on the center of the five way control to enter the Options menu Units Press SEL while Units is highlighted to enter the Unit menu Choose English Imper...

Page 117: ...ter is accessed and reset through the Driver Information Center DIC See Driver Information Center DIC 0 129 Tachometer The tachometer displays the engine speed in revolutions per minute rpm On the Bas...

Page 118: ...ould be refueled soon Here are four things that some owners ask about None of these show a problem with the fuel gauge At the service station the fuel pump shuts off before the gauge reads full It tak...

Page 119: ...for the reading to fluctuate If the gauge pointer reaches the warning area or the shaded thermostat symbol at the far end of the gauge and remains there for more than 30 seconds the engine coolant ha...

Page 120: ...Readiness Light This light shows if there is an electrical problem with the airbag system The system check includes the airbag sensor s passenger sensing system the pretensioners the airbag modules th...

Page 121: ...g system See your dealer for service Warning If the airbag readiness light ever comes on and stays on it means that something may be wrong with the airbag system To help avoid injury to yourself or ot...

Page 122: ...ion exhaust intake or fuel system or the use of replacement tires that do not meet the original tire specifications can cause this light to come on This could lead to costly repairs not covered by the...

Page 123: ...l Connecting devices that are not used to perform an Emissions Inspection Maintenance test or to service the vehicle may affect vehicle operation See Add On Electrical Equipment 0 248 See your dealer...

Page 124: ...king brake is released or while driving there is a problem with the electric parking brake system or another system A message may also display in the Driver Information Center DIC See Brake System Mes...

Page 125: ...functioning and there is a problem with the regular brakes See your dealer for service See Brake System Warning Light 0 122 and Brake System Messages 0 136 Lane Keep Assist LKA Light For some vehicle...

Page 126: ...ting the engine If it does not have the vehicle serviced by your dealer This light comes on when the StabiliTrak system is turned off If StabiliTrak is off the Traction Control System TCS is also off...

Page 127: ...comes on when the engine has overheated If this happens pull over and turn off the engine as soon as possible See Engine Overheating 0 269 Tire Pressure Light For vehicles with the Tire Pressure Monit...

Page 128: ...operly The vehicle could be low on oil and might have some other system problem See your dealer Low Fuel Warning Light This light is near the fuel gauge and comes on briefly when the ignition is turne...

Page 129: ...If it does not come on have the vehicle serviced by your dealer For vehicles with a reconfigurable cluster this light is in the display area and may not come on when the ignition is turned on This lig...

Page 130: ...ight For vehicles equipped with this light it comes on when a door is open or not securely latched Before driving check that all doors are properly closed See Door Ajar Messages 0 137 for more informa...

Page 131: ...aveled in either kilometers km or miles mi since the trip odometer was last reset The trip odometer can be reset by pressing and holding SEL while this display is active The average fuel economy shows...

Page 132: ...the next maneuver when using route guidance Estimated Time to Arrival Shows the estimated time until arrival at your destination Distance to Destination Shows the distance to the destination when usi...

Page 133: ...Life System 0 261 Tire Pressure Shows the approximate pressures of all four tires Tire pressure is displayed in either kilopascal kPa or in pounds per square inch psi If the pressure is low the value...

Page 134: ...ayed in the HUD may be cleared by using the steering wheel controls See Vehicle Messages 0 135 The HUD control is to the left of the steering wheel To adjust the HUD image 1 Adjust the driver seat 2 S...

Page 135: ...calls will be displayed when active on vehicles equipped with these features All HUD views may briefly display audio information when the driver uses the steering wheel controls to adjust the audio se...

Page 136: ...o not require immediate action can be acknowledged and cleared by pressing SEL The messages that require immediate action cannot be cleared until that action is performed All messages should be taken...

Page 137: ...our dealer for service SERVICE PARKING BRAKE This message displays when there is a problem with the Electric Parking Brake See your dealer for service STEP ON BRAKE TO RELEASE PARK BRAKE This message...

Page 138: ...EN message may also be displayed if the vehicle starts to move Close the door completely HOOD OPEN This message will display along with a hood open symbol when the hood is open A chime may also sound...

Page 139: ...s when the engine oil level may be too low Check the oil level before filling to the recommended level If the oil is not low and this message remains on take the vehicle to your dealer for service See...

Page 140: ...onger detected Restarting is allowed without the RKE transmitter for five minutes Press the brake pedal to restart the vehicle NUMBER OF KEYS PROGRAMMED This message displays when programming new keys...

Page 141: ...kely to occur See Front Automatic Braking FAB System 0 234 AUTOMATIC COLLISION PREP UNAVAILABLE This message displays when the Front Automatic Braking FAB System has been unavailable for some time The...

Page 142: ...under the following conditions The radar is not clean Keep the radar sensors free of mud dirt snow ice and slush Clean the entire front and or rear of the vehicle For cleaning instructions see Exteri...

Page 143: ...and cannot detect vehicles in the blind zone or the vehicle is passing through an open area such as the desert where there is insufficient data for operation This message may also activate during heav...

Page 144: ...d Active Handling System are available but intended for use on dry race track conditions Adjust your driving accordingly See Performance Traction Management V Series Only under Competitive Driving Mod...

Page 145: ...vehicle s handling capabilities will be reduced during severe maneuvers StabiliTrak will be affected See Traction Control Electronic Stability Control 0 206 SERVICE STABILITRAK This message displays...

Page 146: ...may be a problem with the power steering system If this message displays and a reduction in steering performance or loss of power steering assistance is noticed see your dealer SERVICE STEERING COLUMN...

Page 147: ...oad Limits 0 189 and Tire Pressure 0 292 You can receive more than one tire pressure message at a time The DIC also shows the tire pressure values See Driver Information Center DIC 0 129 Transmission...

Page 148: ...lization Use the audio system controls to access the personalization menus for customizing vehicle features The following are all possible personalization features Depending on the vehicle some may no...

Page 149: ...e Manage Favorites This allows favorites to be edited See Manage Favorites in Settings under Radio in the infotainment manual Number of Favorites Shown Press to set the number of favorites to display...

Page 150: ...tons on the center stack Select Off or On Auto Defog When set to On the front defog will automatically react to temperature and humidity conditions that may cause fogging Select Off or On Auto Rear De...

Page 151: ...Change Alert This allows the feature to be turned on or off See Lane Change Alert LCA 0 236 Select Off or On Comfort and Convenience Select and the following may display Auto Memory Recall Easy Exit O...

Page 152: ...Seconds or 120 Seconds Power Door Locks Select and the following may display Unlocked Door Anti Lockout Auto Door Lock Delayed Door Lock Unlocked Door Anti Lockout When on this feature will keep the d...

Page 153: ...n the RKE transmitter See Remote Keyless Entry RKE System Operation 0 29 Select Off or On Passive Door Unlock This allows the selection of what doors will unlock when using the button on the driver do...

Page 154: ...isplay Android Auto Manage Android Auto Devices Android Auto This feature allows Android devices to be connected to the infotainment system through a USB port Select Off or On Manage Android Auto Devi...

Page 155: ...n Off or On See Assistance Systems for Parking or Backing 0 225 Rear Cross Traffic Alert Select to turn Off or On See Assistance Systems for Parking or Backing 0 225 Rear Park Assist Symbols Select to...

Page 156: ...nt Panel Illumination Control 160 Dome Lamps 160 Reading Lamps 160 Lighting Features Entry Lighting 161 Exit Lighting 161 Battery Load Management 161 Battery Power Protection 162 Exterior Lighting Bat...

Page 157: ...y controls the system Keep this area of the windshield clear of debris to allow for best system performance The high beam headlamps remain on under the automatic control until one of the following sit...

Page 158: ...ol is left on in either the headlamp or parking lamp position and the driver door is opened with the ignition off Headlamp High Low Beam Changer 2 3 Headlamp High Low Beam Changer Push the turn signal...

Page 159: ...hicle is started in a dark garage the automatic headlamp system comes on immediately If it is light outside when the vehicle leaves the garage there is a slight delay before the automatic headlamp sys...

Page 160: ...he AFL See Exterior Lamp Controls 0 155 Hazard Warning Flashers Hazard Warning Flashers Press and hold this button for one second to make the front and rear turn signal lamps flash on and off Release...

Page 161: ...ntrols can be adjusted D Instrument Panel Illumination Move the thumbwheel up or down to brighten or dim the lights The brightness of the displays automatically adjusts based on outdoor lighting The i...

Page 162: ...onalization 0 147 Exit Lighting Some exterior lamps and interior lights come on at night or in areas with limited lighting when the driver door is opened after the ignition is turned off The dome lamp...

Page 163: ...the power demands of some accessories Normally these actions occur in steps or levels without being noticeable In rare cases at the highest levels of corrective action this action may be noticeable to...

Page 164: ...on system and voice or speech recognition if equipped It also includes information on settings Performance Data Recorder PDR If equipped the PDR icon displays on the Home screen The PDR records video...

Page 165: ...l show when recording To define a finish line see Define Finish Line later in this section If there is no available space on the SD card a message displays Delete or transfer recordings on the SD card...

Page 166: ...ehicle is in motion Tap on the screen while the video is playing to display the video controls Video Scrubber Changes the position and playback The length of the bar corresponds to the time of the vid...

Page 167: ...isplays these vehicle metrics Vehicle Speed Same as Sport GPS Tracking Map Shows the vehicle s current position relative to a known route Engine Rotations Per Minute RPMs The vertical line and triangl...

Page 168: ...as Sport 0 100 km h 0 60 mph 0 200 km h 0 100 mph 400 m 1 4 mi and 0 200 0 km h 0 100 0 mph The timer starts recording as soon as the vehicle accelerates As the vehicle passes each speed and distance...

Page 169: ...as the vehicle is in Valet Mode Overwrite existing data when memory full Allows manual overwriting of previous recordings one at a time starting with the oldest when the current recording requires ad...

Page 170: ...nce Passenger Compartment Air Filter 177 Service 177 Climate Control Systems Dual Automatic Climate Control System The climate control buttons and the touch screen are used to adjust the heating cooli...

Page 171: ...de on the front climate control page displayed See the infotainment manual Climate Control Status Screen The climate control status screen appears briefly when the climate control buttons on the facep...

Page 172: ...elivery mode can still be adjusted w x Driver and Passenger Temperature Controls The temperature can be adjusted separately for the driver and the passenger Press to increase or decrease the temperatu...

Page 173: ...ay also prevent the air conditioner from running Press AUTO to return to automatic operation and the air conditioner runs as needed Automatic Air Recirculation When the AUTO indicator light is on the...

Page 174: ...ng else that is sharp This may damage the rear window defogger grid and affect the radio s ability to pick up stations clearly The repairs would not be covered by the vehicle warranty Driver and Passe...

Page 175: ...selected when poor quality air is detected The air quality sensor will not maintain recirculation for an extended period to prevent the air inside the vehicle from becoming too dry or stuffy Under cer...

Page 176: ...within five seconds press the MODE or temperature buttons on the faceplate SYNC Press SYNC on the touch screen to match the rear climate control temperature to the front climate control driver temper...

Page 177: ...shion and seatback See Heated Rear Seats 0 63 Air Vents Adjustable air vents are in the center and on the side of the instrument panel 1 Thumbwheel 2 Slider Knob Use the thumbwheels 1 near the air ven...

Page 178: ...air that is pulled into the vehicle The filter should be replaced as part of routine scheduled maintenance See Maintenance Schedule 0 329 See your dealer regarding replacement of the filter Service Al...

Page 179: ...d 199 Automatic Transmission Automatic Transmission 200 Manual Mode 202 Drive Systems All Wheel Drive 203 Brakes Antilock Brake System ABS 203 Electric Parking Brake 204 Brake Assist 206 Ride Control...

Page 180: ...the road hands on the wheel and mind on the drive Do not use a phone in demanding driving situations Use a hands free method to place or receive necessary phone calls Watch the road Do not read take...

Page 181: ...n that time a vehicle moving at 100 km h 60 mph travels 20 m 66 ft which could be a lot of distance in an emergency Helpful braking tips to keep in mind include Keep enough distance between you and th...

Page 182: ...ler if there is a problem Curve Tips Take curves at a reasonable speed Reduce speed before entering a curve Maintain a reasonable steady speed through the curve Wait until the vehicle is out of the cu...

Page 183: ...rol can be affected when traction is reduced by water snow ice gravel or other material on the road Learn to recognize warning clues such as enough water ice or packed snow on the road to make a mirro...

Page 184: ...dexos2 specification If this oil is not available the following oils can be used as an alternative Valvoline SYNPOWER MST 5W 40 Mobil 1 ESP Formula M 5W 40 See Capacities and Specifications 0 338 Thi...

Page 185: ...kes During the burnishing procedure the brake pads will smoke and produce an odor The braking force and pedal travel may increase After the procedure is complete the brake pads may appear white at the...

Page 186: ...lation pressures while driving on various types of tracks This helps to achieve a well balanced vehicle and enhance tire traction performance Use good judgment to determine the appropriate inflation p...

Page 187: ...ill vary based on driving style track temperature and weather conditions Return the tires to the recommended cold tire inflation pressure when high speed driving has ended See Vehicle Load Limits 0 18...

Page 188: ...system and transmission Shift to a lower gear when going down steep or long hills Warning Using the brakes to slow the vehicle on a long downhill slope can cause brake overheating can reduce brake pe...

Page 189: ...ice Turn off cruise control Blizzard Conditions Stay with the vehicle unless there is help nearby Get help and keep everyone in the vehicle safe Turn on the hazard warning flashers Tie a red cloth to...

Page 190: ...the front wheels Turn off any traction system Shift back and forth between R Reverse and a low forward gear spinning the wheels as little as possible To prevent transmission wear wait until the wheels...

Page 191: ...ressure 0 292 There is also important loading information on the Certification label It may show the Gross Vehicle Weight Rating GVWR and the Gross Axle Weight Rating GAWR for the front and rear axle...

Page 192: ...able cargo and luggage load capacity of your vehicle See Trailer Towing Sedan V6 and V Series 0 247 or Trailer Towing Sedan L4 Engine 0 246 for important information on towing a trailer towing safety...

Page 193: ...A vehicle specific Certification label is attached to the vehicle s center pillar B pillar The label may show the gross weight capacity of the vehicle called the Gross Vehicle Weight Rating GVWR The G...

Page 194: ...or similar activities during this break in period Check engine oil with every refueling and add if necessary Oil and fuel consumption may be higher than normal during the first 2 400 km 1 500 mi To br...

Page 195: ...nformation Center DIC See Transmission Messages 0 146 When the vehicle is shifted into P Park the ignition system will switch to OFF Do not turn the engine off when the vehicle is moving This will cau...

Page 196: ...d pressing and holding the button for more than five seconds will place the vehicle in Service Only Mode The instruments and audio systems will operate as they do in ON RUN but the vehicle will not be...

Page 197: ...e thing This clears the extra gasoline from the engine Do not race the engine immediately after starting it Operate the engine and transmission gently until the oil warms up and lubricates all moving...

Page 198: ...ment display The indicator on the switch will illuminate when the system is operational When h comes on green in the instrument cluster the system is active The system is not active when it comes on w...

Page 199: ...t first pushing the button on the shift lever If you can the shift lever was not fully locked into P Park Torque Lock Torque lock is when the weight of the vehicle puts too much force on the parking p...

Page 200: ...CO can cause unconsciousness and even death Exhaust may enter the vehicle if The vehicle idles in areas with poor ventilation parking garages tunnels deep snow that may block underbody airflow or tai...

Page 201: ...et out of the vehicle if the shift lever is not fully in P Park with the parking brake firmly set The vehicle can roll Do not leave the vehicle when the engine is running unless you have to If you hav...

Page 202: ...is dangerous Unless your foot is firmly on the brake pedal the vehicle could move very rapidly You could lose control and hit people or objects Do not shift into a drive gear while the engine is runni...

Page 203: ...without upshifting while using Tap Shift could damage the vehicle Always upshift when necessary while using Tap Shift Vehicles with Tap Shift have controls on the back of the steering wheel to manuall...

Page 204: ...m a stop in snowy and icy conditions it is suggested to shift into second gear A higher gear allows the vehicle to gain more traction on slippery surfaces Drive Systems All Wheel Drive Vehicles with t...

Page 205: ...al down firmly and let ABS work You may hear the ABS pump or motor operating and feel the brake pedal pulsate This is normal Braking in Emergencies ABS allows you to steer and brake at the same time I...

Page 206: ...pply the EPB in some situations when the vehicle is not moving This is normal and is done to periodically check the correct operation of the EPB system If the EPB fails to apply the rear wheels should...

Page 207: ...system These systems help limit wheel slip and assist the driver in maintaining control especially on slippery road conditions TCS activates if it senses that any of the drive wheels are spinning or...

Page 208: ...comes on and stays on the vehicle may need more time to diagnose the problem If the condition persists see your dealer Turning the Systems Off and On Caution Do not repeatedly brake or accelerate heav...

Page 209: ...e Control selecting the various Driver Modes adjusts the ride of the vehicle to enhance the ride performance for the road conditions and the selected mode While in the Sport and or Track Modes the veh...

Page 210: ...C This feature is not intended for use when the vehicle is stuck in sand mud ice snow or gravel If the vehicle becomes stuck see If the Vehicle Is Stuck 0 189 Track Mode V Series Only Use when maximum...

Page 211: ...ression Adjusts throttle sensitivity by selecting how quick or slow the throttle reacts to input Snow Ice The accelerator pedal will reduce engine torque at small pedal inputs This allows better wheel...

Page 212: ...n for five seconds PTM Performance Traction Management if equipped Available in Track Mode There are five selectable settings Competitive Driving Mode V Series Only To select this optional handling mo...

Page 213: ...engine power for a smooth and consistent corner exit The PTM system contains five modes These modes are selected by pressing the Driver Mode Control PTM buttons on the center console Scroll up or dow...

Page 214: ...is only available when the following criteria are met Competitive Driving Mode is selected or any of the Performance Traction Management modes are selected V Series The TCS light comes on the instrume...

Page 215: ...speed control Improved traction through corners allowing more acceleration More precise steering Increased vehicle agility Integration with StabiliTrak For vehicles with ELSD driven under severe condi...

Page 216: ...Set Coast Press the control down briefly to SET to set the speed and activate cruise control If cruise control is already active use to decrease vehicle speed To decrease speed by 1 km h 1 mph press S...

Page 217: ...hicle speed in small increments briefly press SET down to the first detent For each press the vehicle goes about 1 km h 1 mph slower To decrease the vehicle speed in larger increments briefly press SE...

Page 218: ...le is detected in your path ACC can apply acceleration or limited moderate braking to maintain the selected following gap To disengage ACC apply the brake If ACC is controlling your vehicle speed when...

Page 219: ...to set the speed and activate ACC or to decrease vehicle speed if ACC is already activated To decrease speed by 1 km h 1 mph press SET down to the first detent To decrease speed to the next 5 km h 5 m...

Page 220: ...n the accelerator pedal is pressed ACC will not brake because it is overridden A warning message will appear on the Driver Information Center DIC and the Head Up Display HUD if equipped See Cruise Con...

Page 221: ...m or Near When pressed the current gap setting displays briefly on the instrument cluster and HUD if equipped Subsequent presses cycle the gap button through three settings Far Medium or Near The gap...

Page 222: ...ps will come on The automatic braking may feel or sound different than if the brakes were applied manually This is normal Stationary or Very Slow Moving Objects Warning Adaptive Cruise Control ACC may...

Page 223: ...Electric Parking Brake 0 204 To release the electric parking brake press the accelerator pedal A DIC warning message may display indicating to shift to P Park before exiting the vehicle See Vehicle Me...

Page 224: ...extra attention in curves and be ready to use the brakes if necessary Select an appropriate speed while driving in curves ACC may operate differently in a sharp curve It may reduce the vehicle speed i...

Page 225: ...indshield behind the rearview mirror and the radar sensors on the front of the vehicle can become blocked by snow ice dirt or mud These areas need to be cleaned for ACC to operate properly For cleanin...

Page 226: ...147 If equipped with the Safety Alert Seat the driver seat cushion may provide a vibrating pulse alert instead of beeping To change this see Collision Detection Systems under Vehicle Personalization...

Page 227: ...image of the area surrounding the vehicle along with the front or rear camera views in the center stack The front camera is in the grille or near the front emblem the side cameras are on the bottom of...

Page 228: ...pedestrians bicyclists crossing traffic animals or any other object outside of the cameras field of view below the bumper or under the vehicle Shown distances may be different from actual distances Do...

Page 229: ...ol ACC have the Backing Warning and Rear Automatic Braking RAB system The Backing Warning part of this system can warn of rear objects when backing up at speeds greater than 8 km h 5 mph The Backing W...

Page 230: ...press the accelerator pedal firmly at any time to override the Rear Automatic Braking Warning There may be instances where unexpected or undesired automatic braking occurs If this happens either pres...

Page 231: ...t are soft or narrow objects high off the ground such as flatbed trucks or objects below ground level such as large potholes Always verify that the parking space is appropriate for parking a vehicle A...

Page 232: ...urn off A DIC progress arrow displays the status of the parking maneuver Depending on the space size additional maneuvers may be required and there will be additional instructions When changing gears...

Page 233: ...pidly or when following a vehicle too closely FCA may not provide a warning with enough time to help avoid a crash FCA does not warn of pedestrians animals signs guardrails bridges construction barrel...

Page 234: ...aches another detected vehicle too rapidly the red FCA display will flash on the windshield Also eight high pitched beeps will sound from the front or both sides of the Safety Alert Seat will pulse fi...

Page 235: ...oes not seem to operate properly cleaning the outside of the windshield in front of the rearview mirror and cleaning the front of the vehicle where radar sensors are located may correct the issue Fron...

Page 236: ...ndesired It could respond to a turning vehicle ahead guardrails signs and other non moving objects To override FAB firmly press the accelerator pedal if it is safe to do so Intelligent Brake Assist IB...

Page 237: ...side blind zone or spot areas or with vehicles rapidly approaching these areas from behind The LCA warning display will light up in the corresponding outside side mirror and will flash if the turn si...

Page 238: ...stem to calibrate to maximum performance This calibration may occur more quickly if the vehicle is driven on a straight highway road with traffic and roadside objects e g guardrails barriers During a...

Page 239: ...if the vehicle approaches a detected lane marking without using a turn signal in that direction It may also provide a Lane Departure Warning LDW system alert as the lane marking is crossed The LKA sys...

Page 240: ...ing without using a turn signal in that direction It may also provide an LDW alert by flashing A amber as the lane marking is crossed Additionally there will be three beeps or the driver seat will pul...

Page 241: ...eavy knocking is heard when using gasoline rated at 95 RON octane or higher the engine needs service Use of Seasonal Fuels Use summer and winter fuels in the appropriate season The fuels industry auto...

Page 242: ...cause injury or death Continued Warning Continued To help avoid injuries to you and others read and follow all the instructions on the fuel pump island Turn off the engine when refueling Keep sparks...

Page 243: ...you are refueling do not remove the nozzle Shut off the flow of fuel by shutting off the pump or by notifying the station attendant Leave the area immediately Filling the Tank with a Portable Gas Can...

Page 244: ...icle for towing a trailer Read the entire section before towing a trailer For towing a disabled vehicle see Towing the Vehicle 0 315 For towing the vehicle behind another vehicle such as a motor home...

Page 245: ...rt the combination moving and then apply the trailer brake controller by hand to be sure the brakes work During the trip check occasionally to be sure that the load is secure and the lamps and any tra...

Page 246: ...heating To avoid this let the engine run while parked preferably on level ground with the automatic transmission in P Park for a few minutes before turning the engine off If the overheat warning comes...

Page 247: ...eed altitude road grades outside temperature and how much the vehicle is used to pull a trailer are all important It can depend on any special equipment on the vehicle and the amount of tongue weight...

Page 248: ...aler for assistance The rear bumper on the vehicle is not intended for hitches Do not attach rental hitches or other bumper type hitches to it Use only a frame mounted hitch that does not attach to th...

Page 249: ...river behavior tracking device may interfere with vehicle systems This could affect vehicle operation and cause a crash Such devices may also access information stored in the vehicle s systems Caution...

Page 250: ...lb Replacement 278 Halogen Bulbs 278 High Intensity Discharge HID Lighting 278 LED Lighting 278 License Plate Lamp 279 Replacement Bulbs 279 Electrical System Electrical System Overload 280 Fuses and...

Page 251: ...stems aerodynamics durability and electronic systems like antilock brakes traction control and stability control These accessories or modifications could even cause malfunction or damage not covered b...

Page 252: ...a record with all parts receipts and list the mileage and the date of any service work performed Caution Even small amounts of contamination can cause damage to vehicle systems Do not allow contaminan...

Page 253: ...Cadillac CTS CTS V Owner Manual GMNA Localizing MidEast 9369309 2016 crc 7 30 15 252 Vehicle Care Engine Compartment Overview 2 0L L4 LTG Engine...

Page 254: ...rting 0 313 3 Engine Compartment Fuse Block 0 281 4 Engine Coolant Surge Tank and Pressure Cap See Cooling System 0 264 5 Remote Negative Battery Terminal See Jump Starting 0 313 6 Engine Oil Fill Cap...

Page 255: ...Cadillac CTS CTS V Owner Manual GMNA Localizing MidEast 9369309 2016 crc 7 30 15 254 Vehicle Care 3 6L V6 LGX Engine...

Page 256: ...rting 0 313 3 Remote Negative Battery Terminal See Jump Starting 0 313 4 Engine Coolant Surge Tank and Pressure Cap See Cooling System 0 264 5 Engine Compartment Fuse Block 0 281 6 Engine Cooling Fan...

Page 257: ...Cadillac CTS CTS V Owner Manual GMNA Localizing MidEast 9369309 2016 crc 7 30 15 256 Vehicle Care 3 6L V6 LF3 Engine...

Page 258: ...rting 0 313 3 Engine Compartment Fuse Block 0 281 4 Engine Coolant Surge Tank and Pressure Cap See Cooling System 0 264 5 Remote Negative Battery Terminal See Jump Starting 0 313 6 Engine Cooling Fan...

Page 259: ...Cadillac CTS CTS V Owner Manual GMNA Localizing MidEast 9369309 2016 crc 7 30 15 258 Vehicle Care 6 2L V8 LT4 Engine...

Page 260: ...gine Oil in this section Check the engine oil level regularly and maintain the proper oil level See Checking Engine Oil and When to Add Engine Oil in this section Change the engine oil at the appropri...

Page 261: ...level above the operating range i e the engine has so much oil that the oil level gets above the cross hatched area that shows the proper operating range the engine could be damaged You should drain o...

Page 262: ...d oil stay on your skin for very long Clean your skin and nails with soap and water or a good hand cleaner Wash or properly dispose of clothing or rags containing used engine oil See the manufacturer...

Page 263: ...GINE OIL SOON message and reset the oil life at 100 Be careful not to reset the oil life display accidentally at any time other than after the oil is changed It cannot be reset accurately until the ne...

Page 264: ...ine air cleaner filter make sure that the engine air cleaner filter housing and nearby components are free of dirt and debris Remove the engine air cleaner filter Lightly tap and shake the engine air...

Page 265: ...ve the screws on top of the air cleaner filter cover 2 Lift the air cleaner filter cover away from the air cleaner filter housing 3 Pull out the air cleaner filter 4 Inspect or replace the engine air...

Page 266: ...265 2 0L L4 LTG Engine 1 Engine Coolant Surge Tank and Pressure Cap 2 Engine Cooling Fan Out of View 3 6L V6 LGX Engine 1 Engine Coolant Surge Tank and Pressure Cap 2 Engine Cooling Fan Out of View 3...

Page 267: ...an cause premature engine heater core or radiator corrosion In addition the engine coolant could require changing sooner Any repairs would not be covered by the vehicle warranty Always use DEX COOL si...

Page 268: ...r dispose of engine coolant by putting it in the trash pouring it on the ground or into sewers streams or bodies of water Have the coolant changed by an authorized service center familiar with legal r...

Page 269: ...turn the cap when the cooling system including the surge tank pressure cap is hot Wait for the cooling system and surge tank pressure cap to cool Warning Adding only plain water or some other liquid...

Page 270: ...t for the engine cooling fan s By this time the coolant level inside the coolant surge tank top chamber may be lower If the level is lower add more of the proper DEX COOL coolant mixture to the surge...

Page 271: ...he vehicle until the engine is cool If Steam Is Coming from the Engine Compartment with No Overheat Warning V Series Only The V Series hood vent is functional and will allow water from rain and car wa...

Page 272: ...t Add washer fluid until the tank is full See Engine Compartment Overview 0 252 for reservoir location Caution Do not use washer fluid that contains any type of water repellent coating This can cause...

Page 273: ...ts in the proper sequence to torque specifications See Capacities and Specifications 0 338 Brake pads should be replaced as complete sets Brake Pedal Travel See your dealer if the brake pedal does not...

Page 274: ...gine and burn if the engine is hot enough You or others could be burned and the vehicle could be damaged Add brake fluid only when work is done on the brake hydraulic system When the brake fluid falls...

Page 275: ...nds after handling After a power loss such as disconnecting the battery or removing the maxi fuses in the power distribution fuse block the following steps must be performed to calibrate the electroni...

Page 276: ...he vehicle should be on a level surface If the level is below the bottom of the fill plug hole on the transfer case some lubricant will need to be added Add enough lubricant to raise the level to the...

Page 277: ...he ignition on but do not start the engine Without applying the regular brake try to move the shift lever out of P Park with normal effort If the shift lever moves out of P Park contact your dealer fo...

Page 278: ...ssembly away from the windshield The passenger side wiper arm has limited travel 2 Press the button in the middle of the wiper arm connector and pull the wiper blade away from the arm connector 3 Remo...

Page 279: ...arning Halogen bulbs have pressurized gas inside and can burst if you drop or scratch the bulb You or others could be injured Be sure to read and follow the instructions on the bulb package High Inten...

Page 280: ...mbly down to remove 3 Turn the bulb socket 1 counterclockwise to remove it from the lamp assembly 3 4 Pull the bulb 2 straight out of the bulb socket 1 5 Push the replacement bulb straight into the bu...

Page 281: ...will stop Wiper function is available immediately after the wiper switch is set to off and back to on To protect the wiper motor from overheating the wipers may slow down when the windshield is dry fo...

Page 282: ...Fuse Block 0 284 and Rear Compartment Fuse Block 0 287 Engine Compartment Fuse Block The underhood fuse block is on the passenger side of the engine compartment Lift the fuse block cover to access th...

Page 283: ...ber Usage 3 Passenger motorized safety belt Number Usage 4 Not used 5 Not used 6 Driver power seat 7 Not used 8 Headlamp washer relay 9 Not used 10 Not used 11 Not used 12 Not used 13 Passenger power...

Page 284: ...7 Spare MIL ignition 38 Spare PT Fuse 39 O2 sensor 40 Ignition coil injector 41 Spare Ignition coil injector 42 Engine control module 43 Not used 44 Not used 45 Washer 46 Not used 47 Front washer rela...

Page 285: ...Instrument Panel Fuse Block The instrument panel fuse block is in the end of the driver side of the instrument panel To access the fuses remove the end panel by gently prying with a plastic tool near...

Page 286: ...lder Mini Fuses Usage 3 Electric steering column lock Mini Fuses Usage 4 Data link connector 5 Heater ventilation and air conditioning control 6 Tilt and telescoping steering column 8 Spare 9 Glove bo...

Page 287: ...ilation and air conditioning 24 Display 25 Heated steering wheel 26 Wireless charger 27 Steering wheel switches 28 Spare 29 Visor 30 Spare J Case Fuses Usage 31 Spare 32 Spare 33 Front heater ventilat...

Page 288: ...idEast 9369309 2016 crc 7 30 15 Vehicle Care 287 Rear Compartment Fuse Block The rear compartment fuse block is behind a cover on the driver side of the rear compartment The vehicle may not be equippe...

Page 289: ...umber Usage 16 Trunk release 17 Run relay 18 Logistics relay 19 Logistics fuse 20 Rear window defogger relay 21 Mirror window module 22 Pedestrian protection 23 Canister vent 24 Body control module 2...

Page 290: ...itional information refer to the tire manufacturer Warning Poorly maintained and improperly used tires are dangerous Overloading the tires can cause overheating as a result of too much flexing There c...

Page 291: ...nstalling winter tires on the vehicle if frequent driving on snow or ice covered roads is expected All season tires provide adequate performance for most winter driving conditions but they may not off...

Page 292: ...is permanent damage To prevent permanent damage keep speed below 80 km h 50 mph With a light load the vehicle can be driven up to 100 km 60 mi with a moderate load 80 km 50 mi and a heavy load 45 km 2...

Page 293: ...optimized for maximum dry and wet road performance This special tread and compound will have decreased performance in cold climates and on ice and snow It is recommended that winter tires be installe...

Page 294: ...he vehicle with more weight than it was designed to carry When to Check Check the tires once a month or more How to Check Use a good quality pocket type gauge to check the tire pressure Proper tire in...

Page 295: ...00Y size tires require inflation pressure adjustment when driving the vehicle at speeds of 160 km h 100 mph or higher Set the cold tire inflation pressure to 300 kPa 44 psi Sustained operation at spee...

Page 296: ...the system is not operating properly The TPMS malfunction indicator is combined with the low tire pressure telltale When the system detects a malfunction the telltale will flash for approximately one...

Page 297: ...quipment tires and the correct inflation pressure for the tires when they are cold See Vehicle Load Limits 0 189 for an example of the Tire and Loading Information label and its location Also see Tire...

Page 298: ...301 Operating electronic devices or being near facilities using radio wave frequencies similar to the TPMS could cause the TPMS sensors to malfunction If the TPMS is not functioning properly it cannot...

Page 299: ...heel position 8 Proceed to the passenger side front tire and repeat Step 7 9 Proceed to the passenger side rear tire and repeat Step 7 10 Proceed to the driver side rear tire and repeat Step 7 The hor...

Page 300: ...Wheel Replacement 0 303 Directional tires should not be rotated Each tire and wheel should be used only in the position it is in Directional tires will have an arrow on the tire indicating the proper...

Page 301: ...mperatures driving speeds vehicle loading and road conditions affect the wear rate of the tires Treadwear indicators are one way to tell when it is time for new tires Treadwear indicators appear when...

Page 302: ...ing performance GM s TPC Spec number is molded onto the tire s sidewall near the tire size If the tires have an all season tread design the TPC Spec number will be followed by MS for mud and snow GM r...

Page 303: ...the wheels on the vehicle If the vehicle tires must be replaced with a tire that does not have a TPC Spec number make sure they are the same size load range speed rating and construction radial as the...

Page 304: ...ehicle is vibrating when driving on a smooth road the tires and wheels may need to be rebalanced See your dealer for proper diagnosis Wheel Replacement Replace any wheel that is bent cracked or badly...

Page 305: ...ructions To avoid vehicle damage drive slow and readjust or remove the traction device if it contacts the vehicle Do not spin the wheels If traction devices are used install them on the rear tires Cau...

Page 306: ...or pedal and steer to straighten the vehicle It may be very bumpy and noisy Gently brake to a stop well off the road if possible Warning Lifting a vehicle and getting under it to do maintenance or rep...

Page 307: ...cannot be seen or smelled It can cause unconsciousness and even death Never run the engine in an enclosed area that has no fresh air ventilation For more information see Engine Exhaust 0 199 Warning O...

Page 308: ...sure Deflation Button 5 Tire Sealant Canister 6 Sealant Air Hose Clear 7 Air Only Hose Black 8 Power Plug 9 Canister Release Button Under Sealant Air Hose Tire Sealant Read and follow the safe handlin...

Page 309: ...id further tire and wheel damage by driving slowly to a level place Turn on the hazard warning flashers See Hazard Warning Flashers 0 159 See If a Tire Goes Flat 0 304 for other important safety warni...

Page 310: ...the pressure will quickly drop and start to rise again as the tire inflates with air only 10 Inflate the tire to the recommended inflation pressure using the pressure gauge 3 The recommended inflatio...

Page 311: ...under Using the Tire Sealant and Compressor Kit without Sealant to Inflate a Tire Not Punctured If the tire pressure has fallen more than 68 kPa 10 psi below the recommended inflation pressure stop dr...

Page 312: ...5 Attach the air only hose 7 onto the tire valve stem by turning it clockwise until it is tight 6 Plug the power plug 8 into the accessory power outlet in the vehicle Unplug all items from other acces...

Page 313: ...ory power outlet in the vehicle 13 Disconnect the air only hose 7 from the tire valve stem by turning it counterclockwise and replace the tire valve stem cap 14 Replace the air only hose 7 and the pow...

Page 314: ...wing steps to do it safely Warning Batteries can hurt you They can be dangerous because They contain acid that can burn you They contain gas that can explode or ignite They contain enough electricity...

Page 315: ...that they are not touching 3 Set the parking brake firmly and put the shift lever in P Park with an automatic transmission or Neutral with a manual transmission Caution If any accessories are left on...

Page 316: ...ry to start the vehicle that had the dead battery If it will not start after a few tries it probably needs service Caution If the jumper cables are connected or removed in the wrong order electrical s...

Page 317: ...the tow eye is removed reinstall the cover with the notch in the original position Recreational Vehicle Towing Recreational vehicle towing means towing the vehicle behind another vehicle such as a mo...

Page 318: ...e vehicle must be towed a dolly should be used See the following information on dolly towing Caution Use of a shield mounted in front of the vehicle grille could restrict airflow and cause damage to t...

Page 319: ...Towing All Wheel Drive Vehicles Vehicles with all wheel drive cannot be dolly towed Appearance Care Exterior Care Locks Locks are lubricated at the factory Use a de icing agent only when absolutely ne...

Page 320: ...finish with a soft clean chamois or an all cotton towel to avoid surface scratches and water spotting Finish Care Application of aftermarket clearcoat sealant wax materials is not recommended If pain...

Page 321: ...the molding finish Carbon Fiber Care Carbon fiber parts can be washed and waxed like any other parts Use a clear or black pigmented wax See Carbon Fiber 0 193 Cleaning Exterior Lamps Lenses Emblems De...

Page 322: ...st once a year Hot dry climates may require more frequent application Black marks from rubber material on painted surfaces can be removed by rubbing with a clean cloth See Recommended Fluids and Lubri...

Page 323: ...s chafing etc Visually check constant velocity joint boots and axle seals for leaks Body Component Lubrication Lubricate all key lock cylinders hood hinges liftgate hinges and the steel fuel door hing...

Page 324: ...ning cloth Do not spray cleaners directly on any switches or controls Cleaners should be removed quickly Never allow cleaners to remain on the surface being cleaned for extended periods of time Cleane...

Page 325: ...hniques Gently blot liquids with a paper towel Continue blotting until no more soil can be removed For solid soils remove as much as possible prior to vacuuming To clean 1 Saturate a clean lint free c...

Page 326: ...dampened with water to remove dust and loose dirt For a more thorough cleaning use a soft microfiber cloth dampened with a mild soap solution Caution Soaking or saturating leather especially perforate...

Page 327: ...se a crash and injury Make sure the floor mat does not interfere with the pedals Use the following guidelines for proper floor mat usage The original equipment floor mats were designed for your vehicl...

Page 328: ...369309 2016 crc 7 30 15 Vehicle Care 327 2 Reinstall by lining up the floor mat retainer openings over the carpet retainers and snap into position 3 Make sure the floor mat is properly secured in plac...

Page 329: ...ervices Proper vehicle maintenance helps to keep the vehicle in good working condition improves fuel economy and reduces vehicle emissions for better air quality Because of all the different ways peop...

Page 330: ...INE OIL SOON message displays service is required for the vehicle as soon as possible within the next 1 000 km 600 miles If driving under the best conditions the engine oil life system may not indicat...

Page 331: ...d not stick or squeak Restraint system component check See Safety System Check 0 70 Fuel system inspection for damage or leaks Exhaust system and nearby heat shields inspection for loose or damaged co...

Page 332: ...er hook up routing and condition Every 96 000 km 60 000 Miles Replace spark plugs Inspect spark plug wires 2 0L LTG and 3 6L LF3 Turbo Engines Every 156 000 km 97 500 Miles Replace spark plugs Inspect...

Page 333: ...above it may be necessary to replace your spark plugs at more frequent intervals For further assistance in determining the most suitable service maintenance intervals for your vehicle please contact y...

Page 334: ...stem DOT 3 Hydraulic Brake Fluid GM Part No 19299818 Windshield Washer Automotive windshield washer fluid that meets regional freeze protection requirements Automatic Transmission DEXRON HP Automatic...

Page 335: ...Anchor and Release Pawl Lubriplate Lubricant Aerosol GM Part No 89021668 or lubricant meeting requirements of NLGI 2 Category LB or GC LB Weatherstrip Conditioning Weatherstrip Lubricant GM Part No 36...

Page 336: ...4 3 6L V6 Engine LGX 19330000 PF63E 3 6L V6 Engine LF3 89017525 PF63 6 2L V8 Engine V Series 12640445 PF64 Passenger Compartment Air Filter 13356916 CF185 Spark Plugs 2 0L L4 Engine 12647827 41 125 3...

Page 337: ...d Maintenance Maintenance Records After the scheduled services are performed record the date odometer reading who performed the service and the type of services performed in the boxes provided Retain...

Page 338: ...windshield from outside The VIN also appears on the Vehicle Certification and Service Parts labels and certificates of title and registration Engine Identification The eighth character in the VIN is t...

Page 339: ...sh Air Conditioning Refrigerant For the air conditioning system refrigerant type and charge amount see the refrigerant label under the hood See your dealer for more information Cooling System Engine 2...

Page 340: ...ual Recheck fluid level after filling Engine Specifications Engine VIN Code Horsepower Torque Spark Plug Gap 2 0L L4 Engine LTG X 203 kW 5500 rpm 272 hp 5500 rpm 400 Y 3000 rpm 295 lb ft 3000 rpm 0 75...

Page 341: ...dEast 9369309 2016 crc 7 30 15 340 Technical Data Vehicle Top Speed Vehicle Top Speed Metric English 2 0L L4 Engine LTG 200 km h 124 mph 3 6L V6 Engine LGX 240 km h 149 mph 3 6L V6 Engine LF3 TBD km h...

Page 342: ...Cadillac CTS CTS V Owner Manual GMNA Localizing MidEast 9369309 2016 crc 7 30 15 Technical Data 341 Engine Drive Belt Routing 2 0L L4 Engine 3 6L V6 Engine 6 2L V8 Engine...

Page 343: ...les may also store data about how the vehicle is operated such as rate of fuel consumption or average speed These modules may retain personal preferences such as radio presets seat positions and tempe...

Page 344: ...er parties such as law enforcement that have the special equipment can read the information if they have access to the vehicle or the EDR GM will not access these data or share it with others except w...

Page 345: ...ag Restrain 75 Passenger Sensing System 77 What Makes an Airbag Inflate 75 What Will You See after an Airbag Inflates 76 When Should an Airbag Inflate 74 Airbag System cont d Where Are the Airbags 73...

Page 346: ...charge HID Lighting 278 License Plate Lamps 279 Buying New Tires 301 C Capacities and Specifications 338 Carbon Fiber 193 Carbon Monoxide Engine Exhaust 199 Trunk 39 Winter Driving 187 Cargo Tie Downs...

Page 347: ...tance Systems 224 Driver Information Center DIC 129 Driver Mode Control 208 Driving Assistance Systems 231 Characteristics and Towing Tips 243 Competitive 211 Defensive 180 For Better Fuel Economy 26...

Page 348: ...tem 234 Front Seats Heated and Ventilated 60 Fuel 240 Additives 241 Economy Driving 26 Filling a Portable Fuel Container 242 Filling the Tank 241 Gauge 117 Low Fuel Warning Light 127 System Messages 1...

Page 349: ...K Key and Lock Messages 139 Keyless Entry Remote RKE System 29 Keys 28 L Lamps Daytime Running DRL 157 Dome 160 Exterior Controls 155 Exterior Lamps Off Reminder 157 Exterior Lighting Battery Saver 16...

Page 350: ...CH System 89 Lumbar Adjustment 56 Front Seats 56 M Maintenance Records 336 Maintenance Schedule 329 Recommended Fluids and Lubricants 333 Malfunction Indicator Lamp 121 Manual Mode 202 Memory Features...

Page 351: ...77 Passenger Sensing System 77 Performance Data Recorder PDR 163 Personalization Vehicle 147 Power Door Locks 37 Mirrors 44 Outlets 107 Protection Battery 162 Retained Accessory RAP 197 Seat Adjustmen...

Page 352: ...eated Rear 63 Lumbar Adjustment Front 56 Memory 58 Power Adjustment Front 54 Rear 61 Reclining Seatbacks 57 Securing Child Restraints 95 96 Security Light 127 Messages 145 Vehicle 41 Vehicle Alarm 41...

Page 353: ...04 Different Size 302 If a Tire Goes Flat 304 Inspection 298 Low Profile 292 Messages 146 Pressure 294 Pressure Light 126 Pressure Monitor Operation 295 Pressure Monitor System 294 Rotation 299 Run Fl...

Page 354: ...ealant and Compressor Kit 312 Tire Pressure 292 Vehicle Data Recording and Privacy 342 Ventilation Air 176 Visors 48 W Warning Brake System Light 122 Caution and Danger 2 Lane Departure LDW 238 Warnin...

Reviews: