

Caddon Hives
Page 2 of 3 Jan 2013
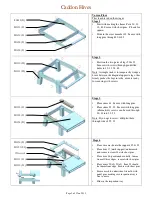
Varroa Floor
This is achieved in four stages:
Stage 1
•
Start with making the frame Parts 30, 31,
32, 48. Secure with short pins. (Check for
square)
•
Slide in the cross member 38. Secure with
long pins through 30 & 48.
Stage 2
•
Position the two pairs of legs 50 & 51.
Secure with screws through pre-drilled
holes in 30, 31, 38, 48.
Note: A simple trick is to temporarily wedge a
brace between the diagonal opposite legs, this
firmly pushes the legs into the corners ready
for securing with screws
Stage 3
•
Place items 34. Secure with long pins
•
Place items 52, 53. Secure with long pins
(alternatively screws can be used through
30, 48 into 52, 53
Note: If you opt to screw, drill pilot hole
through side of 52, 53
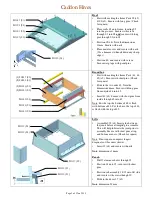
Stage 4
•
Place wire mesh onto the supports 52 & 53
•
Place item 37 (mesh support) under mesh
and secure to items 34 with short pins
•
Place item 36, positioned centrally, 16mm
from all three edges, secure with short pins
•
Place items 35(x2) 39(x2). Item 35 should
be 16mm from edge. Secure with short pins.
•
Secure mesh to underside of item 36 with
panel pins, making sure inspection tray is
free to move
•
Slide in the inspection tray
BH031 (X1)
BH038 (X1)
BH030 (X1)
BH032 (X1)
BH034 (X1)
BH052 (X1)
BH053 (X1)
BH050 (X2)
BH051 (X2)
Wire mesh
BH035 (X2)
BH036 (X1)
BH037 (X1)
BH039 (X2)
BH048(X1)


