background image

The Configuration Screen

SEHI100TX User’s Guide

7-11

I/F

The number of the interface corresponding to the channels over which 
packets with that IP Address pass. On the SEHI, this value is always 1.

IP Address

Displays the IP address of the SEHI.

SubNET Mask

Displays the subnet mask for the SEHI. A subnet mask is a 32-bit quantity 
which “masks out” the network bits of the IP address. This is done by 
setting the bits in the mask to 1 when the network treats the corresponding 
bits in the IP address as part of the network or subnetwork address, or to 0 
if the corresponding bit identifies the host.

MAC Address

Displays the physical address associated with the interface.

Default Gateway

Displays the default gateway for the SEHI. This field is not defined until 
an appropriate value is entered. The default gateway identifies the default 
gateway device that will forward packets to other IP subnetworks.

Serial Port 1 Application

Displays the port’s application setting as CONSOLE.

Baud Rate

Displays the Baud Rate setting of the device attached to the SEHI through 
the serial port. The setting for the serial port is 9600.

Port Enable Override

This command lets the user override the Disable Port settings in the 
Device Statistics screen to enable all ports in the stack.

SEHI Book  Page 11  Wednesday, May 15, 1996  10:42 AM

Summary of Contents for SEHI SEHI100TX-

Page 1: ...SEHI100TX 22 100BASE T INTELLIGENT STACKABLE HUB USER S GUIDE ...

Page 2: ...G BUT NOT LIMITED TO LOST PROFITS ARISING OUT OF OR RELATED TO THIS MANUAL OR THE INFORMATION CONTAINED IN IT EVEN IF CABLETRON SYSTEMS HAS BEEN ADVISED OF KNOWN OR SHOULD HAVE KNOWN THE POSSIBILITY OF SUCH DAMAGES Copyright 1996 by Cabletron Systems Inc P O Box 5005 Rochester NH 03866 5005 All Rights Reserved Printed in the United States of America Order Number 9031511 01 April 1996 SPECTRUM LANV...

Page 3: ...ING Changes or modifications made to this device which are not expressly approved by the party responsible for compliance could void the user s authority to operate the equipment DOC NOTICE This digital apparatus does not exceed the Class A limits for radio noise emissions from digital apparatus set out in the Radio Interference Regulations of the Canadian Department of Communications Le présent a...

Page 4: ...eement shall be interpreted and governed under the laws and in the state and federal courts of New Hampshire You accept the personal jurisdiction and venue of the New Hampshire courts EXCLUSION OF WARRANTY AND DISCLAIMER OF LIABILITY 1 EXCLUSION OF WARRANTY Except as may be specifically provided by Cabletron in writing Cabletron makes no warranty expressed or implied concerning the Program includi...

Page 5: ...d c in all respects is proprietary data belonging to Cabletron and or its suppliers For Department of Defense units the product is licensed with Restricted Rights as defined in the DoD Supplement to the Federal Acquisition Regulations Section 52 227 7013 c 1 ii and its successors and use duplication disclosure by the Government is subject to restrictions as set forth in subparagraph c 1 ii of the ...

Page 6: ...ications 3 1 3 1 1 HubSTACK Interconnect Cable Requirements 3 1 3 1 2 UTP Cable Specifications 3 2 3 1 3 Multimode Specifications for the EPIM 100FX 3 3 3 2 Network Cable Lengths 3 4 3 3 Network Port Specifications 3 5 3 4 COM Port Requirements 3 5 3 5 Operating Specifications 3 6 3 5 1 Power Supply Requirements 3 6 3 5 2 Environmental Requirements 3 6 3 6 Agency Approvals 3 7 3 7 Physical Specifi...

Page 7: ...gement 7 6 7 4 The Feature Selection Screen 7 7 7 5 The Community Name Table Screen 7 8 7 5 1 Editing the Community Name Field 7 9 7 6 The Configuration Screen 7 10 7 6 1 Setting the IP Address 7 12 7 6 2 Setting the Subnet Mask 7 12 7 6 3 Setting the Default Gateway 7 13 7 6 4 Using the Port Enable Override 7 13 7 6 5 Exiting the Configuration Screen 7 14 7 7 The Trap Table Screen 7 14 7 7 1 Conf...

Page 8: ...E PORT Command 7 24 7 9 3 Using the DISABLE PORT Command 7 24 7 9 4 Exiting the Device Statistics Screen 7 24 APPENDIX A EPIM SPECIFICATIONS A 1 EPIM Specifications A 1 A 1 1 EPIM 100TX A 1 A 1 2 EPIM 100FX A 2 APPENDIX B IMAGE FILE DOWNLOAD USING OIDS B 1 Setting Up a UNIX Workstation as a TFTP Server B 2 B 2 Standard Local Download B 3 INDEX ...

Page 9: ...ormation and concludes with a list of related manuals Chapter 2 SEHI Features and Options briefly describes SEHI features and provides information about available options Chapter 3 Installation Requirements and Specifications provides installation requirements network guidelines and SEHI specifications Chapter 4 Installation contains instructions for installing the SEHI as a stackable or standalon...

Page 10: ... file to the SEHI by setting specific MIB OID strings 1 2 DOCUMENT CONVENTIONS The following conventions are used throughout this document NOTE Note symbol Calls the reader s attention to any item of information that may be of special importance TIP Tip symbol Conveys helpful hints concerning procedures or actions CAUTION Caution symbol Contains information essential to avoid damage to the equipme...

Page 11: ... A description of any action s already taken to resolve the problem e g changing mode switches rebooting the unit etc A description of your network environment layout cable type etc Network load and frame size at the time of trouble if known The serial and revision numbers of all Cabletron Systems products in the network The device history i e have you returned the device before is this a recurrin...

Page 12: ...ntelligent stackable hub the SEH100TX 22 NOTE The terms SEHI Stackable Ethernet Hub with Intelligence and SEH Stackable Ethernet Hub are used throughout this manual when describing the features and functions of the SEHI100TX 22 and the SEH100TX 22 PWR CPU CLN HubSTACK 100BASE TX HUB WITH LANVIEW SEHI100TX 22 22X 21X 20X 19X 18X 17X 11X 10X 9X 8X 7X 6X 16X 15X 14X 13X 12X 5X 4X 3X 2X 1X E 1 A RCV L...

Page 13: ...egment Only devices on the problem segment are affected When the problem is solved the SEHI automatically reconnects the isolated segment to the network Polarity Detection and Correction Each twisted pair port on the SEHI incorporates a polarity detection and correction feature that allows the SEHI to pass data regardless of the polarity of the twisted pair segment s receive link FLASH EEPROMs The...

Page 14: ...COM port on the SEHI Cabletron Systems provides a UTP console cable with RJ45 connectors at each end adaptors for DB9 or DB25 connections and an instruction sheet with adaptor pinout information with the SEHI Chapter 7 Local Management provides detailed information on setting up and managing your network through Local Management 2 3 STACKABLE CAPABILITIES The SEHI100TX 22 intelligent hub is design...

Page 15: ...ECTRUM Cabletron Systems SPECTRUM Element Manager Windows Cabletron Systems Remote SPECTRUM Portable Management Applications Third Party SNMP compliant Network Management Packages 2 6 OPTIONAL 100BASE TX and 100BASE FX EPIMs 100BASE TX and 100BASE FX EPIMs are not included with the SEHI but can be purchased separately from Cabletron Systems EPIMs enable the expansion of a network through different...

Page 16: ...n planning and preparing the network cabling and connections The quality of the connections and the length of cables are critical factors in determining the reliability of the network The following sections describe specifications for each media type 3 1 1 HubSTACK Interconnect Cable Requirements Attach the SEHI to the stacked SEH modules with the HubSTACK Interconnect cables provided with each SE...

Page 17: ...se jitter in the bit cell timing resulting in data errors A 100BASE TX link must not generate more than 1 4 ns of jitter If the cable meets the impedance requirements for a 100BASE TX link jitter should not be a concern Crosstalk Crosstalk is caused by signal coupling between the different cable pairs contained within a multi pair cable bundle 100BASE TX transceivers are designed so that the user ...

Page 18: ...EHI EPIM 100FX module the network must meet the following requirements Cable Loss Test the fiber optic cable with a fiber optic attenuation test set adjusted for an 850 nm wavelength This test verifies that the signal loss in a cable is within an acceptable level The maximum loss for a multimode fiber optic cable is 11 0 dB Fiber Optic Budget and Propagation Delay Determine the maximum fiber optic...

Page 19: ...ter Figure 3 1 shows a simplified example of a network with one Class I repeater Link segments A and B represent the longest links in the network In this case if both segment A and segment B are UTP each segment may be up to 100 meters long for a maximum network length of 200 meters If segment A is UTP and segment B is fiber the maximum length of the network is 263 meters with a maximum UTP segmen...

Page 20: ...ure 3 2 RJ45 Network Ports 3 4 COM PORT REQUIREMENTS The RJ45 COM port supports access to a Local Management Console The COM port supports a Digital Equipment Corporation VT320 terminal or PC emulation of the VT320 terminal Figure 3 3 shows the pinouts for the RJ45 COM port SEHI100TX 22 Repeater DTE DTE A B 1 2 3 4 5 6 7 8 1 Receive 5 Not Used 2 Receive 6 Transmit 3 Transmit 7 Not Used 4 Not Used ...

Page 21: ...e input requirements are listed in Table 3 2 3 5 2 Environmental Requirements This section details the environmental requirements of the SEHI Operating Temperature 5 C to 40 C 41 F to104 F Storage Temperature 30 C to 90 C 22 F to194 F Operating Humidity 5 to 95 non condensing Table 3 2 Power Supply Requirements Line Input Range Volts V Current Amperes A Frequency Hertz Hz 100 125 Vac 4 0 A 50 60 H...

Page 22: ...60950 Emissions This unit meets the emission requirements of FCC Part 15 Class A EN 55022 Class A and VCCI Class I Immunity This unit meets the immunity requirements of EN 50082 1 including IEC 801 2 ESD IEC 801 3 Radiated Susceptibility and IEC 801 4 EFT B 3 7 PHYSICAL SPECIFICATIONS This section details the physical specifications for the SEHI Dimensions H x W x D 2 8 in x 17 0 in x 13 5 in 7 2 ...

Page 23: ...t it aside to prevent damage 3 Visually inspect the SEHI If there are any signs of damage contact Cabletron Systems Technical Support immediately 4 Read the SEHI Release Notes included in the shipping box NOTE A single phase grounded power receptacle that meets the requirements listed in Chapter 3 must be located within seven feet of the installation Failure to follow installation instructions may...

Page 24: ...rm this operation Leaving the switch in the UP position results in user installed parameters such as IP address and Community Names being cleared from NVRAM whenever the SEHI loses power and or is reset See Chapter 6 Section 6 4 for detailed instructions on setting the NVRAM switch Figure 4 1 NVRAM Switch Location The SEHI may be installed on a tabletop or shelf or in a 19 inch rack and configured...

Page 25: ...stallation site with fluctuations of less than 10 C per hour The SEHI must be located within seven feet of its power source and with an unrestricted free surface area as shown in Figure 4 2 Figure 4 2 Tabletop or Shelf Installation Proceed to Section 4 5 Powering Up and Stacking the SEHI CAUTION In order to allow for proper cooling there must be a two inch clearance on either side and the back of ...

Page 26: ...HI as follows 1 Locate the strain relief bracket and four 8 32 x 3 8 inch pan head screws from the rackmount kit 2 Attach the strain relief bracket to the bottom of the SEHI Figure 4 3 Figure 4 3 Attaching the Strain Relief Bracket Do NOT attempt to attach the strain relief bracket with screws other than the 8 32 x 3 8 inch screws included with the SEHI Use of longer screws may damage the unit or ...

Page 27: ... cover screws provided in the rack mounting kit attach the rack mounting brackets to each side of the SEHI Figure 4 4 Installing the Rack Mounting Brackets Do not remove the cover from the SEHI100TX 22 Do not remove any other screws from the unit Screws 4 Rack Mounting Brackets 2 1511_05 PWR CPU CLN HubSTACK 100BASE TX HUB WITH LANVIEW SEHI100TX 22 22X 21X 20X 19X 18X 17X 11X 10X 9X 8X 7X 6X 16X 1...

Page 28: ...SEHI in the Rack Proceed to Section 4 5 Powering Up and Stacking the SEHI CAUTION The cooling fans at the rear panel of the SEH must have adequate clearance two inches on either side and in the rear for unrestricted air flow The temperature for the selected location must be maintained between 5 C and 40 C and fluctuate less than 10 C per hour PWR CPU CLN HubSTACK 100BASE TX HUB WITH LANVIEW SEHI10...

Page 29: ...Do not proceed with the following steps until the CPU LED is a steady blinking green 3 Power up the SEH above the SEHI in the stack by plugging the power cord into the back panel of the SEH and plugging the other end into a grounded receptacle CAUTION If you are using an intelligent hub SEHI to manage the stack you must locate the SEHI at the bottom of the stack The SEHI must be completely powered...

Page 30: ...ect the interconnect cable between the SEH and the SEHI before powering up the SEH Otherwise damage to the SEH may result CAUTION Do not leave an interconnect cable connected at only one end during network operation Corrupted data may result 100BASE TX HubSTACK Interconnect Cable REAR VIEW SEHI Managing 4 SEH Non Intelligent Hubs OUT SEHI100TX INTERCONNECT IN SEHI100TX 22 100BASE TX HUB WITH LANVI...

Page 31: ...er operation Install an EPIM 100TX or an EPIM 100FX as follows 1 Remove the coverplate or the existing EPIM whichever applies 2 Slide the new EPIM into place making sure that the connectors on the rear of the EPIM align correctly and firmly with the connector inside the SEHI Refer to Figure 4 7 3 Install the mounting screw Figure 4 7 Installing an EPIM 100TX FX CAUTION Observe all static precautio...

Page 32: ...PIM 100TX Section 5 1 2 EPIM 100FX Section 5 1 3 Prior to connecting the network cabling check the connectors for the proper pinouts as shown in Chapter 3 5 1 1 Connecting to Network Ports Attach UTP segments to the RJ45 Network Ports on the front panel of the SEHI Each twisted pair port on the SEHI incorporates a polarity detection and correction feature The polarity detection and correction feat...

Page 33: ...s Technical Support 5 1 2 Connecting a UTP Segment to an EPIM 100TX The EPIM 100TX is often used to provide a connection between the SEHI and a bridge router or switch Normally in this configuration a straight through cable is used and the EPIM crossover switch shown in Figure 5 2 is set to not crossed over The EPIM 100TX is also used to provide another RJ45 port to connect to a UTP segment Before...

Page 34: ...eps until it is on a Check that the 100BASE TX device at the other end of the twisted pair segment is powered up b Verify that the RJ45 connector on the twisted pair segment has the proper pinouts c Check the cable for continuity d Check that the twisted pair connection meets dB loss and cable specifications outlined in Chapter 3 Section 3 1 2 e Check that the crossover switch is in the correct po...

Page 35: ...ends of the connectors 2 Insert one end of the SC connector into the EPIM 100FX on the SEHI See Figure 5 3 Figure 5 3 EPIM 100FX Port NOTE An odd number of crossovers preferably one must be maintained between devices so that the transmit port of one device is connected to the receive port of the other device and vice versa CAUTION Do not touch the ends of the fiber optic strands and do not let the...

Page 36: ...er optic device at the other end of the fiber optic link segment c Verify that the fiber connection meets the dB loss specifications outlined in Chapter 3 If a link is not established contact Cabletron Systems Technical Support 5 2 TESTING THE INSTALLATION The SEHI00TX 22 is now ready for operation Before placing the network into service test that all stations can be addressed and that the SEHI an...

Page 37: ...f the attached devices check the link as follows 1 Check that the LNK LED if applicable for the port is on If the LED is not on a Check that the 100BASE TX device at the other end of the twisted pair segment is powered up b Verify that the connector on the twisted pair segment has the proper pinouts Refer to Chapter 3 for the pin assignments for twisted pair connectors c For the EPIM 100FX check t...

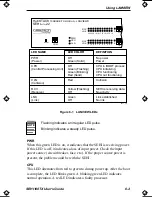
Page 38: ...segment The affected port remains segmented until a good packet is transmitted received without collisions If the LNK LED is still not on contact Cabletron Systems Technical Support 6 2 USING LANVIEW The SEHI incorporates the Cabletron Systems LANVIEW status monitoring and diagnostics system LANVIEW LEDs help diagnose problems such as power failure or cable fault The SEHI includes the following LA...

Page 39: ...s normal operation A red LED indicates a faulty processor NOTE Flashing indicates an irregular LED pulse Blinking indicates a steady LED pulse LED NAME PWR Power CPU Central Processing Unit CLN Collision RCV Receive LNK Link LED COLOR Off Green Solid Off Green Flashing Green Blinking Red Solid Red Yellow Flashing Off Green Off DEFINITION No power Power CPU in BOOT process CPU initializing CPU func...

Page 40: ... and the device at the other end of the segment The LNK LED remains on as long as a link is maintained Each SEHI Network Port ports 1 22 has a corresponding LNK LED 6 3 USING THE RESET BUTTON The SEHI incorporates a recessed RESET button See Figure 6 1 The RESET button initializes the SEHI processor This button does NOT initialize Non Volatile Random Access Memory NVRAM the nonvolatile random acce...

Page 41: ...itch located on the front panel 3 Wait until the unit boots approximately 12 seconds 4 Return the NVRAM switch to the DOWN position Figure 6 2 NVRAM Switch Location To prevent the possibility of electrical shock do not remove the chassis cover to access the NVRAM switch and use only a non metallic tool when moving the NVRAM switch CAUTION Failure to return the NVRAM switch to the DOWN position wil...

Page 42: ...ntrol access to the SEHI through the community names established in the Community Name Table Designate which Network Management Workstations receive trap messages from the device Navigate through the Management Information Base MIB and manage the objects within it from a remote location Given the appropriate security level the MIB is accessible from the SEHI through SNMP Tools Local Management als...

Page 43: ...s that perform the same Local Management function For example Press ENTER means press either ENTER or RETURN unless this manual specifically instructs you otherwise SPACE bar and BACKSPACE Key These keys cycle through selections in some Local Management fields Use the SPACE bar to cycle forward through selections and use BACKSPACE to cycle backward through selections Arrow Keys These are navigatio...

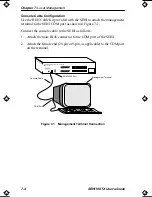
Page 44: ...PC running a VT series emulation software package An RJ45 console cable is required to attach the management terminal to the SEHI The console cable is included with the SEHI in a package that contains the following UTP console cable with RJ45 connectors on each end Adaptors for DB9 or DB25 connections Instruction sheet The following sections explain how to attach the console cable and set up the m...

Page 45: ...rt as shown in Figure 7 1 Connect the console cable to the SEHI as follows 1 Attach the male RJ45 connector to the COM port of the SEHI 2 Attach the female end 25 pin or 9 pin as applicable to the COM port on the terminal Figure 7 1 Management Terminal Connection Management Terminal Console Cable COM RJ45 Port COM Port HubSTACK 100BASE TX HUB WITH LANVIEW SEHI100TX 22 COM 1511_14 ...

Page 46: ... Terminal Setup Parameters Menu Function Selection Display Setup Columns 80 Columns Controls Interpret Controls Auto Wrap No Auto Wrap Test Cursor Cursor General Setup Mode 7 Bit Control Cursor Keys Normal Cursor Keys Communications Setup Transmit Transmit 9600 Receive Receive Transmit XOFF any option Bits Parity 8 Bits No Parity Stop Bit 1 Stop Bit Local Echo No Local Echo Port DEC 423 Data Leads...

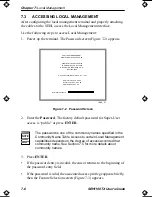
Page 47: ...s to the beginning of the password entry field If the password is valid the associated access privilege appears briefly then the Feature Selection screen Figure 7 3 appears NOTE The password is one of the community names specified in the Community Name Table Access to certain Local Management capabilities depends on the degree of access accorded that community name See Section 7 5 for more details...

Page 48: ...corresponding Function Key The selected screen appears To exit your Local Management session use the arrow keys to highlight the EXIT LIM SERVICE command then press ENTER Figure 7 3 Feature Selection Screen NOTE If the terminal keyboard is not used for 15 minutes the Local Management session ends and the screen defaults to the Password screen Cabletron Systems Incorporated P O Box 5005 Rochester N...

Page 49: ...of security authorization Basic Read Read Only Read Write and Super User With Super User access the user changes the existing passwords by changing the community names Only the community name assigned Super User access has full management privileges The following sections explain each field on the Community Name Table screen and provides instructions on how to change them COMMUNITY NAME Displays t...

Page 50: ...odifiable parameters including Community Names IP Addresses Traps and SNMP Objects 7 5 1 Editing the Community Name Field The password used to access Local Management at the Password screen must have Super User privileges for the edits to take effect If a password is entered with Basic Read Read Only or Read Write privileges Local Management displays the message AUTHORIZATION PROHIBITS ACCESS and ...

Page 51: ...Enable Override option to enable all device ports in the stack This option overrides the Port Disable setting in the Statistics screen The following sections explain each field on the Configuration screen and instructions on how to change them NOTE The first time a user attempts to exit the screen without saving the changes a NOT SAVED message is displayed The edits are lost if the user proceeds t...

Page 52: ...k address or to 0 if the corresponding bit identifies the host MAC Address Displays the physical address associated with the interface Default Gateway Displays the default gateway for the SEHI This field is not defined until an appropriate value is entered The default gateway identifies the default gateway device that will forward packets to other IP subnetworks Serial Port 1 Application Displays ...

Page 53: ...pears indicating that the changes have been saved to memory 7 6 2 Setting the Subnet Mask The subnet mask defines how the SEHI treats SNMP Trap IP destination addresses in its Trap Table Set the subnet mask when workstations in the Trap Table reside on a different subnet i e across a gateway or router and these workstations are to receive SNMP traps Use the subnet mask factory default setting of 0...

Page 54: ...ues for XXX being from 0 to 255 3 Press ENTER If your entry is accepted as a valid default gateway OK appears to the right of the field 4 Use the arrow keys to highlight the SAVE option then press ENTER or F6 The SAVED OK message appears indicating that the changes have been saved to memory 7 6 4 Using the Port Enable Override Use the following steps to override the Disable Port settings 1 Use the...

Page 55: ...ion then press ENTER or F8 The screen shown in Figure 7 6 appears Figure 7 6 Trap Table Screen The Trap Table defines the management stations that receive SNMP Traps for alarm event notification The following sections explain each field on the Trap Table screen and provide instructions on how to change them SNMP Community Name Displays the community name included in the trap message sent to the Ne...

Page 56: ... 4 Press ENTER 5 Use the arrow keys to highlight the appropriate Trap IP Address field 6 Enter the IP address of the workstation that you want to send traps to in this field The format for this entry is XXX XXX XXX XXX with the value of XXX ranging from 0 to 255 and three dots or else it returns to the beginning of the field 7 Use the arrow keys to highlight the SAVE option then press ENTER or F6 ...

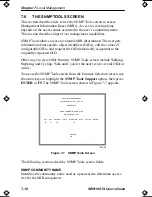
Page 57: ...ested OID Other ways to view OIDs from the SNMP Tools screen include Walking Stepping and Cycling Walk and Cycle let the user review several OIDs at a time To access the SNMP Tools screen from the Features Selection screen use the arrow keys to highlight the SNMP Tools Support option then press ENTER or F9 The SNMP Tools screen shown in Figure 7 7 appears Figure 7 7 SNMP Tools Screen The following...

Page 58: ... are the sections of the OID separated by periods When a walk is initialized the following categories for each walk entry or step are displayed Specified OID gives the number tag for that OID Size identifies the number of bytes it takes to store that object Type specifies the variable type of the object e g int integer Data displays what the object identifier represents Recall OID Recalls from mem...

Page 59: ...l specify MIB_NO_INSTANCE otherwise information about that OID data type length and value appear 7 8 2 Getting the Next OID Use the following steps to GET the next OID 1 Highlight GETNEXT with the arrow keys then press ENTER or F8 GETNEXT OID F9 appears 2 Enter the desired OID or OID extension Press F9 to recall the last OID request The recalled OID may then be modified as necessary 3 Press ENTER ...

Page 60: ...kly scan a MIB for the specific information that is needed The WALK command scrolls through OIDs numerically sequential to the initial OID request The STEP command scrolls the MIB Walk one OID at a time Cycling allows you to specify how many GETNEXT commands to cycle through for one OID 7 8 5 Walking Through OIDs Use the following steps to WALK through an OID 1 Highlight WALK using the arrow keys ...

Page 61: ...me through all of the sublayers of the MIB available for that OID 7 8 7 Cycling Through OIDs Use the following steps to CYCLE through an OID 1 Use the arrow keys to Highlight CYCLES then press ENTER 2 Enter the number of cycles desired to occur after ENTER CYCLE COUNT then press ENTER 3 Enter how many seconds delay desired between get next requests after ENTER CYCLE DELAY secs then press ENTER 7 8...

Page 62: ...lowing sections describe Device Statistics screen fields and provide instructions on how to change them BYTES RECEIVED Displays the number of bytes received FRAMES RECEIVED Displays the number of frames received ERRORS RECEIVED Displays the number of errors received COLLISIONS Displays the number of collisions received SEHI LOCAL MANAGEMENT Cabletron SEHI Revision X XX XX DEVICE STATISTICS STACK T...

Page 63: ...as the data that was originally sent ALIGNMENT ERRORS Displays the number of errors due to misaligned packets RUNT PACKETS Displays the number of runt packets received from the network A runt packet is less than the minimum Ethernet frame size of 64 bytes not including preamble GIANT PACKETS Displays the number of packets received that exceed 1518 data bytes not including preamble PORT ADMIN STATU...

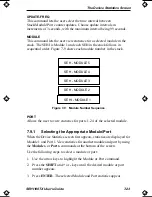
Page 64: ...7 9 Module Number Sequence PORT Allows the user to view statistics for ports 1 24 of the selected module 7 9 1 Selecting the Appropriate Module Port When the Device Statistics screen first appears statistics are displayed for Module 1 and Port 1 View statistics for another module and port by using the Module x or Port x commands at the bottom of the screen Use the following steps to select a modul...

Page 65: ... PORT Command The DISABLE PORT command lets the user disable the port selected in the PORT command The user must first use the PORT command to select the desired port Use the following steps to set the DISABLE PORT command 1 Use the arrow keys to highlight the DISABLE PORT command at the bottom of the screen 2 Press ENTER The corresponding port is enabled and the Port Admin Status field is updated...

Page 66: ...5 connector supporting Unshielded Twisted Pair UTP cabling The slide switch on the EPIM 100TX determines the cross over status of the cable pairs If the switch is on the X side the pairs are internally crossed over If the switch is on the side the pairs are not internally crossed over Figure A 1 shows the pinouts for the EPIM 100TX in both positions Figure A 1 EPIM 100TX Pinouts Position not cross...

Page 67: ...are peak power levels after optical overshoot A peak power meter must be used to correctly compare the values given above to those measured on any particular port If power levels are being measured with an average power meter add 3 dBm to the measurement to compare the measured values to the values listed above Table A 1 Transmitter Power Cable Type Worst Case Budget Typical Budget 50 125 µm fiber...

Page 68: ...nload of the new firmware image is in progress Before downloading the image to a device you must do the following Load the image file onto your network TFTP server Decompress the image file NOTE Download an image file to the SEHI with a remote management package such as SPECTRUM SPECTRUM Element Manager or the appropriate SPECTRUM Portable Management Application Refer to the specific package docum...

Page 69: ...Request a process status and grep for TFTP e g unix netstat a grep tftp The following information represents a typical output user 161 7 7 1 2 32 184 p3 S 12 00 grep tftp root 87 0 0 0 9 48 136 S 11 05 tftp s The term tftp s located at the end of the root string indicates TFTP is active If TFTP is NOT running only the grep process appears 2 If you do NOT have a tftpboot directory then create one e...

Page 70: ...age file download Refer to your specific MIB walking tool documentation for instructions on how to set MIB OID strings The Download OIDs for Cabletron Systems products reside in the Cabletron Systems enterprise MIBs group 52 The specific OIDs necessary to perform an image file download reside in the common download group under ctDL Cabletron Download The full OID string to reach this group is 1 3 ...

Page 71: ...c tftpboot sehi hex Table B 1 OIDs and Settings Step OID Name OID Number Data Type SNMP OID Data 1 ctDLForceOnBoot 1 3 6 1 4 1 52 4 1 5 8 1 1 0 integer 1 2 ctDLCommitRAMToFlash 1 3 6 1 4 1 52 4 1 5 8 1 2 0 integer 1 3 ctDLTFTPRequestHost 1 3 6 1 4 1 52 4 1 5 8 1 4 0 IP address Enter the IP address of the TFTP server 4 ctDLTFTPRequest 1 3 6 1 4 1 52 4 1 5 8 1 5 0 string ASCII Enter the path to the ...

Page 72: ...MAC address 7 11 port ENABLE override 7 11 serial port application 7 11 subnet mask 7 11 D Default gateway 7 13 Device statistics alignment errors 7 22 bytes received 7 21 collisions 7 21 CRC errors 7 22 disable port 7 22 enable port 7 22 errors recieved 7 21 frames received 7 21 giant packets 7 22 module 7 23 oow collisions 7 22 port 7 23 port admin status 7 22 port seg status 7 22 runt packets 7...

Page 73: ...al setup 7 5 trap table 7 14 N Network connection 5 1 EPIM 100FX 5 4 EPIM 100TX 5 2 unshielded twisted pair 5 2 Network port specifications SEHI100TX 22 3 5 NVRAM setting 6 5 O OIDs 7 16 Operating specifications 3 6 P Port ENABLE override 7 13 Power supply requirements 3 6 R Remote network management 2 4 Reset 6 4 S Safety requirements 3 7 SEHI features 2 2 Size dimensions 3 7 SNMP tools cycles 7 ...

Page 74: ... Anwendung des Geraetes geeignet und der zum Benuetzen im Lande der Anwendung anerkannt ist SPANISH El cable principal de la red eléctrica utilizado con este equipo debe tener 2 conductores y 1 toma de tierra con un mínimo de 0 75 mm2 cada uno y necesita tener un aparato de acoplamiento standard IEC en un extremo y un enchufe para el cable principal de la red eléctrica en el otro extremo lo cual s...

Page 75: ......

Reviews: