background image


Quick Start Guide 


        700-485 Transcoder Installation Guide


8/12


6.


The G711 Delay field can be set to delay the G711 audio stream in relation to the outgoing 

transcoded IPTV stream.  This delay can be set to synchronise low latency audio system playout 

with screens being fed from 780 or 782 units decoding the main transcoded stream.  The units 

specified are milli-seconds (mS). 


7.


Set the 

Resolution

 field to determine the output resolution of the Transcoded stream.  Set to Auto 

to keep the outgoing picture resolution the same as the incoming one.  If you set an output picture 

resolution from the drop-down list, and the output picture will be scaled to that resolution, 

regardless of the original incoming picture resolution.  Ensure low resolution incoming pictures are 

not scaled up too far, or 

grainy

 pictures will result. 


8.


Select the 

Video Codec

 to be used for the outgoing stream.  H265 will only work with 782 Settops 

and PC/MAC software players (

not 780 settops

) but does give a good quality pictures at low 

bitrates. 


9.


Set the average 

Bitrate

 for the outgoing transcoded stream (in Mbps).  Higher bit rates give better 

quality pictures but use more network bandwidth. 


10.


Press the 

Apply

 button at the bottom of the page to start the transcoding process.  After a few 

seconds the output data rate on the right-hand side of the screen will be updated to show the full 

bitrate of the transcoded stream.  This will vary a little. 


Clicking the download link on the right-hand side of the transcoder process will download a SDP (session 

Description Protocol) file onto your PC.  Some audio systems use this SDP file to tell them the IP address 

of the G711 audio stream. 
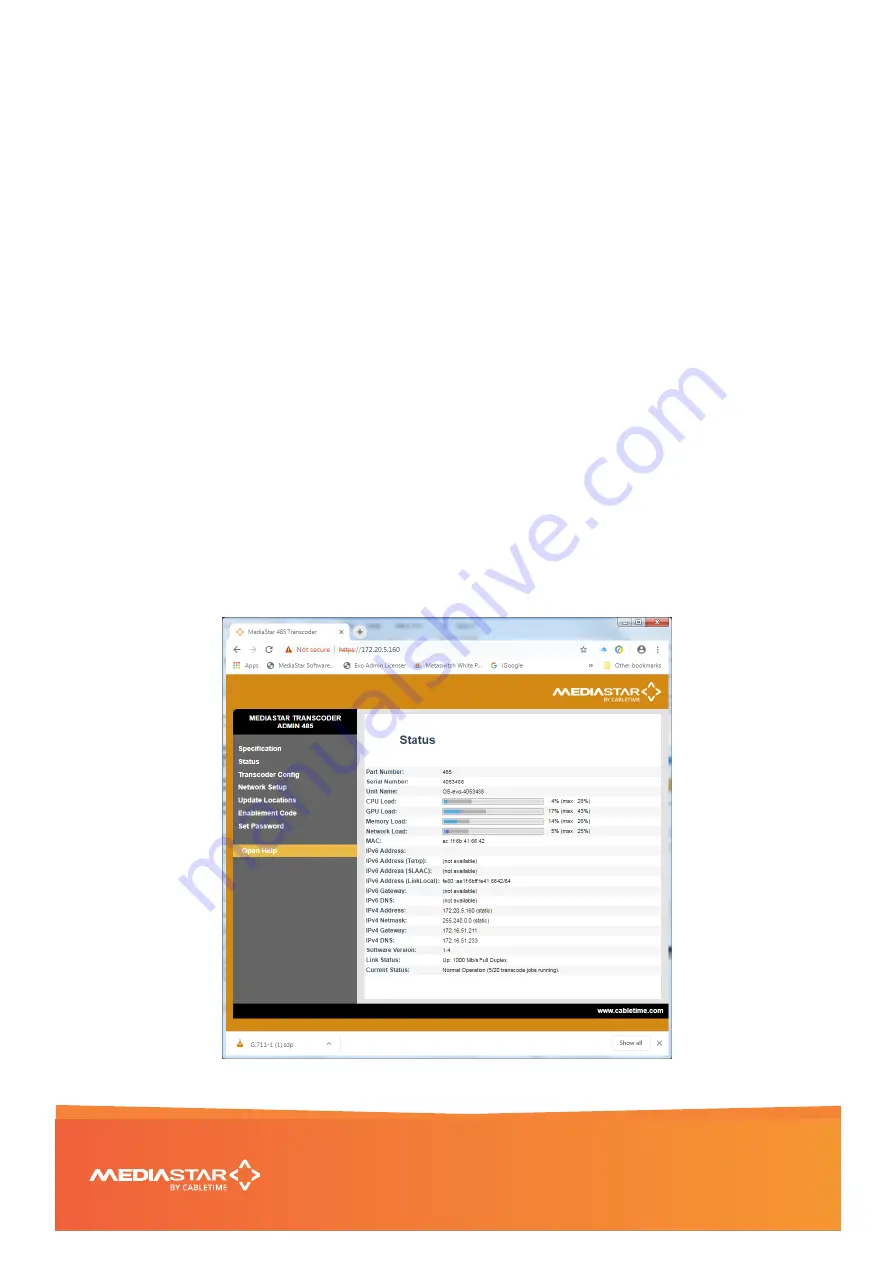
 

If you go to the 

Status page

 (left hand menu link) you will then see the processing load on the 

transcoder and the total incoming and outgoing data rates in the indicator bars.  The maximum recorded 

levels can be reset using a checkbox action on the Enablement Code menu. 


Summary of Contents for MediaStar 700-485

Page 1: ... setting in the standard 480p to 1080p range although high upscaling is not recommended for picture quality reasons H265 encoded video provides a picture of equal quality to MPEG2 or H264 but at significantly lower stream data rates It should be noted though that 780 units do not play H265 video streams What s in the box 700 485 1RU Transcoder Rack Mounting Kit AC mains power leads The Transcoder ...

Page 2: ...A grounding type plug has two blades and a third grounding prong The wide blade or the third prong are provided for your safety If the provided plug does not fit into your outlet consult an electrician for replacement of the obsolete outlet 11 Protect the power cord s from being walked on or pinched particularly at plugs convenience receptacles and the point where they exit from the apparatus 12 O...

Page 3: ...removed If there is any doubt whatsoever about these installation requirements a qualified electrician must be consulted All MediaStar equipment has a maximum operating temperature of 40 C When mounting inside an enclosed 19 rack tower ensure there is sufficient cool free ventilation airflow to keep MediaStar equipment below its maximum operating temperature When mounting the Transcoder unit ensur...

Page 4: ...es assigned to the unit If the IP address of the machine needs to be changed then a Click the Network Setup entry in the menu on the left hand side b Change the IPv4 and IPv6 parameters as required c Click Apply 2 Changing Passwords Cabletime User a At the login prompt login as user cabletime if automatic login is not configured b Double click the Terminal icon on the desktop c Enter the command p...

Page 5: ...ranscoder is disabled This can be changed as follows Enabling a At the login prompt login as user cabletime if automatic login is not configured b Double click the Terminal icon on the desktop c Enter su d Enter the current password for the root user e Enter systemctl enable sshd f Enter systemctl start sshd Disabling a At the login prompt login as user cabletime if automatic login is not configur...

Page 6: ... This is where all the stream transcoding parameters are configured Network Setup Allows specification of the Network Connection Static or DHCP addressing device Hostname IP Address Subnet Mask and Gateway settings Confirm these with the network administrator before configuring Update Locations This is the URL of the MediaStar http server and folder that the Re Caster will look at for software upd...

Page 7: ...g way 1 Check the Enabled box to enable the transcoder process 2 Set the name of the TV channel in the Label field This channel name will be used for transcoder stream media icons automatically created in Media Manager 3 Set the IP stream details of the incoming stream in the Source Address field If a Multicast IP address is set the Transcoder will pull the stream off the network using IGMP comman...

Page 8: ...he outgoing stream H265 will only work with 782 Settops and PC MAC software players not 780 settops but does give a good quality pictures at low bitrates 9 Set the average Bitrate for the outgoing transcoded stream in Mbps Higher bit rates give better quality pictures but use more network bandwidth 10 Press the Apply button at the bottom of the page to start the transcoding process After a few sec...

Page 9: ...lticast UDP MPEG2 transport streams TTL 16 H264 or H265 video formats 1 10 Mbps ABR AAC stereo audio 48 192 kbps G711 64 Kbps RTP unicast or multicast streams with TV picture audio with up to 10000mS synchronisation delay STREAM HANDLING CAPACITY Simultaneous transcoding of 20 IPTV streams including video audio format conversion picture resolution conversion and simultaneous output of separate G71...

Page 10: ...Quick Start Guide 700 485 Transcoder Installation Guide 10 12 Notes ...

Page 11: ...Quick Start Guide 700 485 Transcoder Installation Guide 11 12 Notes ...

Page 12: ...iterature indicates that the product and its electronic accessories should not be disposed of with other household waste at the end of its working life To prevent possible harm to the environment or human health from uncontrolled waste disposal please separate these items from other types of waste and recycle them responsibly to promote the sustainable reuse of material resources Whilst all reason...

Reviews: