background image

www.cablematters.com 

HDBaseT HDMI Extender


3. CONNECTION AND OPERATION 

3.1 Installation Checklist 

Please review these steps before installing the HDMI Extender 

 

Power-off the source and display equipment before connecting 

 

Extenders must be located within 3.7 feet of an electrical outlet 

 

Recommend max total distance for HDMI cables (in/out) is 20 feet 

 

4K displays require 4K rated HDMI cables in the shortest length needed 

 

Use high quality 22-28 AWG HDMI cables for the best performance 

 

Unshielded cable is appropriate for shorter lengths in a low EMI area 

 

Shielded cable is appropriate for longer lengths in a high EMI area 

 

CATV STB  or A/V receivers with HDMI 1.2 may block the signal 

 

IR TX & RX cables must have line of sight with source and remote 

 

Test the Extender and cabling before installing in a permanent location 

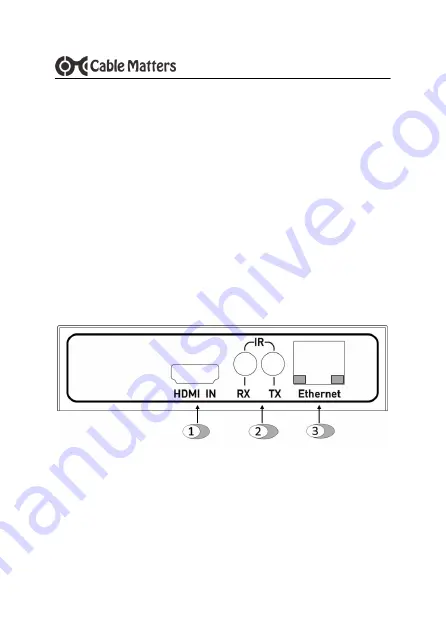
3.2 Front Panel Connections - Transmitter


1) 

HDMI IN

: Connect the HMDI input video source cable 

2) 

IR RX/TX

: Connect the IR Receiver and Transmitter cables to RX 

and the TX ports (optional) 

3) 

Ethernet

: Connect an RJ45 patch cable to a router to provide 

internet access. LEDs: Status=green and Data Transfer=yellow 

Summary of Contents for 103078

Page 1: ...www cablematters com HDBaseT HDMI Extender over Single Cat 6 up to 330 Feet Model 103078 User Manual Supports 100BaseT Uncompressed Video and Surround Sound Audio ...

Page 2: ...n Checklist 3 3 2 Front Panel Connections Transmitter 3 3 Rear Panel Connections Transmitter 4 3 4 Front Panel Connections Receiver 3 5 Rear Panel Connections Receiver 5 3 6 IR Cable Installation 6 3 7 Extender Connection Instructions 7 3 8 Troubleshooting Notes 8 4 TECHNICAL SPECIFICATIONS 9 5 WARRANTY AND SUPPORT 10 5 1 Customer Support and Contact Information 5 2 Warranty Information 5 3 Limita...

Page 3: ...pecifications are subject to change without notice Cable Matters is a registered trademark or trademark of Cable Matters Inc All rights reserved All other trademarks are the property of their respective owners 1 3 FCC Compliance Statement This equipment has been tested and found to comply with the limits for a Class B digital device pursuant to Part 15 of the FCC Rules 2 PRODUCT OVERVIEW 2 1 Packa...

Page 4: ... feet Supports video over Cat 5e up to 150 feet Supports HDBaseT uncompressed video technology Plug Play installation with no drivers required Dolby Digital DTS Dolby TrueHD and DTS HD Master Audio Support Bi directional IR Control with the included RX and TX cables Bi directional RS 232 support to connect a PC for control Bi directional Ethernet to connect a router to a PC or smart device HDCP co...

Page 5: ... for the best performance Unshielded cable is appropriate for shorter lengths in a low EMI area Shielded cable is appropriate for longer lengths in a high EMI area CATV STB or A V receivers with HDMI 1 2 may block the signal IR TX RX cables must have line of sight with source and remote Test the Extender and cabling before installing in a permanent location 3 2 Front Panel Connections Transmitter ...

Page 6: ...ED Link status indicator verifies a live connection 3 DC 5V AC power adapter port Red LED confirms power 3 4 Front Panel Connections Receiver 1 HDMI OUT Connect the HMDI output display cable 2 IR RX TX Connect the IR Receiver and Transmitter cables to RX and the TX ports optional 3 Ethernet Connect an RJ45 patch cable to a router to receive internet access LEDs Status green and Data Transfer yello...

Page 7: ...eceiver 1 RS232 Male DB 9 serial port connects an RS 232 device 2 Link Connect a Cat 6 cable with 568B wiring Green LED Link status indicator verifies a live connection 3 DC 5V AC power adapter port Red LED confirms power See Section 3 7 for Extender connection instructions ...

Page 8: ...nnect an IR Transmitter cable to the Transmitter TX port It must have line of sight with the remote for the Output display 2 Connect an IR Receiver cable to Transmitter RX port It must have line of sight to the source HDMI Input IR sensor 3 Connect an IR Transmitter cable to the Receiver TX port It must have line of sight with the remote for the Input source 4 Connect an IR Receiver cable to the R...

Page 9: ...onnect the IR RX and TX cables optional 5 Connect the RS 232 cables optional 6 Power on all the equipment 7 Select the input source from the display menu 8 Connect the AC power adapters to the Extender boxes 9 Check that the red power LED is lit 10 Check that the green Link LED is lit 11 Check the Ethernet status indicators if a router is connected Note Test the Extender boxes and connections befo...

Page 10: ...y Check the audio output settings from the source input device Test each HDMI cable by connecting it with other equipment Test the Cat 6 cable with a cable tester It must be terminated using the 568B wiring standard High resolution 4K displays may require a heavy gauge AWG 22 24 or RedMere HDMI cable for cables over 10 feet Place the Extender boxes away from fluorescent lighting or equipment that ...

Page 11: ...4096 x 2160 30Hz up to 70m 3D Support HDMI 1 4b 1080P 60hz HDCP HDCP 1 4 Audio Support 2 Ch Dolby DTS 7 1 Surround Sound Extender Dimensions Transmitter Receiver each L x W x H Weight 4 2 x 4 2 x 1 Inches 9 5 Ounces Included Cables HDMI 4K Rated 2 x HDMI 19 pin male to male 6 Ft IR RX TX 2 x Transmitter and Receiver 3 7 Ft cord Cat 6 RS 232 and additional HDMI cables are sold separately Environmen...

Page 12: ...ts and labor costs only Cable Matters does not warrant its products from defects or damages arising from misuse abuse or normal wear 5 3 Limitation of Liability In no event shall Cable Matters Inc including their officers directors employees or agents be liable for any damages whether direct or indirect special punitive incidental consequential or otherwise loss of profits loss of business or any ...

Reviews: