background image

VGA Extender over Cat 6 with Audio Support 

www.cablematters.com 

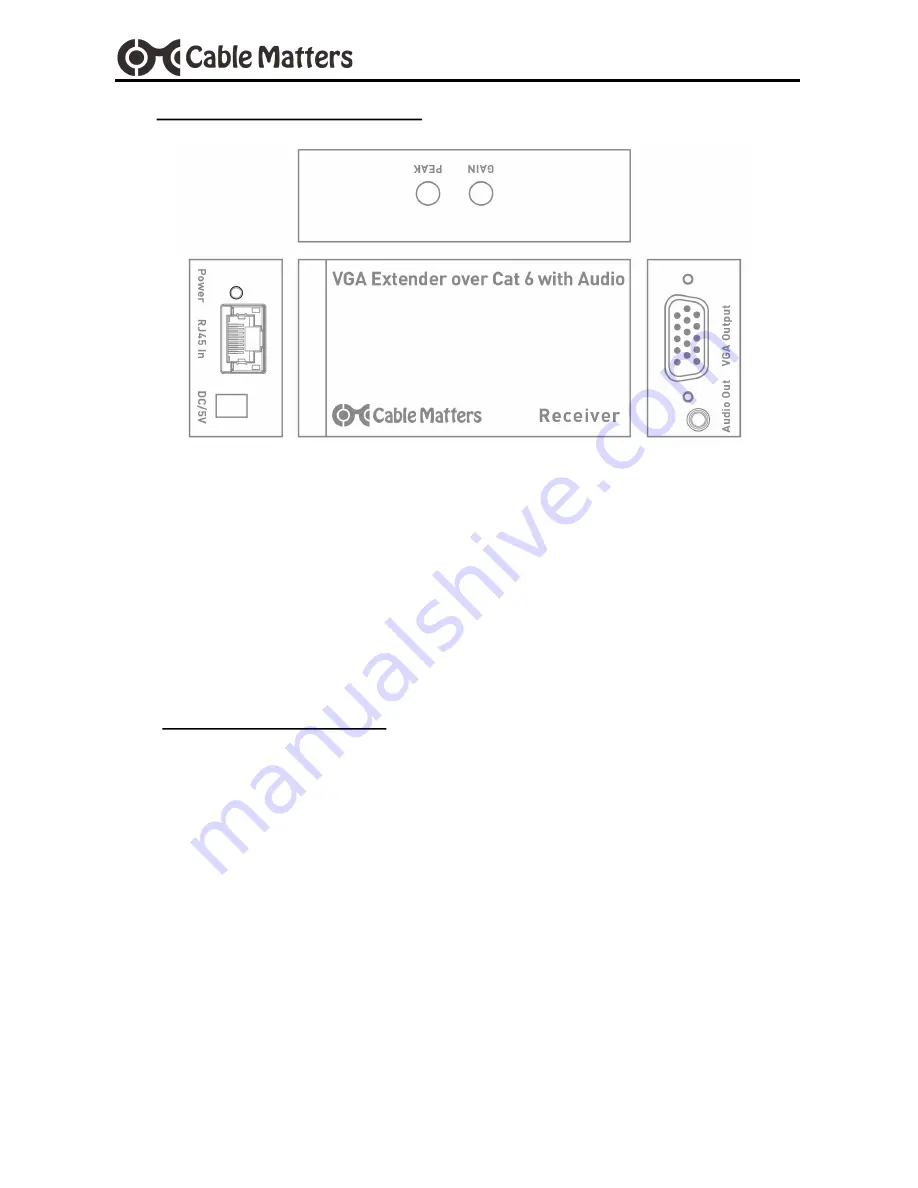
1)  Connect the power adapter to the Receiver and an electrical outlet. Verify 

that the green power LED is lit. 

2)  Connect a VGA cable from the remote display to the VGA Output female 

port on the Receiver.  

3)  Connect a Cat 6 cable to the RJ45 In female port. 

4)  Connect speakers to the Audio Out port (optional). 

3.4 Installation Confirmation 

 

Power-on the computer source and the remote display. 

 

Verify that the video is displayed correctly on the remote display and that 
the audio (optional) is transmitting to the remote speakers. 

 

It may take a few minutes for the video to synchronize. See Section 3.5 for 
configuring the video resolution and sound. 

 

It the remote display video is too dark, adjust the brightness with the GAIN 
screw terminal on the Receiver. 

 

If the remote display video is skewed, adjust the clarity with the PEAK 
screw terminal. 

3.3 Connecting the Receiver Unit 

Summary of Contents for 103004

Page 1: ...Support User Manual Extend both video and audio up to 300 meters Utilize a Cat 6 cable instead of a bulky VGA cable Supports a local monitor and local audio Easy installation with no drivers required...

Page 2: ...ures 3 3 CONNECTION INSTRUCTIONS 4 3 1 Installation Checklist 3 2 Connecting the Sender Unit 5 3 3 Connecting the Receiver Unit 6 3 4 Installation Confirmation 3 5 Video and Audio Settings 7 3 6 Troub...

Page 3: ...y company in question Regardless of any direct acknowledgement elsewhere in the body of this document Cable Matters hereby acknowledg es that all trademarks registered trademarks service marks and oth...

Page 4: ...GA cables audio cables and Cat 6 cabling is sold separately 2 2 Product Description The Cable Matters VGA Extender distributes a VGA signal up to 975 feet from a computer to a VGA display over a singl...

Page 5: ...display to mirror the video of the remote display Supports mirroring of local and remote audio to connect speakers Extender units are AC powered to boost the video and audio signals Compact Extender b...

Page 6: ...and audio cables at each end is 10 feet for the best performance The Cat 6 cabling should be directly connected and not used with any other equipment such as a network switch or router The Extender u...

Page 7: ...om the computer source to the VGA Input female port not the VGA Local port on the Sender 3 Connect a Cat 6 cable to the RJ45 Out female port Optional Connections Connect a 3 5mm audio stereo cable fro...

Page 8: ...nal 3 4 Installation Confirmation Power on the computer source and the remote display Verify that the video is displayed correctly on the remote display and that the audio optional is transmitting to...

Page 9: ...te The local display mirrors the content of the remote output display Audio Settings Audio is supported only over 3 5mm cables sold separately Configure the audio output from the source computer Adjus...

Page 10: ...ible if possible Check the audio output settings from the computer and the input settings of the remote display Test each VGA and audio cable by connecting it with other equipment Try to place cables...

Page 11: ...e Transmission Ranges 640 x 480 1000 Ft 800 x 600 660 Ft 1024x 768 495 Ft 1280 x 1024 330 Ft 1920 x 1080 250 Ft HDCP Compliance No Analog VGA does not support HDCP Vertical Frequency Range 60 75 85 Hz...

Page 12: ...ion The warranty covers parts and labor costs only Cable Matters does not warrant its products from defects or damages arising from misuse abuse alteration or normal wear and tear 5 3 Limitation of Li...

Reviews: