background image

1

1


Replacing Assembly Units

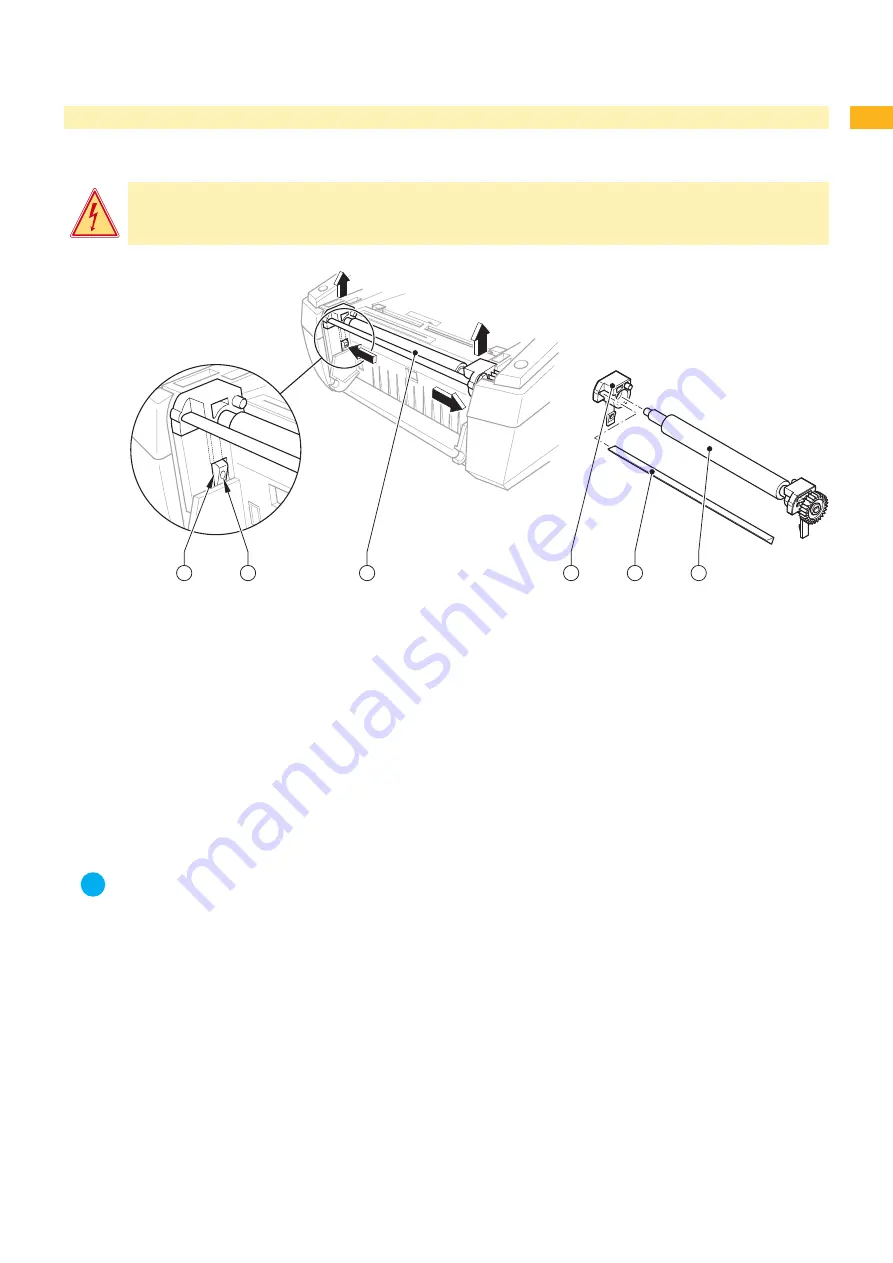
Replacing the Print Roller

Danger!

Danger to life and limb from electric shock!

Disconnect the device from the mains supply before opening the outer casing.

20

10

0

10

30

40

50

50

1

2

4

5

6

3

Fig. 7 

Replacing the print roller

  1  Apertures
  2  Holding lugs
  3  Print roller unit

  4  Roller holder
  5  Peel-off edge
  6  Print roller

Open the cover and hinge down the control panel, press the release button and hinge up the print module. 

Release the locking device to remove the print roller unit (3):  
Insert a pointed tool through the apertures (1) on both sides, press on the pressure points of the holding lugs 
(2), and release the print roller unit (3). A soft click will be heard and the print roller unit (3) rises slightly. Pull the 
released print roller unit (3) upwards out of the device.

Pull the roller holder (4) and the peel-off edge (5) off the print roller (6) and insert both into the new print roller. 

i

Notice! 
Printers with cutting unit are not equipped with peel-off edge (5).

Insert the print roller unit (3) into the holder apertures, and press down evenly on both sides until it latches in.

Hinge down the print module and press evenly on the two marked surfaces so that the unit snaps in on both 
sides. Close the control panel.

1.

2.

3.

4.

5.

Summary of Contents for MACH4

Page 1: ...Barcode Label Printer Service Manual MACH4 The Business Class from Serial No 10000 ...

Page 2: ...oration TrueTypeTM is a registered trademark of Apple Computer Inc Editor Regarding questions or comments please contact cab Produkttechnik GmbH Co KG Topicality Due to the constant further development of our products discrepancies between documentation and product can occur Please check www cabgmbh com for the latest update Terms and conditions Deliveries and performances are effected under the G...

Page 3: ...ter Casing 10 2 6 Replacing the Print Mechanism 11 2 7 Replacing the Printhead 12 2 8 Replacing the Print Roller 13 2 9 Replacing the Brake of the Ribbon Supply Hub 14 2 10 Replacing the Drive of the Cutting Unit 15 2 11 Replacing the Blades of the Cutting Unit 16 2 12 Replacing the CPU PCB 17 2 13 Replacing the Power Unit 18 3 Adjustments 19 3 1 Measuring the Winding Torques 19 3 2 Adjusting the ...

Page 4: ...ot wear clothing with metal parts Do not wear jewelry Do not wear spectacles with metal frames Warning Items of clothing drawn into the device by moving parts can lead to injuries Do not wear any items of clothing which could get caught by moving parts 1 2 Protective Devices Warning There is a risk of injury if protective devices are missing or defective Replace all protective devices covers safet...

Page 5: ...g circuits in the device Test the zero potential of the device parts Check the working area for possible sources of danger such as wet floors defective extension cables defective protective conductor connections Additional precautions in the case of exposed voltages Ask a second person to remain near the working site This person must know where the emergency and power switches are and how to switc...

Page 6: ...d Slave interface 3 Two USB master interfaces for keyboard and scanner 4 Ethernet 10 10 Base T interface 5 CompactFlash card slot 6 Power supply socket 7 PC card slot type II 8 Power switch 9 Cover 10 Roll hub 11 Holder slots 12 Ribbon rewind hub 13 Printhead mounting with printhead 14 Release button of the print module 15 Pressure roller 16 Control panel ...

Page 7: ...es that are suitable for the task at hand cab special tools Tape holder test collar cab item number 5540932 Cylindrical dynamometer spring scale 0 10 N cab item number 5906108 Standard tools Screw driver Torx size TX 10 200 Hex screwdriver straight size 2 5 Screwdriver with flat blade size 4 Flat nose pliers ...

Page 8: ...th one hand grip the control panel with the other hand and remove one axle 5 from its bearing 3 by pulling strongly Grip the control panel above the second axle and pull it until the axle comes out of its bearing i Notice Ensure that the plug connector 4 is not damaged 4 Draw the lugs 2 beside the bearings 3 out of the device 5 Pull the plug 4 out of the printer and put down the control panel 6 Pu...

Page 9: ...onnect the damping mechanism by pressing both toothed lugs 1 towards the center of the device Press the cover further back until the axles 4 come out of the guide 7 To fit the new cover first remove the locking rings 6 and the axles 4 Place a new cover 5 on the casing ensure that the damping wheels 2 mesh with the toothed lugs 1 Push the axles 4 on both sides from the inside into the hinged apertu...

Page 10: ...ing 1 Two screws 2 Outer casing 3 Two Screws 4 Cover The outer casing can be removed complete with the cover Open the cover 4 remove the roll hub and material Unscrew 2 screws 1 from the front of the casing Unscrew 2 screws 3 from the inside of the floor Remove the outer casing 2 together with the cover 4 Mount the outer casing with the cover in the reverse order Hinge up the print module for easi...

Page 11: ...PU PCB 4 Remove the grounding cable 3 with the screw 6 from the CPU PCB 4 Loosen the two screws 5 Slide the print mechanism 1 back a little until the elongated holes 8 can be lifted off from the two screws 5 Pull the lower lugs 9 out of the bottom guides 7 and put the print mechanism down Slide the lower lugs 9 of the new printing mechanism into the bottom guides 7 press down and slide forward unt...

Page 12: ...unded wrist strap Do not touch the connector pins of the printhead by naked hands Open the cover and hinge down the control panel press the release button and hinge up the print module Disengage the printhead 4 from the printhead mounting 6 by unscrewing the screw 3 Remove the printhead cables 5 and 7 from the printhead 4 After exchanging the printhead 4 attach the printhead cables 5 and 7 to the ...

Page 13: ... a pointed tool through the apertures 1 on both sides press on the pressure points of the holding lugs 2 and release the print roller unit 3 A soft click will be heard and the print roller unit 3 rises slightly Pull the released print roller unit 3 upwards out of the device Pull the roller holder 4 and the peel off edge 5 off the print roller 6 and insert both into the new print roller i Notice Pr...

Page 14: ...een fully inserted into the recesses of the holder 3 Grip the hub 1 that the axle cannot rotate press the holder 6 of the friction coupling inwards and turn the lock washer 7 counterclockwise using the tool 5 until it is released then take it off 4 Take off the several elements of the brake and mount the new parts in reverse order 5 Grip the hub 1 that the axle cannot rotate press the lock washer ...

Page 15: ...atches 2 and lift it Loosen the nuts 9 Loosen but not remove the two screws 7 carefully so that the connectors 8 can be moved from the pivots of the eccentrics 6 Unlock the two eccentrics 6 and pull they off from the shaft 5 Unlock the clock wheel 4 pull out the shaft 5 from the drive 11 and the base plate 10 Remove the drive 11 and insert the new drive into the form hole of the base plate 10 Asse...

Page 16: ...en key and that way swivel the clamp 7 with the lower blade 8 away from the upper blade 10 Danger Danger of cuts and bruising The springs at the clamp are strongly tight while turning up or down and when it is turned down Do not reach into the area between the blades Do not touch the blade edges with bare hands 4 Loosen the three screws 6 of the lower blade 8 remove the blade and attach the new bl...

Page 17: ... Grounding cable 8 Grounding cable power input module 9 Screw 10 Fan cable Save the printer configuration on a CompactFlash card the configuration manual Pull out all memory modules of their slots Remove the outer casing 2 5 on page 10 Disconnect cables 1 to 6 from the CPU PCB Loosen both screws 9 and the grounding cables 7 8 Disconnect the fan cable 10 and remove the CPU PCB Reassemble in the rev...

Page 18: ...input plug 9 Bottom lug Turn the printer and place it on a suitable underlay Loosen the two screws 3 Insert a screwdriver into the recess 4 lift and remove the cover 1 Unplug the mains input 8 and power unit 6 cables Remove the two screws 5 Remove the power unit 7 Slide the new power unit 7 under the 3 bottom lugs 9 and slot the power unit PCB with the drill holes for the screws 5 into the corresp...

Page 19: ...upling on the ribbon rewind hub Fig 13 A 14 4 17 4 Ncm 4 8 5 8 N Brake on ribbon rewind hub Fig 13 B 2 7 4 5 Ncm 0 9 1 5 N Friction coupling on the ribbon supply hub Fig 13 C 3 9 4 5 Ncm 1 3 1 5 N C B A 1 2 3 4 2 3 Fig 13 Measuring the winding torques 1 Ribbon rewind hub 2 Test collar 3 Spring scale 4 Ribbon supply hub Measuring the torque of the coupling on the supply hub Wind the cord several ti...

Page 20: ...d they cannot be reset 3 2 Adjusting the Winding Torques Danger Danger to life and limb from electric shock Disconnect the device from the mains supply before opening the outer casing 6 5 4 3 2 1 3 4 5 6 7 4 3 2 1 6 3 4 5 6 7 5 5 4 3 2 1 6 3 4 5 6 7 6 1 7 2 3 4 5 Fig 14 Adjusting the winding torques 1 Knurled ring 2 Locking device 3 Print module 4 Supply hub friction coupling 5 Rewind hub friction...

Page 21: ...nment 3 Screws for adjusting the printhead pressure 4 Screw for adjusting the printhead bend Screws for horizontal alignment 2 Turning the screws clockwise will move the printhead to the front Turning the screws counter clockwise will move the printhead to the back For an optimum print quality the heating elements of the printhead must be aligned to the peak of the print roller This setting guaran...

Page 22: ...at side where the print image is lighter Turn the screws 3 counter clockwise each by a quarter turn until the print image is even over the entire width It may be necessary to turn both screws alternately The darkness of the print image might still not be satisfactory Turn the screws 2 counter clockwise and shift the printhead to the back until the print image almost disappears Now turn the screws ...

Page 23: ...23 4 Block Diagram Fig 16 Block diagram 1 Fig 17 Block diagram 2 ...

Page 24: ...r supply socket 6 Power switch 6 Power unit 18 replacing 18 Pressure roller 6 Printhead 6 12 replacing 12 Printhead cable 12 Printhead mounting 6 12 Print mechanism 11 adjusting 22 adjusting elements 21 replacing 11 Print roller 13 replacing 13 Print roller unit 13 Procedure in case of accidents 5 Protective devices 4 R Release button of the print module 6 Replacing blades of the cutting unit 16 b...

Reviews: