C.T.S.V. Medimachine II User Manual Download Page 21

21

50. Red light

51. Other colours choices

52. Other colours choices

53. Other colours choices
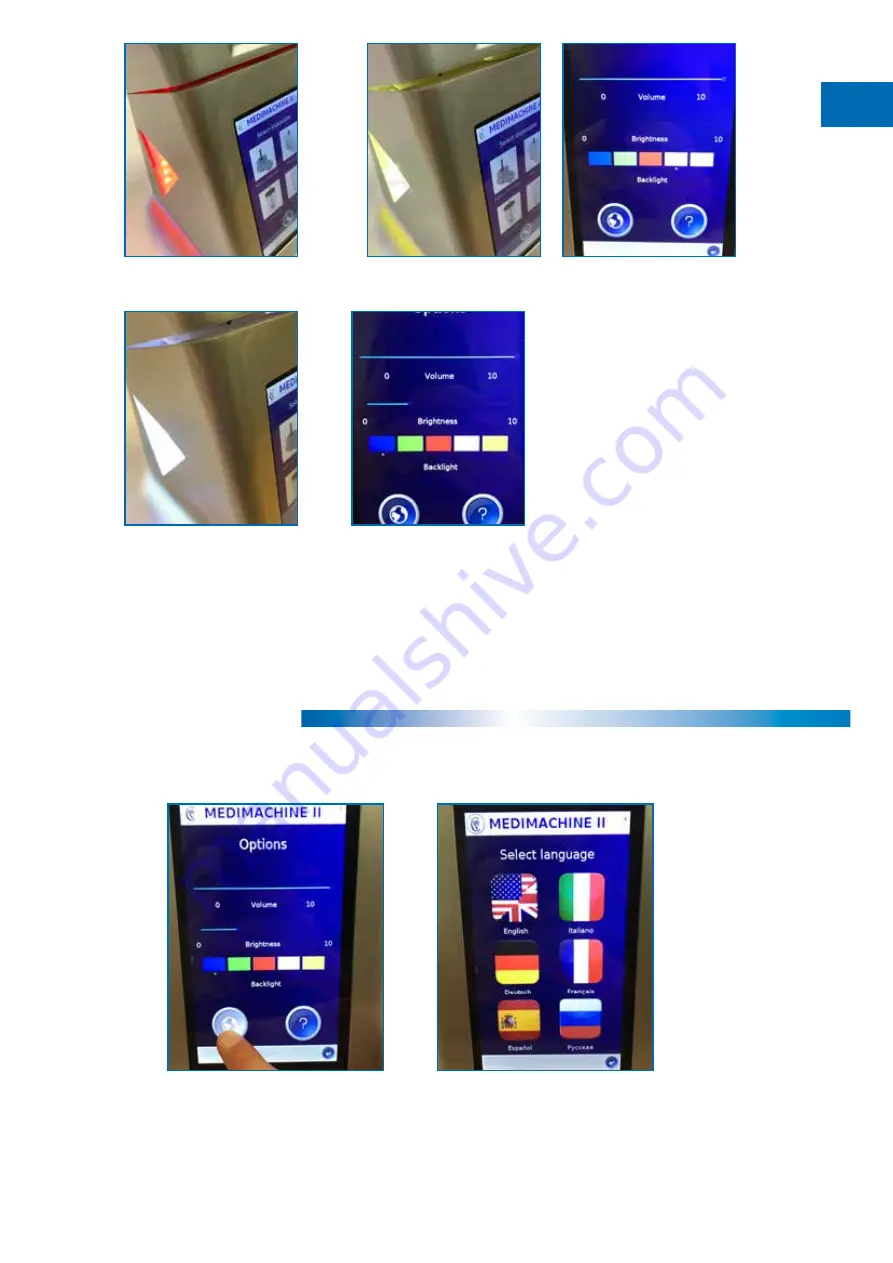
54. Change language

From the settings page, select the planet icon to access to the language selection page 

and select as required

USE OF INSTRUMENTS

Part 5

6 - Operating the Medimachine II

6

Summary of Contents for Medimachine II

Page 1: ...Medimachine II Dissociator and Homogenizator code 121600 USER MANUAL...

Page 2: ...ng of the unit within their business or organization Maximum care has been taken by C T S V srl in the preparation of this user manual However C T S V srl shall not be liable for any technical or edit...

Page 3: ...Manufactured by C T S V srl Via Marco Polo 28 10090 Bruino TO Italy Tel 39 011 9049381 Fax 39 011 9055288 info ctsv biz www ctsv biz Medimachine II Dissociator and Homogenizator User manual Rev 08...

Page 4: ...ducts and spare parts Chapter 4 Storage and handling Chapter 5 Installation Chapter 6 Operating instructions Chapter 7 Maintenance Chapter 8 Troubleshooting Chapter 9 Technical specifications Chapter...

Page 5: ...e user manual for further instructions and proceed with caution Warning This symbol indicates the risk of loss of life or severe injury to the instrument operator due to high voltage Consult the user...

Page 6: ...ical and biological hazards The instrument must be used only with properly installed Medimachine II disposable whose lids are tightly closed Electrical hazards Please be particularly aware of electric...

Page 7: ...oratory environment from contamination All liquid and solid waste must be considered biohazardous and therefore must be handled taking universal laboratory precautions All clinical samples must be con...

Page 8: ...pplications Medimachine II homogenizator provides high quality results for extraction of molecules for the analysis of chemical residues virus bacterias etc Four types of disposables have been special...

Page 9: ...Before connecting the power cord to the power outlet ensure that the voltage is the one stated in the ID label 6 Fuses N 2 fuses x 4A 7 Start push button ON position the switch to I OFF position the...

Page 10: ...chine II must be stored and operated under dry conditions non condensing humidity Storage temperature must be between 15 C and 70 C The instrument should be operated at a temperature between 5 C and 4...

Page 11: ...livery 1 Medimachine II 1 power cord 1 Medimachine II user manual Basic tool screw driver and or allen key 4 adapters for the related disposables Installation The Medimachine II requires a flat surfac...

Page 12: ...nectors Before connecting the power cord to the power outlet ensure that the voltage is the one stated in the ID label 6 Fuses N 2 fuses x 4A 7 Start push button ON position the switch to I OFF positi...

Page 13: ...allation please choose the appropriate language touching the flag 3 Empty When the Medimachine II is in standby all led are on 4 Back to home Touch the back arrow to reach the home page 6 Operating th...

Page 14: ...e 10 Select mode 6 Operating the Medimachine II 5 Choose disposable dissociation Where dissocation of a solid tissue is required follow the procedure below selecting the appropriate dissociation dispo...

Page 15: ...etic lock is released 11 Manual program 17 Remove disposable Now is possible to open and remove the disposable 12 Pop up lid warning 18 Automatic program 13 Time setting 19 Select automated program 14...

Page 16: ...ized new program can be added both for dissociation and homogenization 20 Pop up lid warning 21 Running 22 manual stop During all sample processing the operator can manually stop the instrument by tou...

Page 17: ...m can be easily removed by selecting the program and touching the X icon 27 Choose disposable homogenization USE OF INSTRUMENT Part 3 Homogenization chapter Where sample homogenization is required fol...

Page 18: ...light 33 Time setting 34 Run 35 Running 29 Position in place 36 End When the process is terminated the magnetic lock is released 37 Remove disposable Now is possible to open and remove the disposable...

Page 19: ...19 6 Operating the Medimachine II 43 Manual stop 38 Automatic program 39 Select automated program 40 Select automated program and run 41 Pop up lid warning 42 Running 6...

Page 20: ...to settings options 45 Setting options From the setting options page voice volume brightness and led colours may be customized 46 Led colours 47 Confirm setting and esc Everytime operator changes colo...

Page 21: ...s 52 Other colours choices 53 Other colours choices 54 Change language From the settings page select the planet icon to access to the language selection page and select as required USE OF INSTRUMENTS...

Page 22: ...the blowen fuse with a 2 x 4A 4 Place the holder with the new fuse in the housing 5 With a 6 mm screwdriver gently push the holder into the housing and rotate c w 45 6 Plug in the power cord and swit...

Page 23: ...ice provider authorized by C T S V srl Make sure that all parts are decontaminated and sterilized Use the original packaging material Always use your personal safety equipment while removing or disass...

Page 24: ...oes not switch on check if power cord is connected and main switch is on If it is connected and the switch is on but the instrument remains off please proceed with fuse replacement as described into t...

Page 25: ...Motors Low speed specs rotational speed 90 rpm rotation wise clock wise max torque 420 mNm High speed specs rotational speed 22 200 rpm rotation wise clock wise stall torque 123 mNm Conditions of ope...

Page 26: ...the warranty is subject to receipt of reasonable proof by the customer that the defect is contained within the terms of the warranty All claims made under this warranty must be presented to C T S V wi...

Page 27: ...chnical questions please contact your local C T S V srl representative or C T S V srl Technical Support C T S V srl Via Marco Polo 28 10090 Bruino TO Italy Tel 39 011 9049381 Fax 39 011 9055288 info c...

Page 28: ...ty that the tissue homo genizer equipment Model MEDIMACHINE II cod 121600 Supply voltage 85 264 VAC 47 63 Hz Year of manufacture 2016 Complies with the following standards and specifications EN 60601...

Page 29: ...29 www ctsv biz REG N 623 UNI EN ISO 9001 2008...

Reviews: