background image

C. BECHSTEIN 

VARIO · MANUAL

6

This section assumes that you have an instrument - 
upright or grand - including VARIO Digital System that 
is ready to play. In most cases, your dealer has already 
ensured that the entire instrument is in perfect condition 
and you have already been able to enjoy its acoustic 
facets. So let‘s explore the digital possibilities of your 
piano together - let‘s get started. 

POWER SUPPLY & START UP

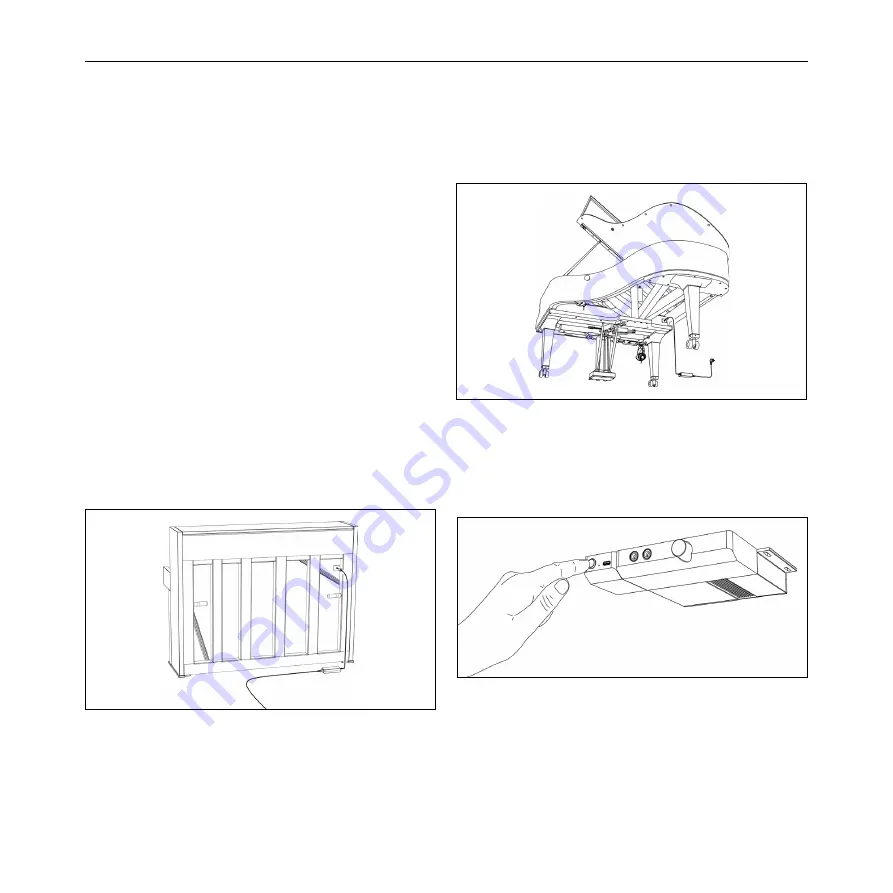
The VARIO requires a power connection for operation. 
The power supply which is included in the package is 
connected to the rear of the piano. Please do not use any 
power supply other than this one. For grand pianos, you 
will find the appropriate socket on the bottom, about an 
arm‘s length behind the two VARIO control modules.  

Position of the power supply connection on upright pianos 

Position of the power supply connection on grand pianos

Switch on the VARIO digital system by pressing the 
button. If the LED on the control unit lights gold after a 
few seconds, the system is ready.

Switching on by pressing the button

2.  GETTING STARTED

2.1  Power on: The first contact with your new VARIO

Summary of Contents for VARIO

Page 1: ...19 Further information as well as audio and video examples are available on our website https www bechstein digital com This document is always the latest version as well as in other languages also av...

Page 2: ...ent 15 3 7 Calibration of the pedals 16 3 8 Pedal Adjust 17 3 9 Select sounds 18 3 10 Make your playing visible the monitor 19 3 11 Adjusting dynamics and playing feel Sensitivity 20 3 12 The Metronom...

Page 3: ...the playing into an electrical signal which can then be played by a digital sound device the sound module of the VARIO system or an app via headphones A mute bar customized for each instrument also si...

Page 4: ...ARIO digital system very quickly right after power up and control the most important things with just two controls even without apps or connected devices Read more about the basic operation on page 6...

Page 5: ...n for operation The power supply which is included in the package is connected to the rear of the piano Please do not use any power supply other than this one For grand pianos you will find the approp...

Page 6: ...ome very loud during forte play Front panel connectors and volume knob Once you ve enjoyed the first notes you ll certainly be looking forward to more sounds from the VARIO System press the button onc...

Page 7: ...fers you more space Download the VARIO App see the following sections for details and launch it on your device Details on the connection options different cable types Bluetooth can be found in the sec...

Page 8: ...s professional users appreciate the numerous software tools for notation training recording or sound design And beginners can expect a creative world of apps for learning and playfully exploring the b...

Page 9: ...app on your iPad iPhone or iPod touch ap on Search to find our app using the keywords BECHSTEIN VARIO This QR code will also take you to the VARIO app scan it directly with the camera function Open t...

Page 10: ...ve prevent scrolling due to their function In such areas it is best to use the outer edges of the blocks On smartphones only one column of the VARIO app is displayed By turning the smartphone to the s...

Page 11: ...hed automatically immediately after plugging in Further information on the possible USB cable connections can be found in section Connectivity on page 36 CONNECTING TO MIDI In the MIDI CONNECTION bloc...

Page 12: ...etooth devices Black entries are visible devices via Bluetooth MIDI grey entries refer to earlier unavailable connections The dialog closes automatically as soon as the connection has been established...

Page 13: ...er of parameters see the sections Adjusting the keystroke and Sensitivity curve even novice users can optimally adjust their VARIO system It s that simple Go to the Calibration Keys section Press Star...

Page 14: ...terpreted as a kind of frame in whose boundaries you can then adjust the settings to your desired dynamic behavior of the keyboard The following tips and hints will help you If the value of the hammer...

Page 15: ...ecalibration from time to time can be useful Proceed as follows Navigate to the Pedal Calibration area Press Start the pedals in the graphic turn grey Now step down the three pedals of your piano one...

Page 16: ...mechanical pedal at which the digitally generated output reacts The two graphics are interdependent the value Pedal Up Trigger bottom cannot be higher than the trigger point above just like in the aco...

Page 17: ...touch display of the VARIO classic You do not yet own a VARIO digital system and have only downloaded the free VARIO App so far In this case a single sound Grand Piano is available to you here 3 9 Se...

Page 18: ...d with the recorder are displayed as vertical bars They are moved to the left by newer bars and disappear over time This type of display helps for example to find the optimal values for key adjustment...

Page 19: ...ee 4 points two at the outer edges two inside By moving these points you change the translation of the keystroke into the tonal development Changing the height of the two outer points limits compresse...

Page 20: ...xperiment with the values and to find your preferred setting yourself SET UP DYNAMIC ZONES As you play you will have noticed that the note display in the SENSITIVITY block follows In this way you can...

Page 21: ...T TAP button several times one after another at the desired time interval As long as the color of the outer ring remains the same the button is in Tap Mode If you let the metronome run a few beats the...

Page 22: ...ording to the set tempo and time signature To do this set the mode selector on the RECORDER block to the metronome symbol below the record and play buttons In combination with the recorder a few speci...

Page 23: ...odes In Tape mode the recorder operates without a time reference and records from the first note played if you activate the recorder with the Record button In Metronome mode you add the metronome to t...

Page 24: ...If neither of the two digits is selected for recording the recording button starts a new song as usual ORGANIZE SONGS You will find your recordings in the SONGS block Press the Songs button to open th...

Page 25: ...data from your device Use other apps such as Messenger Mail or music notation programs to send or edit your music Use the many iOS iPadOS system services like iCloud Save to Files or Shortcuts With t...

Page 26: ...lti symbol three dots on the REVERB to select from different reverb algorithms The amount of this effect signal is adjustable If you adjust it beyond the middle the sound is additionally moved further...

Page 27: ...he points around freely and listen to their tonal impact You determine the slope Q by drawing the thin colored lines of a band The round button at the bottom right of the EQUALIZER block switches betw...

Page 28: ...also the recorder and the keyboard at the bottom of the VARIO app In the MIDI CONNECTION block you can transpose up to 24 semitones up or down A double tap on the value immediately resets the setting...

Page 29: ...f your VARIO digital system several times to switch between the favourites see also section Getting started page 6 The colour of the LED corresponds to the colours of the App button The following para...

Page 30: ...a the Apple App Store you can import this into the system in the Firmware section Compare the versions If a new version is available the VARIO App recommends an update Start it via the corresponding b...

Page 31: ...them Via headphones the perceptual loudness is different from when listening to the acoustic instrument While it may be a fun to play we recommend that you always use your VARIO digital system at a m...

Page 32: ...ver 50 mm Neodymium driver Audio transmission range 20 Hz 20 kHz Sensitivity 95 dB 1 mW Input impedance 32 Pressure force 3 5 N Connections 3 5 mm socket on the headset 3 5 mm stereo jack gold plated...

Page 33: ...end that you only use original parts or Apple certified adapters the so called MFI program the connectors contain additional electronics that are not always compatible with all versions of iOS or iPad...

Page 34: ...immermann The rubberized material is non slip and can easily be hooked in between the music stand and the keyboard lid see illustration Please note that your mobile device will not be completely secur...

Page 35: ...USB C USB A USB C Lightning Apple Camera Connection Kit 1 2 4 Without cable via Bluetooth MIDI LE Compatible with all devices mentioned above USB C MIDI and charging Power Delivery Many Notebooks Win...

Page 36: ...ed equipment Never use the unit at a high sound level Do not turn on the system if Liquids or other objects have got into the front modules or the instrument the power supply unit is damaged Smoke is...

Page 37: ...main functions Calibration Calibration of the sensor system Dynamic adjustment Velocity curve Flexible setting options for conversion into MIDI note ON velocity 5 zones keyboard ranges Recording funct...

Page 38: ...emitones Effects Hall Reverb Small room piano hall concert hall Echo Tempo metronome dependent delay Equalizer 4 band fully parametric Connectivity Bluetooth Bluetooth MIDI via Bluetooth Low Energy BL...

Page 39: ...on plus connected devices if required see below Optional power supply for connected mobile devices 5 V 0 9 A 9 V 1 A 15 V 1 A 20 V 2 5 A Standby 0 285 W Energy saving Auto Power Off Yes Dimensions mm...

Page 40: ...41 C BECHSTEIN VARIO MANUAL...

Reviews: