background image


Step 2: 

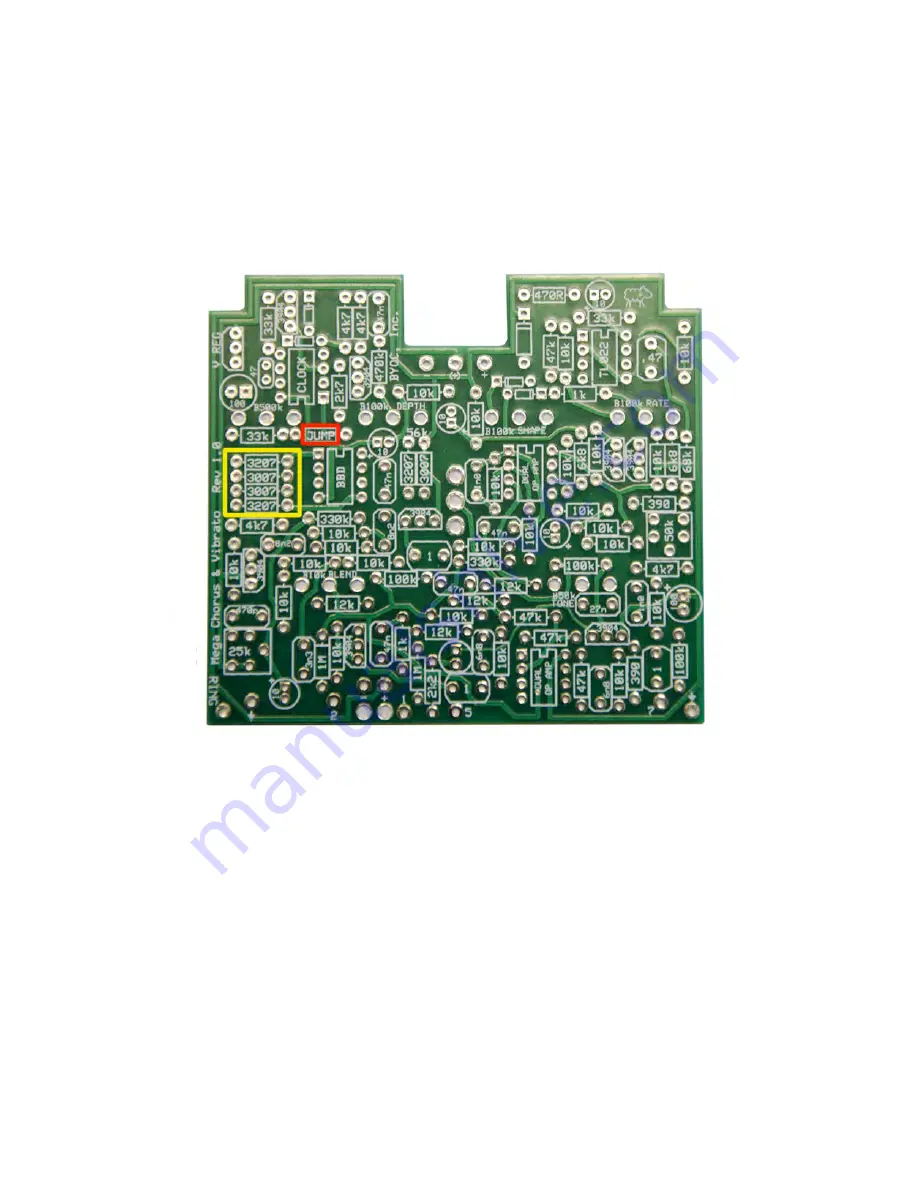
Add jumpers to the highlighted areas.  This is done by using a small amount of 

lead clipping left over from the last step to make a zero resistance connection.  

NOTE:  

The space labeled “JUMP” will be jumpered regardless of what BBD you are using.  If 

you are using a 3207 BBD, you will put jumpers in both spaces labeled “3207” and leave 

both spaces labeled “3007” empty.  If you are using a 3007 BBD, you will put jumpers in 

both spaces labaled “3007” and leave both spaces labeled “3207” empty.


Summary of Contents for Mega Chorus & Vibrato Kit

Page 1: ...warranty any of the individual parts once they have been used If you have a component that is used but feel it was defective prior to you using it we reserve the right to determine whether or not the...

Page 2: ...ryone titles their threads HELP then it makes it impossible for the people who are helping you to keep track of your progress A very brief description of your specific problem will do It will also mak...

Page 3: ...ibrato Kit Instruction Index Parts Checklist page 6 Populating the Circuit Board page 8 Main PCB Assembly page 17 Wiring page 19 Installing the IC Finishing up page 25 Operation Overview page 26 Schem...

Page 4: ...This is what your kit should look like when it s complete Your kit may come with different color capacitors switches etc Don t be alarmed by this They all still do the exact same thing...

Page 5: ......

Page 6: ...470k Yellow Purple Black Orange Brown 2 1M Brown Black Black Yellow Brown Visit www byocelectronics com resistorcodes pdf for more information on how to differentiate resistors Capacitors 1 47p Cerami...

Page 7: ...otentiometers SNAP THE SMALL TABS ON THE TOP OF THE POTS OFF WITH A PAIR OF NEEDLE NOSE PLIERS 3 B100k Rate Shape and Depth 1 B10k Blend 1 B50k Tone 1 B500k Delay Hardware 1 predrilled enclosure w 4 s...

Page 8: ...ead clippings You will need them for the next step NOTE Only add ONE 56k resistor to one of the spaces highlighted in yellow If you are using a 3207 BBD insert the 56k resistor into the space labeled...

Page 9: ...resistance connection NOTE The space labeled JUMP will be jumpered regardless of what BBD you are using If you are using a 3207 BBD you will put jumpers in both spaces labeled 3207 and leave both spa...

Page 10: ...es Be sure to match the end of the diode with the stripe to the layout on the PCB The stripped end should go in the square solder pad The 1N4148 diodes will go in the 4 smaller spaces The 1N4001 goes...

Page 11: ...ches up with the notch on the layout ONLY SOLDER THE SOCKET NOT THE ACTUAL IC This is a socket The sockets get soldered to the PCB The ICs get inserted into the sockets The actual IC chip itself never...

Page 12: ...Step 5 Add the transistors Orient them so that the flat side matches up with the flat side on the PCB layout Be sure to insert the 78L08 8v regulator into the space labeled V REG...

Page 13: ...he 25k adjusts the circuits bias voltage and the 50k trimpot adjusts the sine wave symmetry You start by setting the trimpots at the middle of its rotation or noon This will get you started and should...

Page 14: ...Step 7 Add the film and ceramic disc capacitors These are non polarized so they can go in either direction...

Page 15: ...E polarized meaning there is a positive and negative end The positive side will have a longer lead and goes in the square solder pad The negative side will have a shorter lead and a stripe running alo...

Page 16: ...At this point your board should look like this If built to 3207 spec s...

Page 17: ...he battery snap Load the snap wires in the strain relief holes through the bottom of the PCB and insert the stripped ends of the wire into the solder pads through the top side of the PCB Solder on the...

Page 18: ...nds of the wires This keeps the strands from fraying and primes the wire for soldering Load the wires in from the top and solder on the bottom of the PCB But before you strip and tin the wires you ll...

Page 19: ...entiometers toggle switch and LED into the bottom side of the PCB DO NOT SOLDER ANYTHING YET The LED will have one lead that is longer than the other THIS WILL GO INTO THE SQUARE SOLDER HOLE Don t for...

Page 20: ...re you ve removed the nuts and washers from the pots and that you ve also snapped the tabs off the pots as well before installing Step 3 Turn the entire pedal over so that the component side of the PC...

Page 21: ...ack to the enclosure Your kit may come with either an external thread or internal thread Don t get confused by this They still function exactly the same You just thread the external nut on the outside...

Page 22: ...Jack Step 2 Install the 1 4 jacks to the enclosure Step 3 Wire the power section of the pedal according to the diagram below You do not need to use red or black wire for this The wire that comes with...

Page 23: ...t the footswitch They are both 180 degrees of each other Either way is fine It does not matter as long as the flat sides of the solder lugs are running horizontal not vertical FOOT SWITCH SOLDER LUG D...

Page 24: ...Step 7 Wire the PCB to the foot switch and jacks SLEEVE TIP TIP SLEEVE...

Page 25: ...Installing IC Finish up Don t forget to adjust the trimpots add the knobs put the cover on the enclosure and apply the bumpers to the cover...

Page 26: ...Frequency Oscillator LFO Tone Clockwise adds high frequencies in the wet signal Counter clockwise cuts high frequencies in the wet signal Noon is neutral but keep in mind that the circuit has low pass...

Page 27: ...saw wave bends pitch up faster and down slower Clockwise produces a ramp wave bends pitch up slower and down faster Sine Triangle Switch Power supply 9V battery or 2 1mm negative tip 9V ONLY Current D...

Page 28: ......

Page 29: ...For hi res schematic visit http www byocelctronics com mcvschematic pdf Please visit http byocelectronics com board for any technical support copyright 2014 BYOC Inc...

Reviews: