Section 5
– Initial Setup
JEM Section 5
- 5 -
4.
If sharp, lengthen the string by adjusting the saddle back. If flat, shorten the
string by moving the saddle forward. Otherwise, go to step 5.7
a.
Loosen the nut lock (on the Headstock) for the specific string that you are adjusting.
b.
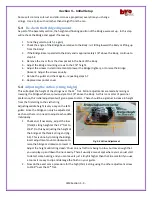
Then using the Tuner, remove the tension on the Bridge saddle. Loosen the saddle bolt
with the supplied 2.5mm Allen wrench (Fig 5.6). Adjust the saddle position in or out as
determined in step 4. (Additional movement can be achieved by using the 2
nd
hole in the
bridge to lock down the saddle).
c.
Tighten the saddle lock bolt, retune the string and tighten the nut lock.
d.
Repeat step 3 until you are satisfied.
e.
Tighten the nut lock bolt.
5.7
String Retainer Adjustment
1.
On the Headstock, tighten the string retainer so there is a slight downward angle from the nut
to the tuners. Ensure nut locking bolts are secure.
2.
Check that all pocket access covers have been screwed down (pearled side out) and that
protective material has been removed.
5.8
…Other Hints
There are a few other things that you can do to optimize your tuning stability:
1.
Each time you play your guitar, before you do your final tuning, play for a few minutes to allow
the strings to warm up. Metal expands when warm and contracts when cool. After you've
played a few riffs, you can then do your final tuning;
2.
Wipe the strings, neck and bridge with a lint-free cloth after playing;
3.
When transporting or storing your guitar, even for short periods, avoid leaving it anyplace you
wouldn't feel comfortable yourself.
Remember, guitars are tempered instruments! Re-tune, play and make further adjustments as needed.
We hope you have enjoyed building your guitar! If you have any questions along the way please email
us at
Custom Shop Products:
Made in the U.S.A.


