background image


BXB ELECTRONICS CO., LTD.   

                                                 9/23                                   

www.bxb.tw


1. Turn On 

1.1 After confirming all the wiring is done, switch on the main controller and the LCD will display 

following information: 


  B  X  B    E  D  C    1  .  0    V  e  r  s  i  o  n 

C  o  n  f  e  r  e  n  c  e    P  A    S  y  s  t  e  m 


1.2 Later, the system will start auto-scanning all connected conference microphones; LCD will 

display following information: 


  M  e  m  o  r  y    C  h  e  c  k   


·  ·  ·  ·  ·  ·  O  K   


1.3 After scanning completes, LCD will display following information (default page). 

1    N  O  :  N  o    M  i  C   


2    M  O  D  E  : 


N  o  r  m  a  l 


3    O  P  E  N  -  M  I  C  : 


0  2    M  i  c 


4    A  U  T  O 

O  F  F  : 


3  0    S  e  c 


NOTE


1.   When the main controller is turned on, the system start auto-scanning if all the microphones 

work properly. Red light ring on normal  microphone stays on while flashing ones mean 

connection failure.   

2.   In this case, turn off the unit and check whether the microphone connection is correct or not. 

Switch it on and check again. 

3.   Press any of the microphone unit or wait for 30 seconds, light ring on microphones will be 

turned off, the conference is ready to go. 

Summary of Contents for EDC-1051

Page 1: ...sy y y D D Di i ig g gi i it t ta a al l l C C Co o on n nf f fe e er r re e en n nc c ce e e S S Sy y ys s st t te e em m m U U Us s se e er r r M M Ma a an n nu u ua a al l l V V Ve e er r rs s si iio o on n n 2 2 2 0 0 0 D D Da a at t te e e M M Ma a ay y y 1 1 10 0 0 2 2 20 0 01 1 12 2 2 ...

Page 2: ... Talking Microphones Display 11 3 2 Conference Mode Setting 12 3 3 Open Microphone Number Setup 13 3 4 Automatic Turn Off Mic Time Setup 13 3 5 Volume Setting 14 Microphone Description 15 Tabletop Chairman Unit EDC 1011 15 Tabletop Delegate Unit EDC 1012 16 Flush mounted Chairman Unit EDC 1021 17 Flush mounted Delegate Unit EDC 1022 18 Flush mounted Chairman Unit EDC 1023 19 Flush mounted Delegate...

Page 3: ...its What s more the digital volume control module and communication control module can definitely meet your requirements for any occasion The main control unit runs auto detection to check if all the units work properly when turning on facilitating timely system detection High reliability is our utmost purpose when developing EDC1000 conference system Each main control unit and its fittings have a...

Page 4: ...ntrol module 5 built in software control module Chairman Unit 1 Types Tabletop and flush mounted 2 Microphone on off button control button 3 built in conference digital volume control module 4 Pliable in anywhere within circuit 5 A maximum of 10 units can be installed 6 ID code setting 7 bit DIP switch Delegate Unit 1 Types Tabletop flush mounted and hand held 2 Microphone on off button 3 A maximu...

Page 5: ... F 104 F humidity below 90 9 Please do not switch on and off the apparatus rapidly Rapid switch on and off the apparatus should be avoided all the time to prevent inside sensitive electronic circuits from being damaged by surges 10 Do not clean the apparatus and its accessories with chemical solvents Use only a clean dry dampish cloth 11 Refer to maintenance technician when the apparatus has been ...

Page 6: ...C SHOCK DO NOT REMOVE COVER OR BACK NO USER SERVICEABLE PARTS TO QUALIFIED SERVICE PERSONNEL 12M There are three groups of microphone port on the main control unit which can be connected randomly Chairman delegate unit is equipped with hidden connecting terminal While connecting BXB Advanced Y shape fast cord is adopted to form hidden wiring with simple and beauty effect The chairman microphone ca...

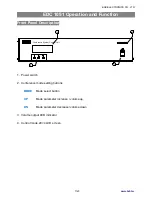
Page 7: ...scription 8 5 0 2 2 Mode Up Down Power Conference System Control Unit 1 2 3 4 1 Power switch 2 Conference mode setting buttons MODE Mode select button UP Mode parameter increase volume up DN Mode parameter decrease volume down 3 Volume output LED indicator 4 Control mode 20 4 LCD screen ...

Page 8: ...K DO NOT REMOVE COVER OR BACK NO USER SERVICEABLE PARTS TO QUALIFIED SERVICE PERSONNEL 6 1 2 3 4 5 1 Aux output terminal XLR 2 L speaker volume control for conference unit built in loudspeaker 3 Link 1 3 Conference unit connectors 4 DC fuse DC 250V 8A 5 Power input 100V 240V 6 RS 232 port 2nd foot Transmitted Data Tx 3rd foot Received Data Rx 5th foot Signal Ground G Aux output terminal pin diagra...

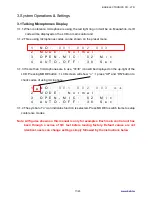
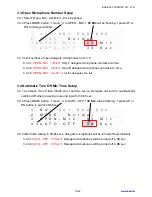
Page 9: ...pletes LCD will display following information default page 1 N O N o M i C 2 M O D E N o r m a l 3 O P E N M I C 0 2 M i c 4 A U T O O F F 3 0 S e c NOTE 1 When the main controller is turned on the system start auto scanning if all the microphones work properly Red light ring on normal microphone stays on while flashing ones mean connection failure 2 In this case turn off the unit and check whethe...

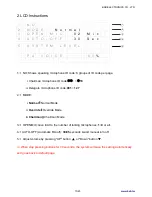
Page 10: ...Normal Mode ii Override Override Mode iii Chairman Chairman Mode 3 OPEN MIC Give limit to the number of talking microphones 1 9 or all 4 AUTO OFF Automatic Mic off 30 45 seconds and manual turn off 5 Adjust volume by pressing UP button or Down button When stop pressing buttons for 30 seconds the system will save the setting automatically and goes back to default page 1 N O 2 M O D E N o r m a l 3 ...

Page 11: ...e than 3 microphones are in use icon will be displayed on the up right of the LCD Pressing MODE button LCD screen will show press UP and DN button to check codes of using microphone 1 N O 0 0 1 0 0 2 0 0 3 2 M O D E N o r m a l 3 O P E N M I C 0 2 M i c 4 A U T O O F F 3 0 S e c 3 1 4 The symbol of icon indicates function is selected Press MODE to switch items to setup conference modes Note All fi...

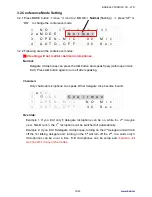
Page 12: ...egate mics become invalid 可 Override Example 1 If you limit only 1 delegate microphone can be on while the 2nd delegate press TALK button the 1st microphone will be switched off automatically Example 2 If you limit 3 delegate microphones turning on the 4th delegate unit will turn off the 1st talking delegate unit turning on the 5th will turn off the 2nd in a word only 3 microphones can be on at a ...

Page 13: ...Setup 3 4 1 Automatic mic off time 30 45 sec could be set up Delegate unit will be automatically switched off when receiving no sound input for 30 45 sec 3 4 2 Press MODE button move to AUTO OFF 30 Sec will be flashing press UP or DN button to switch 30 45 sec 3 4 3 After finish talking in 30 45 secs delegate microphones will be turned off automatically 3 4 3 1 AUTO OFF 30 Sec Delegate microphones...

Page 14: ...ng To adjust system volume please press UP button or Down button on the main control unit the LCD will be shown as follow When stop pressing buttons for 30 seconds the system will save the setting automatically and goes back to default page P A V O I C E 6 0 ...

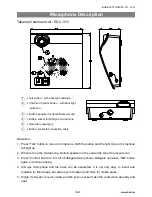
Page 15: ... Delegate can press Talk button again to continue talking 4 DIN type microphone and the base can be separated It is not only easy to install and maintain for fixed areas but also easy to transport and store for mobile areas 5 Single Y shaped connection cable and the built in socket make the conference area tidy and neat 1 Talk button with backlight indication 2 Chairman Control Button with backlig...

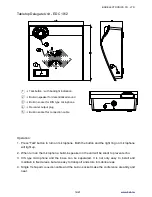
Page 16: ...o prevent echo 3 DIN type microphone and the base can be separated It is not only easy to install and maintain in fixed areas but also easy to transport and store in mobile areas 4 Single Y shaped connection cable and the built in socket make the conference area tidy and neat 1 Talk button with backlight indication 2 Build in speaker for decentralized sound 3 Built in socket for DIN type microphon...

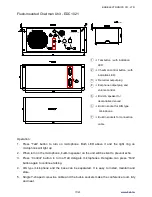
Page 17: ...can press Talk button again to continue talking 4 DIN type microphone and the base can be separated It is easy to install maintain and store 5 Single Y shaped connection cable and the built in sockets make the conference room tidy and neat TALK CONTROL REC mm EAR VOL CONFERENCE SYSTEM 1 Talk button with indication LED 2 Chairman control button with indication LED 3 Recorder output plug 4 Earphone ...

Page 18: ...to prevent echo 3 DIN type microphone and the base can be separated It is easy to install maintain and store 4 Single Y shaped connection cable and the built in sockets make the conference room tidy and neat CONFERENCE SYSTEM VOL EAR REC TALK mm 1 Talk button with indication LED 2 Recorder output plug 3 Earphone output plug and volume control 4 Build in speaker for decentralized sound 5 Built in s...

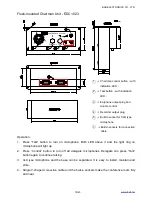
Page 19: ... to continue talking 3 XLR type microphone and the base can be separated It is easy to install maintain and store 4 Single Y shaped connection cable and the built in sockets make the conference room tidy and neat 1 2 3 REC EAR VOL TALK CONFERENCE SYSTEM mm CONTROL 1 Chairman control button with indication LED 2 Talk button with indication LED 3 Earphone output plug and volume control 4 Recorder ou...

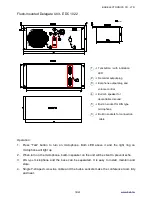
Page 20: ...ype microphone and the base can be separated It is easy to install maintain and store 3 Single Y shaped connection cable and the built in sockets make the conference room tidy and neat 1 Talk button with indication LED 2 Earphone output plug and volume control 3 Recorder output plug 4 Built in sockets for XLR type microphone 5 Built in socket for connection cable mm CONFERENCE SYSTEM TALK VOL EAR ...

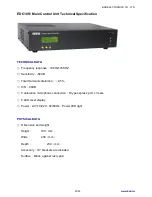
Page 21: ...HZ 16KHZ Sensitivity 60dB Total Harmonic distortion 0 5 S N 90dB Conference microphone connection D type express port x 3 sets 5 LED level display Power AC110 220 50 60Hz Power LED light PHYSICAL DATA Dimension and weight Height 100 mm Wide 430 mm Depth 230 mm Accessory 19 brackets are included Surface Black against rusty pain ...

Page 22: ...ase dimensions 140 x 48 x 150mm W x H x D Mounting Table top Microphone length 48 cm length Net Weight 0 82kg Including Mic EDC 1021 EDC1022 Base dimensions 220 x 92 x 50mm W x H x D Mounting Flush mounted type Hole size 200 x 85 x 50mm W x H x D Microphone length 48 cm length Net Weight 0 6kg Including Mic EDC 1023 EDC1024 Base dimensions 146 x 62 x 110mm W x H x D Mounting Flush mounted type Hol...

Page 23: ...RONICS CO LTD 23 23 www bxb tw BXB ELECTRONICS CO LTD http www bxb tw 6F 1 No 288 5 Xinya Rd Qianzhen Dist Kaohsiung City 806 Taiwan R O C Post code 80673 TEL 886 7 970 3838 FAX 886 7 970 3883 E mail bxb bxb tw ...

Reviews: