background image


  1.  Always set the actuator levers / switches 

on the tractor's control unit to the float 
(neutral) position. 

  2.  Remove the dust caps from the hydraulic 

plugs and the hydraulic sockets. 

  3.  If necessary, clean the hydraulic plugs of 

the hydraulic hose lines as well as the 
hydraulic sockets before coupling them to 
one another. Make sure that no dirt can 
enter the hydraulic system! 

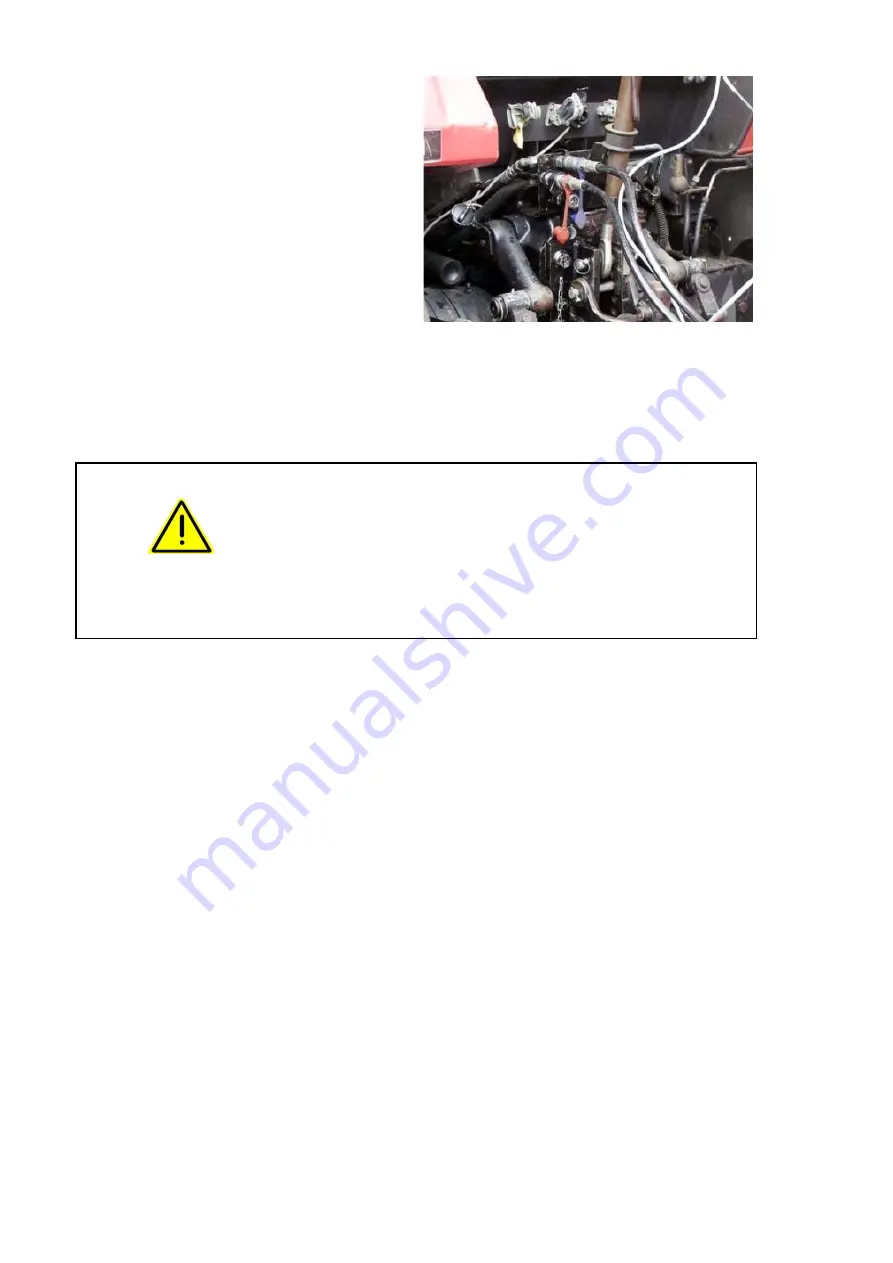
  4.  Couple the plugs of the hydraulic hose 

lines to the hydraulic sockets. You need to 
feel the plugs lock into place 

 4.1  Return line (blue dust cap) to the 

return (T). 

 4.2  Pressure line (red dust cap) to the 

flow (P). 


Fig. 7.3-1 


7.4 

Uncoupling the hydraulic hose lines  

WARNING 


Risks to a person's health from infections may arise if hydraulic 
oil escapes under high pressure and enters the body! 

Before uncoupling the hydraulic hose lines, make sure that the 
hydraulic system on the tractor and the accessory equipment has 
been depressurized. Always set the actuators on the tractor's control 
unit to the neutral position. 

Seek immediate medical attention if injury from hydraulic oil has 
occurred! Risk of infection! 


  1.  Always set the actuator levers / switches on 

the tractor's control unit to the neutral 
position. 

  2.  Release the hydraulic plugs and pull them 

out of the hydraulic sockets. 

  3.  Use the protective dust caps to protect the 

hydraulic plugs and hydraulic sockets 
against dirt. 


Summary of Contents for V-LOAD Cutter Megastar 110

Page 1: ...V LOAD Cutter Megastar 110 110 H 1 20 110 H 1 70 145 145 H 1 20 145 H 1 70 170 170 H 1 20 195 195 H 1 20 Rev 2 02 17 Item no 103012 www bvl group de ENGLISCH Operating Manual...

Page 2: ...1 34 Administration 49 0 5903 951 37 Spare parts Service Internet http www bvl group de E mail info bvl group de EC Declaration of Conformity According to EC Directives 2006 42 EC MRL Bernard van Leng...

Page 3: ...l group de info bvl group de Spare part orders Service For the address see the manufacturer s address Tel Fax Mobile Internet E mail 49 0 5903 951 48 49 0 5903 951 37 49 0 172 281 63 22 http www bvl g...

Page 4: ...accessory equipment have read this operating manual before putting the accessory equipment into operation Special equipment is available for all accessory equipment When customizing your accessory eq...

Page 5: ...6 General safety instructions 20 2 6 1 Danger area work area and hazard areas 20 2 6 2 General information on safety and accident prevention 21 2 6 3 Hydraulic system 25 2 6 4 Electrical system 26 2 6...

Page 6: ...rting and setting down the silage block 64 10 1 1 Cutting and transporting the silage block 65 10 1 2 Setting down the silage block 65 11 Cleaning maintenance and repairs 66 11 1 Cleaning 67 11 2 Lubr...

Page 7: ...83 13 2 5 Actual rear axle load of the tractor 83 13 2 6 Load capacities of the tires mounted on the tractor 83 13 2 7 Table 84 13 3 Requirements for the operation of tractors with trailed machines 8...

Page 8: ...accessory equipment in a safe and efficient way If you have any questions please do not hesitate to contact us 1 2 Storing the operating manual The operating manual is part of the accessory equipment...

Page 9: ...action 1 1 Instruction for action 2 Lists Unordered lists are displayed as lists with bullet points Example item 1 item 2 Item numbers in illustrations Figures included in round brackets refer to the...

Page 10: ...n at a glance 2 1 1 Action related safety instructions Action related safety instructions warn of hazards which may arise in a specific situation or in connection with a certain type of action are pri...

Page 11: ...vides instructions on how to handle the accessory equipment properly provides tips on how to use the accessory equipment in the most efficient way possible is marked by the adjacent symbols IMPORTANT...

Page 12: ...structions the action related safety instructions the instructions for action the information on proper use the warnings attached to the accessory equipment all national generally applicable regulatio...

Page 13: ...as well as environmental protection limit work with on the accessory equipment to personnel who are familiar with all general safety and accident prevention regulations have been instructed in how to...

Page 14: ...ediately If the correction of a fault is not part of the operator s responsibilities or the operator lacks the necessary expertise the operator must report the defect to his supervisor or the owner 2...

Page 15: ...n instructed person is someone who is familiar with or has been trained in the tasks assigned to him and the potential dangers associated with improper conduct and has received instructions about the...

Page 16: ...d liability are excluded in cases of personal injury and property damage that can be attributed to one or several of the following causes Intended use also comprises observing all information provided...

Page 17: ...hazard areas in this regard and observe page 20 Reset all controls on the accessory equipment to the zero position before starting the tractor 2 5 2 Safety devices and safeguards The accessory equipm...

Page 18: ...tional and international regulations will become void Use only original spare parts or modification or accessory parts that have been approved by the manufacturer in order to ensure that the Declarati...

Page 19: ...s 2 5 5 Warranty and liability Our Terms of Sales and Delivery apply as a general rule The owner has received these terms no later than by the time the contract was concluded Warranty and liability cl...

Page 20: ...tently or rolling way Only if no one is inside the work area of the accessory equipment is the operator allowed to move the accessory equipment shift the moving components of the accessory equipment f...

Page 21: ...afety information provided in the chapter the action related safety instructions laid out in the other chapters must be observed as well The operator is required to adapt his driving style in such a w...

Page 22: ...t switch off the tractor and secure it from starting up and rolling away inadvertently No one is allowed between the tractor and the accessory equipment while the tractor is moved up to the accessory...

Page 23: ...danger area of the accessory equipment the turning and slewing range of the moving parts on the accessory equipment from under raised and unsecured moving parts of the accessory equipment There are ar...

Page 24: ...he tractor Use counterweights as necessary The front axle of the tractor must be subjected to at least 20 of the tractor s unladen weight in order to ensure that the steerability of the tractor remain...

Page 25: ...quipment from being lowered inadvertently depressurize the hydraulic system remove the accessory equipment or secure the tractor against inadvertent start up or rolling away have an expert verify the...

Page 26: ...ices or components on the accessory equipment including connection to the on board supply system the user must independently verify that the installation does not effect any faults of the vehicle s el...

Page 27: ...nded start up Secure the raised accessory equipment or any raised parts thereof from being lowered unintentionally before cleaning servicing or repairing the accessory equipment Use suitable tools and...

Page 28: ...y a triangular safety symbol 2 pictogram intended to help avoid the hazard The pictogram is composed of an image providing information on how to avoid the hazard Explanations regarding the warnings Th...

Page 29: ...y equipment and secure them against start up and rolling away pull the key from the ignition use chocks Read and follow the instructions regarding the specific intervention that are provided in the co...

Page 30: ...lity or steerability of the tractor when the accessory equipment is fitted This hazard may cause serious injury including death The driving stability and steerability of the tractor must be ensured at...

Page 31: ...safeguard Opening and closing the locking mechanism on the safeguard requires the use of a wrench AF 13 Do not open the safeguard while the drive motor is running Before you can open the safeguard al...

Page 32: ...bar Pos 13 2 7 2 Instructions An instruction is composed of a pictogram 1 Pictogram contains information regarding the proper handling of the accessory equipment The pictogram contain information in...

Page 33: ...before putting the unit into operation reset the actuators for the power lift of the tractor to the zero position The permissible operating pressure of the hydraulic system is 200 bar Set the upper li...

Page 34: ...warnings and instructions The following illustrations show the arrangement of warnings and instructions on the accessory equipment Warnings shown on one side of the accessory equipment will also be fo...

Page 35: ...injury as well as danger to the environment and the accessory equipment including Risk of personal injury on account of unprotected work areas Failure of important functions of the accessory equipment...

Page 36: ...ory equipment that are labeled with the adjacent pictogram and can be used to attach lifting gear Loading and unloading using the tractor designated for operation with the accessory equipment WARNING...

Page 37: ...cutting bar fitted with hydraulically powered cutting knives that are used to cut the silage block and a mechanical or hydraulic push off system for setting down the cut silage block It can also be eq...

Page 38: ...alled and moved to their safety position WARNING Risks of personal injury from crushing entanglement and catching may arise when moving parts of the accessory equipment are unprotected during operatio...

Page 39: ...7 pin optional lighting beam Fig 4 3 1 4 4 Type plate and CE mark The illustrations below show the arrangement of type plate accessory equipment number and CE mark The entire identification constitute...

Page 40: ...540 705 735 Number of tines units 11 11 11 Hydraulic lifting device mm 1 200 1 700 Electrics 12 Volt DC Hydraulics maximum permissible operating pressure 200 bar necessary oil volume flow rate 25 lite...

Page 41: ...11 11 Hydraulic lifting device mm 1 200 1 700 Electrics 12 Volt DC Hydraulics maximum permissible operating pressure 200 bar necessary oil volume flow rate 25 liters min maximum permissible oil volume...

Page 42: ...e mm 1 200 Electrics 12 Volt DC Hydraulics maximum permissible operating pressure 200 bar necessary oil volume flow rate 25 liters min maximum permissible oil volume flow rate 45 liters min required h...

Page 43: ...e mm 1 200 Electrics 12 Volt DC Hydraulics maximum permissible operating pressure 200 bar necessary oil volume flow rate 25 liters min maximum permissible oil volume flow rate 45 liters min required h...

Page 44: ...mity The manufacturer confirms that the accessory equipment conforms to all general health and safety requirements by issuing the Declaration of Conformity by attaching the CE mark to the accessory eq...

Page 45: ...imum of 25 l min and maximum of 45 l min at a maximum of 200 bar Hydraulic oil Hydraulic oil HLP 46 Some hydraulic components can be coupled to either a double acting control unit a single acting cont...

Page 46: ...control unit Upper link 1 double acting control unit Lifting frame 1 single acting control unit or 1 double acting control unit Mirrors The tractor used must be equipped with mirrors to allow the driv...

Page 47: ...tch offering 3 switching positions to control the hydraulic functions Function I left position neutral position center position function II right position If the accessory equipment is taken out of op...

Page 48: ...ent position Lower cutting bar Extend hydraulic push off system Neutral position Push off system stops at current position Retract hydraulic push off system Hydraulic side shift left Neutral position...

Page 49: ...th oil the individual hydraulic components of the accessory equipment are linked directly to the control units of the tractor s hydraulic system For information on the required control units refer to...

Page 50: ...ched pushbutton functions that need to be performed constantly i e a function will be performed until the switch is returned to the neutral position When released the button will remain in the switch...

Page 51: ...rk Do not use the cutting knives if they are bent worn out Clean and sharpen the cutting knives regularly Stationary and moving cutting knives must be in contact with one another along the entire leng...

Page 52: ...ting frame Fig 5 10 1 5 11 Side shift Special equipment There is an option to equip the accessory equipment with a hydraulic side shift The sift shift allows the operator to extract silage blocks in a...

Page 53: ...eed to comply with all national traffic regulations Compliance with national traffic regulations is the responsibility of the vehicle owner the owner and the driver the operator Also observe the infor...

Page 54: ...e and secure the tractor against rolling away using chocks if necessary 6 2 Checking the operation of the accessory equipment Check if the accessory equipment is fully operational before putting the a...

Page 55: ...o longer steer and brake properly Mount the accessory equipment only to suitable tractors See chapter Necessary equipment on the tractor page 45 WARNING Risks of personal injury from crushing and impa...

Page 56: ...e operator page 14 in this regard 1 Make sure that no one is inside the work area before starting the tractor 2 Aligning it with the accessory equipment drive the tractor up to the accessory equipment...

Page 57: ...option to the center position 3 Move the lifting frame option to the bottommost position 4 Lower the cutting bar to its bottommost position 5 Lower the accessory equipment until it rests horizontally...

Page 58: ...he accessory equipment has been depressurized Always set the actuators on the tractor s control unit to the neutral position Seek immediate medical attention if injury from hydraulic oil has occurred...

Page 59: ...flow P Fig 7 3 1 7 4 Uncoupling the hydraulic hose lines WARNING Risks to a person s health from infections may arise if hydraulic oil escapes under high pressure and enters the body Before uncouplin...

Page 60: ...re performed or work tools or parts of the accessory equipment are actuated by accident while the accessory equipment is being mounted to the tractor and while the tractor engine running if the tracto...

Page 61: ...the operating pressure of the accessory equipment to the corresponding tractor used The DBV has been set to 155 bar at the factory based on an assumed maximum tractor pressure of 170 bar Adjust the DB...

Page 62: ...er negotiate narrow curves at excess driving speeds Avoid abrupt steering maneuvers when driving on slopes along the slope and the layer line tip over hazard WARNING Risks of personal injury may arise...

Page 63: ...tines While driving with a loaded silage block set the cutting bar 10 15 cm above the fork tines 5 Switch off the oil circuit between tractor and accessory equipment and the control panel in order to...

Page 64: ...equipment is operated with an excessive hydraulic oil pressure Observe the maximum permissible hydraulic oil pressure of the accessory equipment before starting up the tractor 10 1 Removing transport...

Page 65: ...shorter sides If installed the silage cat will move down onto the silage block acting as a holding down device that allows for easier transport 5 When the cutting process is complete move up the cutti...

Page 66: ...red inadvertently the tractor starts up and rolls away by accident during work on the accessory equipment Work to clean service and repair the accessory equipment may not be performed until the tracto...

Page 67: ...articular care Never use gasoline benzene petroleum or mineral oils to treat hydraulic hose lines Cleaning with high pressure sprayers steam cleaners Make sure to observe the following steps when usin...

Page 68: ...pment dealer for more information 11 2 1 The lubrication chart of the silage block cutter at a glance Component location Number of lubrication points Activity Hours of operation Slide rails of the cut...

Page 69: ...n priority 11 4 Cutting knives of the cutting bar Sharpen the cutting knives of the cutting bar on a regular basis Check the cutting knives every time before starting to work Replace damaged or worn c...

Page 70: ...harpening the cutting knives When preparing to work on the cutting unit you should move the cutting unit to a working height that is as ergonomic as possible Before working on the cutting unit remove...

Page 71: ...alling down e g by clamping 2 Loosen the screws 1 upper row of screws on the side on the clamping plates 3 Unscrew the screws 2 4 Remove the splint pin from the bolt 3 and pull the bolt out 5 Take out...

Page 72: ...e cables must be as uniform as possible 1 Lower the cutting bar to its bottommost position 2 Lower the accessory equipment to the ground 3 Switch off the tractor and secure it against inadvertent star...

Page 73: ...tractor make sure that both hydraulic systems have been depressurized Make sure to connect the hydraulic hose lines properly Check all hydraulic hose lines and couplings for leaks damage and contamin...

Page 74: ...utter The markings on the fitting provide the following information 1 Manufacturer s marking of the hydraulic hose line A1HF 2 Date of manufacture of the hydraulic hose line 07 10 year month October 2...

Page 75: ...eaking spots Damage deformation or leaks in the hose fitting Minor surface damage does not mandate an exchange The hose slipping out of the fitting Corrosion on the fitting which may impair the operat...

Page 76: ...hose lines hydraulic hose lines cannot rub against components or against one another by arranging and fastening them properly Protect hydraulic hose lines with protective sleeves if necessary Cover sh...

Page 77: ...e the accessory equipment in accordance with the lubrication chart and grease the piston rods of the hydraulic cylinders Take steps to prevent corrosion e g oil the accessory equipment using anti corr...

Page 78: ...38 41 M 10 16 17 49 69 83 M 10x1 52 73 88 M 12 18 19 86 120 145 M 12x1 5 90 125 150 M 14 22 135 190 230 M 14x1 5 150 210 250 M 16 24 210 300 355 M 16x1 5 225 315 380 M 18 27 290 405 485 M 18x1 5 325 4...

Page 79: ...ndstill before the danger area of the accessory equipment may be entered Fault Cause Remedy No hydraulic function available Oil flow interrupted Check quick release couplings pressure relief valve and...

Page 80: ...east as long as those of the stationary blades see chapter Changing cutting knives page 70 Cutting bar bends Pressure applied on the surface of the transversal cutting unit long side is too great Use...

Page 81: ...r and brake occur as a result Check the suitability of the tractor before attaching the machine to the tractor The machine may only be attached to suitable tractors Conduct a brake test in order to ch...

Page 82: ...weight FH kg Maximum drawbar load See machine technical data a m Distance between front mounted machine centre of gravity or front weight and the middle of the front axle total of a1 a2 See tractor a...

Page 83: ...H L V tat F T G G Enter the numerical value for the actual gross weight and the permissible gross weight indicated in the operator s manual in the vehicle registration certificate of the tractor in t...

Page 84: ...ities from the operator s manual or the vehicle registration certificate of the tractor 2 Enter these values in the table below 3 Calculate the actual values on the basis of the preceding formulae 4 E...

Page 85: ...1 Combination possibilities of connecting and pulling equipment The figure shows permissible combination possibilities of the connecting equipment on the tractor and the pulling equipment on the mach...

Page 86: ...tractor The actual DC value of a combination to be coupled must be calculated as follows DC g x T x C T C Fig 13 3 1 T Permissible gross weight of the tractor in t see operator s manual or vehicle reg...

Page 87: ...Fork tines 50 H Hazard meaning 8 High pressure sprayers steam cleaners 66 Hydraulic hose lines 48 Hydraulic oil 44 Hydraulic system 24 48 I Information on safety and accident prevention 20 Installati...

Page 88: ...on 16 Safety devices and safeguards 16 37 Settings 59 Side shift 51 Specialty workshop 13 Structural modifications 17 Supply lines 38 T Transport trips 61 Transporting the accessory equipment 23 Type...

Reviews: