background image

SAFETY INSTRUcTIONS
The safety recommendations outlined in this section should be read and understood 

before operating this machine. When using this machine follow these basic safety 

precautions to reduce risk of fire, electric shock or injury.  Keep this information for 

future reference.
1.


To prevent the possibility of a fire or injury, do not allow foreign articles inside the 

 machine.

2.  Do not attempt to laminate items that exceed total recommended material 

thickness.

3.  Do not insert pouch film with the back end first. (Front of film: Sealed side, Back 

of film: open side.)  This may cause the pouch to jam the rollers.

4.  To prevent the possibility of electric shock, do not immerse the laminator in water 

or permit liquids inside the machine.

5. Because the laminator creates heat, keep out of the reach of children.
6.  Do not cut pouches before inserting them into the laminator.  This will cause the 

laminator to jam.

7. Do not laminate leaves, flower, clothes etc.
8.  If the room temperature is low (under 64°F/18°C), the ready light may take longer 

to come on.

9.   When unplugging the power plug, grip the plug to pull it out.  Pulling the cord may 

result in electric shock, fire, or damage to the machine.

10.  Do not use the machine if the cord is damaged.  This may result in electric 

shock, fire, or other hazards.

11.   Do not place objects on the power cord and do not bend it excessively.  This may 

result in electric shock, fire or other hazards.

12.  When not using the machine for long periods of time, unplug the power cord 

from the outlet.

13. The machine should be installed near an outlet that is easily accessible.

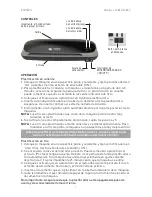
How to load a laminating pouch

The laminating pouch is sealed along one side. Open the pouch and place the item to be 

laminated centrally and as close to the sealed edge as possible. The sealed edge is then 

placed into the entry slot to start the laminating process.

Jam Release Button

Should the pouch become jammed during the laminating process turn the machine off 

and press and hold the ‘jam release’ button and remove the item.

ENGLISH 

Model • 20892/20893

2

Summary of Contents for BSN20892

Page 1: ...ficadora de documentos 20892 20893 OWNER S MANUAL GUIDE D UTILISATION MANUAL DEL USUARIO Please read and retain these instructions Lisez et conservez ces instructions pour utilisation ultérieure Por favor lea y conserve estas instrucciones ...

Page 2: ...nate leaves flower clothes etc 8 If the room temperature is low under 64 F 18 C the ready light may take longer to come on 9 When unplugging the power plug grip the plug to pull it out Pulling the cord may result in electric shock fire or damage to the machine 10 Do not use the machine if the cord is damaged This may result in electric shock fire or other hazards 11 Do not place objects on the pow...

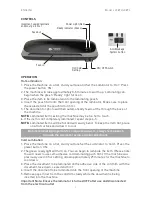
Page 3: ...r unique documents always test a pouch through the laminator using a similar document Cold Lamination 1 Place the machine on a flat sturdy surface Set the Laminator to Cold Press the power button ON 2 The green ready light will turn on You can begin to laminate the item Please note You will need to use self adhesive cold laminating puch film If the machine was previously used in hot setting allow ...

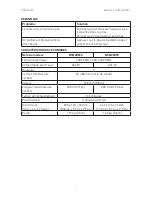
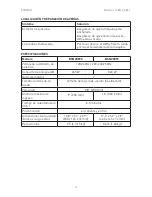
Page 4: ...ATIONS Model Name BSN20892 BSN20893 Power Supply Voltage 120V 60Hz 220 240V 50Hz Power Consumption W 265 W 365 W of Rollers 2 Min Pouch Size Credit card size 54 x 86 mm Speed 9 8 250 mm Maximum Entry Width 9 230 mm 13 330 2 mm Warm up Time Min 3 5 minutes Lamination Hot and Cold Unit Dimensions W x D x H 13 8 x 5 7 x 2 9 350 x 145 x 74 mm 17 4 x 5 7 x 2 9 443 x 145 x 74 mm Unit Weight 2 5 lbs 1 15...

Page 5: ...s etc 8 La plastifieuse pourrait prendre plus de temps à être prête à basse température moins de 18 C 64 F 9 Débrancher la plastifieuse en tirant sur la fiche et non sur le fil d alimentation 10 Ne pas utiliser l équipement si le fil d alimentation est endommagé 11 Ne pas plier excessivement le fil d alimentation ou le couvrir d un objet lourd 12 Débrancher l équipement si vous ne prévoyez pas l u...

Page 6: ...ne Avant de plastifier des articles importants ou irremplaçables effectuez un test avec des articles de matière semblable Plastification à froid 1 Déposer la plastifieuse sur une surface solide et ferme Choisir le mode de plastif cation à froid Allumer la plastifieuse 2 Le voyant d activation vert s allumera La plastifieuse est maintenant prête à rec voir des sachets de plastification autoadhésifs...

Page 7: ...CTÉRISTIQUES TECHNIQUES Nom du modèle BSN20892 BSN20893 Tension électrique 120V 60Hz 220 240V 50Hz Alimentation électrique 265 W 365 W Rouleaux 2 Format minimal des sachets 54 x 86 mm carte de crédit Vitesse 250 mm 9 8 po Largeur maximale des sachets 230 mm 9 po 330 2 mm 13 po Temps de réchauffement 3 5 minutes Plastification à chaud ou à froid Dimensions larg x prof x haut 350 x 145 x 74 mm 13 8 ...

Page 8: ...las en la plastificadora Esto atascará la plastificadora 7 No plastifique hojas flores ropa etc 8 Si la temperatura ambiente es baja menos de 64 F 18 C la luz indicadora de listo tardará más en encenderse 9 Al desconectar el enchufe agarre el enchufe para sacarlo Halar el cordón puede producir un choque eléctrico o dañar la máquina 10 No use la máquina si el cordón está dañado Esto puede producir ...

Page 9: ...icar documentos importantes o únicos pruebe siempre una funda a través de la plastificadora usando un documento similar Plastificación en frío 1 Coloque la máquina en una superficie plana y resistente y fije la plastificadora en Cold frío Oprima el botón de encendido ON 2 Se encenderá la luz verde indicadora de listo Puede comenzar a plastificar el artículo Por favor tenga en cuenta Deberá usar pe...

Page 10: ...CACIONES Modelo BSN20892 BSN20893 Voltaje de suministro de potencia 120V 60Hz 220 240V 50Hz Consumo de energía W 265 W 365 W Núm de rodillos 2 Tamaño mínimo de la funda Tamaño de tarjeta de crédito 54 x 86 mm Velocidad 9 8 250 mm Anchura máxima de ingreso 9 230 mm 13 330 2 mm Tiempo de calentamiento min 3 5 minutos Plastificación en caliente y en frío Dimensiones de la unidad Ancho x largo x alto ...

Reviews: