4
BASIC SETUP
• Unlock/open battery cover and insert 3 AAA batteries*
(Fig 1, pg 3)
. Record the serial # inside-you’ll need it
later to register your D-Tour online. Close the cover.
• Go outdoors. HOLD
POWER
(1) (keep the button
pressed) until the display comes on. Wait for GPS
satellite lock (icon stops blinking) (11). This may take
a few minutes after the first power-up in a new area.
• Press
SETUP
(4). Press
MARK
(2), then press the
TRIP
(3) or
SETUP
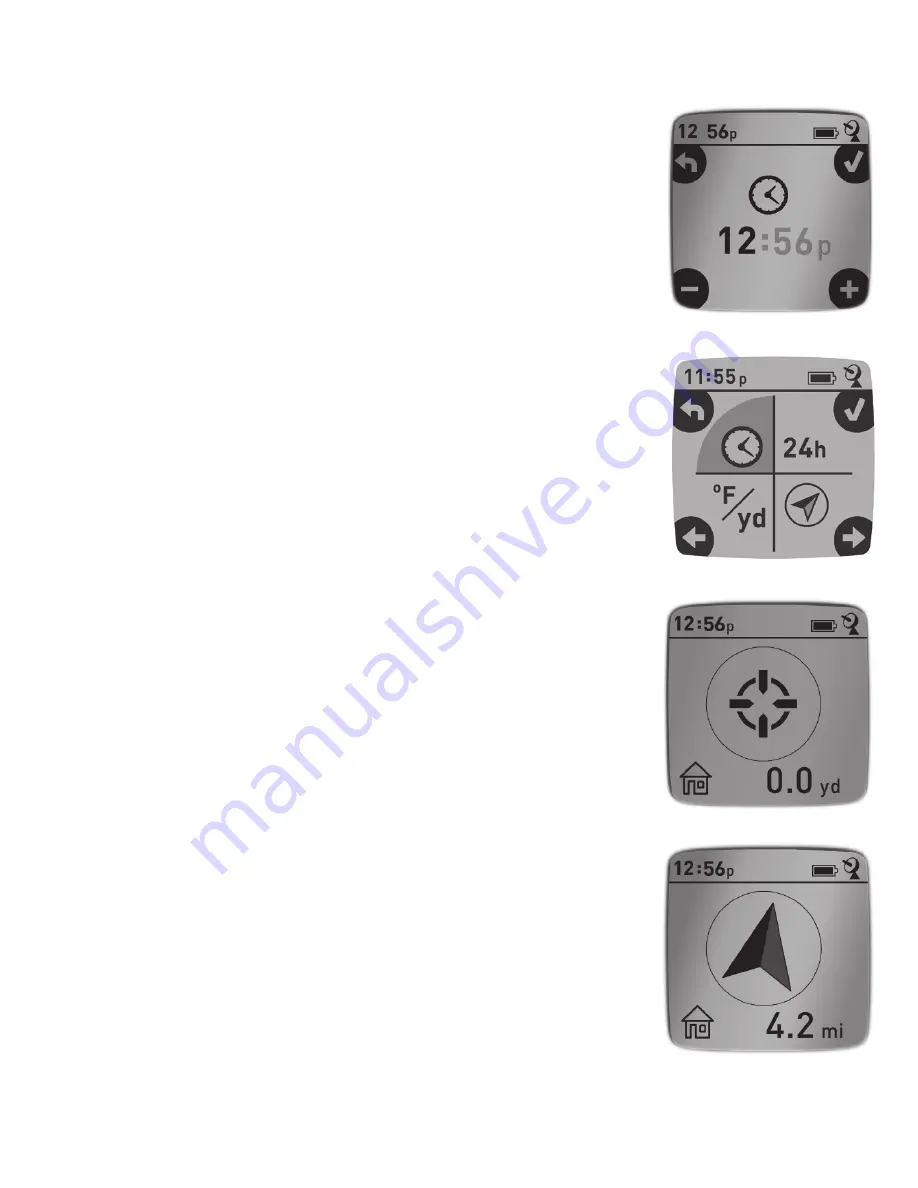
button to set the Hour for your area
(Fig.
2)
. Press
MARK
to return to the Setup screen.
• To change the time and temp/distance formats, press
SETUP
to select “12h” or “
0
F/yd”, then press
MARK
to
set to “24h” or “
0
C/m”.
(Fig. 3)
. The arrow’s function
is explained on the next page. Press
POWER
to exit
Setup screen.
MARKING/RETURNING to a LOCATION
• Press
POWER
to select one of five Location icons or up
to 5 additional locations with number designations
(6) (Home, Car, Star, Flag, Target, #1-5). While standing
at the Location you want to mark, HOLD
MARK
to
save its position in the D-Tour’s memory (the display
will change as shown)
(Fig. 4)
. You can now turn the
power off (HOLD
POWER
) and leave the location.
• To return to the location you marked, turn the D-Tour
on. Make sure the same icon or # you used to mark
the location is shown (if not, press
POWER
to select
it). The display indicates the direction and distance
back to the location
(Fig. 5)
. Move in the direction
of the arrow, watching for the distance to decrease.
Fig. 2
Fig. 3
Fig. 4
Fig. 5
* Do not mix old and new batteries. Do not mix battery
types-use ALL lithium or ALL alkaline.
Summary of Contents for BackTrack D-TOUR 360310BG
Page 1: ...B C ...
Page 2: ...TABLE OF CONTENTS PAGE ENGLISH Français Español Deutsch ITALIANO 3 13 14 24 25 35 36 46 47 57 ...
Page 8: ...8 a b c d f e Fig 19 Fig 18 ...
Page 11: ...11 g i j k l h Fig 20 Fig 22 Fig 21 ...
Page 19: ...19 a b c d f e Fig 19 Fig 18 ...
Page 22: ...22 g i j k l h Fig 20 Fig 22 Fig 21 ...
Page 30: ...30 a b c d f e Fig 19 Fig 18 ...
Page 33: ...33 g i j k l h Fig 20 Fig 22 Fig 21 ...
Page 41: ...41 a b c d f e Fig 19 Fig 18 ...
Page 44: ...44 g i j k l h Fig 20 Fig 22 Fig 21 ...
Page 52: ...52 a b c d f e Fig 19 Fig 18 ...
Page 55: ...55 g i j k l h Fig 20 Fig 22 Fig 21 ...
Page 58: ......
Page 59: ......


